 All of us of course are aware of the bonnet stay location and where to house it in the bonnet when raised?
 it is important that it is located correctly or accidents will happen.
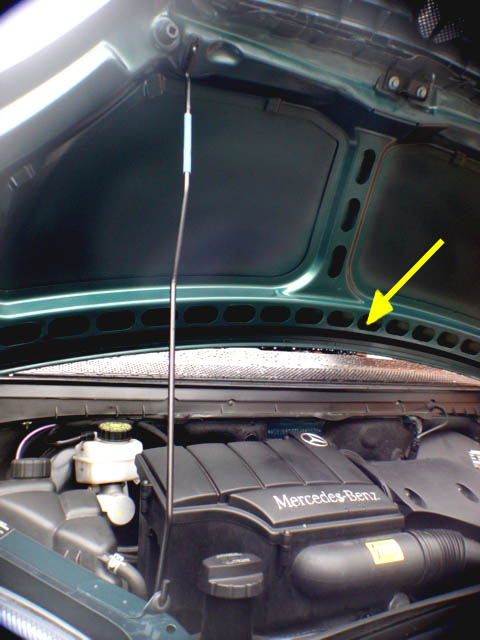
While your looking round have a look at the MB spray job on your car
If your car is like mine was, then inside the holes along the back edge of the bonnet you will find no spray just the white undercoat, and in some places not even that. I was astounded when I took this up with my local MB agent to find on inspection that Brand New cars in their showroom were the same! Completely unsprayed area, I have since taken the precaution of spraying mine, I live quite near to the sea, and the last thing I want corrosion forming along that back seam. Prevention being the best cure!
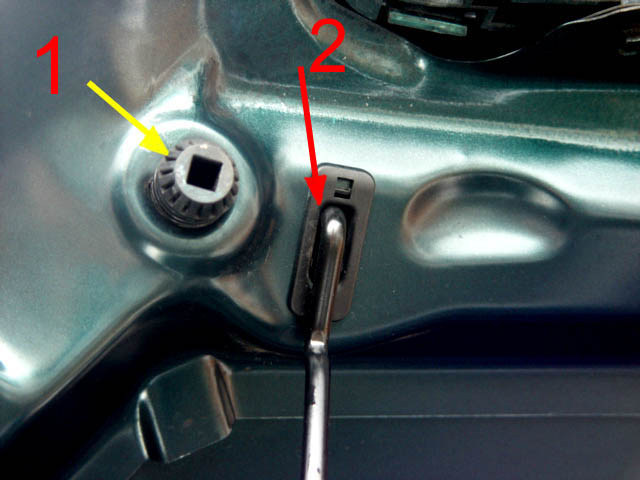
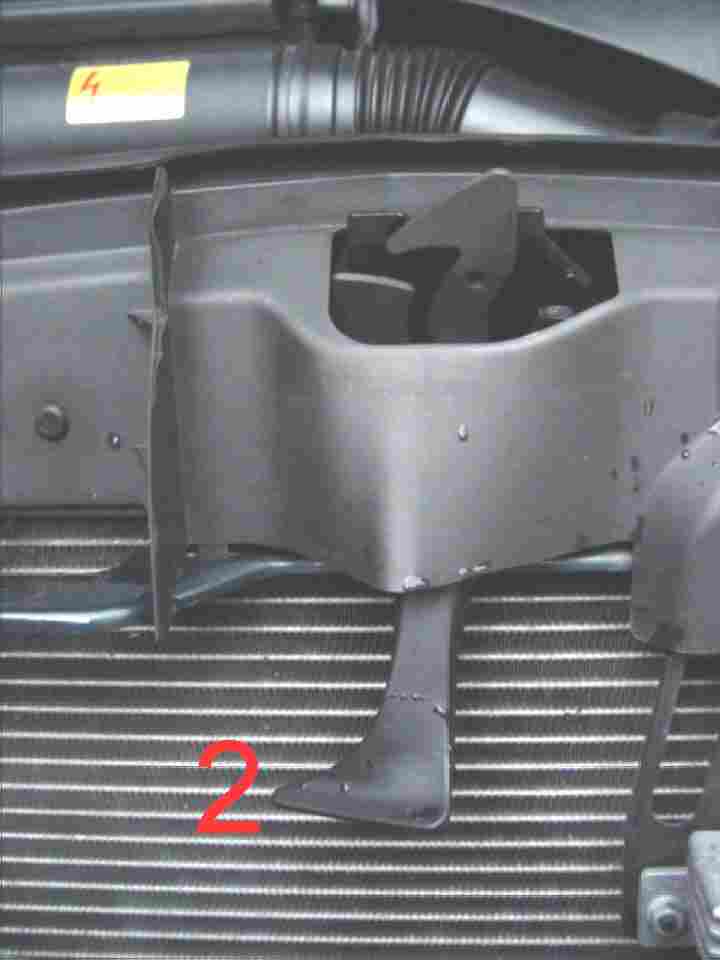
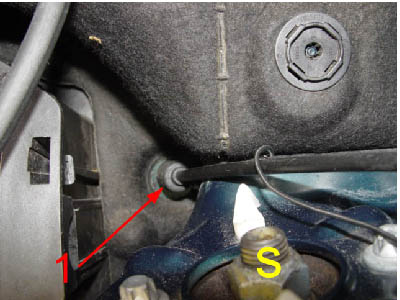
While were are here its worth noting the bonnet adjustment stop, 1 which can be adjusted to even up the lay of the bonnet and to prevent any vibration when the bonnet is closed, simply screw either way to adjust, in or out. 2 The location for the bonnet stay when up, placed anywhere else is likely to slip or damage the bonnet.
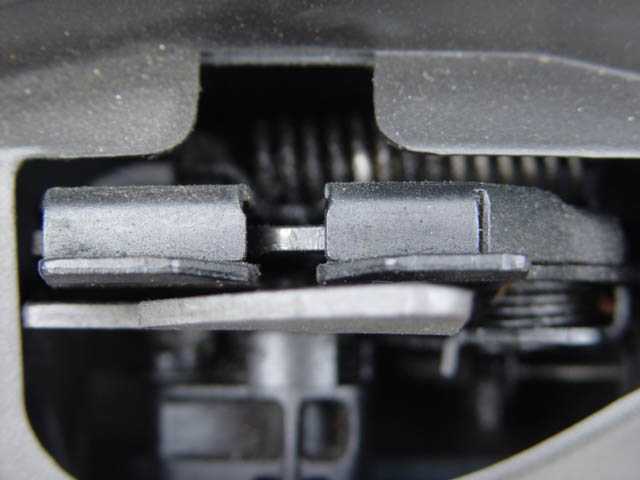
When we pull down on the bonnet release leaver inside the car, the inner cable is pulled through its casing which is secured at either end, this in turn moves the release mechanism allowing the bonnet to move to the first stage of release
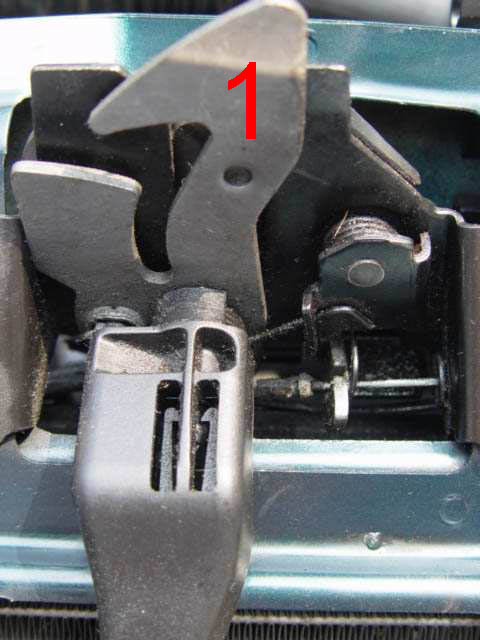
1 the springing open as far as the secondary or safety catch. 2 This feature plays an important roll it that in the event of the first catch failing or insufficient pressure being applied when closing, the safety catch will prevent the bonnet being opened by the force of the wind caused by the forward motion, although this is less likely than with a car that has a flatter laying bonnet, should such an occurrence arise there is a possibility of damage and certainly your windscreen being covered, which would not be helpful in any circumstances. Is is therefore worth ensuring these components work correctly. MB direct that on finding any worn parts relating to the bonnet closure mechanism, then as a unit it should be replaced.
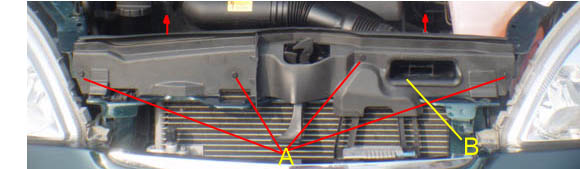
The bonnet Alarm Activation Switch A Will activate the alarm if the bonnet is opened after the alarm has been set. The Alarm switch is well protected laying to the rear of, and tucked in against the plastic cowling running across the front of the car. Twin cables can be seen going to the protected switch. To test the switch, ensure the bonnet is fully closed, open the drivers window, set the alarm using the remote fob, after a minute or so pull the bonnet release, the alarm should instantly sound. Alternatively deactivate the movement sensors if fitted, and while sitting in the car, pull the bonnet release, again the alarm should sound.
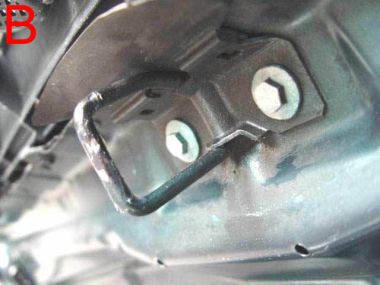
The main feature on the bonnet is then main bonnet catch, B this should be tight, and a smear of grease doesn't go a miss as you check the various components on your car.
 If we look into the mechanics of the lock we can see various springs etc despite some peoples views, I will continue to expect mine to be serviced/lubricated on the 'B' Service, there is provision on the sheet for this item to be lubricated and in my case Service lube, a PTFE spray lubricant was used. Lubrication reduces wear, which in my mind makes things last longer. If you are doing it yourself (DIY) then you will need to take the location of the switch into account and avoid spraying in that precise area, the container used in my case has a fine tube that can be fitted to the nozzle and therefore lubricant can be sprayed precisely where it is most needed, on the moving parts.
do not spray the switch or you run the risk of causing a short circuit within the switch, this can cause your alarm to sound every time you try to set it
If we look into the mechanics of the lock we can see various springs etc despite some peoples views, I will continue to expect mine to be serviced/lubricated on the 'B' Service, there is provision on the sheet for this item to be lubricated and in my case Service lube, a PTFE spray lubricant was used. Lubrication reduces wear, which in my mind makes things last longer. If you are doing it yourself (DIY) then you will need to take the location of the switch into account and avoid spraying in that precise area, the container used in my case has a fine tube that can be fitted to the nozzle and therefore lubricant can be sprayed precisely where it is most needed, on the moving parts.
do not spray the switch or you run the risk of causing a short circuit within the switch, this can cause your alarm to sound every time you try to set it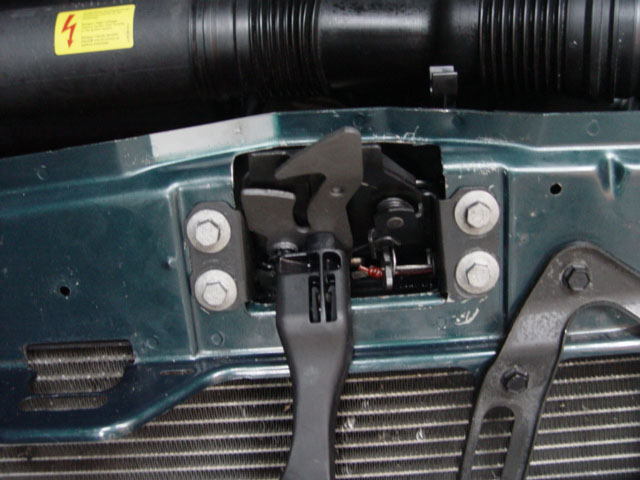
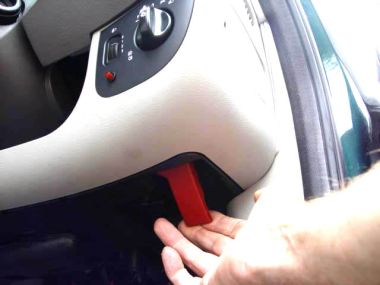
Emergency Bonnet release facility.
How you get the bonnet open if for some reason the cable does not release the bonnet is anybodies guess, if the nipple should come off the cable end which although remote could cause havoc and I really do not know how you would go about releasing it without causing damage to the car.
As a consequence of this and not wishing to spend hours trying to open the bonnet, I have added a release feature that could get me out of trouble.
Using a length of thick nylon, (I used strimmer nylon)
I firstly removed the plastic moulding which is fitted forward of the radiator. This is secured with 4 studs, withdraw the plastic centre pin and the moulding can be removed making it easier to get at the bonnet release mechanism.
I securely tied a large knot to form a nipple in one end of the nylon and inserted it along with the nipple on the end of the bonnet release catch, both are retained behind a spring clip
I then followed as near as possible the bonnet release cable which runs to the near side of the car, on reaching that area I then feed the nylon down through and out just inside the engine bay and secured the tail end to the front sub frame.
When I now pull on the nylon the bonnet opens onto the safety catch without using the interior release. Thus this will provide an emergency release facility, If I even have problems.
I also cleaned and serviced the release catch mechanism.
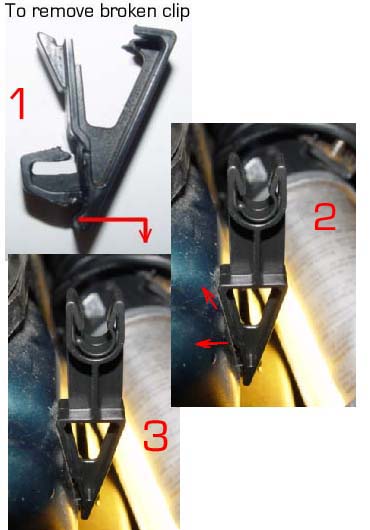
Now you would have to be pretty unfortunate to break the bonnet stay securing clip, but that's exactly what I did, caught it with the back of my hand when cleaning and ,Bang! cold day it was GONE!
However very cheap to replace at £1.04 and easy to replace as well, but you might have to wait a day or two for delivery as it is not a spare part that is required very often. When it arrives Take a good look at the new unit and itself explanatory as to how it fits, simply ease the old clip out at the bottom and pull the clip down and away from the metal cross member
,
Fit the new clip by placing the clip at 45 degrees to the holes push in an up , then press the bottom of the new clip home .Job done Part Number A168 887 0060
To get at the cable to either inspect, or replace you will need to firstly remove the cowling that partially covers the component parts.
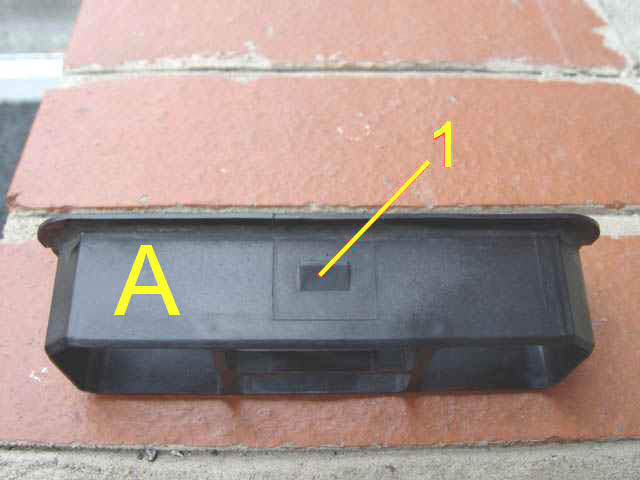
This is quite an easy task, firstly remove the front of the air intake cowling , A this pulls out, at the same time forcing it slightly upwards tilt it forward from the top, this allows the small lug 1 to slid from it location. To replace, snap back into position.
Then there are four studs these are best removed using two small screw drivers 3 placing the blades behind the head of the stud ease the head forward,

 it is not the end of the world if you break one but it may involve a round trip of some miles to obtain it! If the head does not move reasonably easily give it a small spot of WD40 or silicone spray that will do the trick! If the cap complete with the pin comes right out of the black body, do not worry it is not broken, it can be refitted before you put the stud back. Having eased the centre pin well forward, about a 1cm
2
the complete stud can now be eased from from it is location by pulling or you can again use the two screwdrivers, thus keeping it square with it is housing. When all four and the front of the air intake have been removed the cowling can be lifted off the top of the cross member allowing easy access to the bonnet release components. When replacing squeeze the four shoulders gently first , then align with the location hole, slid the body of the stud fully into and touching the cowling ,now push in the pin, the stud should now be re-secured.
When working with any plastic component of this nature it is best done when conditions are warm. alternatively warm small items such as these studs before attempting refitting.
it is not the end of the world if you break one but it may involve a round trip of some miles to obtain it! If the head does not move reasonably easily give it a small spot of WD40 or silicone spray that will do the trick! If the cap complete with the pin comes right out of the black body, do not worry it is not broken, it can be refitted before you put the stud back. Having eased the centre pin well forward, about a 1cm
2
the complete stud can now be eased from from it is location by pulling or you can again use the two screwdrivers, thus keeping it square with it is housing. When all four and the front of the air intake have been removed the cowling can be lifted off the top of the cross member allowing easy access to the bonnet release components. When replacing squeeze the four shoulders gently first , then align with the location hole, slid the body of the stud fully into and touching the cowling ,now push in the pin, the stud should now be re-secured.
When working with any plastic component of this nature it is best done when conditions are warm. alternatively warm small items such as these studs before attempting refitting. 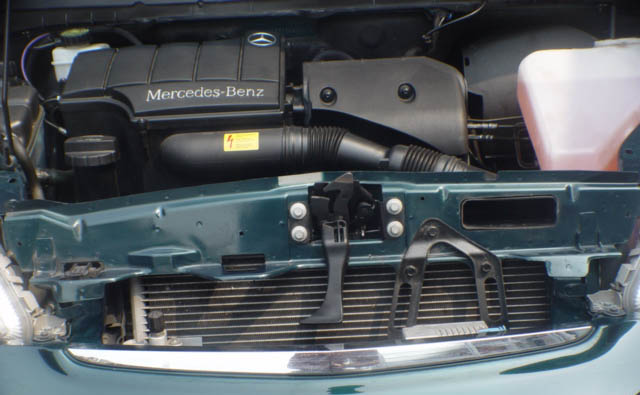
Having removed the cowling the various lock components can be seen, make sure that the cable is not fraying needling strands of the combined cable breaking away, thus causing the overall cable to be weakened) and that the nipple crimped onto the end of the cable ensure it is not showing signs of damage. Lubricate the components parts well, the less force required on the lever to open the bonnet the less likelihood there is of the cable failing.
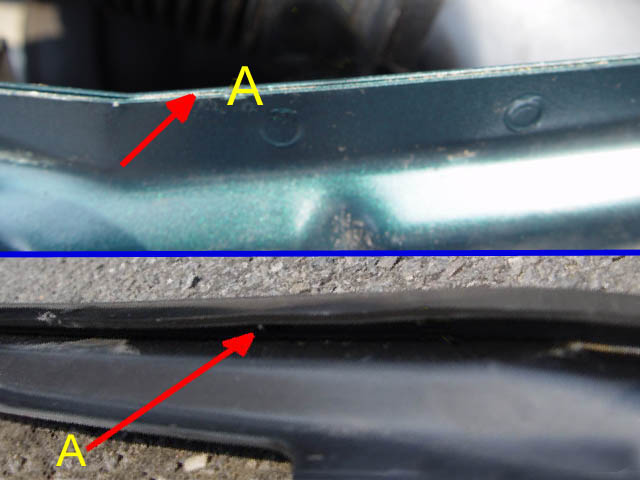
When replacing the cowling ensure the groove at the top fits snugly onto the top of the cross member. A Ensure the four holes are aligned , refit the studs then refit the air intake cowling. If you have fitted a new cable BEFORE CLOSING THE BONNET get an assistant to pull the bonnet lever, while you watch the mechanism to which the cable is attached this is best done before re fitting the cowling. and is the only component that can be seen moving during your test. The Bowden cable enters the car on the nearside on my RHD A160.
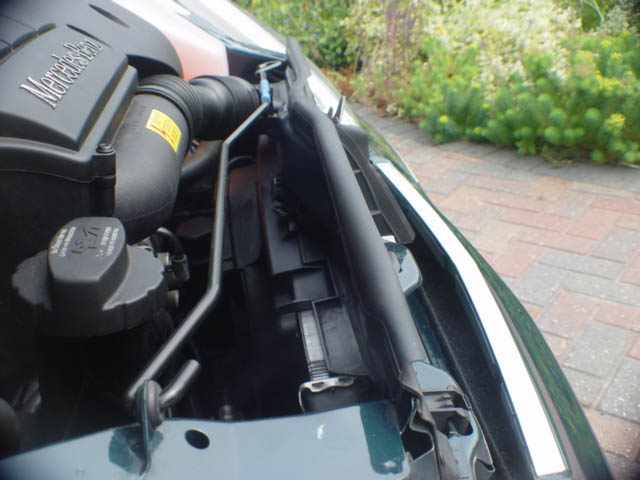
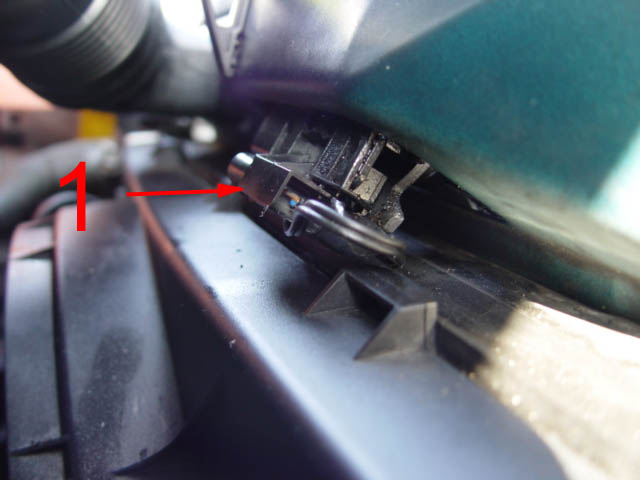
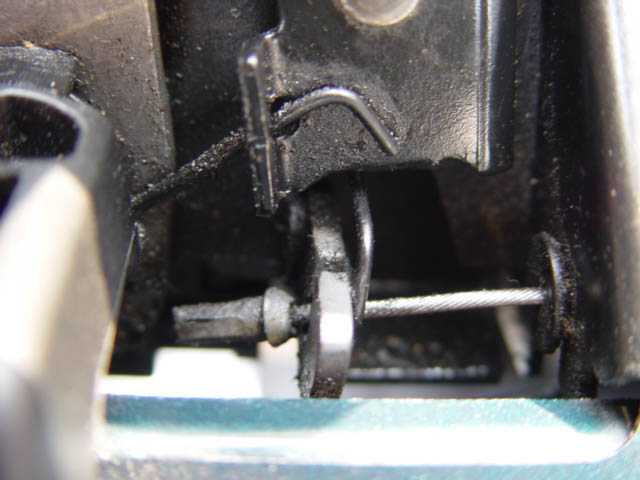
 If you are unable to open your bonnet, it may be worth checking the following try to locate the cable run inside the car, this photo shows where it enters N/S directly to the rear of the strut, if you can locate it, then try to trace the cable to it is end then pull the inner cable to see if it will release the bonnet, I am unsure as to how the cable traverses across the width of the car or even how it connects to the lever but both ends are vulnerable to wear & tear, It may be that the cable continues the full width of the car, in which case the cable insert will finish up in the area of the release leaver. I would at least look before I called out the army to help me get under the bonnet! I can suggest no other way of opening the bonnet! If you know of a way I would be pleased to hear from you! In the meantime I will continue with my preventative maintenance in an attempt to prevent my car suffering such a failure. it is called LUCK.
Fitting a new cable
On of the first problems is that Mercedes-Benz do not show how or where the cable runs in relation to the dash, on the Right hand drive car, its obvious that it runs across the car in the inside the car behind the bulkhead/or fire wall as MB call it . But that doesn't help, also all documentation relating to the cable, shows only the left hand version, of course that easy to fit all you have to do is follow the old cable and connect it to the release lever ,MB quote for one hours labour so it is still not a cheap job. Why they didn't leave it on the left is anybodies Guess, after all the left the steering wrack unchanged!
However the right car drive car is a difficult job, I understand that the new Haynes manual 12/11 08 mentions, simply says pull the new cable in with a piece of string which you attach to the old cable when you pull the old unit out. However this didn't help Dan who spend hours and hours + £70 on parts to overcome a stiff bonnet release I quote from his mails:-
Hi Lofty, I'm a new A Class owner ( not of a new A class unfortunately) and have found your site invaluable. It seems that a lot of the reliability issues banded around about these cars are due to garages taking unsuspecting owners for a ride, they then report huge bills and everyone gets scared of ownership. Time will tell but thanks for your hard work, it puts my mind at rest!
I have a specific problem that isn't covered entirely and wondered if you have any further information on it. My bonnet release was stiff from the day I bought it (a 1999 A170 CDI) and this resulted in my breaking the inner red handle. I have since replaced this (£6.70 +VAT) and realised that the mechanism or the cable was too stiff. I've tried freeing everything up and was rather hopeful about the new mechanism that I bought (£25 + VAT) curing the problem. It didn't and it can now only be the cable. When you release it the mechanism where the cable attaches, the bonnet stays pulled and you have to manually free it with your finger. So the cable isn't free. I've tried WD40 down both ends and working it in but it doesn't seem to help much, certainly not enough.
I've ordered a new cable from Mercedes Ascot (£17 + VAT) but looking at the cable run it looks like it could be tricky. Facing the engine it goes to the right through the metal box section that the washer bottle attaches to and then out and into the bulk head over the ABS Pump. This bit doesn't scare me, it is the unknown inside the cabin that I'm worried about. It comes in just above the passenger foot well and disappears over to the drivers side through the dashboard, past the heater controls (though probably 10'' or so behind them) and then all the way to the release handle.
I'm relatively handy at DIY mechanics having grown up with my Dad as a garage owner but do you have any idea if I might be biting off a really massive undertaking? If so then I'll take it to a garage.
I was thinking that I could feed the new cable through the bulkhead and into the car after pulling the old one out of the engine bay then taping with some duck tape the old cable to the new one and pulling it through but I've no idea if that would work. Knowing my luck Mercedes would have gone to the lengths of cable tying the cable a few times behind the dash board.
Any help of advice would be most welcome!!
I gave Dan one or two pointers but they only mildly helped the situation and he persisted in trying to fit the new cable.
As I say, the actual mechanism that the cable attaches too I have now replaced. Whilst replacing this I detached the cable from the mechanism and pulled it as far as it would go into the car with WD40 sprayed on the exposed cable, then went to the engine end and pulled it back as far as it would go, just as you suggested. I did this many times and it freed up a little but not enough. I did not however try the polythene bag idea so I shall try tomorrow with some 3 in 1, great idea. Hopefully this will work.
Worst case is to replace the cable, not cool as I really do not want to do this. it is not the cost, from Mercedes it is £17 so not really expensive, it is the potential hassle involved. Even Mercedes service dept in Ascot said they have never done one! Will report back.
Lofty It was at this point that I decided I would put in a secondary means of opening the bonnet on my own car (see above)and as Dan said it is certainly worth considering I might well do that on my own car!
Thanks again
Well I've just finished putting the new cable in, started at 8PM so a good 4 hours. Constant tea stops though as it is freezing outside. I bought the Haynes manual and it suggested pulling the old cable out with some string attached and then pulling the string though with the new one attached. Sounds simple enough, except that all along the cross beam that goes the width of the car and is just below the level of the fan vents the bonnet release cable is cable tied all the way along. I tied 2 pieces of very strong string, just as well as one got caught on something sharp and broke.
I eventually pulled the cable through starting from the engine side and getting it through the bulkhead was no problem, then it fed really well over behind the dash until it hit the middle at which point nothing was working. I ended up taking the glove box out and tried feeling around but no luck. So I took the centre unit with all the heater controls out, again I couldn't get to where the cable should have run, so feeling rather frustrated I dropped the shelf below the steering wheel, still no access to where the cable should be and definitely no luck in getting the cable unstuck. Last resort was to take the instrument cluster out, drop the steering column and feel around. Would you believe it....still nothing!!
Such a poor design considering the left hand drive equivalent is so simple, no wonder Mercedes service dept have not returned my calls, all three of them, and the parts guy and his smug grin now make sense!
So, I pulled the cable out and back into the passenger foot well. Then I tried to see if there was a route in front of the cross beam mentioned before. This was the same beam it was originally cable tied to but just the other side. Eventually it went through and with the clocks out and the steering dropped I could just about grab the cable. I pulled it through and dropped it to the release handle, connected everything up, replaced the lower shelf under the steering and gave it a try. Nothing. It is as if the cable is too long, which is of course a possibility. It doesn't move very freely at all, only slightly better than the last one and I was extremely careful not to kink or bend it any more than slightly.
The Mechanism end (bonnet end) just stays open like the spring isn't strong enough. 4 hours, £70 in parts and I'm no better off. Sod it, I'm now going to take the old cable, remove the outer cover and connect the mechanics end as usual, then drill a hole below the proper cable hole and run the new piece through. Then I'll probably attach a ring of some sort and run it into the glove box. This is what I should have done from the beginning.
Why the hell didn't Mercedes just leave the damn thing on the left hand side! Many cars make you lean over, it is really not going to take the jam out of my doughnut to lean over or ask my passenger to pop the hood!
Anyway, thank you very much for your help. Maybe if any owners are unlucky enough to have their cable go on them they can either take it to a garage and make it their problem or just run a new cable into another location. Maybe they would have better luck than me but I tried and tried, not wanting to admit defeat, but I know when I'm beaten...
I've now run the old cable into the car and just near the glove box. I was planning to cut the outer cable back and feed through and into the glove box via a small hole and grommet and then use electrical blocks (great minds eh!) to loop the inner cable back on itself. You then have a pull handle of a sort. I think I shall run some nylon cable/strimmer wire when I find it sown as you did as a back-up. Dan.
So you can see from Dan's experience above that it is an almost impossible to replace this cable and the old cable is impossible to remove with out knowing if you are going to dislodge or even damage other cables and connection s? Cable ties do not give way easily and they have been used in Dan's case to secure the existing cable.
Put your car into the Garage? Yes but get written fixed cost before leaving the car with them, or you will/could finish up with a large bill due to the number of hours spent trying to get the new cable fitted and at the of the day, in Dan's case the new cable is only mildly better than the old as far as ease of movement is concerned.
If however you are desperate to fit a new cable I would suggest re-routing it along the channel, where the windscreen wiper mechanism is housed you may be able to drop the cable to the parcel shelf area and thus release lever when you reach the carbon filter housing. But only time will tell if that will work. Certainly it is not a Job I would relish on a cold day or warm one either after Dan's experience, and he like me is keen on DIY although I suspect he may have lost some of his enthusiasm after this Job! remember plenty of 3 in 1 light oil will help keep this mechanism freed up thus reducing the amount of wear on the cable, that's got to be easier than trying to fit or finding the money to pay a garage for what should have been a straight forward ,simple job.
Just remember few jobs on this car are a simple fix, I could live with that if the professionals manufacturers repair representatives Mercedes -Benz franchise mechanics where up to the job and new how to fix these problems but sadly this is not the case and invariably they are no more aware of the repair procedures than the owners despite their access to WIS which results in extortionate bills and quotes.
Next.
Back to Index,
Purchase DVD.
Please Make a Donation.