Brakes
Front Brake Calliper Inspection, Repair and Replacement. Replacing the pads as described on the previous page was a relatively simple operation, progressing on to repairs on the calliper, hydraulic pipe work, replacing discs and bleeding the brake system can be a little more tricky. If you are not confident leave it to the experts. Or you could get somebody with mechanical experience to assist you. You can then either tackle the job under their supervision or watch closely while they undertake one side, leaving you to tackle the other, as invariably when it comes to brakes both sides need attending to at the same mileage/time to maintain that important balance. Either way remember your life and that of others may depend on the job being done correctly.
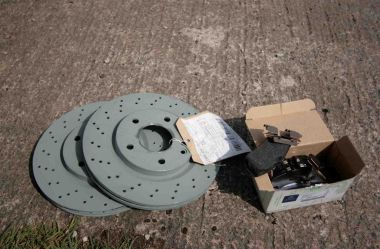
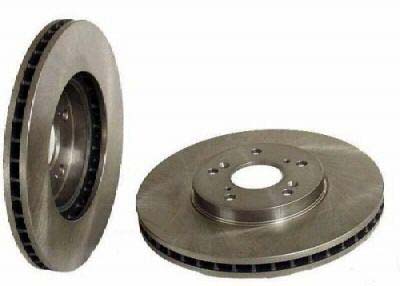
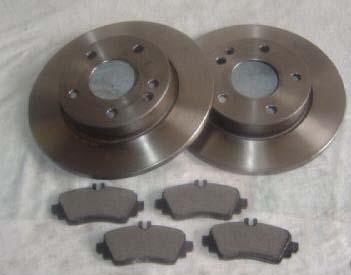
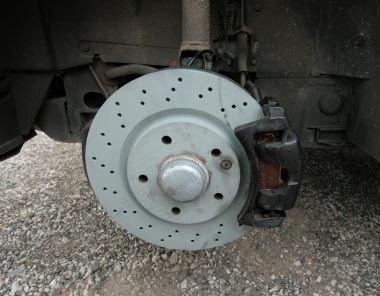
So we are up to the job? having decided to replace the brake discs (some times referred to as rotors) we need to purchase the replacement parts
I would would replace with Mercedes parts, yes you will get cheaper and you will get more sophisticated replacements which some will argue are better than the original parts. Well the decision is yours only you can decide.
BUT for my part I'm going for Mercedes parts every time unless I can buy the same component as supplied by Mercedes parts at a cheaper price, Bosch sparking plugs is an example, the only difference being the boxes the plugs are packed in and the great difference in cost. ££ different so in that case it is worth buying at other outlets, GSF in my case for the plugs, & mention my site and get 5% off
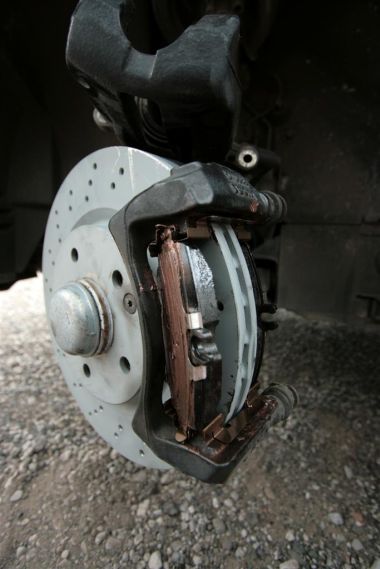
In this case it is a fellow owner who has decided to fit new discs and pads and he quite rightly is changing both sides at the same time, owners are always advised to replace both at the same time, be it pads , discs or both. This maintains the balance which helps prevent the car pulling left or right when braking under pressure.
This car with only 24000 on the clock has already had one set of discs at 12000,
the first set of pads only lasting 75000. Remember if you drive a powerful model, drive hard ,and brake hard you need to keep a very keen eye on the condition of both pads and discs, this owner obviously does all three
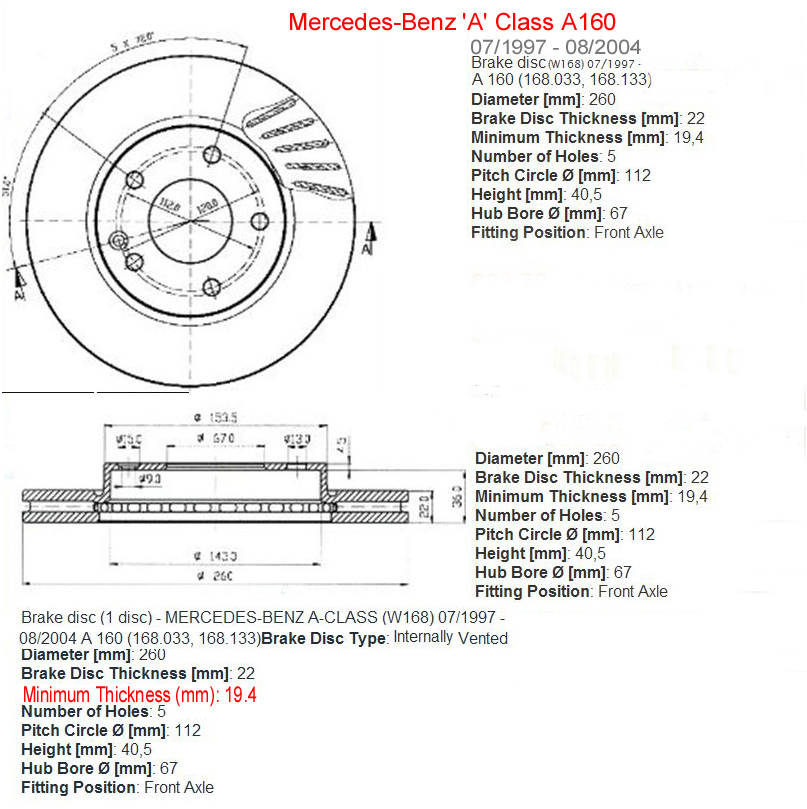
As far as I'm aware there are three main types of discs supplied by Mercedes Parts for the W168 'A' Class of which of course we are aware there are many different models.
A140 range single plate braking surface either side of the single plate/disc.
A160 double braking surface or vented plate. And the double plate braking surface also fitted with holes in the braking disc. This is found on the more powerful models which in this case is an 'A' 210.
Are they interchangeable? In short I do not know, all I would advise is to use your Vin Number to purchase the replacement parts, if you deviate from that then you may well encounter problems where the callipers are not suitable for the disc purchased.
If you must change the specification of the braking system on your car then first seek expert advise.
This may mean changing the complete system callipers, discs and pads.
Also remember in the future your Vin number will not apply for the replacement of the brakes parts changed.
This could cause the next owner serious problems as well as a lot of extra expense.
When calculating the wear on your brake disks a suitable calliper should be used
The minimum thickness for Front Brake Disks as fitted to the 2001/A160 19.4mm measurements should be taken at four points on the discs
Some early A160 along with A140 will have been fitted with solid unvented discs, in this case the minimum thickness is 10mm The discs being 12mm when new.
All discs will be secured to the hub with 'Torx' (Star Drive) screws these must be re-fitted. If damaged replaced, when fitting new discs.
 You will need a T30 star drive piece to remove the screw. Information on the screw appears as A 8.8 The screw must be fully tightened and loc-tite should be applied before re-fitting
Please Note
Until you are satisfied that the new pads have bedded in with the new discs, try where possible to avoid heavy braking. The adhesion between the new pads and disc can be such that the pads can be damaged , bearing in mind that these days they are bonded to the back plate of the pads.
Simply follow the guidance sheet from your pads and disc's and you won't go far wrong!
Before you start and take yourself off to get spare parts consider what you need, yes you have decided you want to change the brake disks, some times referred to as rotors, you also need a small amount of copper slip grease, although I would not be surprised if Mercedes do not include a small amount of this with the kit?
What condition are your flexible brake hoses in? If your car has got to the stage that it requires new brake disks and your not changing for change sake, then there is every chance the flexible brake hoses need changing as well, so do check, once your wheels are off the ground it inconvenient to have to try and arrange collection of other parts. Although I must congratulate my branch they will always mail the parts to me if I ask but this can result in days of delay in getting the job completed when in fact it is only a couple of hours work, if all goes well with all the parts required to hand.
Having got started use the correct size tools or you will damage or round off bolts etc you also need a 'Torque' 'star' drive bit for removing the brake disc locking screw, 'Phillips' or 'Allen' keys will not do all you will do is damage the screw , having done that you will have trouble getting the screw out. So use the correct tools to start with.
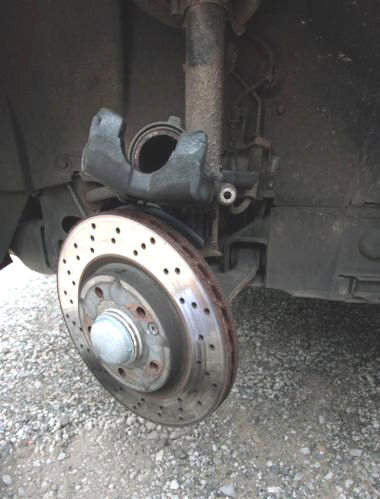
Remove the calliper complete from the hub assembly you could service the calliper at this point if you wish , and you will be assured of not getting fluid or grim on the new components.
Inspect the brake hoses for signs of perishing and replace as necessary (See below for further details)
Make sure the calliper is thoroughly cleaned and all old grease grim removed,
Remove the old pad clips clean and retain one set as spare parts, you cannot buy these separately, they only come with new pad kits so keep a couple of spares does no harm.
Ensure the pad carrier guides are degreased, cleaned and re-greased, the carrier should slide easily when in position on the calliper body.
Examine the area around the piston and ensure there are no signs of leaks.
DO NOT OPERATE THE FOOT BRAKE WHILE THE CALLIPER IS SEPERATED FROM THE BRAKE DISC OR THE HYDRAULIC PISTON WILL BE FORCED FROM THE WHEEL CYLINDER.
Before re-housing the piston into the calliper cylinder, check the fluid reservoir under the bonnet, to ensure there is sufficient capacity for the fluid which will be forced to return via the braking system/circuits.
Or release the fluid from the wheel cylinder via the bleed valve on the calliper ensuring you first have a container to collect the surplus fluid.
compress the piston from it is extended position due to worn pads and discs, until it is flush with the calliper, body
Lock the bleed valve off as soon as the piston is retracted thereby preventing air entering the braking circuit.
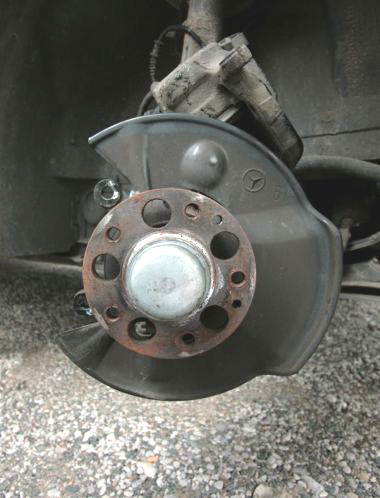
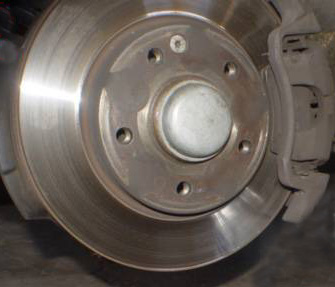
Having got that job out of the way we can now remove the old disc from the flange/stub axle. having previously removed the locking screw.
With a hammer strike the rear of the disc, this will almost certainly have bonded with the flange but a couple of smart blows should see them separated .
Wire brush and clean the face of the flange and lightly grease .
Fit the new brake disc
Secure by re-fitting the locking screw tighten firmly.
Refit the calliper body to the wishbone assembly
Fit the new pad securing clips to the calliper body top and bottom
Using copper slip lightly grease the rim of the hydraulic piston
Also grease the back of the brake pad being positioned against the piston
taking care not to contact the braking surface .
Pads are more easily fitted if held at 45 degrees to the brake disc
When both pads are correctly located position the pad cradle and secure
This is best done by fixing the top of the cradle bolt left loose then swinging the cradle down over the pads
Ensure all bolts are fully tightened.
Having now reassembled all of the components , with the wheels choked handbrake released , operate the brake pedal, this action will bring the hydraulic piston into contact with the rear of the brake pad and force the pad against the new cylinder.
When pressure is released on the pedal and the car out of gear you should be able to turn the disc by hand , but do remember you are also turning the drive shafts.
Refit the wheel, lightly greasing the thread of each wheel bolt.
Remember to torque the bolts when the wheel is lowered to the ground.
(Thank you mykp for the photographs at the start of this section.)
Brake Pad Shims
Brake pad kits and disc and pad kits are provided with shims, these are shaped and are designed to fit behind the brake pads on some vehicles. However Mercedes Technical Department have clearly stated in a letter posted on this site that they should not be fitted to passenger carrying vehicles . It is noted that the owner of the A210 has fitted them.
My advise on this would be if you have owned a car from new as I'm aware he has, if when you come to replace the pads they are fitted with shims then replace them,with shims from the kit IF however your car like mine NOT fitted with shims then DO NOT FIT THEM that way you cannot be wrong.
Mercedes -Benz recommends that the brake fluid be changed at regular intervals (see your service sheet for details) where this is undertaken by the owner a strict sequence should be followed and sufficient fluid drained from each bleed valve to allow clean fluid to reach the wheel cylinder, 10 pumps on each wheel is mentioned in the MB documents. I had 1.5 litres available when I undertook mine but did have about .5 of a litre over. For procedure & sequence see below.
But remember only tackle these jobs if you know what you are doing and feel confident enough to do so, You can't take chances with Brakes. .
We can be alerted to possible brake problems by any of the following:-
Replace Pads & detector.
2 Brake fluid reservoir low level indicator operates.
Action Check front & rear wheel cylinders for leaks. Repair as required, Top up fluid.
Note small amounts of fluid will be required as brake pads or shoes wear, all incidents where large quantities of fluid are required should be thoroughly investigated.
3 Physical check of reservoir indicates that a considerable amount of fluid is required.(car is serviced at prescribed time periods.)
Action As 2 above.
4 Action Check Calliper on none breaking side, i.e. car pulls to left = Check calliper /pads right hand side.
5 Brakes screech or squeal when brakes are applied
Action (a) Can be caused by pads which are not compatible with the discs, or foreign bodies such as granite chips which become lodged in the calliper these can also severally damage the working surfaces of the brake disc. The pad housing/cradle is not moving easily and smoothly on the calliper guides. Clean re-grease (See page 27)
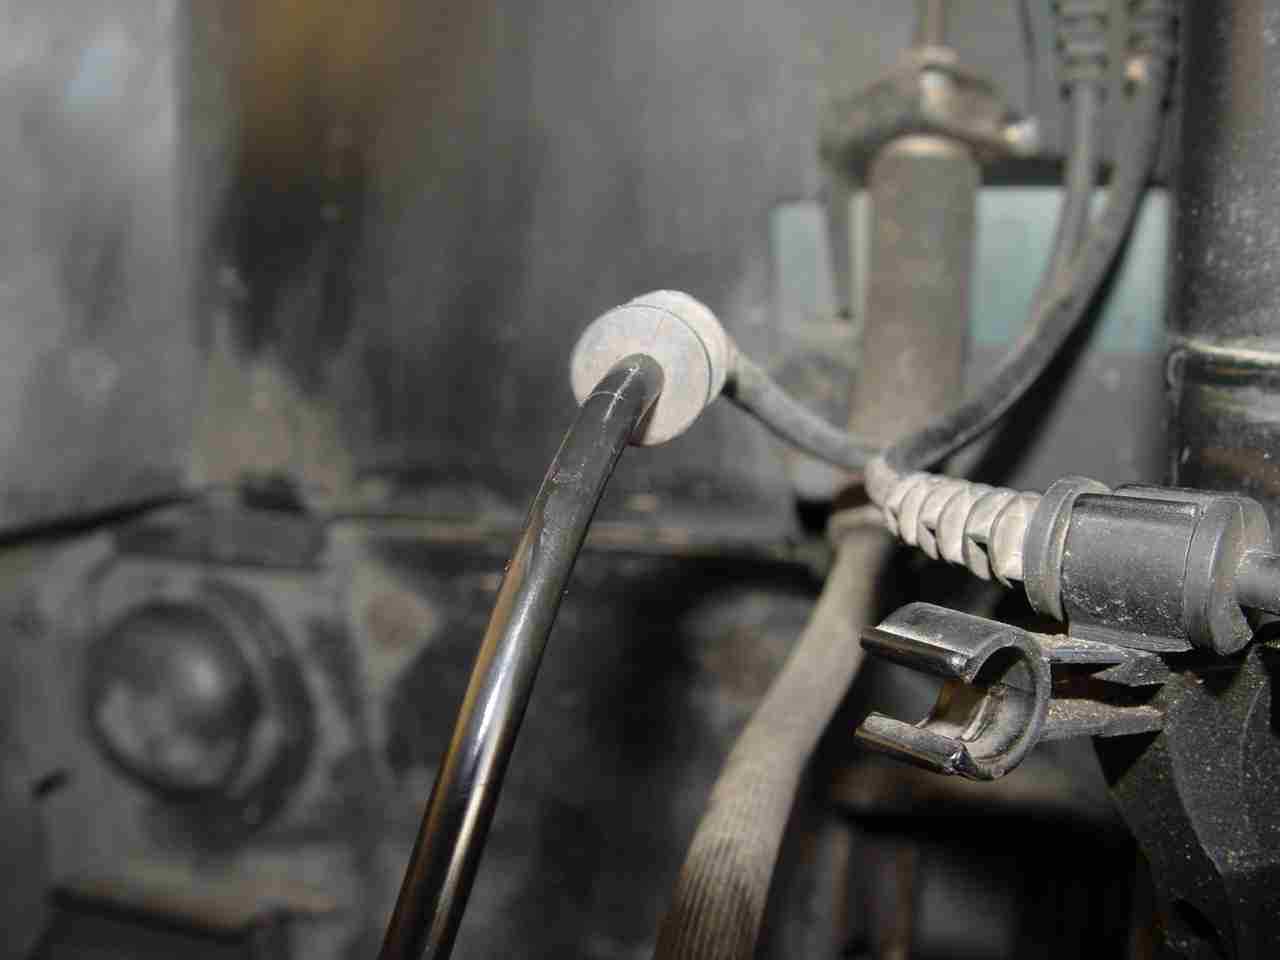
Before removing the calliper remove the ABS & low pad detector cable from their clips, this action will prevent them getting damaged and allow more movement of the calliper.
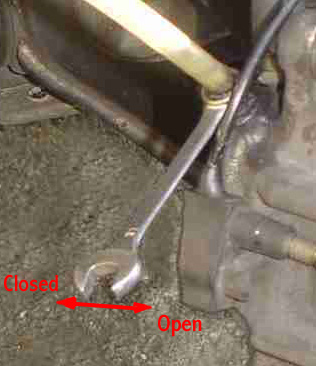
The procedure outlined so far will not have required you to touch the bleed valve, In my experience after some time it may well become ceased up, the bleed valve which is normally made of steel bonds with the aluminium calliper body. I therefore use a 11.mm ring spanner, an open ended spanner is likely to damage the shoulders of the valve, particularly if it is stiff or ceased up.
 I therefore check the valves are serviceable
 whenever working on the brakes. Apply a 11mm ring spanner and just check the bleed valve for movement it only needs to be a small amount of movement, an eight of an inch or so. The valve normally has to be undone a quarter of a turn or more before it will leak. If it is found that the valve will not move, W.D 40 or similar spray, left for a few minutes will sometimes do the job. Having got some movement, move the bleed valve to and fro until you are sure it is serviceable. If the valve is ceased/locked up or very stiff take great care or you will break it off in the calliper body. If it is serviceable, then to prevent the valve corroding in the future wipe a small amount of grease around the outside of the valve, before replacing the protective rubber cap making sure it does not enter the outlet. 2 Replacement rubber caps can be purchased this model having a loop on which stretches over the bleed valve body preventing it from getting lost during your service.
If the valve will not move then leave it or you will break it off. Renewing the bleed valve if broken off in the calliper can be a major job, although special tools called 'Easy Outs'(A tool of various diameter with an anti clockwise spiral that winds into the broken valve body, locks and removes the broken portion of the bleed valve body.) may do the job. These can be purchased at good accessory/tool shops. The alternative being a New Calliper!
Please note You will need to use the bleed valve to undertake the procedures on this page. If it is impossible to move the valve you may have to strip the calliper and apply heat failing that a new callipers will be required. Where I have replaced callipers I have done so as a pair, thereby ensuring that the balance of the breaking system is maintained.
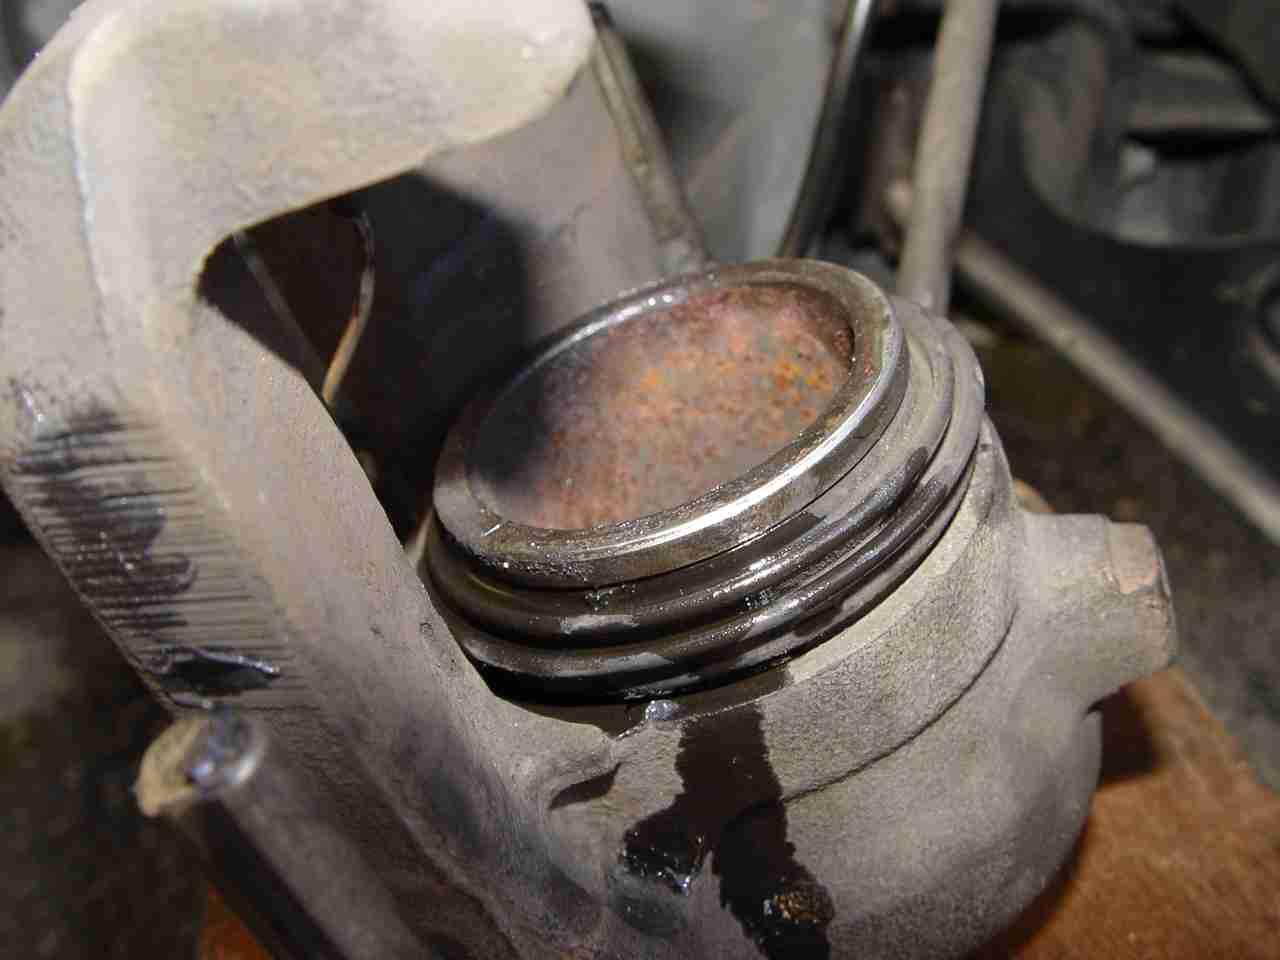
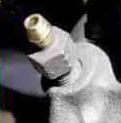
Leaking calliper
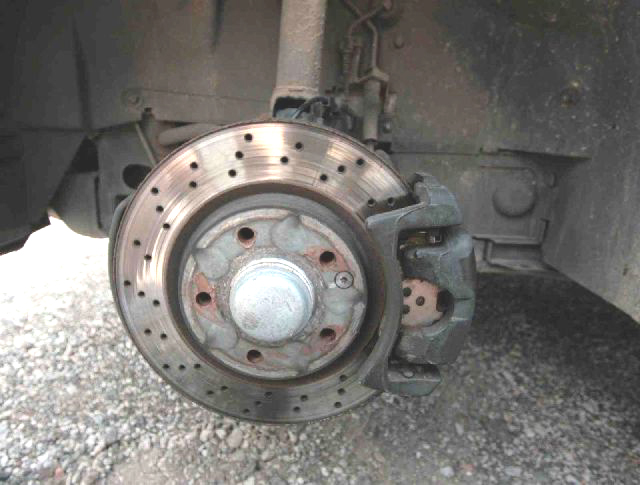
Finding a cylinder that is showing signs of leaking like the one on the right makes the whole job more complicated, although not insurmountable.

Although you will need to seek out a calliper seal kit Part number A 000 420 02 44. which consists of one piston seal and the piston gaiter that also forms part of the seal
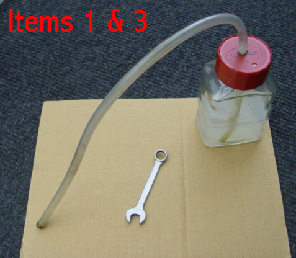
Some additional items & tools are required, and need to be readily available.
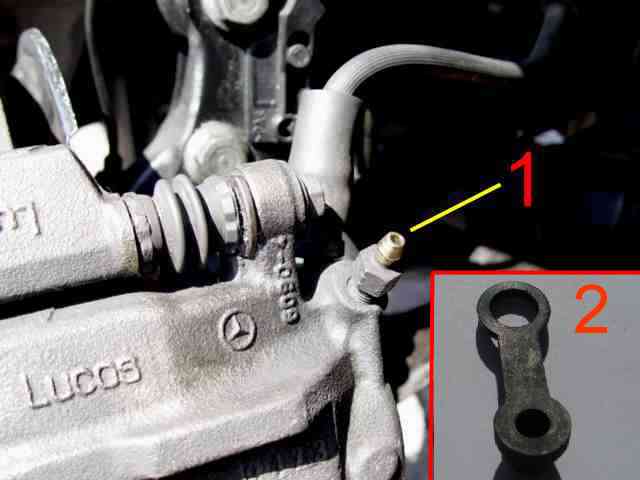
1 A 11.mm ring spanner, for opening and closing the bleed valve
2 A glass jar with plastic lid, in which has been drill one 8mm hole to allow the fitting of the polythene tube with 6mm internal bore, and one smaller hole to allow the jar to vent. Used for drained/used brake fluid into.
3 New Brake fluid, compatible with existing fluid.
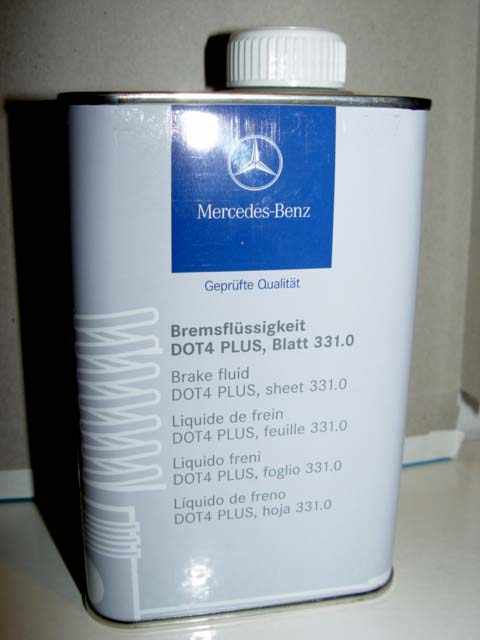 DOT 4 plus, Non Petroleum Base Fluid
 (wet boiling point at least 365F.)MB part NO.A 000 989 08
4 A suitable clamp with plastic or wooden jaws, for clamping the flexible brake hose, prevents loss of fluid.
5 A short length of polythene tubing 6mm bore.
6 A quantity of absorbent cloth, for cleaning.
The Jar and tubing need to be prepared , install the tube into the jar via the 8 mm hole drilled in the lid , place about 2" of brake fluid in the jar ensuring that the tube is below the level of the fluid.
Procedure
Having removed the calliper from the brake disc, remove the pads. Greater movement of the calliper can be achieved if the connection cables, ABS & Low pad detection cables are removed from their clips, remember to return them on completion. Split the pad housing/cradle from the calliper body, as out lined on the previous page (Page 27) Wear eye protection and if available surgical like protective gloves, avoid getting any brake fluid in your eyes, wash any fluid of your hands as soon as possible. . In the event of an accident bathe with copious supplies of water. the
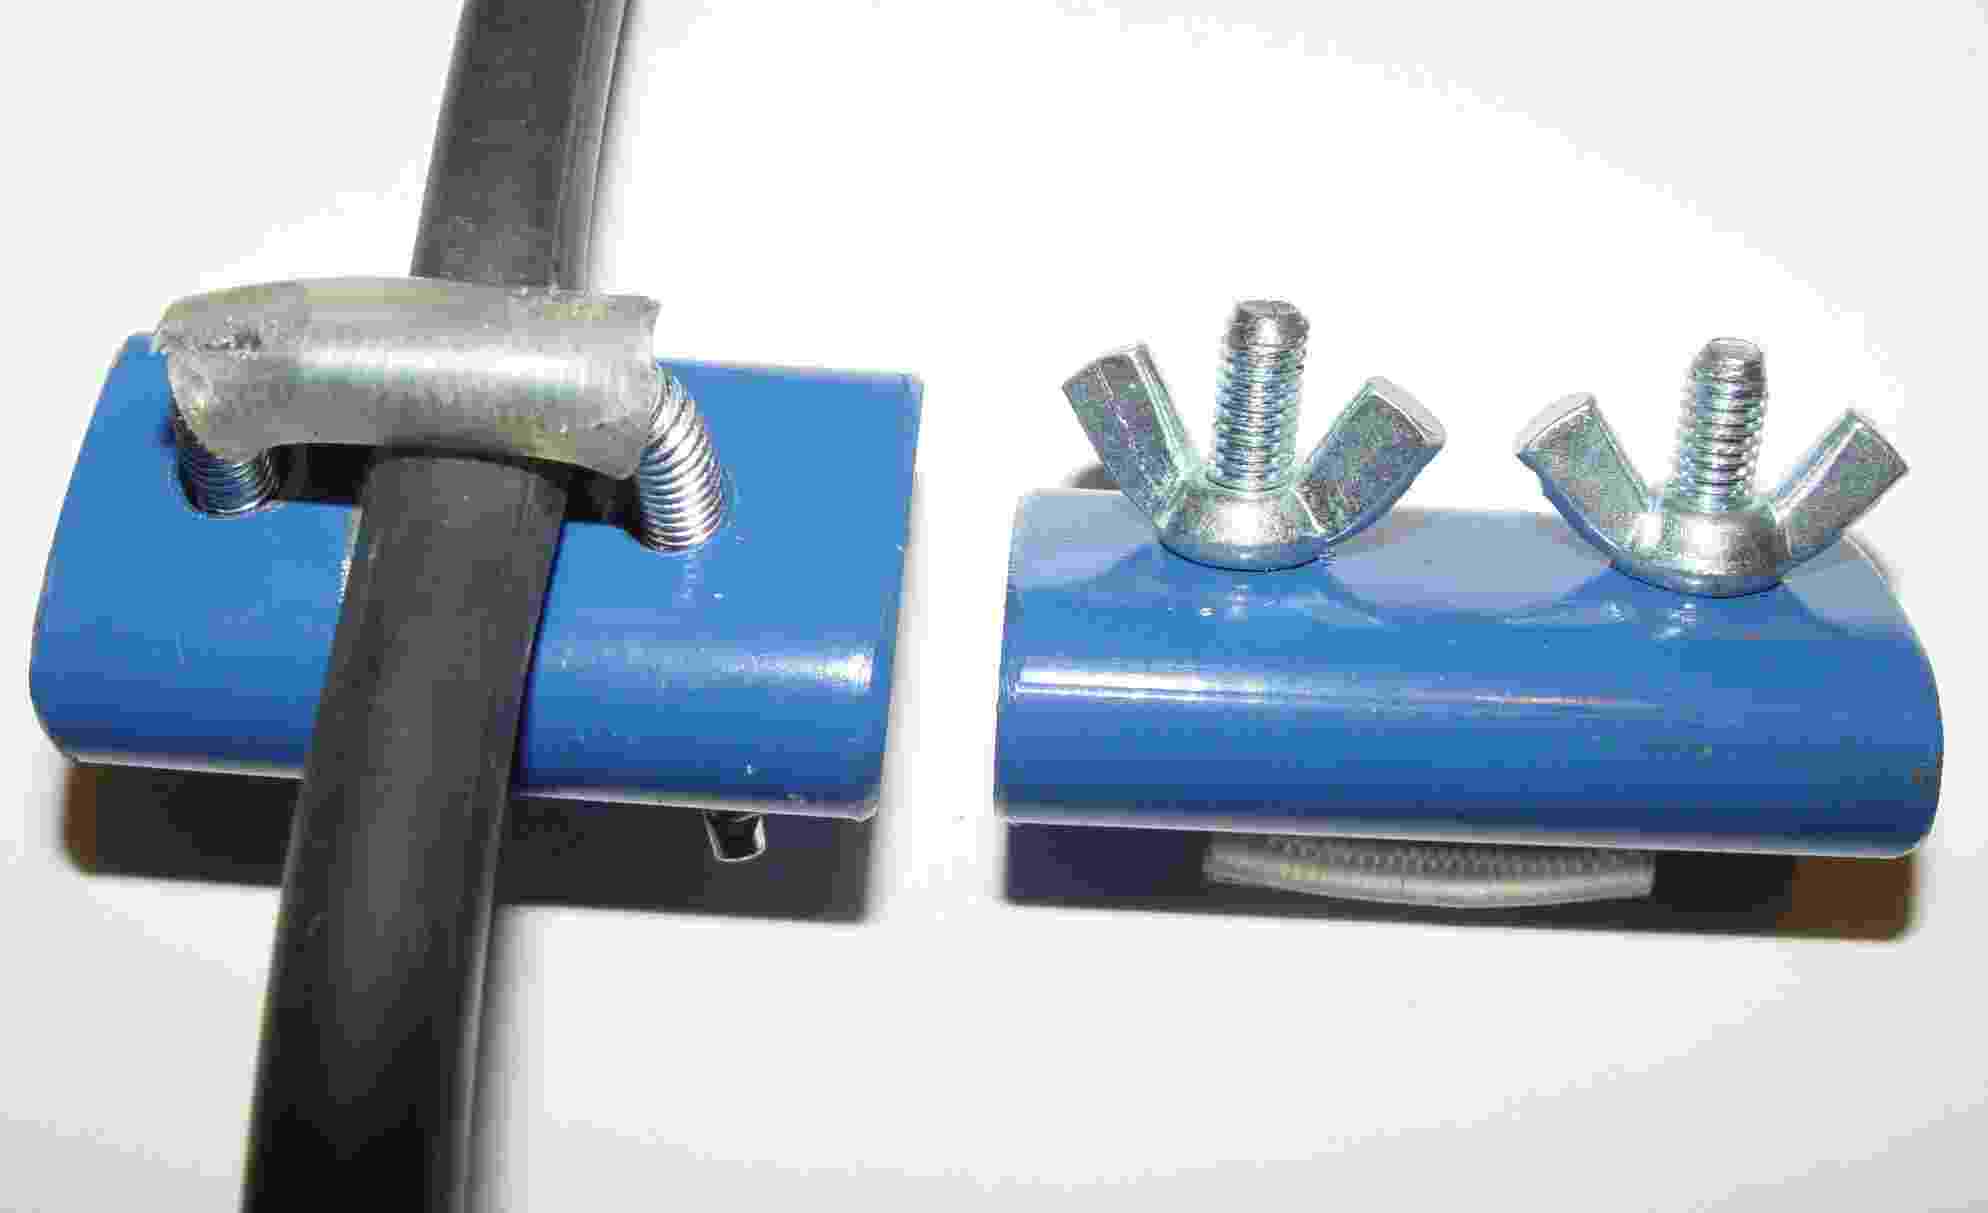
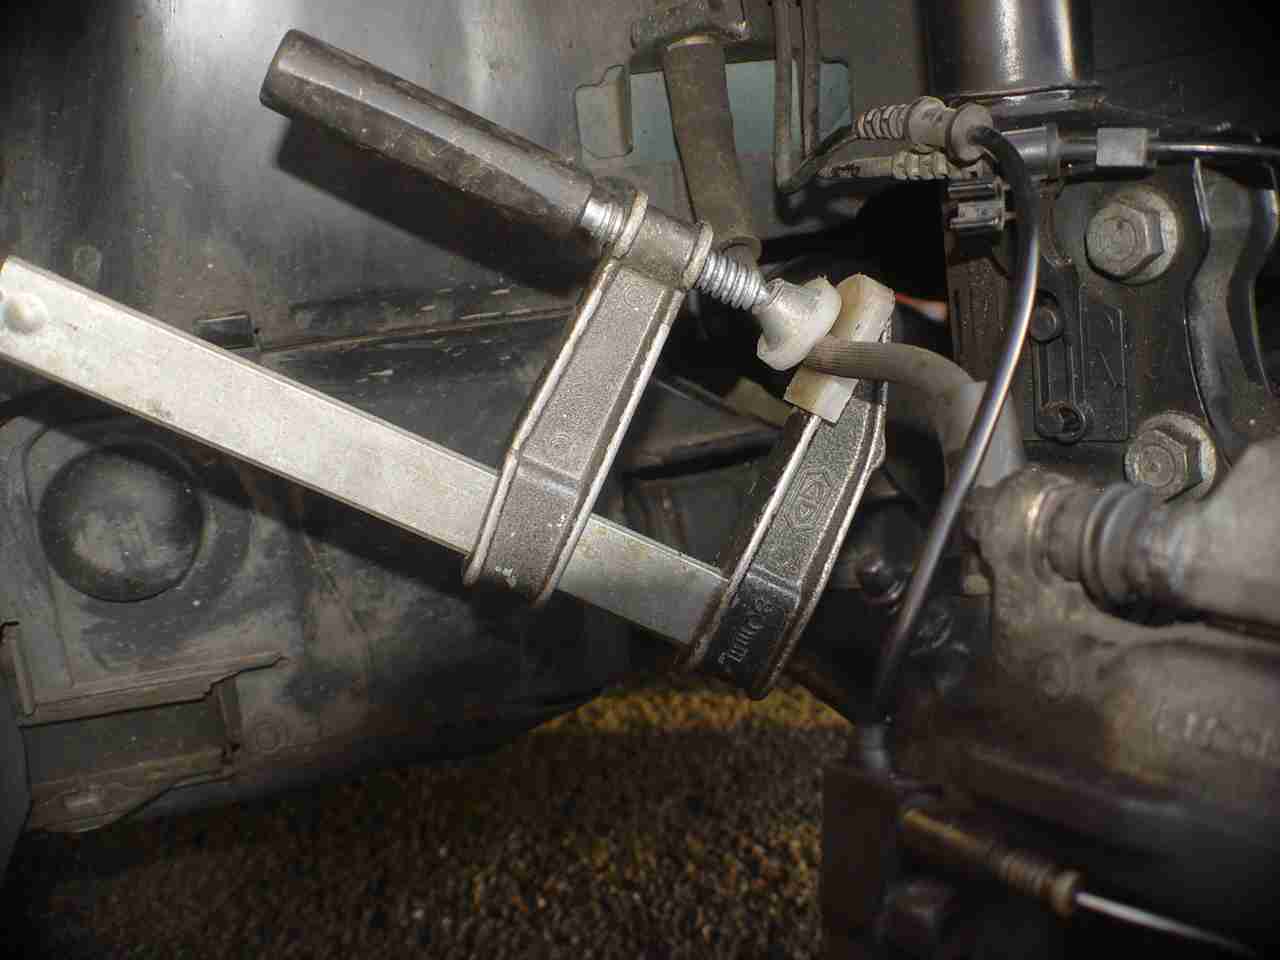
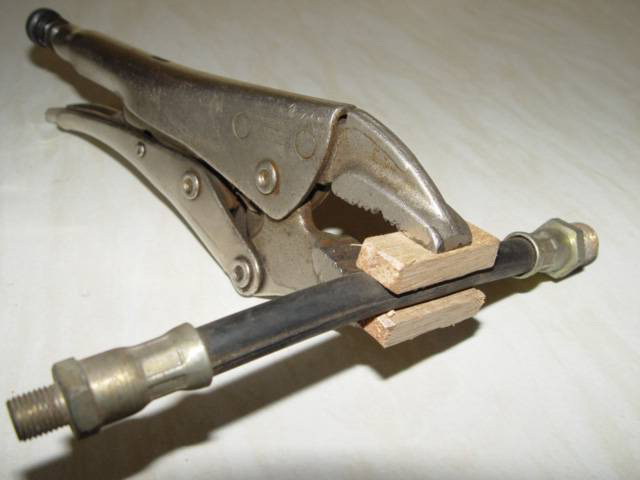
Pre position a suitable or improvised clamp on the flexible brake hose DO NOT TIGHTEN AT THIS STAGE.
The piston will now have to be removed from it is cylinder, with the help of an assistant, get them on your command to slowly pump the brake pedal, using the signal DOWN. UP. STOP This action on the part of your assistant will start to force the piston out of the cylinder, monitoring the progress of the piston get your assistant to continue to slowly operate the foot brake, the piston will be forced completely from the cylinder. Ensure you have plenty of absorbent cloth into which to place the piston as a quantity of fluid will follow the piston from the cylinder. Immediately tighten the pre positioned clamp until the flow of fluid ceases to flow from the calliper. If you improvise, make sure that you do not damage the hose casing, or it will need to be replaced. The mole grips with wooden improvised
jaws is quite acceptable with caution.
Having now removed the piston, wipe dry and clean, remove the old seals, ensure the recesses into which the seals sit are clean and free from particles of old seal or contamination. Take care not to damage the outer piston surface in any way, Clean with the brake cleaning fluid mentioned on the earlier page.
Before replacing the new piston make sure that the inner surface of the cylinder into which the piston slides is clean.
 If necessary flush out the cylinder with the brake cleaning fluid and then wipe clean with a cloth.
If the inner surface of the cylinder is damaged by corrosion as is sometimes the case, then in the short term a New Calliper may be required. However your repair may be successful if the damage is towards the back of the cylinder.
Open the bleed valve at least 3/4 of a turn
Before re-installing the piston lubricate the new seals with a small amount of new brake fluid, position and gently push and slid the piston back into the cylinder by hand, taking care not to pinch or damage the new seals. This procedure should be relatively easy as any air in the cylinder will be evacuated via the bleed valve. Make sure the piston is fully housed.
Re-assemble the calliper as outlined on the previous page,
 re-fit calliper to hub and hand tighten bolts.
Bleeding the System.
This can be undertaken in several ways, I however still use the old system, simple and cheap.
There is also equipment on the market which will allow you to bleed the system on your own without the need to call for assistance
One such unit is the Ezi-Bleed system. which is used by one owner who has found it very successful and posted details for changing the brake fluid in the 'A' Class brake system on the site. For more details of the equipment he used go to:-
http://www.volvoclub.org.uk/faq/Brakes.html#BrakeBleedingSequences
Bleeding the Calliper
1 Place the 11.mm ring spanner over the bleed valve which should still be OPEN.
2 Using the jar previously mentioned complete with it is 2" of clean water and polythene tube, fit the free end of the tube over the outlet of the bleed valve, a 6mm bore tube should be a firm fit and will stay in position.
3 Remove the clamp from the brake hose.
4 With the help of your assistant, On your directions, get them to press the brake pedal to the floor and hold it down.
5 While they hold the pedal down CLOSE THE BLEED VALVE

6 On your direction the brake pedal is then allowed to rise.
7 The procedure 4 5 6 must be repeated until a steady stream of brake fluid is seen to going down the polythene tube to the jar free of any air bubbles. The air evacuated from the system and tube will been seen as bubbles coming from the tube, which must remain below the water line.
8 When this is been achieved, ensure the bleed valve is closed. Get your assistant to now slowly press the pedal until the Calliper piston comes into contact with the pads and takes up any slack between the pads and the brake disc. Check the fluid reservoir, top up with fluid to the maximum mark if required. The brake pedal should now be hard. If there is any sponginess in the pedal, repeat the earlier procedure 4 5 6 again as this indicates that air is still in the system. Only when you are satisfied that the cylinder is free of air and is fluid tight with no apparent leaks continue.
9 Tighten the bleed valve.
10 Re-check the pedal.
11 Remove the tube.
12 Remove the spanner.
13 Re-fit the protective cap.
14 Before going further get you assistant to apply pressure to the brake pedal, check visually for leaking fluid around the bleed valve and the piston of the calliper.
15 When you are satisfied tighten & torque the calliper bolts with a torque wrench, firstly ensuring that loc-tite 'loc-N seal ' has been applied.
16 Re-place the wheel's.
17 Firmly apply the brakes before attempting to move the car.
Bleeding the complete system
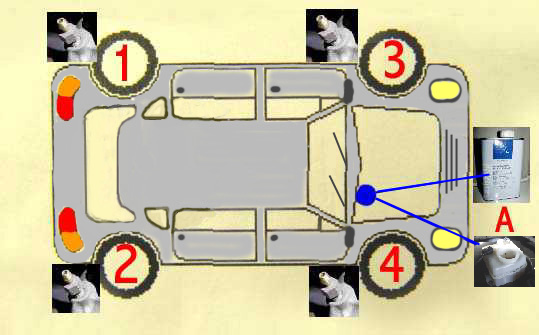
If bleeding the complete system whether using the old method or a pressure system such as Eli-Bleed bleed the system in the following order:- subject to brake Reservoir/Servo being on the Off Side.
1 Nearside Rear.
2 Offside Rear
3 Nearside Front
4 Offside Front
A Location of Servo/Brake Fluid Reservoir. Brake Fluid DOT 4 Plus MB Part No.A000 989 08 07 10
 The brake fluid in your car should be changed every 2 years, (See service sheet for active service (Assyst) edition 29/08/02 Ask for this sheet when collecting your car after service.) This will normally be done by Mercedes on the 'B' Service but bear in mind it is charged an an extra to the service for both parts and labour.
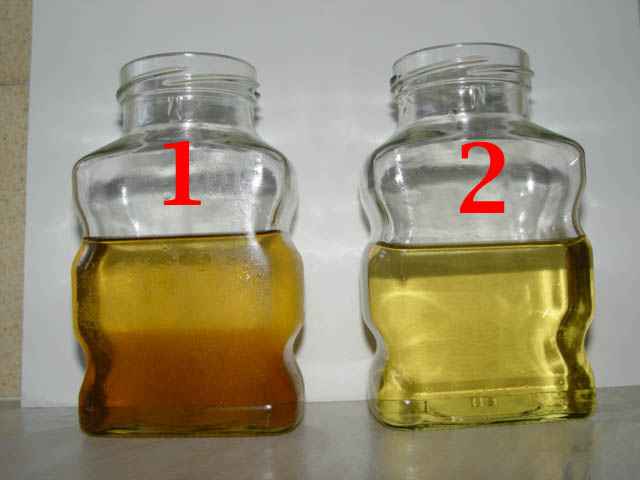
You could be forgiven If you thought this picture had got into the wrong section, I.e. from the wine section. In fact it is used brake fluid 1 and New fluid 2 It is easy to see the difference although 1 is clearing with the dirtiest of the fluid falling to the lowest point I.e. In the braking system, the wheel cylinders. If changing the fluid saves changing a wheel cylinder that has been damaged by a high moisture content in the fluid, then the fluid change at regular intervals is well worth while. Note Brake fluid should never be used again but disposed of with old paint solvent like material.
Another action you may need to take is fitting a Replacement Calliper, Nov.04 just on £100 inclusive of VAT plus the cost of pads, but if the guides are badly worn or the internal surface of the cylinder or indeed the piston is damaged by moisture then you will have no choice. A very simple operation.
1 Slacken the hydraulic brake hose connection to the calliper while it is still firmly fixed in position. (A little WD40 does wonders, these joints will normally have been in place for years, undoing can sometimes be difficult therefore use what technology has provided, it really does help)
2 Clamp the hose as in the previous guidance.
3 Remove the calliper from the hub as above.
4 Re-fit the new calliper, observing all of the previous guidance. re-fit or replace the pads.
5 Bleed the new calliper as with replacement seals.
Brake Discs (See above for more details ) can also be replaced, although will normally outlast several sets of pads which are designed to be sacrificial in that they are made of softer material than the discs. It is good practice, if not essential that the pads are replaced when New Discs are fitted. The only tools required are the stare drive key to undo and replace the grub screw in the disc, and on occasions a little brute force!
There should be no need to bleed the system where new pads and discs are fitted simply compress the piston observing the level of the brake fluid in the reservoir.
Ensure that brake pedal is compressed before moving the car.
Metal and Flexible brake pipes.
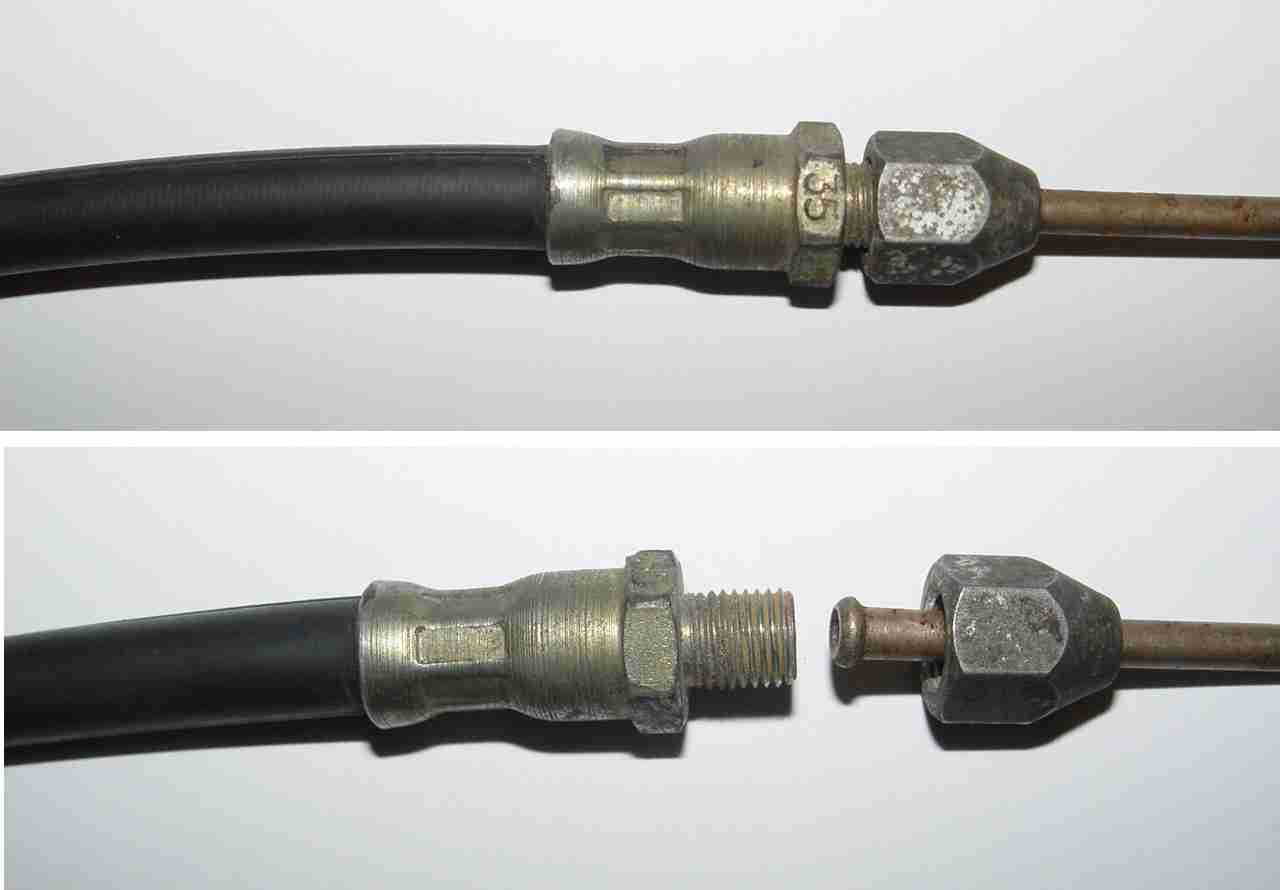
One more job, usually discovered as a result of a pre MOT inspection, or MOT, the Flexible Hydraulic brake hose which will need replacing after a few years, Can be a difficult job, use plenty of WD40 prior to undertaking the actual job. When you come to undoing the connection between the metal brake pipe and the flexible one, take extreme care and watch as you try to move the nut which should revolve on the metal pipe, invariably the nut which forms a collar around the metal pipe bonds with it with the result that the pipe turns with the collar this of course can make the connection totally unusable. Disaster . If you continue you will twist the nut and pipe combined off the end of the metal pipe. Somehow you must break that seal that has formed between metal pipe and swivel nut, you may even have to use heat but take care, the last thing you want is a fire! Heat will however normally assist in breaking the seal.
Once the seal has been broken, and collared nut released you can replace the flexible brake pipe, screw the flexible pipe into the calliper first. Clean the nut and collar of the metal pipe work thoroughly before retightening. When making the connection to the fixed metal pipe ensure that the flexible hose does not twist as it is tightened to the fixed metal pipe work. Apply a coat of thin coat of grease to the metal components on completion.
Bleeding the brakes after fitting the new pipes is as in previous bleeding procedure. As you are unable to clamp the metal pipe, a lump of blue tack may be found useful, however if the new tube is immediately available there should be little fluid loss. To reduce fluid loss remove the brake reservoir cap and place a piece of cling film or plastic over the top of the reservoir, replace the cap. Some fluid may still be lost but as the vacuum in the reservoir increases so the flow of fluid will decrease. On completion ensue the cling-film is removed from the reservoir and that it is toped up before bleeding the brakes. If the reservoir is allowed to get low or empty air will get into the system from the reservoir end and the whole system may have to be bleed of air.(see sequence above)
 Metal Brake Pipes on occasions, more often on older cars also need replacing. This is one job you will require assistance with, brake pipes can be made to measure but the kit to undertake such tasks is costly and therefore I would look to my local Garage who will almost certainly be able to assist. Pre-made pipe work will of course be available as a spare part, but the fitting is not always straightforward and you will almost certainly require some assistance.
 The jobs mentioned on this page should like all maintenance be undertaken only if you feel confident enough to do it. It would be very embarrassing to have to have your car transported to the garage with a job that you could not complete, so be sure before you start that you can complete the task in hand, albeit we all get caught out with the spare part that we do not have to hand, or have forgotten to purchase, or more often than not, can't be got for a couple of days. If possible check before you start!
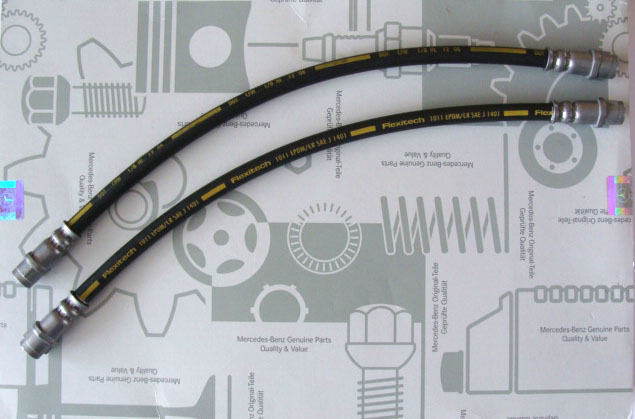
Brake hose can be purchased at most car accessory, however make sure you get the correct hose , these outlets will not exchange parts that are contaminated with brake fluid or even marked. These rear hoses have the following information on:-
Dot .CFW1/8HL 12 06 Flexitech 1011 EPDM/CR SAE J 1401 they are fitted with female, non swivel connectors at both ends, MB Part No. A168 428 02 35, unlike the example below which is non Mercedes-Bens Parts which has a male fitting.
When fitted these units are difficult to even see so keep an eye open for signs of perishing (small cracks in the outer surface of the hose) your car will fail the MOT if they are not in sound condition.
Brake pipes metal
Will in time rust and corrode causing your car to fail the MOT while the flexible hoses perish with time and will need to not only be inspected prior to MOT but replaced if the need arises.
If the need does arise and you are attempting the job yourself remember a piece of polythene placed under the master cylinder cap will prevent the fluid draining from the reservoir, remember to top it up after completing the job and remove the polythene.
If you know you have got to remove curtain pipe work , spray the connections with WD40 several days in advance , this will assist you in getting the nuts undone , also when undoing the nuts use well fitting spanners and take great care to ensure the pipe work does not turn with the nut, or you will finish up worse off than when you started .
Preventative action against corroded pipe work , when ever working under the car with the under floor covers lowered spray pipe work with duck oil or a similar protective product this protects against salt and corrosion. smear the union nuts with grease protecting them against rust and seizure.
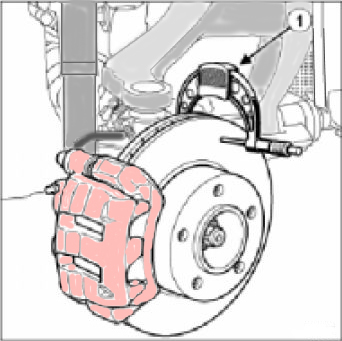
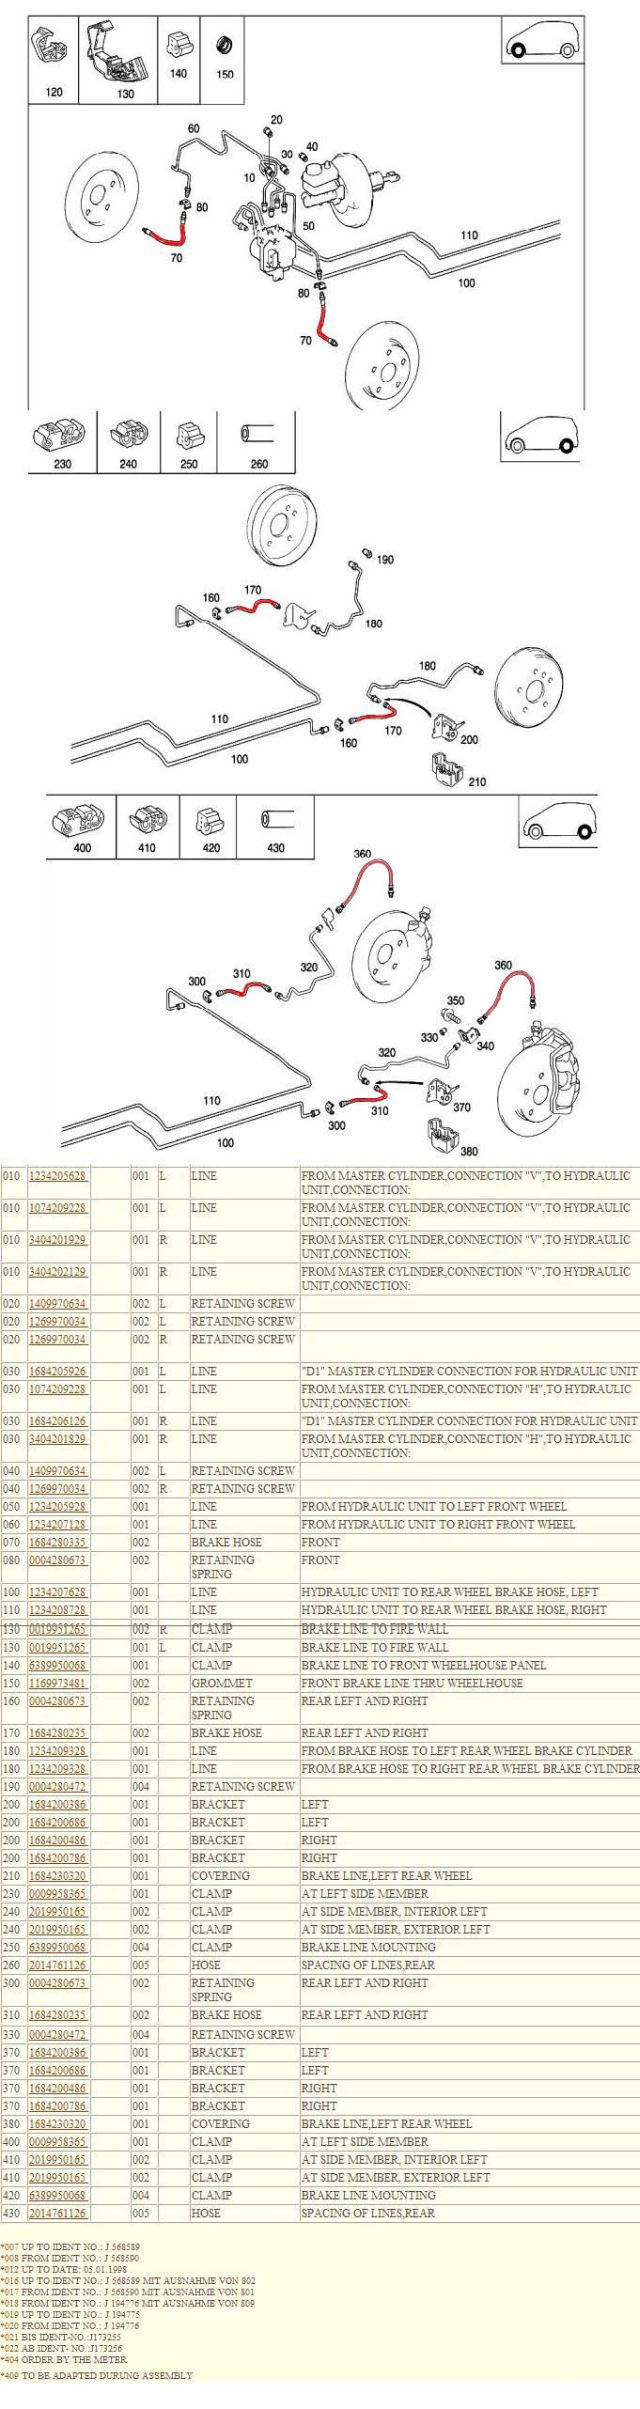
I have indicated the flexible hoses in red, although part 360 is not shown I believe this is also a flexible line, but is only fitted to 'A' Class with discs all round.. Next.
Back to Index,
Purchase DVD.
Please Make a Donation.