 As many of you will have found having your Spark plugs replaced by Mercedes-Benz workshops at approx £80.00 is a very expensive extra on your service bill, and yet the majority of us can do it yourself, in fact would prefer to do it ourselves.
There is little doubt that over a period of years you can save yourself a small fortune replacing such items as 'spark plugs' Air filters Oil and a like saving the funds for the jobs that we all know can't be undertaken in the domestic garage, such as starter motors, & poly 'V' belt tensioner as an example.
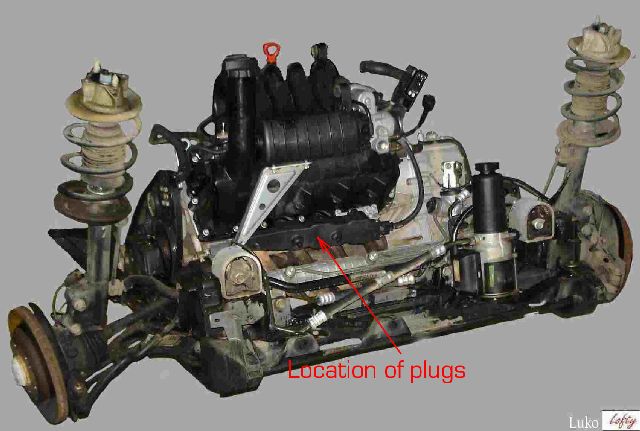
Mercedes service schedules will tell you that the plugs should be changed at around 30000 - 42000 miles. In my book for what it is worth I would recommend inspecting them at say 20000 - 25000 miles. and replacing them if you feel it is necessary, bearing in mind that YOU can change them many times over for the charge that Mercedes Service Centres will make, plus of course the VAT.
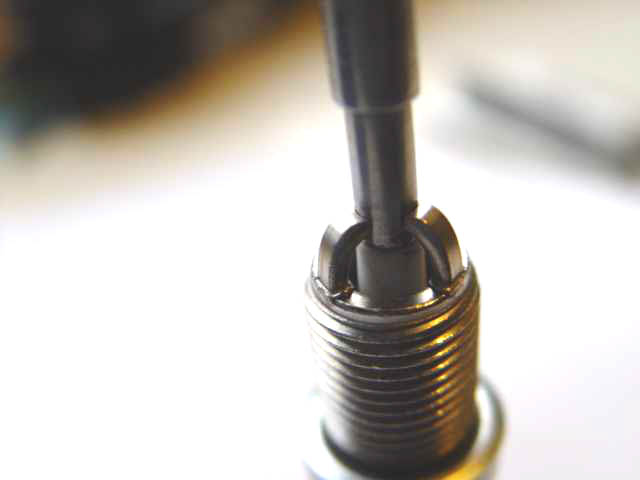
The plug in this photo has done just on 20000, if I'd had a set in the drawer I would have changed them , however at this point I only cleaned checked the gaps to 3 gaps to 1mm and replaced them. I know have a spare set available.
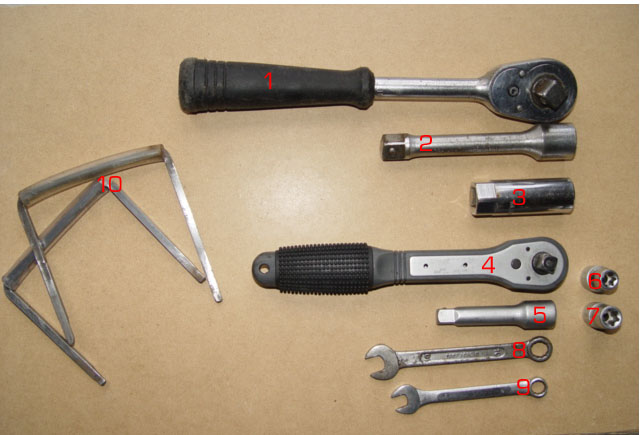 To undertake the job with the minimum of fuss and time you will need:- *
1
x 1/2" Socket Wrench
To undertake the job with the minimum of fuss and time you will need:- *
1
x 1/2" Socket Wrench * 2 Short Extension Bar
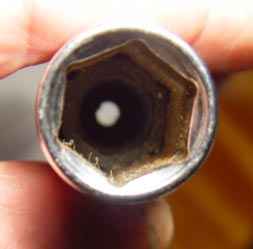
* 3 10mm Spark plug socket( Note, this is a Socket specifically made for installing /removing plugs and is fitted with a rubber insert to prevent damage to the plugs) It is not a long reach standard socket.
* 4 3/8 Drive wrench(optional)
* 5 3/8 Extension bar, (optional)
* 6 & 7 E10 & E12 'Torx' sockets
* 8 & 9 2 x 12 point Ring spanners 8mm & 10mm These can be used as an alternative spanner if 'Torx' sockets are not available,
Note.6 point ring spanners will not work on 'Torx' bolts
* Item 10 shows ignition module cover removal tools sold by lofty for many years These are not now available but can be constructed quite cheaply.
See details below.
11 1 set of 4 spark plugs (not shown)
Plugs are measured across the threaded portion of the plug, although the threaded portion on A class plugs is 13.96mm(14.00mm) the hexagonal fitting is the same as for a 10mm plug.
It is considered that this plug is profiles in this way due the the recess into the head of the engine which has deep plug ports.
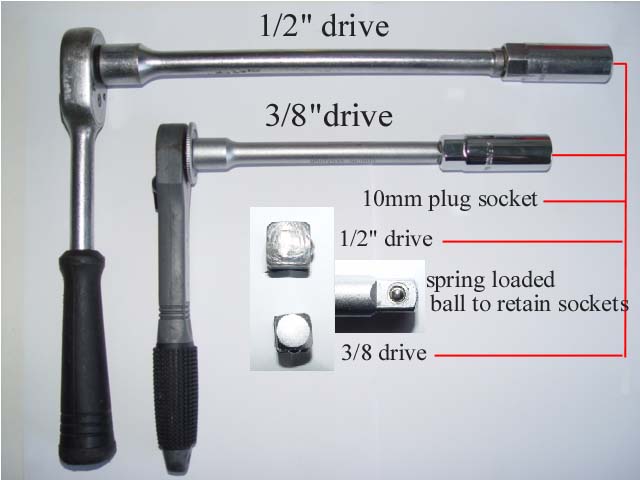
If you are just starting out buying your tools then you may wish to consider purchasing a 3/8 drive ratchet and 10mm plug socket with bar, these are plenty man-enough for doing the job and is easier to use in the confined space, making the removal & replacement of the plugs easier.
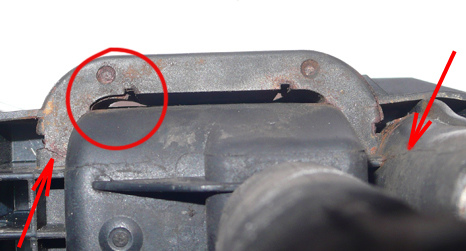
The main problem is the angled bracket which partially covers the plug on the off/side of the engine, I have found that the 3/8 socket assembly with smaller ratchet is easier to use, I am aware of owners who remove and refit the angled bracket so as to get square onto the plug with 1/2 inch drive assembly, although I found it was unnecessary.
Using the 3/8 assembly avoids that task completely.
On another point, many of us whose tools are well used, will find that the 10mm plug socket remains on the plug when the plug is tightened and bar withdrawn, this is usually due to the locking ball in the male end of the extension bar either being missing or again worn. A new bar and socket overcome that problem. I find Halfords tool range to be of good quality are not too expensive.
It is not unusual where the car has been previously serviced by a garage to find that this vital component is missing from the car, because it is difficult to remove without special tools they either get broken off or left off to make the job easier for the mechanic next time round, I am off the opinion that breakage/damage is the more likely cause for them not being replaced.
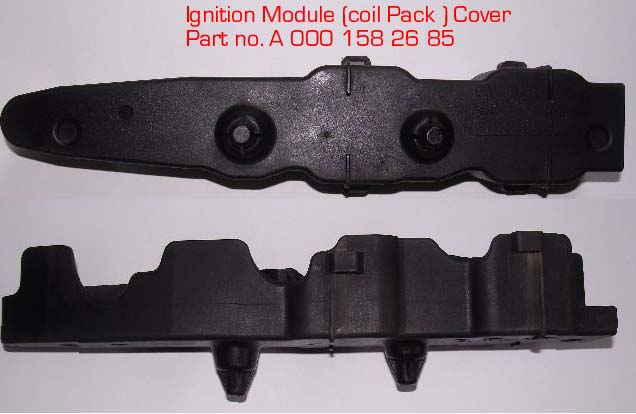
They are cheap to purchase from Mercedes-Benz Parts at only £8.33 each (1.3.2011.) The part number is on the photograph on the right. However you would be well advised to replace them as they protect the Ignition Module( coil pack against road grim and water spray which quickly causes damage to the module.
 Removing the Plastic Ignition Module ( Coil Pack)Cover
 Solaro commented, "This took most of my time, as there was not much info on the web.www.svc.cc was helpful for clues to figure out how to take the damn cover off! But all the picture's assumed there was no cover! After spending an hour and almost giving up, I finally worked out how to take the it off. You need two flat blade screw drivers which you seat into the plastic lugs of the cover. The cover actually snaps on the ignition module.
Ah I hear some of you saying I'm lucky because I haven't got a module cover over my plugs!!
Well if you are driving a petrol 'A' Class (W168) then your cover has gone missing, and there is every chance it is where your plugs were changed last. Lazy mechanics won't refit them because it is takes time, remember they haven't got a set of module tools each, one set per garage if they are lucky and if they can find them? Take my tip buy a cover and fit it, it will most definitely extend the life of the ignition module, keeping salt water spray and road grim off the module and coils. A Shows the Ignition Module ( Coil Pack)cover still in position.
B Indicates the location of the connecting plug and socket.
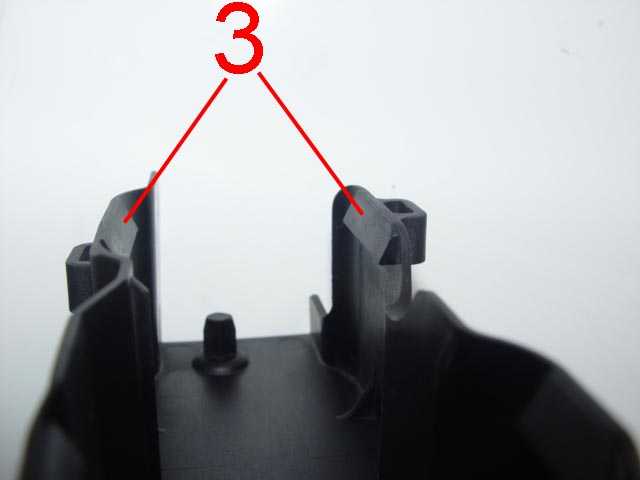
3 Shows the lugs which engage on the coils of the ignition module, note there are two pairs which have to be released together, to allow the cover to be removed easily. Using non specific tools may damage the module.
Wishing to test the procedure Solara used on his car before placing it on this site, I hunted for two flat bladed screw drivers, short enough to work in the confined space between the radiator and the Ignition Module ( Coil Pack)cover, no joy, plenty of long ones! And in any case when I studied the cover I needed four stumpy screw drivers or something very similar and of course three hands to operate them . So I set about making some tools, well several pairs of tools actually before I got it right; which now allow me to easily remove and replace the cover without damage to myself the cover, radiator cowling or the Ignition module. cover and coils See below for details of availability
Remember what ever you choose to use, it is got to be short enough so as not to foul the vulnerable, lethally sharp fines at the bottom of the radiator. Take great care, there are some really sharp objects down in that area. I would suggest when working in this area protect yourself and the radiator by placing a suitable cloth over the exposed top o/s side of the radiator, and if you find it practical, which I certainly don't, wear protective gloves.
When removing the cover ease it off the ignition module, easing the O/S end out from behind the angular support bracket as you do so.
Position in a place of safety while working on the car.
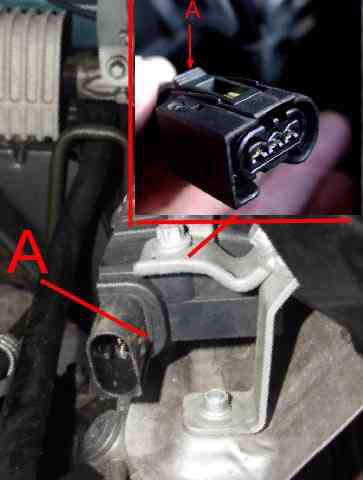
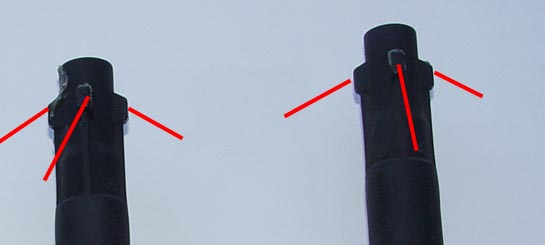
Before attempting to remove the ignition module remove the plug type connector from its socket, located at the extreme N/S end of the module The is done by pressing the small clip A situated to the rear of the plug, at the same time gently withdrawing (pulling) it from the module.
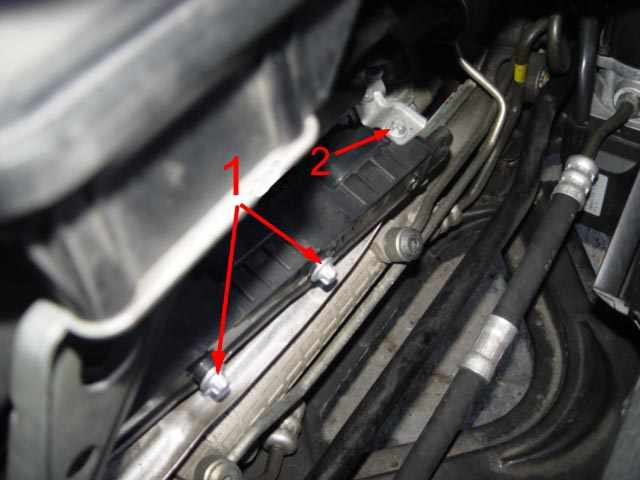
Before the Ignition Module ( Coil Pack)can be removed the two module screws (10mm ring spanner, E12 'Torx' socket) have to be removed along with the bracket screw N/Side end of the module.(8.mm ring spanner, E10 socket)
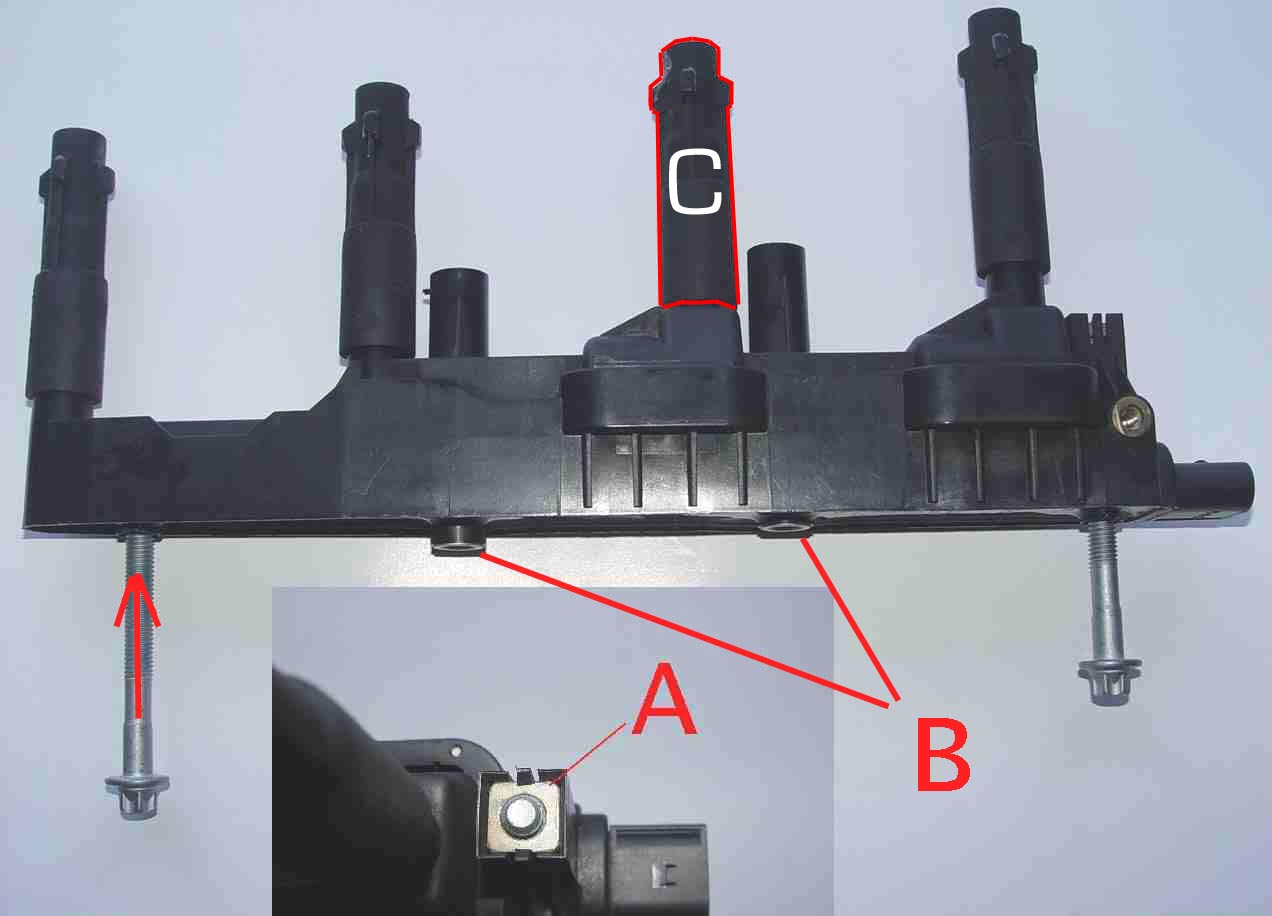 Having removed the two 10mm/E12 Torx screws/bolts from the module place them into the holes at either end of the module, when screwed in (Clockwise) these will engage into an encapsulated nut See
A
and slowly with-draw the module from the plugs, tighten the screws evenly, the plug recess rubbers along with the module will be slowly withdrawn and engine block.
Having removed the two 10mm/E12 Torx screws/bolts from the module place them into the holes at either end of the module, when screwed in (Clockwise) these will engage into an encapsulated nut See
A
and slowly with-draw the module from the plugs, tighten the screws evenly, the plug recess rubbers along with the module will be slowly withdrawn and engine block. Once the module is away from the block remove with care, If the unit is dropped it is very likely to be seriously damaged. Cost to replace just over £75.00 inclusive of VAT 12/01/05

Link to this company and get a quote and you may well find that it costs you less than at Mercedes Outlets, a discount is not offered on this item at present.
However removing the module isn't always straight forward as Michael's mail shows:-
Hi Lofty
Your Ignition Module ( Coil Pack)cover tool worked a treat - thanks. Also the info on your site was invaluable, I would never have worked out to use the module bolts as extractors.
However the extraction was not uneventful, and for others to be aware I hope you won't mind me telling you. Even with the extraction bolts fully home the right-hand end of the module wouldn't come free. I tried gently pulling but in the end brute force had to be used and that's never a good idea. I worked out afterwards that the far right-hand rubber spark plug sleeve was being stretched by the extractor bolts but not sufficiently to pull free from the spark plugs; longer extraction bolts may have helped!
All the brute force achieved was to break the seal that had been formed between the plug top and the rubber insulator, part of which was still bonded to porcelain of the spark plug. I finally managed, using some pliers and it eventually pulled it off, I was then able to change the plugs. As you detailed, the bracket at the left hand end got in the way of my socket set extension, and initially I was going to get a half round file onto it to make space, but in the end I just took the bracket bolt out and bent the bracket away a bit, it went back fine afterwards. Meanwhile the ignition module. I used 'Araldite adhesive' to stick the rubber sleeve back together, it went back on fine and worked. This saved £75 plus VAT, on a new ignition module. I tried pushing spark plugs back into the rubber sleeves while the module was off the car; there is a lot of friction to overcome when you try to pull them out. Some lubrication would be in order but the wrong kind would create a path from the top of the plug down to earth. I would guess that the silicon grease used to create a thermal bond (but no electrical path) for Pentium Processor heat sinks might be good, but I didn't have any. The oil change was no problem. Resetting the ASSYST (single spanner) took a couple of tries - thanks again for the info. Next tasks are the coolant and replacing the brake fluid. Best regards
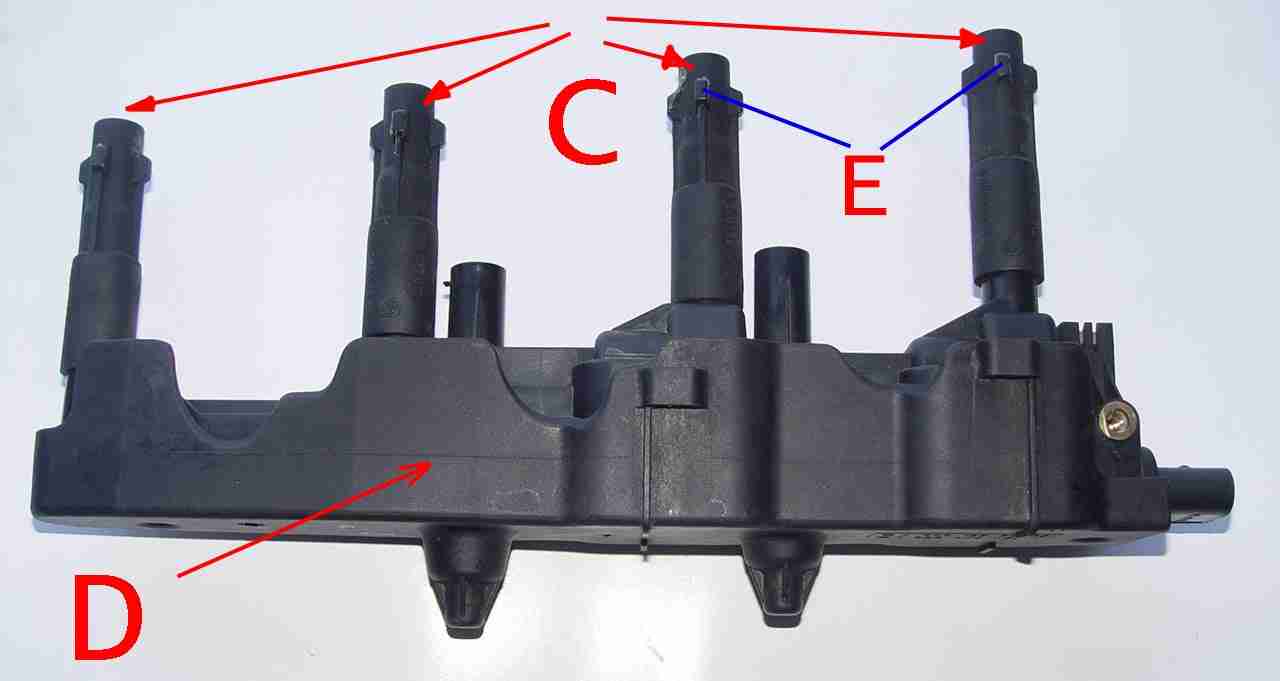
Again a satisfactory ending. But if you encounter this problem it is worth noting that the rubber connector/sleeve C above is available as a separate part, Available from Mercedes Parts, Part number A 000 159 44 42 there is also a spring situated in the sleeve so make sure yours are serviceable before going to purchase the sleeve. Having removed the module the bolts are removed ready to be placed in their original securing positions. The normal location for the screw/bolts is indicated by B
When Jim contacted me his A140 having suffered it is first breakdown in 10 years and added that his car had suddenly started running rough and that following the removal of the Ignition Module ( Coil Pack)he found two plugs normal colour and two sooty black, a defective Ignition Module ( Coil Pack)instantly came to mind, and I was able to give him my diagnoses straight away.
The module has two inbuilt coils, each coil serving two plugs it could therefore be concluded that one coil had gone defective, fuse two was also blown, no doubt caused by the coil short circuiting.
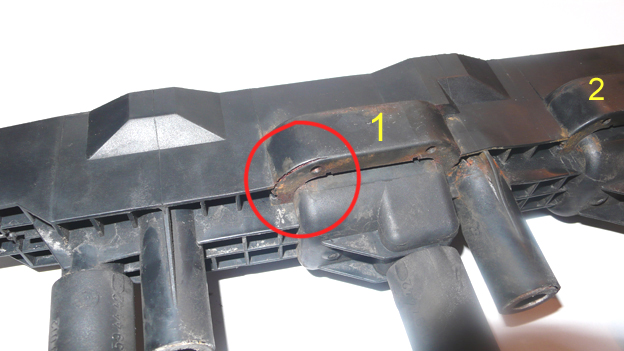
Having mailed him my thoughts and diagnoses, he confirmed that yes the module did look in poor health and attached these photo's which confirms my opinion, like Jim I'm of the opinion that at some point this car has been without the Ignition Module ( Coil Pack)cover which protects the module. although there was one fitted when he removed and checked the plugs, he removed it using a set of 'lofty's Mk4 Ignition Cover Removal Tools' that he had purchased from me some time ago.
 Close inspection of the photograph clearly shows a number of cracks in the module. During wet or even damp conditions this could cause the unit to fail.
 I'll be interested to see if fitting a new module completely cures the problems suffered,
I will now await a further mail which I'm confident will say the car is now back to normal, Hopefully ready for another 10 years of trouble free motoring.
and the outcome
Hello Lofty Just a quick note to say BINGO!, the replacement of the ignition module did the trick. A massive thanks for pointing me in the right direction and allowing me the satisfaction of fixing the car myself without wasting money. I paid £65.86 (10/08/2010) for the module from Euro-car parts. All the best, Jim
Just one more satisfied reader, Oh and Jim thanks for the photographs they will help other readers to see what to look for when they remove their modules, although in many cases the defect won't be so easily detectable, where a coil has simply burnt out for instance there will be little see, however you may then be able to pick up the defect by the smell that will be produces by the burnt copper and insulation.
So having removed the module taking care not to drop it, inspect it for cracks and damage if it appears like this one and you have running problems, then there is every reason to conclude that the unit is defective.
Having removed the Ignition Module ( Coil Pack)inspected and placed in a safe location.

It is worth noting that the plugs are installed with the screw contact left installed on the plug. Having replaced/cleaned the plugs, clean and replace the module, this I found was best done by offering the module square to the block and pushing evenly. The unit will be forced fully home when the screw bolts are re-installed. The hole that can be seen located next to the plug housing is one of the securing screw/bolt holes.
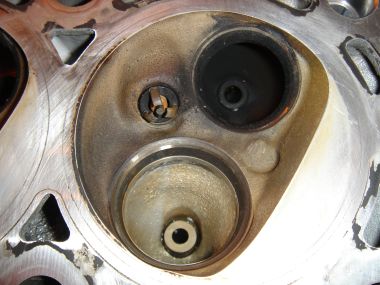
Shows the plug screwed into the cylinder head.
(In this instance both exhaust and inlet valves have been removed)
Torque settings, Plugs 25Nm, Ignition Module ( Coil Pack)screws/bolts 20Nm, Bracket screw 8Nm.
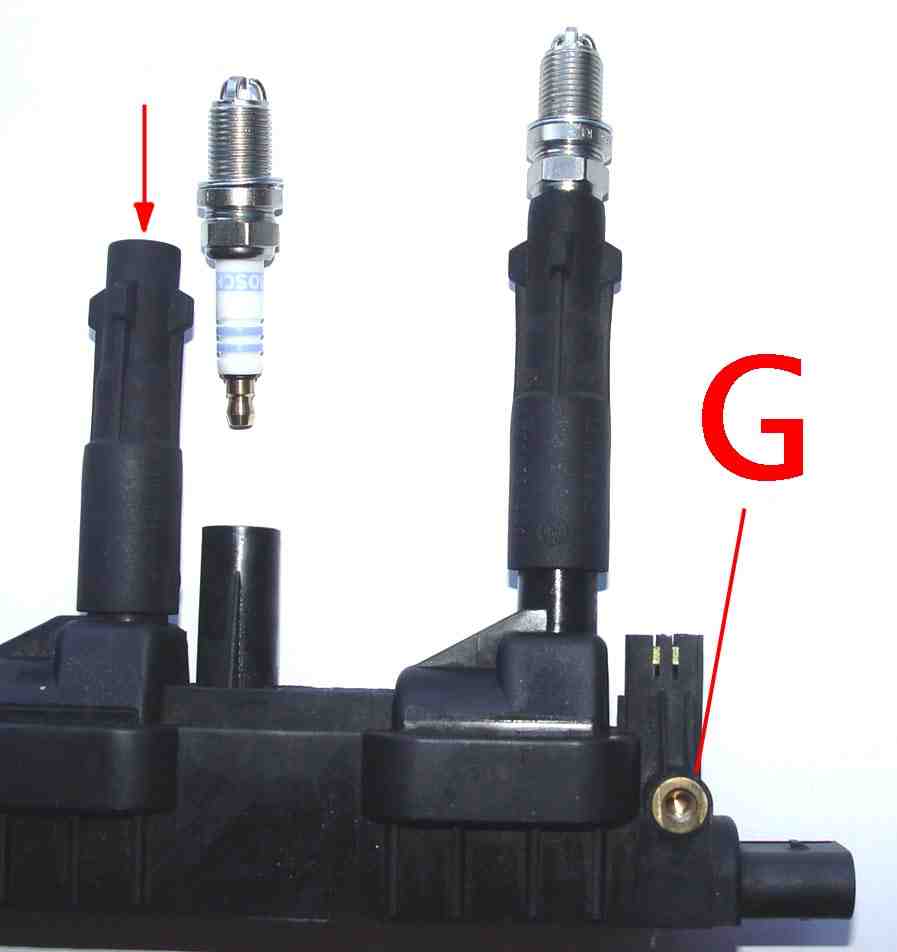
It can be seen that when the module is fully installed the head of the plug is sealed within the rubber sleeve. Worth noting the earthing point for this unit G , make sure it is clean before re-installing the module, this is the point into which the 8mm screw locates
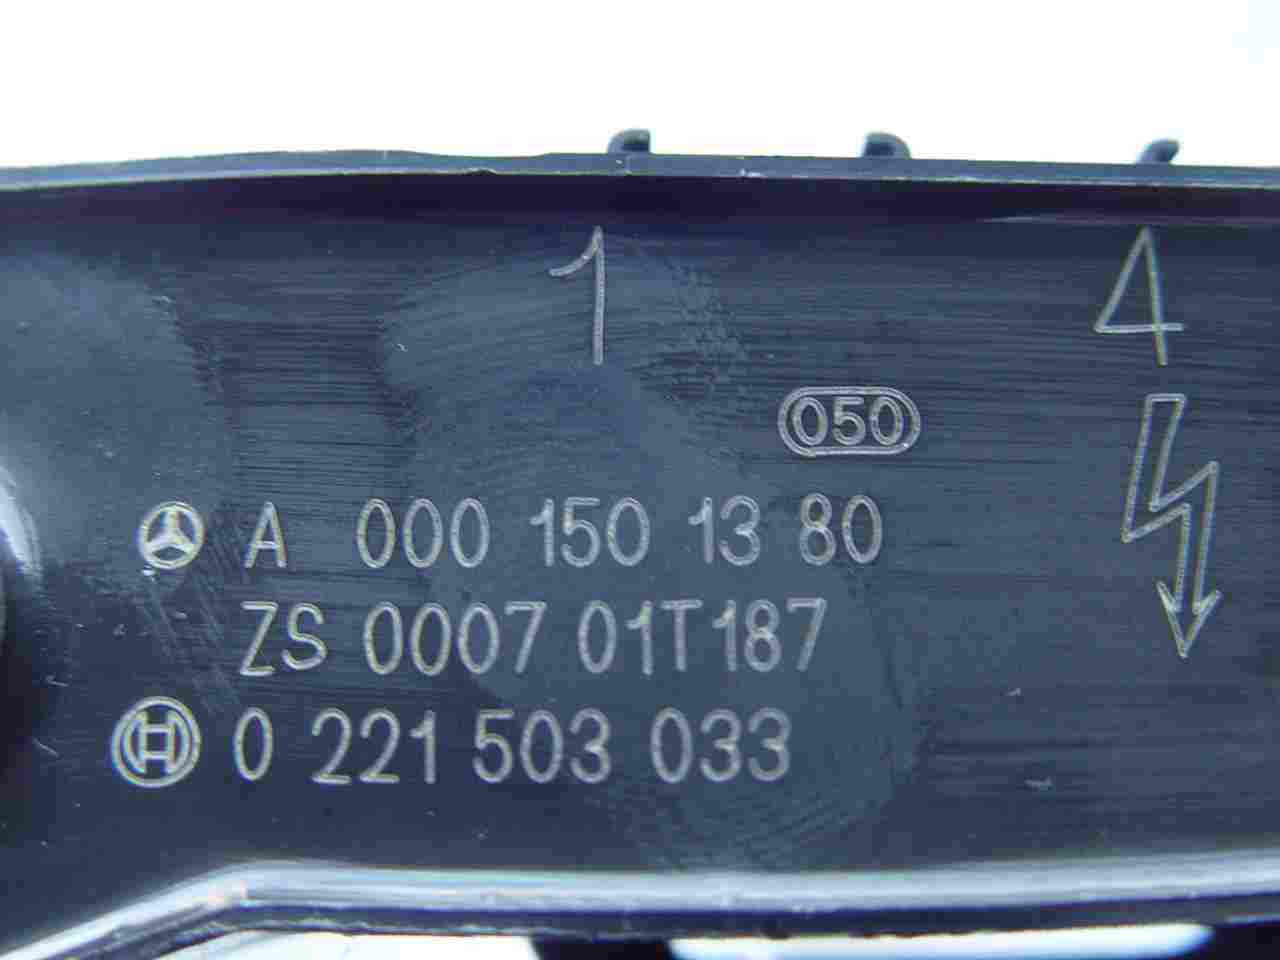
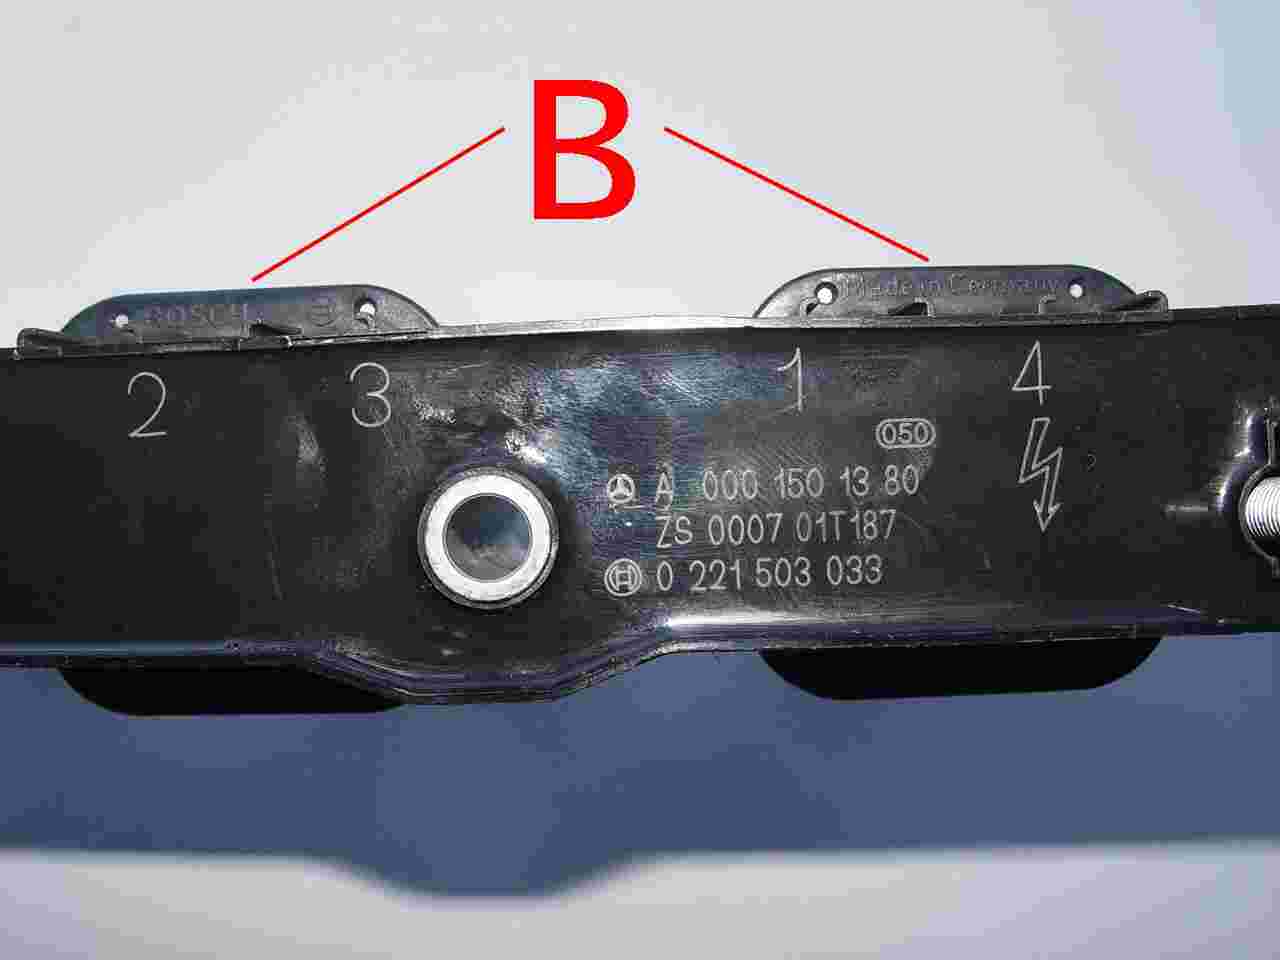 Should you require information in respect of the module fitted to your car it is available on the face of the module.
The shape of the twin coils B can easily be seen in this photo, If damaged the module will more likely fail if you are not using special tools take extreme care. Note Damage the module or cover. See below for special tool & availability.
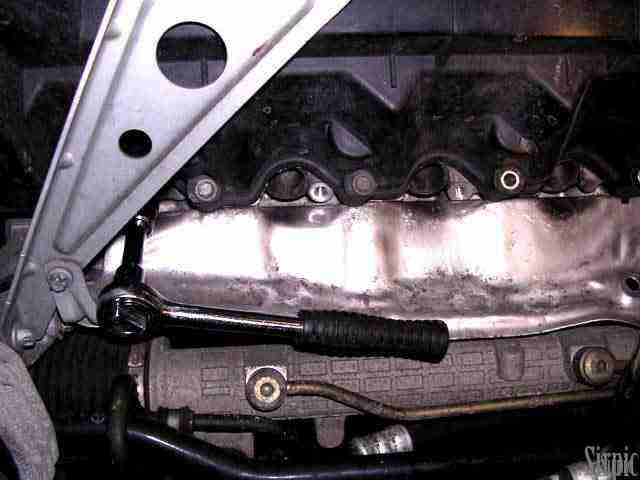
Using the 10mm socket and wrench the spark plugs came out quite easily, but you do need various lengths of extension bar to get the O/S plug out as can be seen the angle bracket partially gets in the way.
When replacing plugs always start them off by hand, this may mean placing the plug in the socket and using a short extension bar without the wrench, they must engage with the thread easily, never force or irreparable thread damage will be caused.
It is always advisable to use a purpose made spark plug socket as this has a rubber buffer in the neck to protect the porcelain of the plug which is easily broken unless the socket is kept square with the plug that's being removed or installed.
Although it may be difficult to gain access with the torque wrench, plugs should torque to 25Nm.
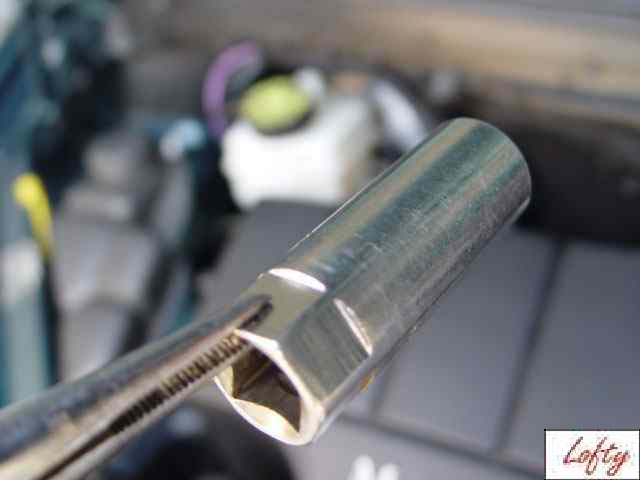 Having fitted and tightened your plugs you may find like Wayne, a fellow member of the BB.com owners club and myself, that when you go to withdraw the socket from around the plug which will have disappeared into the deep plug recess, that the bar comes out of the socket leaving it housed around the plug. An easy way of withdrawing the socket is to use pointed nose pliers, trying to temp or pull it out with the extension bar is a right pain and can take some while. If however you have a New Socket Set and bar the problem may not arise?
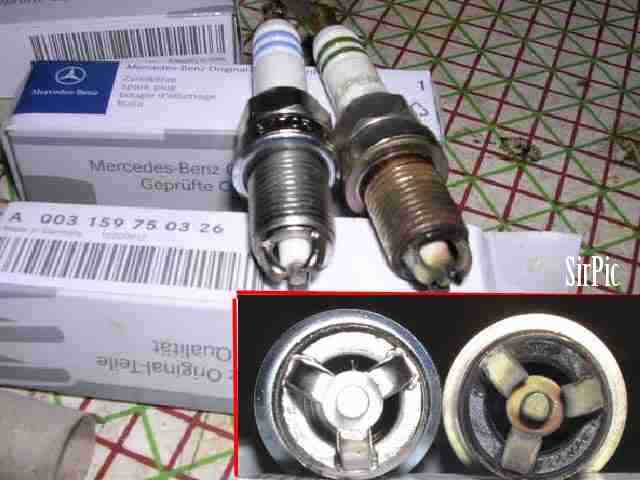
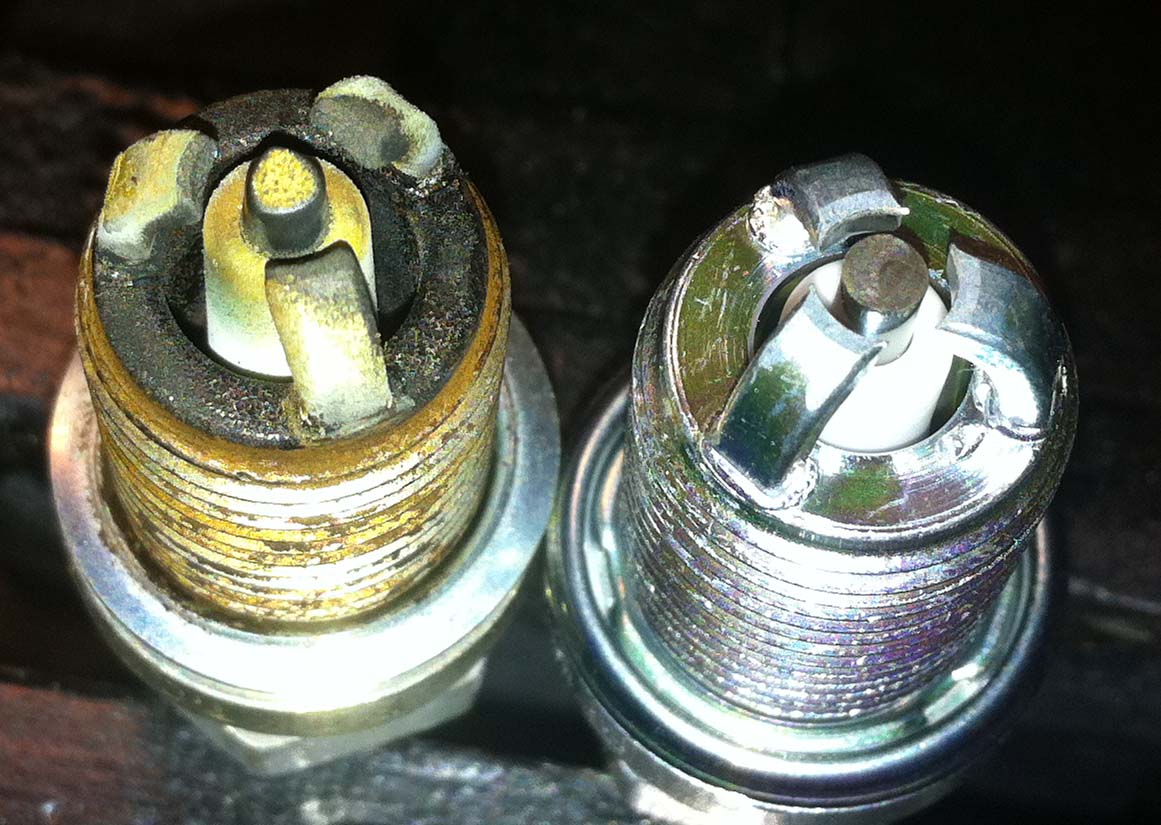
Two examples of worn plugs, remember that the gap on the plugs affects the timing /smooth running of the engine, plugs this worn with a gap twice the size of the pre-set plug gaps when new with without doubt affect the cars performance.
Handling of spark plugs I received this information from an interested party who wished to point out the hazard of trying to adjust triple electrode plugs as well as the damage caused to the plug if dropped.
So how is this possible?
The ceramic of the spark plug insulator is very strong, but not flexible. If you introduce a sideways load, while attempting to adjust the electrodes it can easily crack the ceramic insulator where it enters the metal spark plug shell.
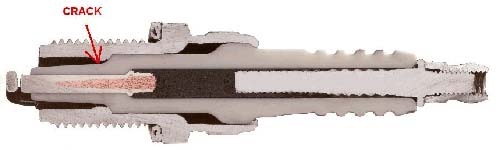 You will not see this crack.
However as the spark plug warms and cools, this crack can grow and eventually the full ceramic 'pyramid' will be loose around the metal centre electrode. As a result it cannot then transfer the heat of the combustion to the metal.
Another thing that can happen is that vibrations will cause it to crack open and the sharp ceramic fragments will be deposited into the cylinder fitted with the now defective plug, this will without doubt cause damage to the cylinder wall, piston, piston rings and valve seats.
Accidentally dropping a spark plug on a hard floor surface can also cause damage to the porcelain insulator and bend electrodes, so if this happens to you inspect the plug thoroughly before fitting /re-fitting. Where there is any doubt discard the plug. Better to re-fit one of the old removed than to fit a defective or suspect plug. Advice:- Always buy 3-electrode spark plugs pre-gapped. (These comments apply equally to other plugs)
M.Vos, Many thanks for the comments and input.
Fragments of porcelain in an engine cylinder of this car which is laying at a 45 degree angle doesn't bear thinking about, and its certainly isn't the simplest of engines to work on, let alone the unnecessary costs involved.
Spark Plugs Bosch F8KTCR 488 R1 Although MB indicate a mileage of 45000 a far greater distance than Solara car has covered, he has still changed the spark plugs; nothing lost. All to gain as plug gaps increase due to the sparking action of the ignition so fine adjustments to the timing must occur. New plugs can only be for the good and if replacing them yourself the cost is nothing when compared to a tank of fuel or servicing at a MB Service centre.
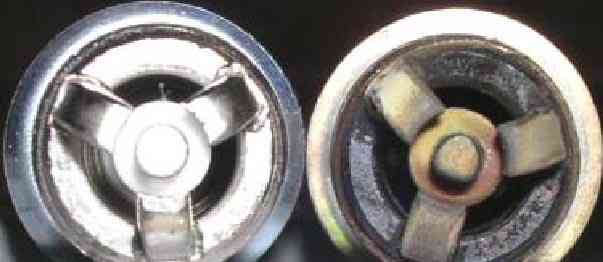 Looking at the two plugs, New and Used there appears to be little difference, however enlarge the electrode, the point at which the spark makes, and it can be clearly seen the the shoulders of the electrodes are eroding away, as is the copper core. It is therefore no longer round but taking on a triangular shape effectively widening the spark plug gap.
 However having just purchased a set of new Bosch plugs from MB and had the gaps sample tested on a shadowgraph I was surprised to be told that they varied considerably from 1.08mm down to 0.93mm. I have taken this matter up
with the Service Dept of Mercedes Chichester and BOSCH quality control, MB Chichester were not aware of the answer and referred me to CS.UK.Dealers@DaimlerChysler.com (Which is an e. mail customer help line) they could not or would not answer the questions asked of them. However as you can see from the information below we have now got an answer from Bosch UK.
Information from Bosch UK 15/2/05
Right contact with Bosch UK, Information from Mr Lee Duffy Technical Service Manager who has been most helpful is that the gap specification on the above plug is 1mm + - The plus & minus factors for production is not known even to him but it is agreed that it would be small. In the case of my 4 new plugs it was -.07 +.08 The gap is measured By Bosch on the inside edge of the electrode across to the copper core B
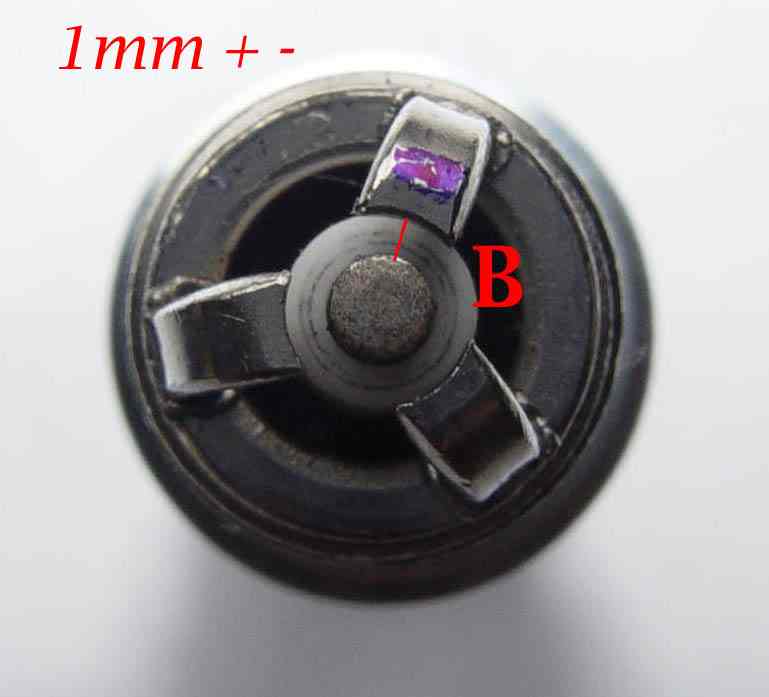 (centre pin) Unlike NGK who use the underside of the triple electrodes to the base of the copper core where it exits the porcelain.
1
So we have established that different manufacturers use different methods of measurement, which is the best method? Is anybodies guess.
(centre pin) Unlike NGK who use the underside of the triple electrodes to the base of the copper core where it exits the porcelain.
1
So we have established that different manufacturers use different methods of measurement, which is the best method? Is anybodies guess.It is however generally understood that a plug with triple electrodes will have a longer life than that of a single electrode. In earlier petrol cars for instance Champion N8 plugs being single electrode were changed at 12000 miles, the triples in question if changed by MB, are scheduled to be replaced at 45000.
The question of all three electrodes arcing at one time was raised, It is generally understood that all electrodes may or may not arc at any one time where there is a slight difference is gap size the arc will take the least line of resistance and therefore jump the smallest gap first. However in time this arcing action will erode the metal at the point of arcing which in will widen the gap. This erosion having enlarged that particular gap will allow one of the other electrodes to now come into play, whereupon the arcing will then commence on that one, or both of the remaining, or where all three gaps are now even, sparking my occur on all three electrodes. Where all of the electrodes are arcing due to the same gap being present the speed of erosion will be reduced on each so that plug will still last as long as the other three.
Beru. is the only other OE specified plug
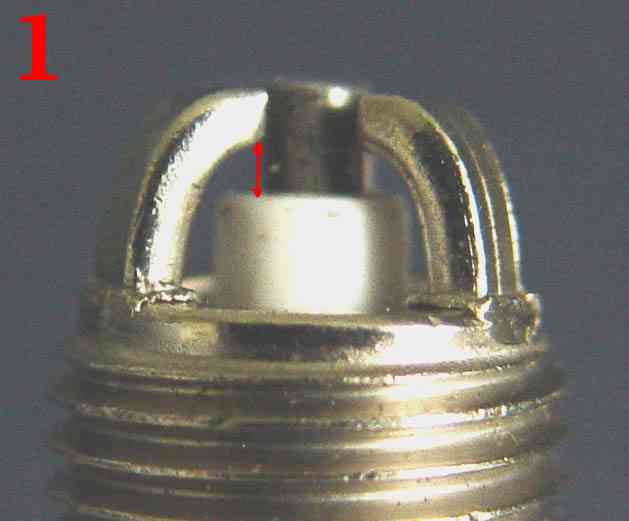
 .To substantiate the point I'm making Solara has kindly taken some pictures of the old plugs firing at a 6000RPM these he removed from his own car. They are shown actually firing on his Spark Vies Tool. For further details :-
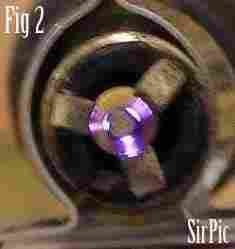
The two examples show the performance of the plugs, remember they have only serviced a mileage of 23000. However in Fig.1. We can see that two of the three electrodes are arcing/sparking thereby indicating that the third electrode is gaped wider than the other two, The more intense of the two arcing electrodes if measured would almost certainly be slightly smaller than the other the arc being a more intense arc. Where as in the fig 2 all three electrodes are arcing 4 plugs producing even sparks like this plug would be ideal, unfortunately it appears there in only one in four that meets that standard. As has now been indicated above the triple electrode plug does give a longer life, that it appears after tests is the only advantage over the single electrode plug.
 Bosch Germany are wrong about there being no tool for gapping these plugs One has been made in the United Kingdom and is a precision tool, it fits snugly over the centre copper core and clearly indicates if the gap is of 1mm + or - very useful having a Son who is a precision tool maker!
When the car fails to perform correctly this tool allows you to check that all your plugs are firing as they should be on as many point as possible and at least one, well. Something the EMS is unlikely to tell you. Saloro's is now going to conduct some tests on a New set of plugs, we will let you know if they perform any better than his old ones.

Result of test 4 brand New Bosch Plugs.
As Was thought because of the irregular gaps which could be seen with the naked eye, The sparking performance of the new Plugs was no better than the ones removed from Saloro's car after 23000 miles. Bosch UK/Observations/ comments are recorded above, Daimler Chrysler are unable to provide any information. In other words they do not know the spec for the Plug gaps fitted in their cars. Well we do now know 1mm + - what we still do not know is the + - factor which it is agreed should be small.

BOSCH SUPER PLUGS
Well I'm pleased to say Bosch have got their act together ! I have just purchased 4 Bosch super FR8KTC plugs for my car, the ones fitted have done just on 20,000, but with the cost of fuel new plugs won't go amiss, and at GSF car parts prices you can't go wrong Wait for it £11.28 for 4 plugs, just a little different to Mercedes Prices for the same plug at £7.00 + 2 years ago and have tested them with my gauge tool used for the same test on Bosch plugs above, and these are are perfectly set at 1mm on all three electrodes on all 4 plugs
.
Replacing Ignition Module
 When replacing the module If you have not already done so, remove the two screws used to withdraw the module.
When re-fitting the Module to the plug top's make sure all 4 plugs/porcelain necks enter the rubber sleeve's, before pushing the Ignition Module ( Coil Pack)fully home., by pushing evenly on the length of the module body.
To assist me in getting the module back with as little problem as possible, I placed a very light smear of grease on each of the four tips on each plug sleeve, this made getting the module back into the block easier. . C the flexible rubber sleeves. E The small lugs on the sleeves. D The protective cover on the module.
 This photo shows the cover correctly stowed on the module, having re-installed it by what ever means remember to ensure it is secure.
As per your advice, the 3/8 drive ratchet, 6 inch extension bar, plug socket, plus E10 and E12 Torx sockets were all that was required (£30 total in Halfords).
Similarly, as you indicated on your site, provided you use the 3/8 drive ratchet, there is no need to remove the o/s angled bracket to get at the plug on the far left. Attaching the extension bar will provide you with the necessary access.
I closely followed your advice about removing and inserting the plugs, and they came out very easily. I used the plug socket and extension bar to manually thread the new ones back in again, finishing off with a ¼ turn of the ratchet. Perfect.
All in all, a very smooth operation. I suspect previous reviewers who experienced problems removing the module may have forgotten your advice to screw in the two E12 extraction bolts evenly.
Incidentally, I recently purchased the Hayes A Class manual (£19.99). Very disappointing. There is no way that a novice like myself could ever renew spark plugs (or any other task) using the limited amount of detail in the Hayes manual. No mention of the module cover, extraction bolts, tools etc, and one tiny black and white photo. A waste of money.
With MB charging in excess of £100 for the job, even after purchasing the tools and plugs, I still saved over fifty pounds, not to mention the satisfaction which comes from doing the job yourself.
Once again, Albert, my heartfelt thanks for your excellent website, email support and module cover tool ( a very clever device!)
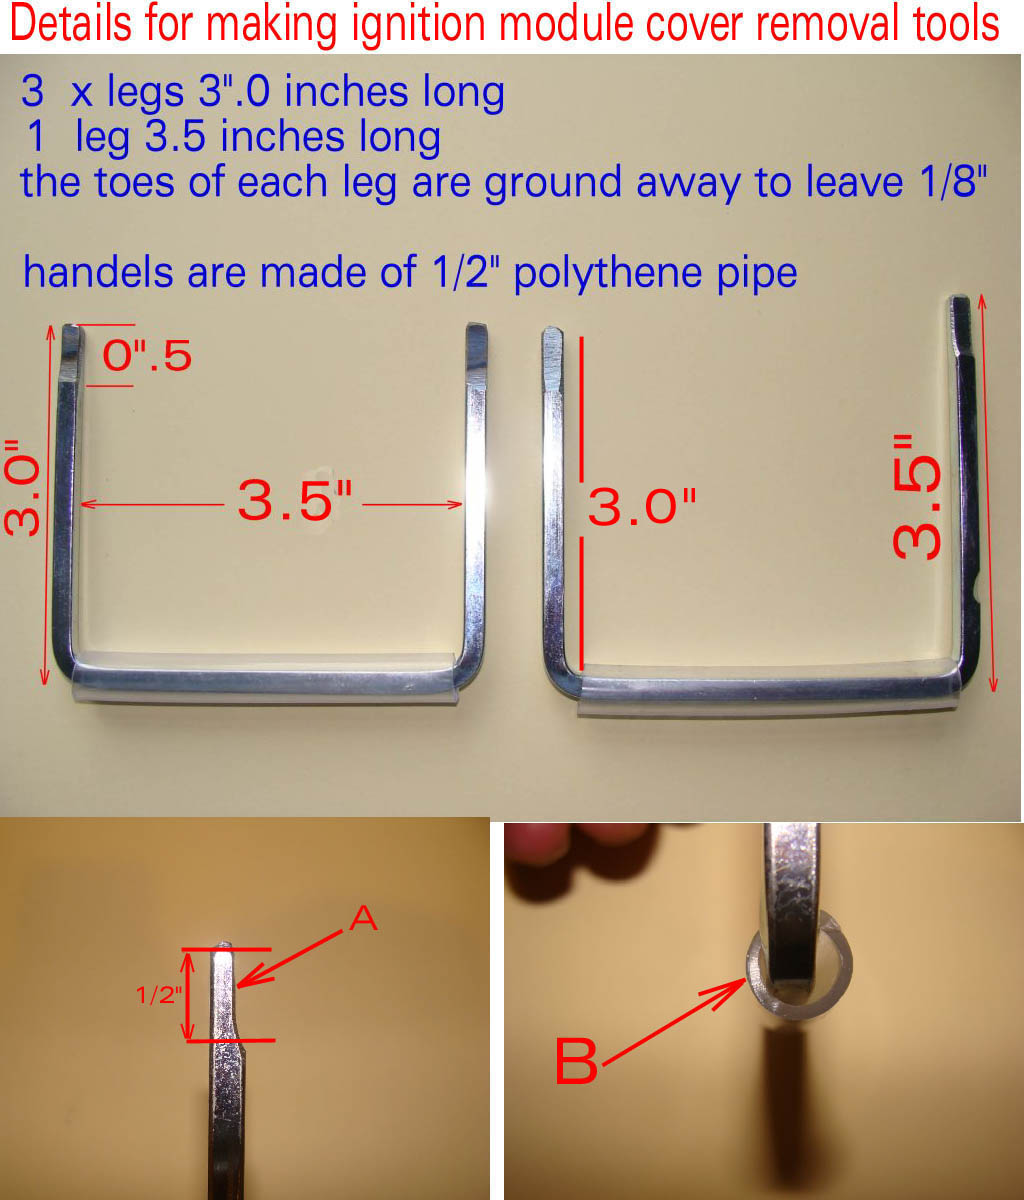
The above tools sold for many years have been discontinued . However if you wish to make your own, good hardware stores sell the 1/8" x 1/8" (5mm x 5mm) square steel which can be bent to shape, note there are three (3) legs the same length and one 1/2" (12.5mm) longer.
The polythene grip can be added if you wish but is a refinement rather than a necessity.
The width of the tools must comply with the details or the toes will not fit the lugs in the ignition module cover.
The legs should not exceed the details or they will foul the radiator grill when used.
When grinding the toes make sure the longer leg is on your right facing upwards and that the remaining toes are ground on the same side, this will ensure that your tools fit the cover. You will need a grind-stone or angle grinder to create the stepped toes
General Observation
It is fully appreciated that all fittings Bolts nuts etc on this car are metric, however I do not intend buying new tools, spanners etc, where imperial tool sizes are an exact fit, like my 1/2" ring spanner on the sump oil drain plug. It the case of star drive bolts, if star drive sockets are not on hand a well fitting 12 point ring spanner can be used, ensure these are a good fit to prevent rounding off the bolt head.
Next.
Back to Index,
Purchase DVD.
Please Make a Donation.