Working under & around your Car,

Yes accidents do happen, but no repair on your car is worth your life an yet that is what it could cost unless you follow very strict rules every time you work on a vehicle /car. In this case a life was tragically lost, in some accidents life and limb are threatened when things go wrong.
There will be times when creating a safe working environment takes longer than the job itself so be it, at least at the end of the day it is YOU who gets to do the road test.
Always Work safely.
 Before starting work , consider the clothing you are wearing, ties and loose clothing can get caught in moving parts causing sever injury or even death, a boiler suit/overalls would be the best bet.
Jewellery such as watches, rings and neck chains are best removed, where a ring cannot be removed cover it with adhesive tape or wear a glove this will prevent it getting caught while working, failure to do so can result in injuries and in some cases amputaion of a finger or as would be in this case a thumb.
Portable Ramp Construction. Blocks, Wedges & Jacking
Before you even start work on your car bear in mind this comment from Jon:-
The only points I would share are these:-
if you're an eczema sufferer like me Wear latex gloves. Mine is pretty mild and been controlled for years, but I didn't think of gloves the first time and went ahead and got my hands dirty.
The result was my skin raging for literally days, after coming into contact with the oily dirty bits around the engine despite really washing thoroughly.
I refitted the ECU/MAFS today wearing gloves and all is well.
So if you do suffer from allergies or are aware you have a sensitive skin wear protective gloves, working on the 'A' Class with difficult access to some parts can be irritating but not as irritating as inflammation of the skin due to contamination by oil, petrol, diesel and solvents.
One of the main problems facing car owners who are interested enough to want to look under their cars these days is how to get the car off the ground without the car doing a balancing act on the vehicle jack or at best a trolley jack or two.
Spoilers/valences have got lower & sound jacking points under modern cars seem to be at a premium and yet stability when working anywhere near the underside of a car is absolutely vital.
Few of us have access to a place where there is a vehicle pit or hydraulic lift and so have to resort to other means. As we know vehicle ramps can be purchased from car accessory shops but they are so steep that they either foul or barely clear the front and rear valance or spoiler, and cause unnecessary wear on the clutch. Also with automatic cars if it becomes very difficult to slowly manoeuvre the car up such a steep slopes,
the last thing you want is to jump the stops along with all the damage that would cause.

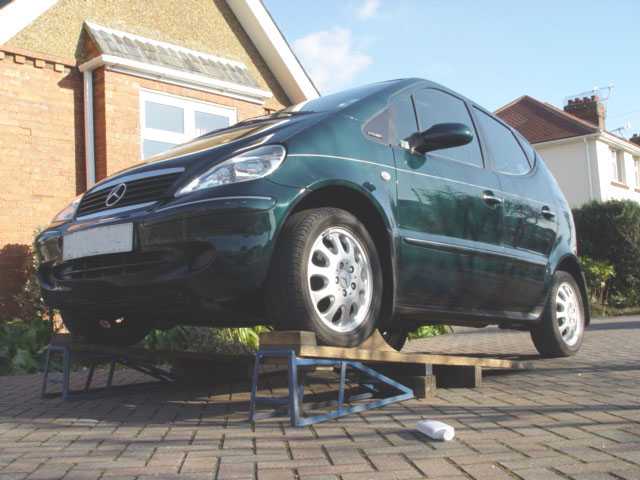
Bearing these points in mind I have adapted my old ramps to allow me not only to drive easily onto the them but also to work under or inspect my 'A' Class in the full confidence of knowing that while I'm doing so I am completely safe. As a Retired Fire Officer I am well aware that many car owners have lost their lives or been seriously injured while working under their cars, just because they didn't take the precaution of ensuring the car was safe from becoming unstable, due to either a faulty jack or because they were working without the vehicle being made safe. Namely using axle stands or blocks which are essential if using a jack as a sole means of lifting/support. Faulty or hydraulic jacks that have not had the valve control fully closed can allow the hydraulic fluid to leak back into the jack reservoir, and thus allow the car to slowly lower/drop without the user being immediately aware, the vehicle slowly dropping until it is too late for the unfortunate owner or mechanic to either scramble to safety or raise the alarm.
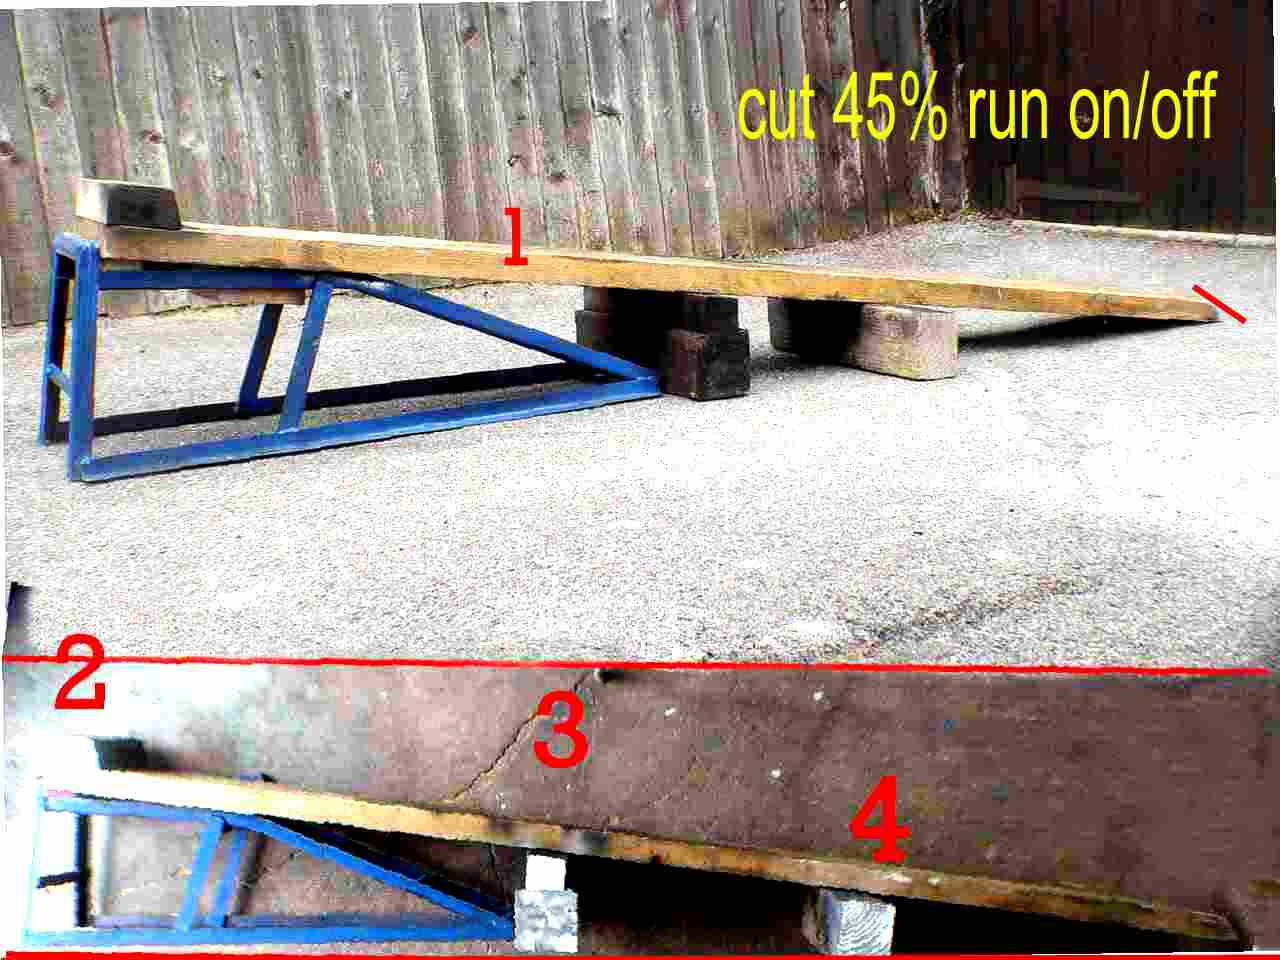
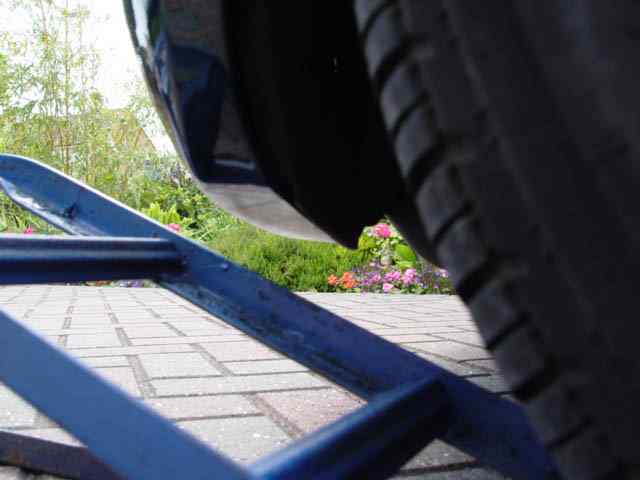
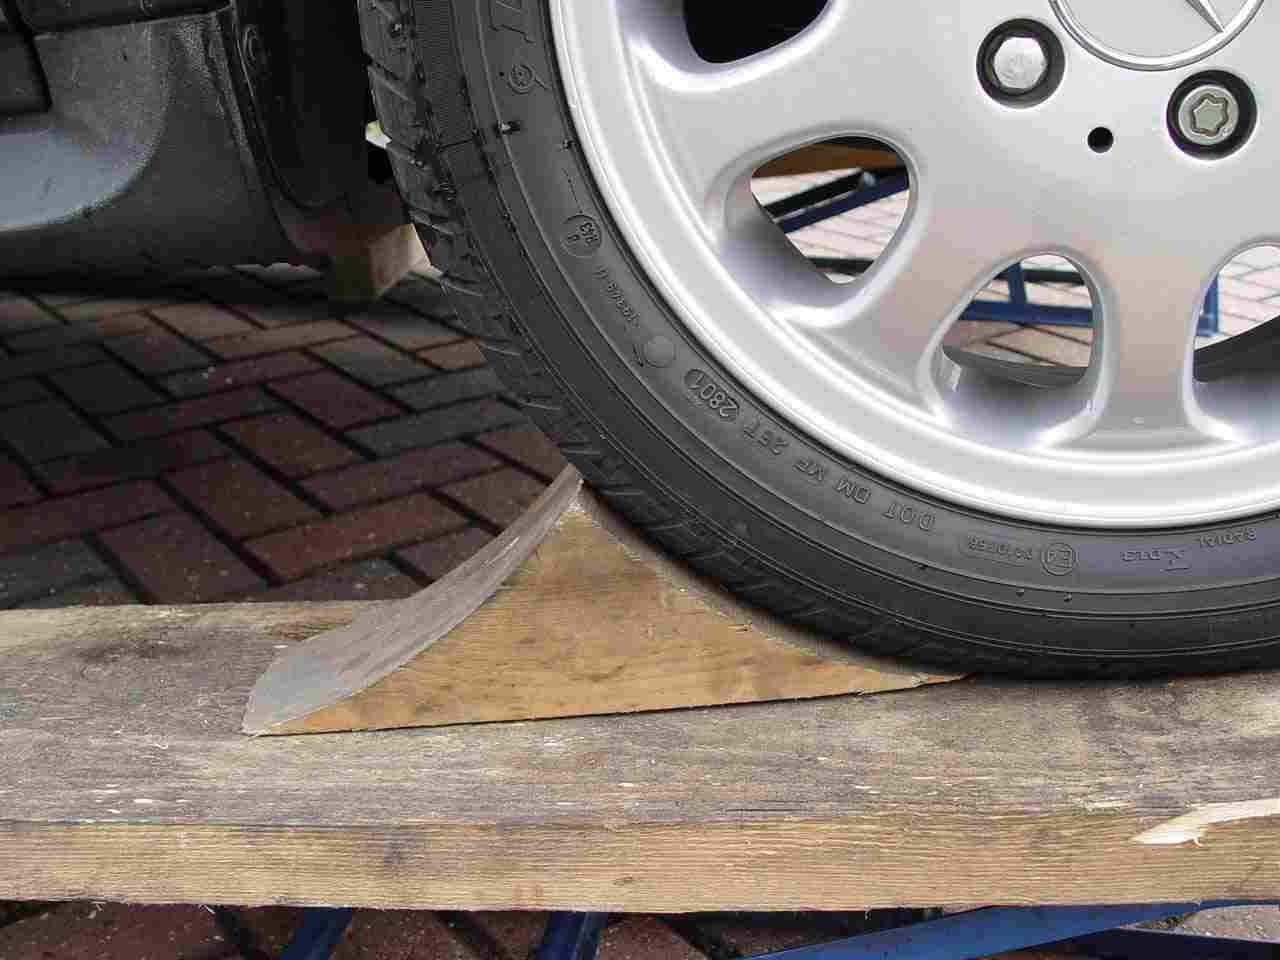
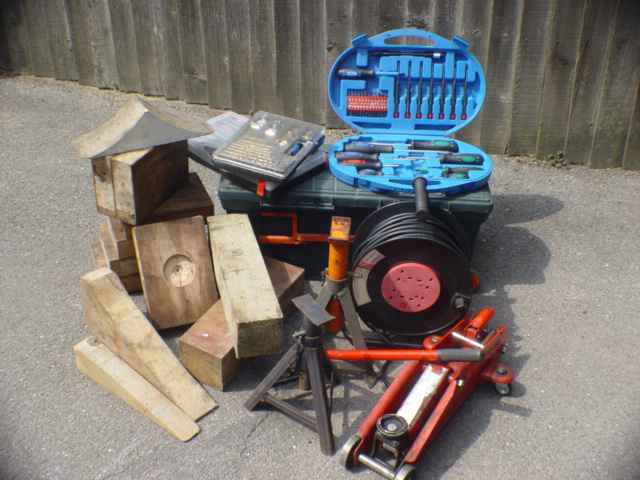
To over come these problems I have therefore adapted the way I use my old ramps In that I use 2 pieces of good quality board 6'6" in length, 8.5" in width and 1.75" thick. The end of each board being cut at an angle of 45% to allow the vehicle wheels to access the boards without shunting the boards forward. The boards have wooden fittings screwed onto them which form the stops, take up slack at the head of the boards on the platform section of the ramp and locate in one of the square holes of the platform, thereby preventing the board moving whilst in use. In addition, four blocks have been made to fit the angle of the ramp and are positioned beneath the ramp before use, although one is sufficient I have used two, bear in mind the weight of your diesel engines. 2 shows the stop, which could easily be made higher if you wished. 3 and 4 shows the support blocks

To prevent the board moving in any direction a square block is fitted to the underside off the board, which is located into one of the recesses of the ramp platform. In addition there is a small packing piece that takes up the space created by the angle of the ramp on the underside of the board. the end furthest for the ramp is cut at a 45% angle to make mounting the boards easier, without this facility there is a tendency for the tyres to shunt the boards forward, making the ramp impractical and unsafe to use. It has been suggested that tails made of something like conveyor belt rubber be fixed to the underside of the boards making it impossible for the car to move the planks! A sound idea if you find movement a problem.
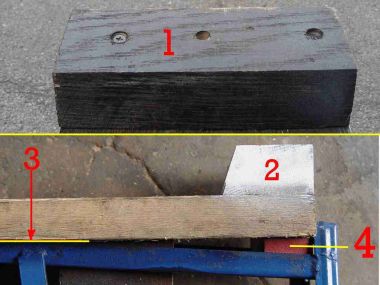 The stop 1 and 2 at the head of each board is firmly affixed and is intended to indicate to the driver when he has reached the head of the board, or maximum working height. 3 Note that the board comes into contact with the back of the platform thereby obtaining max support from the ramps. 4 the packing ensuring that the space at the head of the board is filled. This ensure the heel of the board does not lift as the car height is applied.
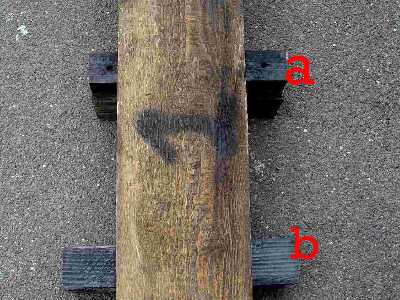
The support blocks and b again cut to suit the angle of your ramp are strategically placed to afford max support to the board, and are portable.
 Providing hard standing and sufficient space is available there is no problem aligning the ramps with the car from the front or rear, driving up the boards which is a very steady angle could not be easier, just keep the steering wheel straight and it is possible to open the drivers door to see how you are doing. If you have an assistant then reaching the stops is no problem, if you are on your own you may have to ease the car forward or backwards to reach the stops, which then gives you maximum working height. Seeing as the slope is so shallow it is no problem to stop and pull away on the boards with out the need to run off and start again.
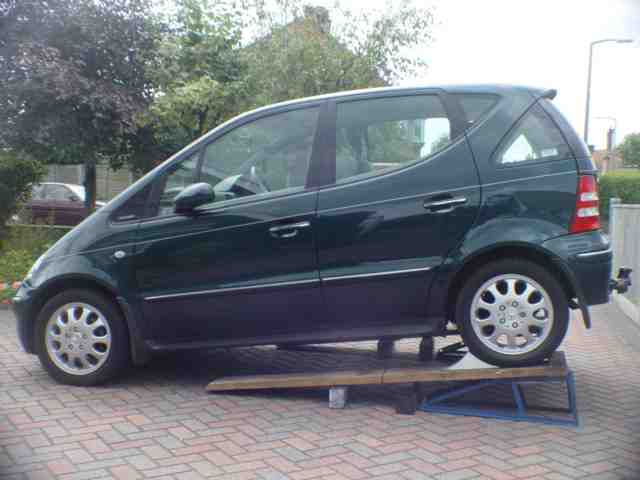
Placing the set up on hard standing is essential, chocking of the wheels is also vital, both front and rear why take chances? If letting off the hand brake for any reason or jacking up wheels, take further precautions by putting the car in the appropriate gear, contra to the angle of the car and removing the ignition keys. 'Be Sure, Be Safe'
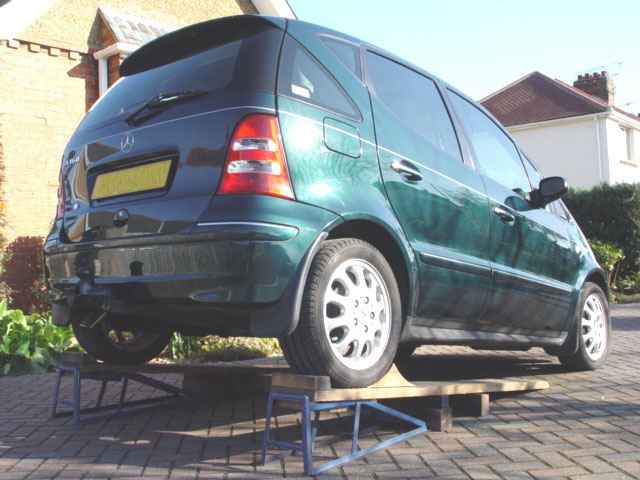
Although the working height doesn't look that great I can assure you that jobs like drop links could be done with ease, if you looked at the previous page, exhaust system, all the photographs were taken while using this ramp, so you can see that quite a lot could be done using this system of raising the car.
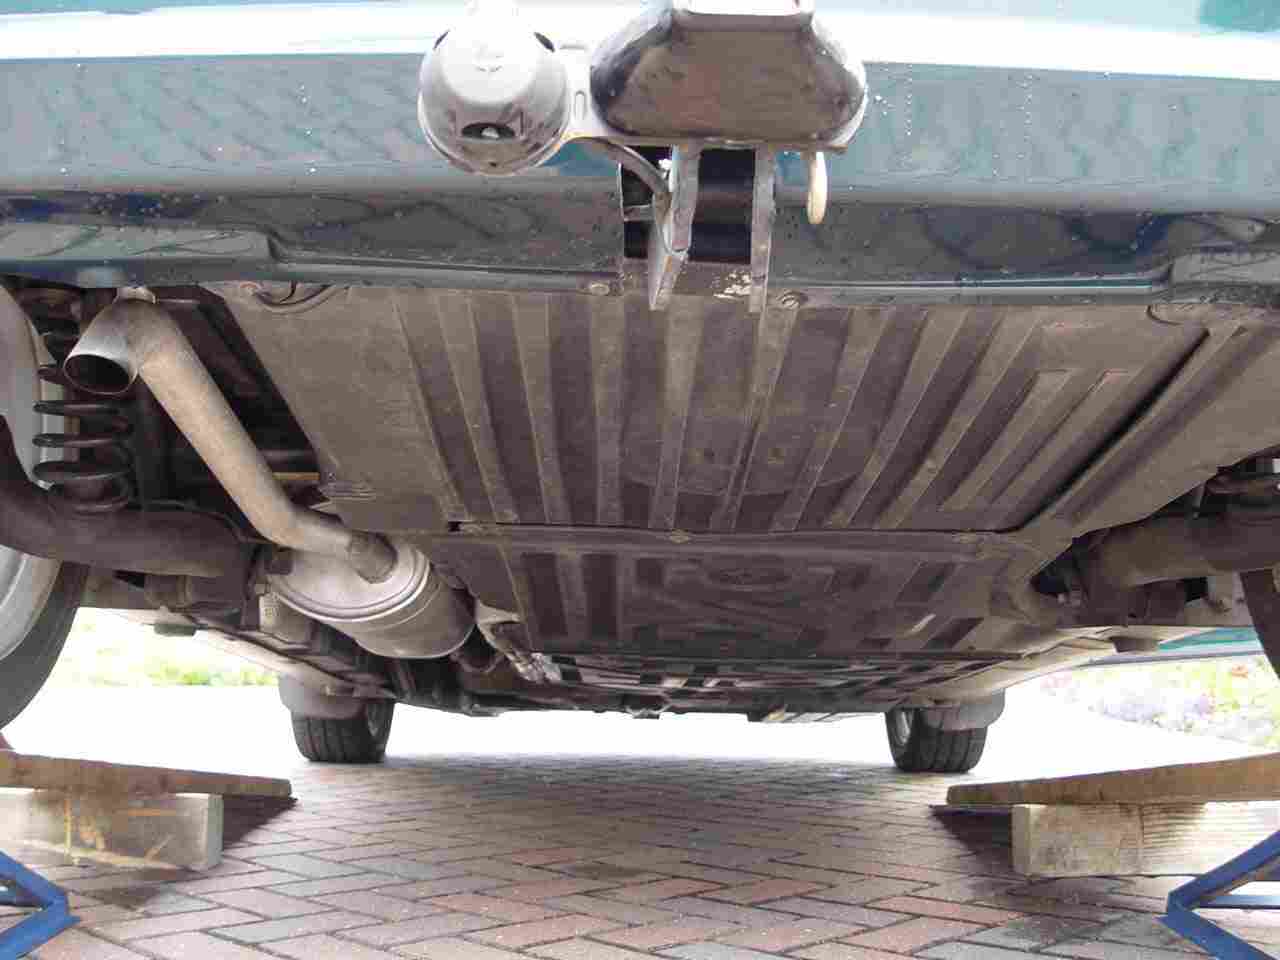 The whole rear section can be worked on and springs and exhaust hangers are ready to hand, if working on springs remember to support the bodywork!
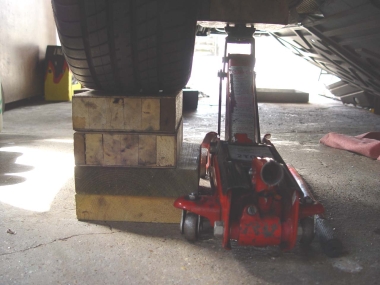
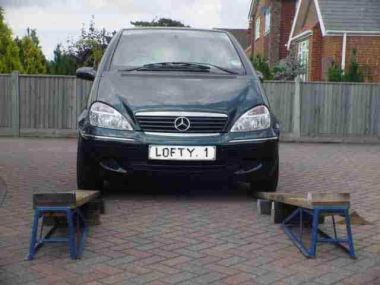
If you wish to raise the whole car for such jobs as replacing the fuel filter, then the rear of the car can be raised using hydraulic jacks , and the car secured by placing wooden blocks under the rear wheels to gain the height required , the car is raised slowly with the block being placed alternately where two reliable jacks are available raise one block at a time ensuring the car is secure at all times in this case both front wheels are firmly chocked.
DANGER
House bricks and some builder blocks are not suitable for this purpose. remember your life is at extreme risk if you use any form of vehicle jack without blocking as well . do not take the risk.
 Before even considering starting work on your car with all that entails ensure you have all the equipment to ensure your safety and that of others. What ever the reason for jacking up the car, firm and if possible level ground is essential, block wedges & axle stands may be required depending on the tasks in hand.
 Never venture under a raised vehicle on jacks alone always use reliable axle stands and ensure that unaffected wheels are firmly chocked.
If using the axle stand make sure they are placed where they are of maximum use, and that the adjustment pins are firmly in place, only use the pins provided with the stands . Remember a large part of the car's weight may be taken on these stands. There is a cross member at the front of the car under which they could be placed, the rear is more difficult but the car must be securely supported or an accident will happen! Trolley jacks are useful tool but they need to be maintained or the valves will allow the load to slowly fall/drop, not such a problem if you correctly blocked!
Note If considering purchasing a trolley jack then firstly ensure that it has a round load point ,(the bit that lifts the load ) that will then fit snugly under your car on a jacking point and will be less likely to slip.

The Jack & Handle, Wedge & Warning Tri-angle are all stowed neatly in the lower section of the boot but unless re-stowed correctly can be responsible for a lot of the rear noise that many of us hear! A piece of cloth under the items works wonders. and if you need it you have got something to wipe your hands on if they get dirty.
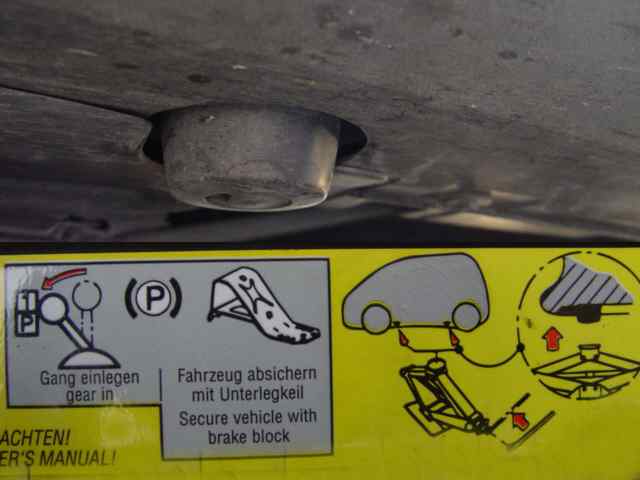
Note the correct use of the wedge/block, placed behind one of the none affected wheels, most important if your car is to be prevented from moving causing the jack to collapse and damage your car and you in the bargain! Why MB did not provide two I do not know, I carry a second in the form of a wooden wedge. Better be safe than sorry
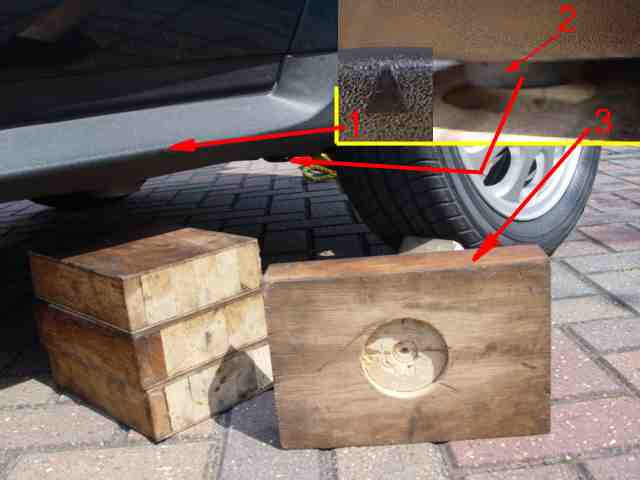
If placing blocks under the Jacking points of your car then have a four blocks prepared so as to allow the male plug of the jacking point to recess into the block, that way the car will be more secure and the block is far less likely to move or slide out of position. My blocks are of laminated timber, stronger than straight forward wooden blocks, find a workshop working in timber and they are sure to have useful 'off cuts' from which you can construct your blocks, You may be lucky and like me even get them cut to size, for a couple of quid?
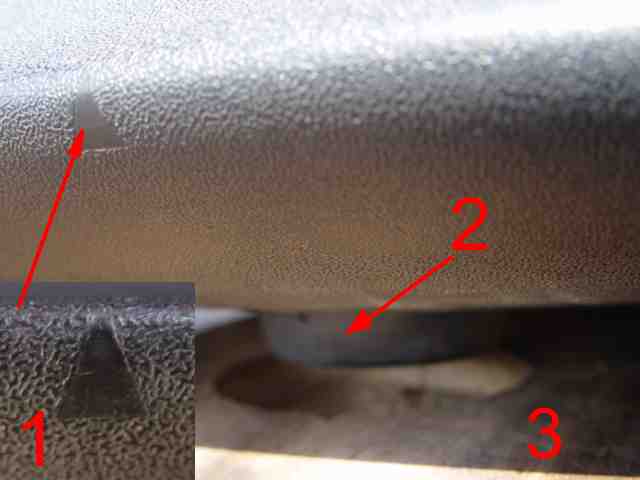
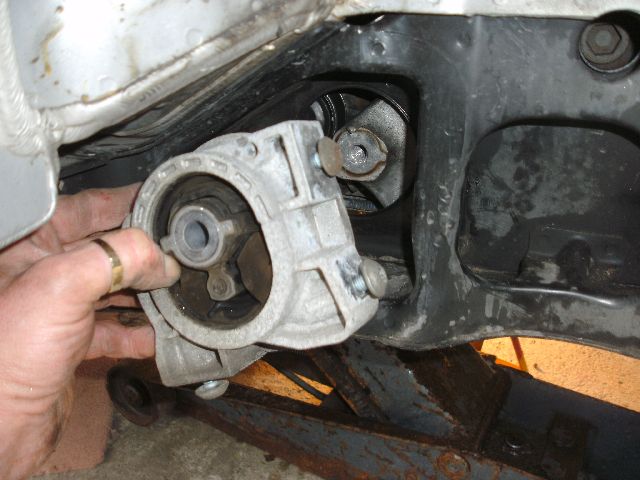
Jacking points are Indicated on the bottom rail although its almost as easy to feel for the male plug. Note the special block recessed to take the plug.
It is essential that the jacking points on this car be observed or severe damage will be caused to the plastic panels situated beneath the vehicle.
it is even worth mentioning this to Body Shop and Tyre Fitting centres or damage may be caused without your being aware of it. The yellow Diagram is photographed from the information on the Jack itself, its worth a look before using the Jack.
When raising the jack and having chocked the unaffected wheels ensure the female cup 1 on the jack head fits correctly on the male location point under the car. there are two either side of the car. The jack can be hand wound to ensure gradual movement and assurance that the jack is in the correct position. It can also be lowered in the same manner. When you have the grease tin out or your looking for somewhere to wipe that bit you do not want ! put it on the worm drive of the jack, even that needs servicing from time to time, and it is unlikely that MB will check that?
Where to I place my axle stands while working on the car?
Hi! First I just have to congratulate you to a awesome page covering the A-Class! I'm really impressed. I'm a bit of a petrol head myself but mostly doing BMW's However I'm about to do a minor job on a A140, so I found your page. But there is one thing I (and I assume some A-Class owners as well) haven't been able to find any info about - where do you place your jack-stands? I'm not really used to have a jack-points poking out thread plastic sheets - but I must say it was really easy and nice to use those. But the question is - where do I place the jack-stands? I could not really find an answer on that question. I'm about to do a smaller front brake job and would like to remove one front wheel at a time (I will never crawl under the car supported only by a hydraulic floor jack). Have you seen any info in the A-Class community regarding where to place jack-stands?
Hi! First I just have to congratulate you to a awesome page covering the A-Class! I'm really impressed. I'm a bit of a petrol head myself but mostly doing BMW's However I'm about to do a minor job on a A140, so I found your page. But there is one thing I (and I assume some A-Class owners as well) haven't been able to find any info about - where do you place your jack-stands? I'm not really used to have a jack-points poking out thread plastic sheets - but I must say it was really easy and nice to use those. But the question is - where do I place the jack-stands? I could not really find an answer on that question. I'm about to do a smaller front brake job and would like to remove one front wheel at a time (I will never crawl under the car supported only by a hydraulic floor jack). Have you seen any info in the A-Class community regarding where to place jack-stands?
Unless you have had the plastic under floor pans lowered on your car you will be sceptical about the jacking points which as far as Mercedes-Benz is concerned are there for supporting the vehicle while you remove and then re-fit a spare wheel. They do not envisage you needing to jack the car for any other reason, as they will be doing all the work and maintenance on the car !
Wrong! Many owners simply cannot afford garage prices and more to the point, Mercedes-Benz workshop prices to service their beloved car. and in some case owners like myself prefer to do their own maintenance albeit is not possible to do some of the larger jobs due to the engine having to be dropped.
So where do we place jacks and axle stands.
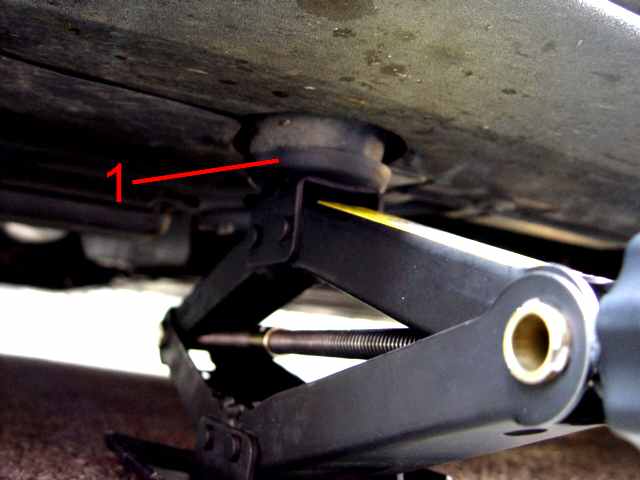
Well the 4 jacking points are secure being mounted onto the under floor of the vehicle
In addition you can jack with care under the wishbones (front Suspension) or on the cross member set to the rear of the front spoiler, which is part of the engine sub frame in addition you have the rear sub-frame, all sound jacking points with care.
However when placing jacks or axle stands make sure you do not damage flexible as well as metal brake hoses and pipes etc.
Do not jack or support the car on any part of the car's bodywork or structure unless you have first ascertained the structure of the cars underside, where possible use blocks which spread the load rather than using a single point of support such as the head of an axle stand.
Never rely on jacks alone, for further details
Note the two positions of the brace, It is good practice where possible to have a tray or box to put nuts bolts and components in thereby keeping them dirt free. .
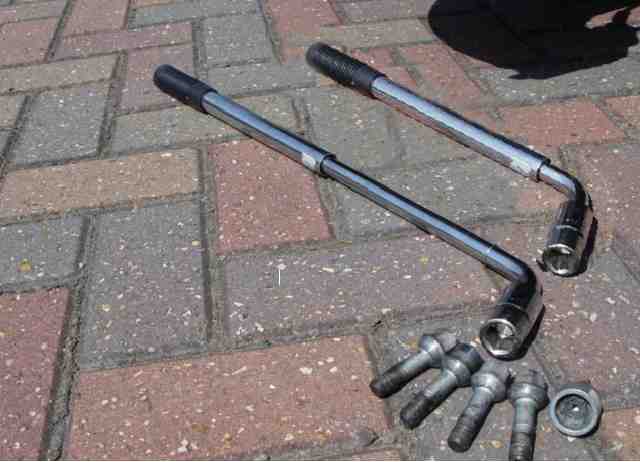
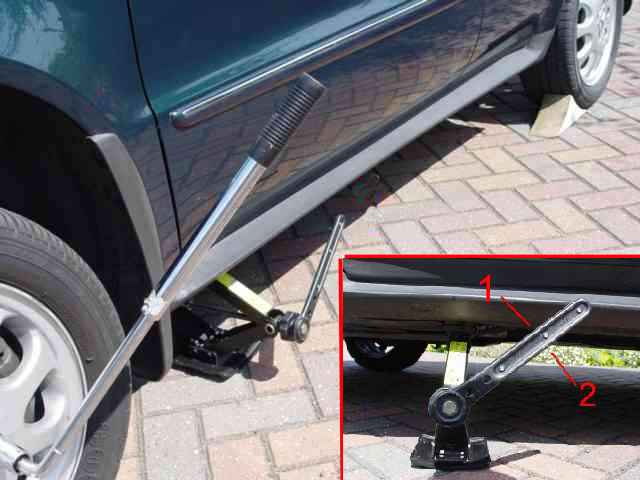 Having correctly sited the jack but before taking any real weight off the wheels it will be necessary to slacken the wheel bolts, including the locked bolt. This is easiest done with an extending wheel brace which these days can be purchased quite cheaply. Having slackened the bolts we now have to jack up the car and will need the jack handle. When using the jack handle, place it on the jack fitting it over the hexagonal nut, movement clockwise raises the jack, anti clockwise lowers the jack. To achieve the direction you require, reverse the handle on the nut as the ratchet on the handle only works one way. Top Tip to save your knuckles having placed the got the jack handle in position place the pad of your thumb on your now spare hand onto the end of the hexagonal drive ,this will stop it keep slipping off, Ouch! 1 The wedge in this photo would be of more effective if it was placed the other side of the car, unless of course you have two!
 When we come to replacing the bolts following a service/inspection, a small amount of grease applied the last few treads of each bolt will ensure the they run up easily, place them in the socket and start them off Rotating the socket by hand to engage the first bolt you may have to rotate the wheel to align to holes with the hub. This way you are not so likely to cross thread them (Damage the thread). Having got them all started use the brace with the extending bar closed (shortest mode) this way you are less likely to over tighten them, as soon as possible check them with a torque wrench. (110Nm)
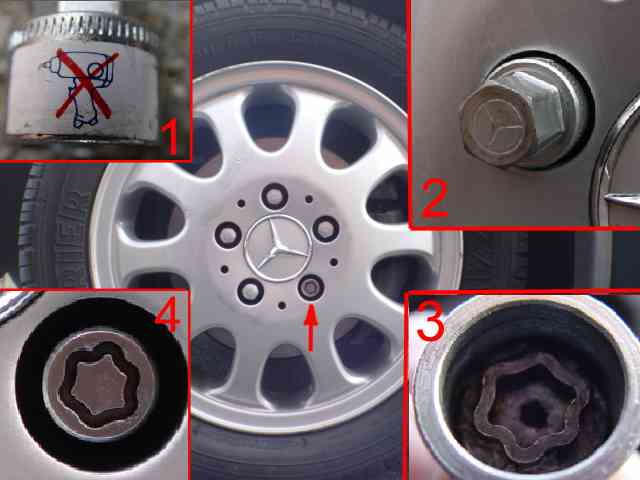
1 key
2 Standard Hexagonal Head
3 Inside of key Showing Male Keyway.
4 Female keyway in Wheel bolt.
I have it on good authority that in tests MB's locking wheel bolts came out well in tests, so your wheels are safe. But remember you cannot get them off without the key,
keep it very safe.
Good wheels cost Good money, it is of course essential that you carry the lock-key in the car, although not necessarily any ware obvious, remember to make it available on any occasion where there my be a need to remove a wheel. Again its worth making the Garage or Tyre Fitting Company aware that you would appreciate them observing the No Power/Pneumatic Tools rule when using your key or severe damage could be caused. I understand from MB that they have keys to fit wheel bolts provided by them, however if the need arose for them to assist you it is likely to cost you a fortune. If in the circumstances they would consider your request at all.
Replacement locking wheel bolt keys are available from MB, however you will need to provide a wheel bolt or existing key to determine the code. MB Part No MB 6 40 82XX the last two digits denote the code for your specific wheel nuts.
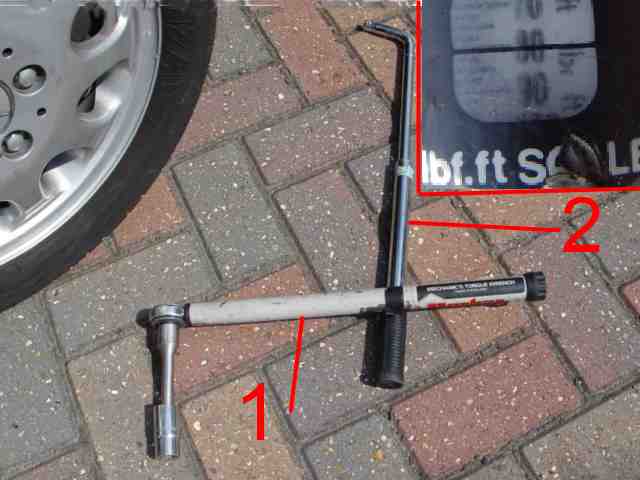
Finish off the tensioning of the wheel bolts with the torque wrench , tighten to 110 Nm, or 80ft.lbs. When tightening all bolts do not apply shock, tighten by applying gradual pressure. to alternate bolts until all five reach to correct tightness. Pneumatic/Air powered tools, should not be used on the key of the locking wheel bolt kit.
Special Notice If you are temped to follow some of my methods then please only do so if you feel fully competent, remember cars a lethal weapons in the wrong hands and also if poorly maintained. Do not short cut on materials, or spares you will save pounds doing little jobs and checking things like exhaust hangers, checking brakes and carrying out inspections prior to MOT's but the initial investment will only be recouped as long as you are not Accident Prone? If that is the case then leave well alone. Better be safe than sorry.