I have been making Home made Wine since 1996, not long after I retired when I had time on my hands and wanted something different to do. My physical health was such that I wasn't able to do some of the things I had previously got involved in like gardening & boating off the beach, the English Channel only being a mile and a half from where I live, so Home Wine Making it was.
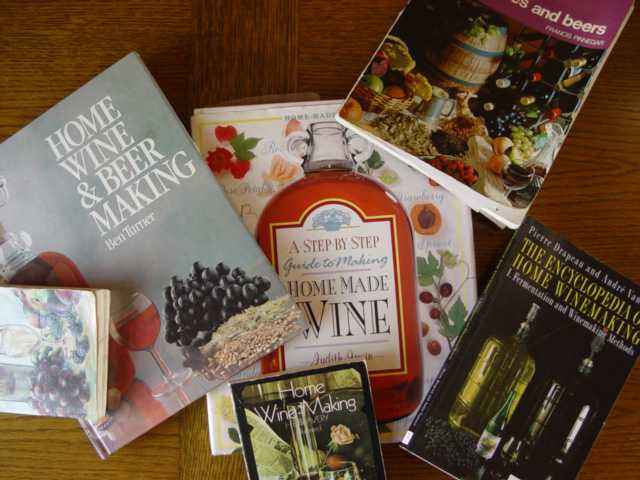 Things got off to a slow start, with some reading of the many books that are available on the subject, all of which have different ideas of how good home made wine should be made, stored , and drunk for that matter, which never seemed to be a problem six bottles seemed to last no time at all, this hobby called for more time more demijohns and bottles!
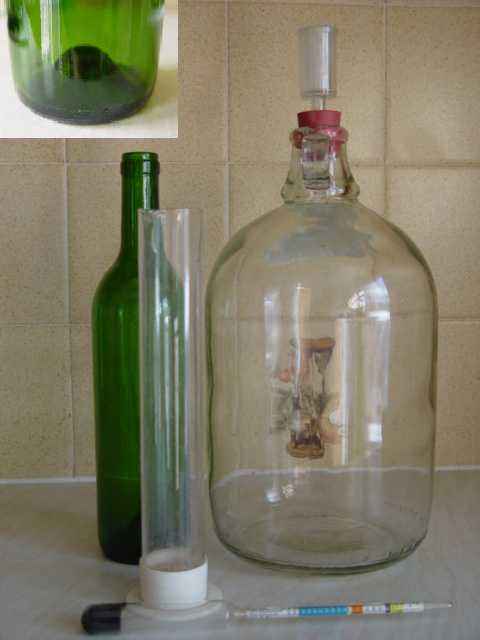 There were numerous pieces of equipment to purchase along with the various chemicals and materials needed to get started, some are necessary others just make the job easier. Having obtained them, some of which were even inherited from an Uncle who was himself a keen wine maker, they would last for years. Demijohns, the glass storage vessels in which the wine can be fermented and stored, I found were best purchased from charity shops, all at around 50p each, a bargain when you can find them. Green Bottles of the same type, long neck for ease of storing/racking, tall with what I call a hip in the bottom, quite difficult to get and quite expensive to purchase, Green because they protect the red wine and rose from loosing its colour.
I soon realised that on most Bank Holidays especially Christmas there are hundreds of unwanted bottles lying waiting to be collected that won't fit into the full bottle banks, more often than not still in their six pack carriers. Its ironic that one Demijohn will fill six 75cl Bottles, you get the pick off the batch, and can select the ones that are clean and meet your requirements.
Removing labels from re-cycled bottles is best done by soaking them over night in a container of water with a small amount of washing up liquid. The use of a paint scrapper is then quite often needed to remove labels that have been applied by the bottling companies and growers using a latex based adhesive. Special bottle brushes and sterilising products are available to ensure that they are thoroughly clean before being re-used.
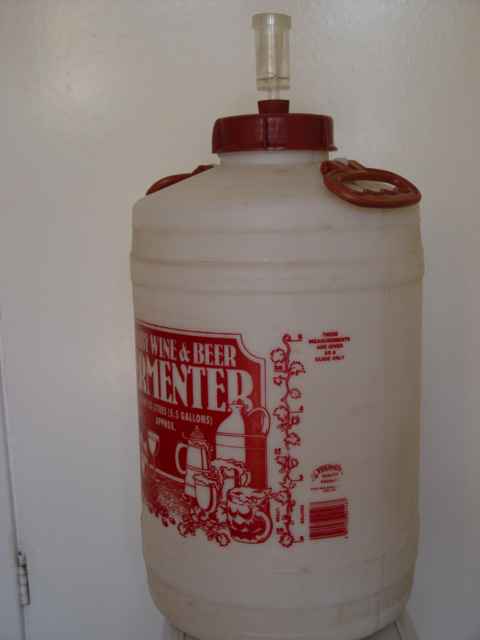
As time goes on you may wish to make more than one demijohn at a time, then you can use the larger container which easily hold 6 gallons, this like the demijohn can be fitted with an air lock or used as an open vessel.
Which ever type of vessel you decide to use make sure that it is marked indicating the litre content on the barrel and remember that most demijohns hold in excess of 4.75 litre in both cases you need a marker to indicate when the prescribed amount of fluid has been added. For a practical purposes 1 litre = 1 3/4 pints
Air locks similar to those fitted to the demijohn and larger container must be used, these with a small amount of water they contain will prevent the air and unwanted gremlins getting at your fermenting wine,
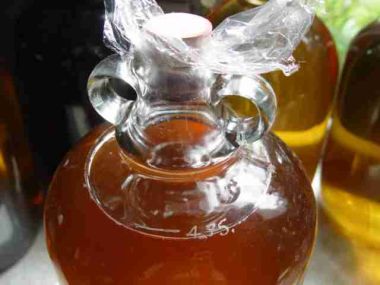 although they allow the gas being made by the fermenting mixture to get out.
Fruit flies will find fermenting fruit & wine miles away, if allowed to access your demijohn or fermentation vessel they will contaminate the mixture, rendering it useless. The air-lock also prevents wild airborne yeasts from entering, these given a chance will also turn your cherished wine to vinegar, making it undrinkable. One word of warning this size of container when full of wine is very heavy, ensure you place the container where you want it before completely filling it with the wine producing mixture, unless you are strong enough to move the full container afterwards, remember we are looking for an even temperature throughout the whole of the fermentation period.
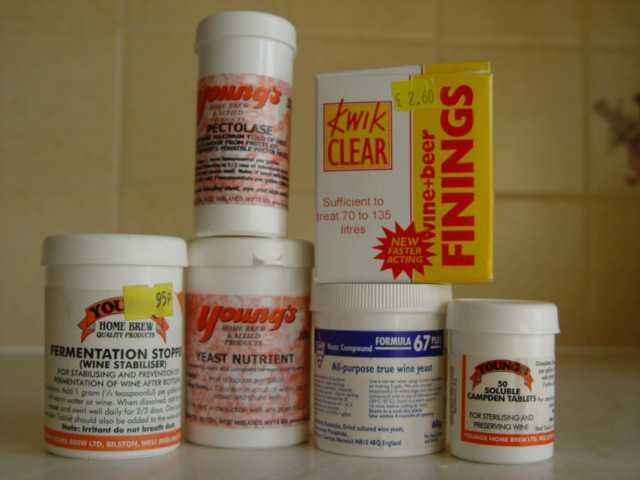 Various products are needed to get started and have of course to be purchased, I'm lucky because we have a very good wine & beer making shop in the Town of Worthing so am able to purchase what I need as well as get helpful tips from the friendly staff. If you would like to use their services or just see what they have to offer just go to :-
http://brewathome.co.uk
Various products are needed to get started and have of course to be purchased, I'm lucky because we have a very good wine & beer making shop in the Town of Worthing so am able to purchase what I need as well as get helpful tips from the friendly staff. If you would like to use their services or just see what they have to offer just go to :-
http://brewathome.co.ukThere you will find everything you are likely to need right down to the polythene tubing needed to siphon your finished wine from the Demijohn to the bottle!
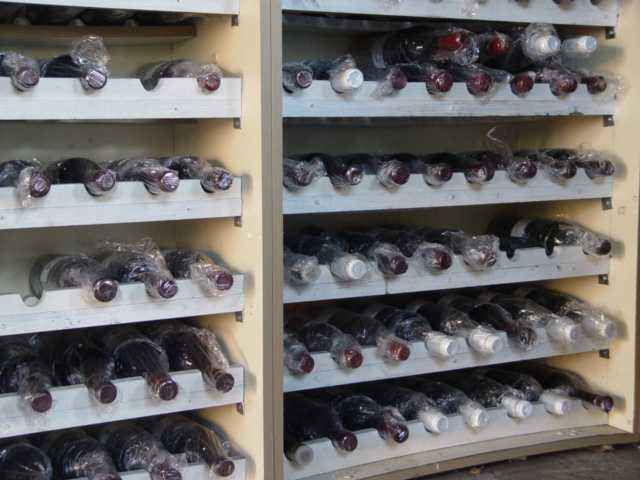
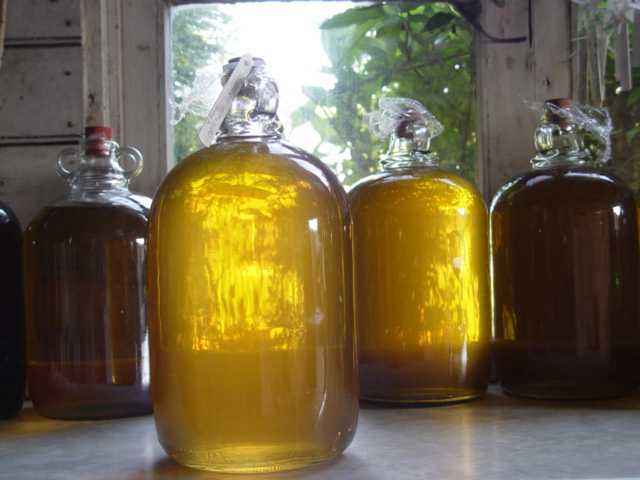 Since 1996 I have made hundreds of bottles of wine, and to date have only lost a half dozen where the corks blew out, I will cover that point along with many others later on. I now store the wine in the demijohns for as long as possible rather than putting it into bottles, this gives the wine time to completely clear and any chance of it re-starting to ferment are greatly reduced. Of course you need to get organised if you are going to lay wine aside for two or more years, when it can be drunk having had time to mature. You also have to consider storage space and the weight of the full demijohns before stowing too many full ones on the same shelf, or all will finish up on the floor wasted.
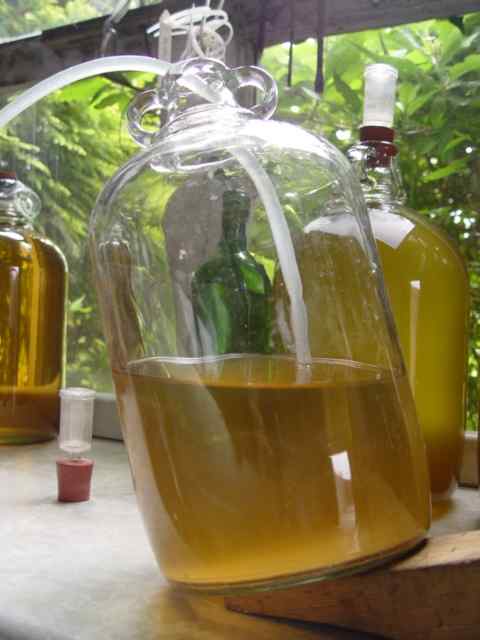
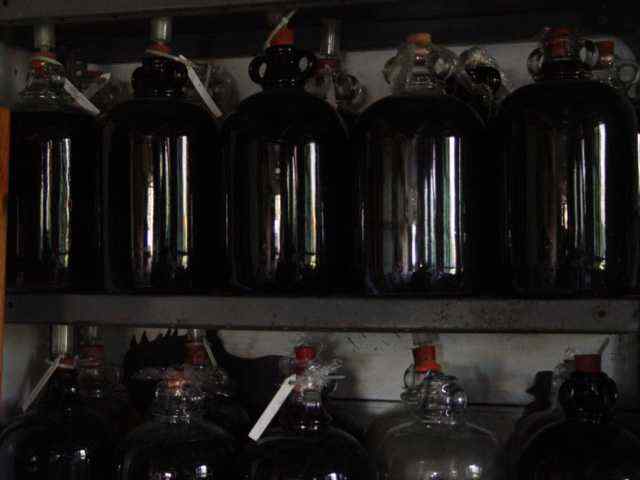 Labelling the wine at the various stages is very important when there are several Reds of Whites made from differing fruit, many a time I have had to try and guess what the wine was made from because the bottle or demijohn didn't get labelled or got lost on the way. I now use plant labels which are re-usable on which I can write the details with a tie through a hole and attach it to the relevant demijohn. The full demijohns in this photo are stored with a rubber bung covered in cling-film to prevent the possibility of the rubber contacting and thereby damaging the taste of the wine.
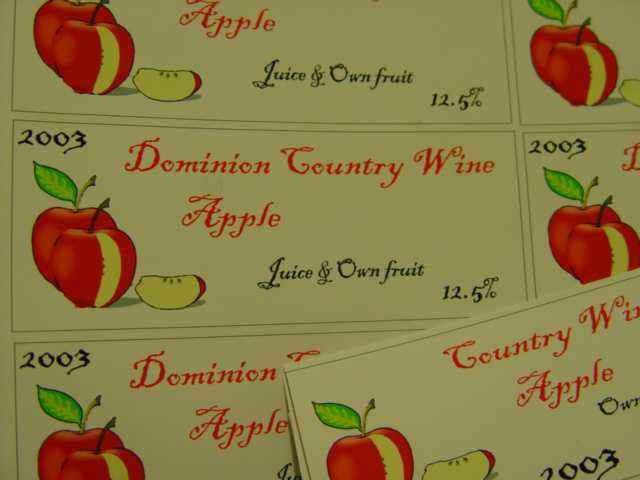
Labelling the bottles to indicate the contents as well as to enhance the appearance on the bottle on the table is equally important, remembering of course to put the year made rather than the year bottled. Making your own labels on the computer is challenging, each label being slightly different from the last and made to suit the individual wine including the year and approx alcohol content.
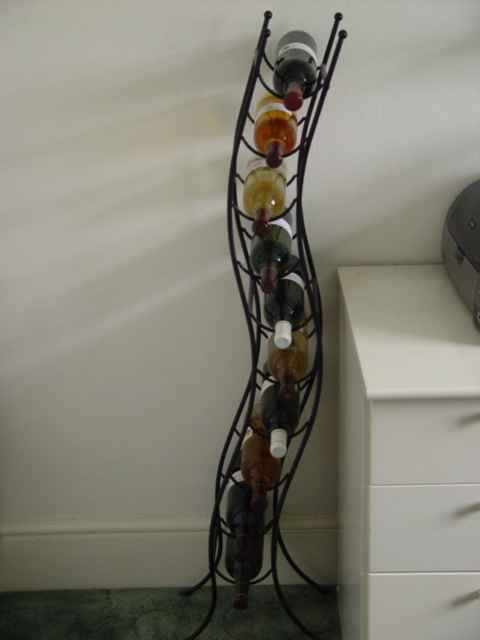
The wine having aged in the demijohn's is then bottled and labelled, it is then racked up ready for the day when it will be required, brought into the house re-racked or drunk, either way it doesn't seem to hang around long and if it does it indicates that we prefer the other readily available wines, so rarely make anymore of that particular wine.
 align="right"> Full bottles left in the garage are rapped in cling film which not only keeps them clean but also ensures the paper labels are not affected by the damp cold conditions, experience showed that the labels deteriorated and the bottles became dusty.
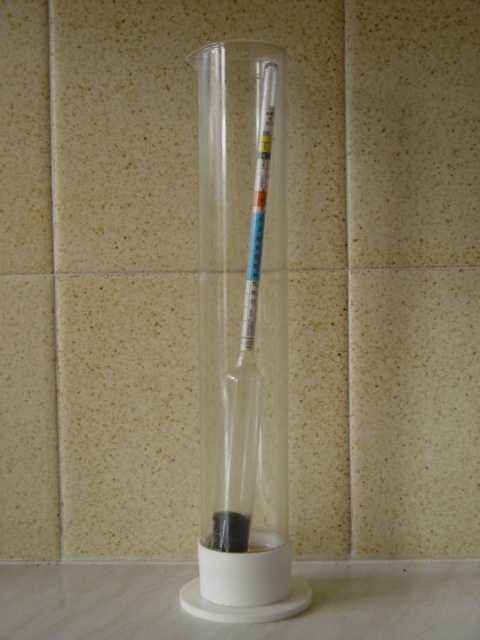 One of the most important pieces of equipment is the hydrometer and test vase. To be able to make wine from the many veg, flowers, and fruits sufficient sugar must be present for the yeast to be able to convert it to alcohol, so we need to be able to measure the amounts of sugar, not just what we add but what is in the product that we intend making the wine from.
To this end if the liquid is juice it can be added to the prescribed amounts of water and the sugar content measured using the hydrometer.
The sugar content will vary from almost zero to 30 on the hydrometeor, the greater the amount of sugar in product the (Higher the reading) In my case I aim to start all wines with a reading of 1085 Some kit wines start as low as 1080,
One of the most important pieces of equipment is the hydrometer and test vase. To be able to make wine from the many veg, flowers, and fruits sufficient sugar must be present for the yeast to be able to convert it to alcohol, so we need to be able to measure the amounts of sugar, not just what we add but what is in the product that we intend making the wine from.
To this end if the liquid is juice it can be added to the prescribed amounts of water and the sugar content measured using the hydrometer.
The sugar content will vary from almost zero to 30 on the hydrometeor, the greater the amount of sugar in product the (Higher the reading) In my case I aim to start all wines with a reading of 1085 Some kit wines start as low as 1080, 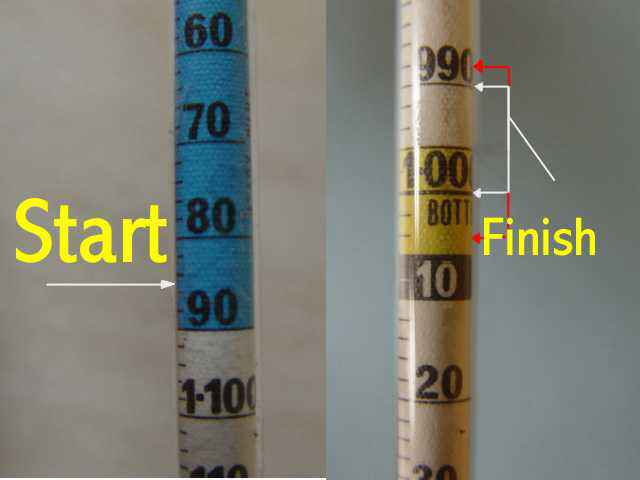
To get used to using your hydrometer, place it carefully in the test vase and fill it with water, you will see that that the hydrometer only floats as the water nears the top showing a reading level with the water surface of 1000, that is the point from which all other readings are taken. This photo indicates the level at which I aim to start all my wines the finishing band is variable dependent on what degree of alcohol you want to achieve and the degree of sweetness,
So the point at which the wine finishes fermenting can vary from wine to wine, a well balanced mixture will however continue fermenting until all the sugar is used up, if the yeast partials are still held in suspension, making the wine look foggy then that is an indication that the yeast is still alive and will convert yet more sugar syrup to alcohol given the chance, small amounts of sugar syrup can be added, thus feeding the yeast, which in turn adds to the alcohol, it is the level of alcohol that eventually kills the yeast. If the yeast is still alive, then almost the instant you add the sugar syrup you will see the yeast partials become active again , bubbles will be seen to start at the airlock and at more regular intervals, where in fact they previously as good as stopped. As a general rule when using wine yeast I consider that the yeast is killed off when the alcohol level reaches 12-13.5% although you will hear some wine makers boasting that their wine is 15 -17%, special yeasts and methods have to be used to achieve these higher figures which are not normally associated with table wine. Most commercial wines fall within the band 11% 12.5%.
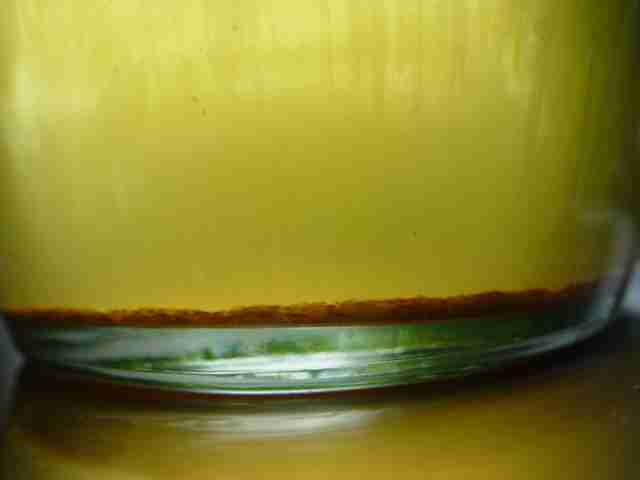
Our wine now absent of yeast particles which fall to the bottom and the wine starts to clear, albeit some may take weeks.
Factors which can prevent yeast working are:- old inactive yeast, cold conditions, hot conditions, imbalanced mixture, alcohol level already at 12-13%.Yeast that has been laying around in the kitchen draw is unlikely to produce a healthy fermenting yeast. The fermenting liquid needs to be kept at about blood temperature, any colder and the yeast will go dormant, becoming active again only when things warm up, if temperature get too hot the yeast will die and will not recover, so care during and when starting the fermentation process must be taken, it important to ensure an even temperature throughout the whole of the fermentation period.
The yeast will die when the alcohol level is about 12-13.5% unbalanced mixtures can produce stuck ferments which are notoriously difficult to restart, to avoid wasting your materials and time follow proven recipes. It is generally considered that the slower the ferment the better the wine, therefore the summer Months in the garden shed out of direct sunlight is ideal. If however you intend trying to make wine in the winter you will either need an emersion heater that fits into the neck of the demijohn or a heating band which goes around the demijohn, failing that a warm airing cupboard all are fine until the wine nears the end of its fermentation stage when the gas being given off can become rather smelly, albeit a perfectly normal part of the wine making.
Provided the wine has
 been keep at a fairly even temperature the air lock will indicate to the the wine maker what the situation is, if the bubbles in the airlock have slowed as to be almost none existent then either the yeast has run out of sugar or the alcohol has killed the majority of the yeast. At this point take a reading using the hydrometer, if the reading is say at 990 then having started our ferment with a reading of 1085 the approximate alcohol level will be 12.75% and the wine can just left to clear or stopped using fermentation stopper and a crushed Camden tablet. This will stop any further fermentation by killing any remaining yeast and the wine will within a few days start to clear.
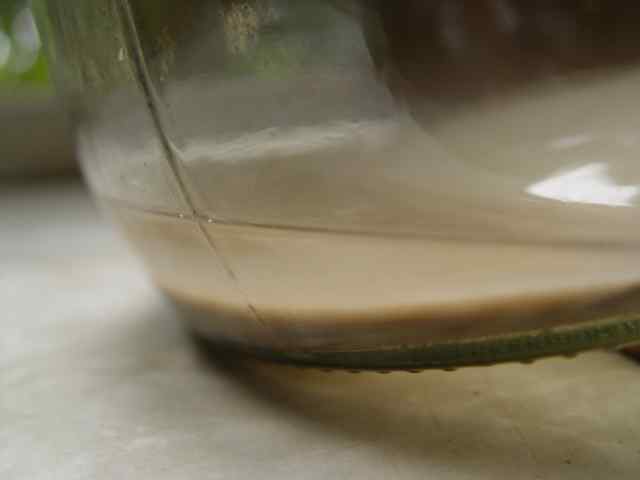 Over the period of a week to 10 days the yeast partials will have fallen to the bottom of the demijohn or container, and we are now able to draw off the clearing wine into a clean demijohn leaving the lees at the bottom as undisturbed as possible, special tubes can be purchased to assist in undertaking this process, although I only use a polythene tube. This process may have to be carried out a number of times before we finish up with crystal clear wine when the wine will be ready to just be stored to age in its demijohn, complete with airlock or rubber bung, or bottled either way the wine must be stored in airtight conditions.
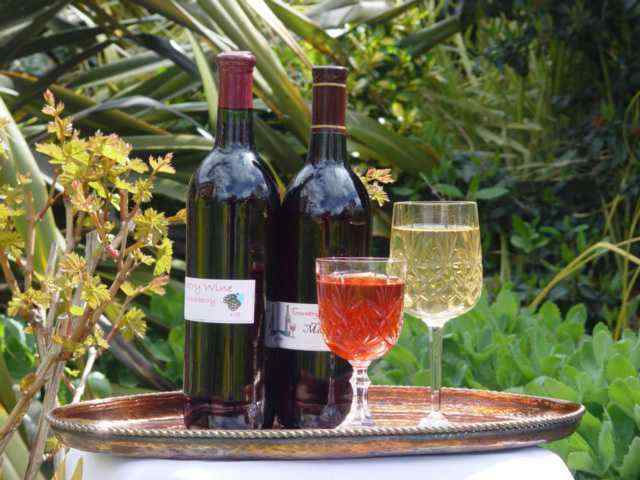
The end product should be a clear wine, be it Red, Rose or White which can be enjoyed with food or just drunk on a sunny evening whilst in the company of friends or alone. All that these two demijohns require now is to be decanted into 12 X 75cl bottles, corked, capped, and labelled. If being racked outside in the garage, then covered in cling-film and left to age and improve until the day they are required.
Before we Bottle the finished wine we need to take another S.G reading on the hydrometer so that we can determine the approximate alcohol level. This is done by taking the S.G. reading we took and recorded at the start, deducting what the reading is now. The resulting figure is then divided by 7.45. So if we started a wine at 1085 and it finished at 995 the figure we would be interested in is the 90. Divide that by 7.45 and we have a alcohol level of 12.08%. So 12% is the figure we are looking to put on the labels as an indicator of the alcohol level in that batch of wine.
Now the sweetness of the wine, with commercial kits the wine is invariably stopped using a fermentation stopper, and stabiliser this kills the yeast and allows the remaining, unused sugar to remain in the mixture thereby sweetening the wine, In this instance the alcohol will be less than if the yeast had been allowed to continue converting the remaining sugar. If you want wines with the max level of alcohol, then having allowed the fermentation process to continue until all the sugar was used you may now need to sweeten, to get the wine to meet your taste requirements. In this case, even though the fermentation appears to have ceased, you would be well advised to use fermentation stopper along with a crushed Campden tablet in each demijohn thereby ensuring that any remaining live yeast does not reactivate as a result of your adding sugar syrup to sweeten the wine,
 any reactivation of the yeast can cause gases to build up and cause the bottles to explode or as in my case with the Strawberry Wine blow the corks out. Some sweeteners are not taken up by the yeast, nor will they raise the S.G. If you do decide to sweeten your wine irrespective of what you use add it very gradually, you will spoil your wine if you over sweeten, you can always add more but you cannot take it out! Equally very dry wines with S.G. levels of 988-994 can suit some pallets but not all. So provide a choice of wines with different degrees of sweetness, as well as provide RED, White, or Rose. Wines with Hydrometer readings above 1000. are moving towards sweet, the higher the reading the sweeter the wine. Wines with reading below 1000 are starting to move towards med/sweet to dry, the lower the figure the dryer (less sweet) the wine.
 Having established or ensured by the application of fermentation stopper that the wine is stable enough to bottle, we need to get every thing ready. The equipment that we use and come into contact with the wine must be sterilised before we use it, that of course applies to all the equipment we have used so far as well. Take care if using bottles with flat bottoms they are usually made of thin glass and the necks can shatter if a stopper is driven in with a corker. The bottles with the hip at the base are generally made of heavier construction although precautions should always be taken when corking bottles. Even though we washed our used bottles before we put them away they must all be done again. this time ensuring they are sterilised using a solution of sodium metabisulphite or solution made using crushed Campden tablets. I make up a solution and rinse out as many bottles as I need, remembering that one full Demijohn should produce six 75cl bottles of wine. There is no need to rinse the bottles after sterilising a small amount of liquid left in each bottle will do no harm to the wine.
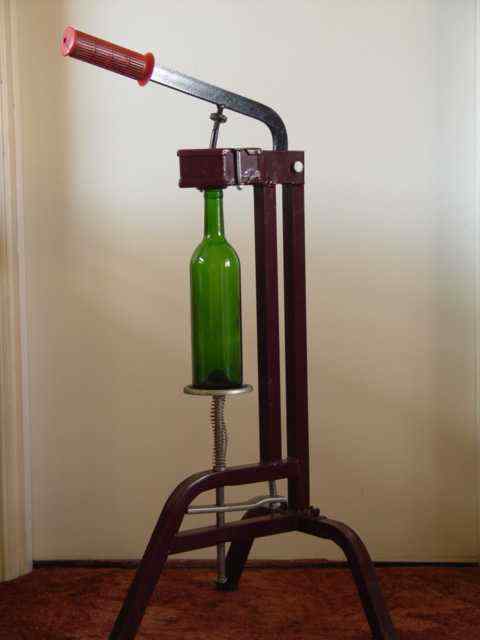
I refer to stoppers because nowadays there is a choice. Re-usable hollow plastic, moulded composite plastic, and the genuine article Cork, which are quite expensive and the quality varies from batch to batch. The degree of effort required to get stoppers into bottles depends on which stoppers you are using. In my case I have purchased a professional corker, if you are corking a large number of bottles its can be hard work and the professional corker takes the hard work out of the job
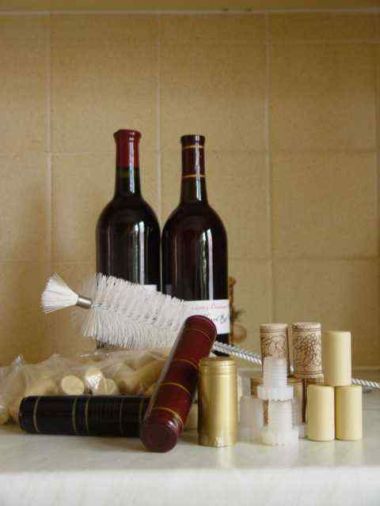
As well as corks we will need shrink caps although not vitally necessary they do give your finished bottle a professional look and they do assist in holding the stoppers in position. Shrink caps can be purchased in differing colours and are shrunk onto the neck of the bottle using a heat gun or even electric hair dryer.

Some of the wine growers and bottling companies are now using bottles with an enlarged top rim, although they are good quality bottles they do not allow the fitting of a cap nor the use of some bottle openers, before you wash and spend time removing the old label make sure they meet your requirements, its annoying when you have filled them with wine to find that you can't fit a sealing cap.
A label is then applied to each bottle using wall paper paste, other adhesives are difficult to remove if you want to use the bottle again, rather than discard. Ready made labels are available but you still have to enter the various pieces of information yourself to make them worthwhile.
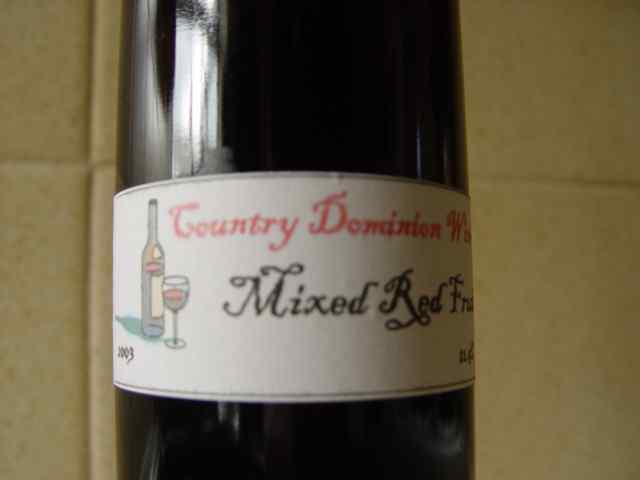 The Information on the label needs to include the Year the wine was made made, the Type of Wine, The approx alcohol content as a %, and a symbol or name of the producer In my case I put the word Country, thereby indicating its Home Made and Dominion Wine, which is part of our address, you may like to add whether Sweet, Med, or Dry. Where I buy the occasional kit wine this is labelled with the kit producers name as well as the name of the wine, one of my favourites is a 5 gallon kit, produced by The House of Beaversdale named Gewürztraminer. Grurz means spice in German, The Traminer grape or Gewürztraminer is the spicy speciality of Alsace, a nice spicy, fruity, pungent white wine and although the kit costs £36.00 it is in my opinion still good value at just over £1.60 per bottle with every thing in the kit that need to make the wine, you will still need all the ancillaries that you have by now surrounded yourself with, for details of this and other kit wines, as well as all the ancillary equipment you require:-
 http://brewathome.co.uk
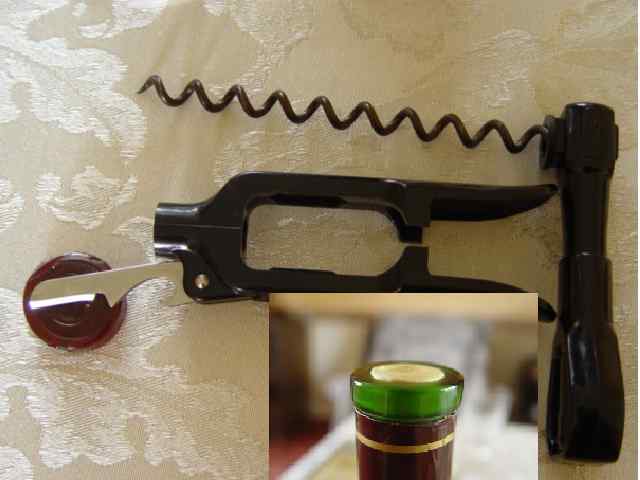 When you come to opening your bottles use a knife and cut round the cap following the ridge on the bottle neck, try not to disturb the wine. All wine will have a some sediment in the bottle. Bottles with the hip at their base will tend to trap this making pouring without disturbing it easier.
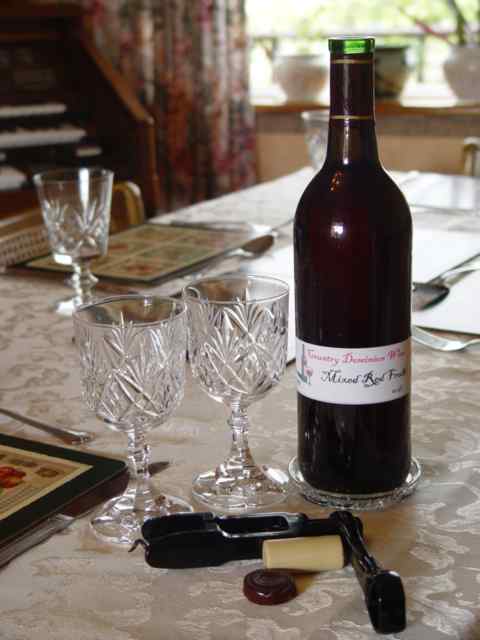 Never completely empty the bottle into someone's glass, as a precaution leave about 1/2 an inch in the bottle and discard. Some corkscrews like the one in the photograph incorporate a knife for that purpose.
Drinking, is not a problem, after all Red Wine is good for us this week!! It will preferably be white wine next week, so make and keep a stock of both. Generally I chill white wine but drink Red wine as it comes normally cold but not chilled. Most wines benefit from being allowed the breath before drinking, so if you have guests why not open a bottle of each after all it will only cost you between 80p & £1.00 per bottle if you've made it yourself. But do remember to have fruit juice or an alternative non alcoholic drink available for the drivers amongst your guests.
Never completely empty the bottle into someone's glass, as a precaution leave about 1/2 an inch in the bottle and discard. Some corkscrews like the one in the photograph incorporate a knife for that purpose.
Drinking, is not a problem, after all Red Wine is good for us this week!! It will preferably be white wine next week, so make and keep a stock of both. Generally I chill white wine but drink Red wine as it comes normally cold but not chilled. Most wines benefit from being allowed the breath before drinking, so if you have guests why not open a bottle of each after all it will only cost you between 80p & £1.00 per bottle if you've made it yourself. But do remember to have fruit juice or an alternative non alcoholic drink available for the drivers amongst your guests.Never encourage Drinking and Driving.
'
Wine Recipes
Next
Back to Homepage