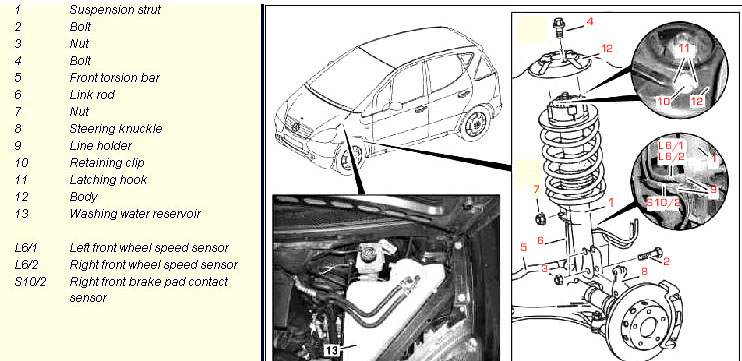
Component parts and Assembly
Front Suspension & Associated Components
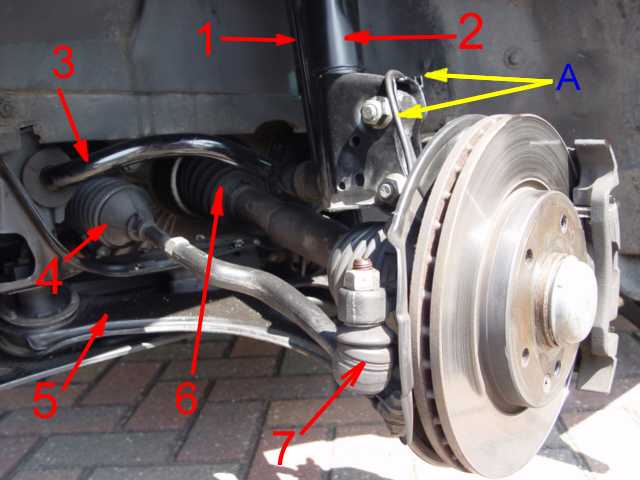
1
Drop link 2
Strut/Shock Absorber
3
Anti Roll bar
4
Steering rack/Track Rod 5
Wishbone 6
Drive Shaft 7
Track Rod End/Ball joint A
Ref retaining clips see photo below
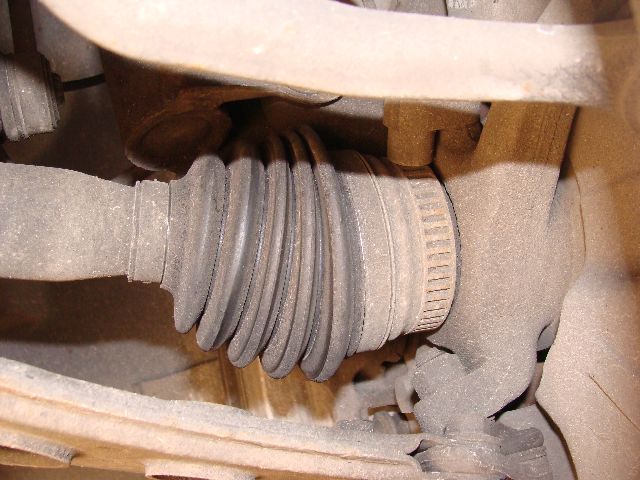
When checking the car for MOT inspect the gaiters? some times referred to as bellows due to their design and shape. (The rubber/composite corrugated covering, located over the moveable sections of the Drive shaft, Pay attention also to the rubbers on the track rod ends and ball joints, splits in any of these if spotted will cause you car to fail.
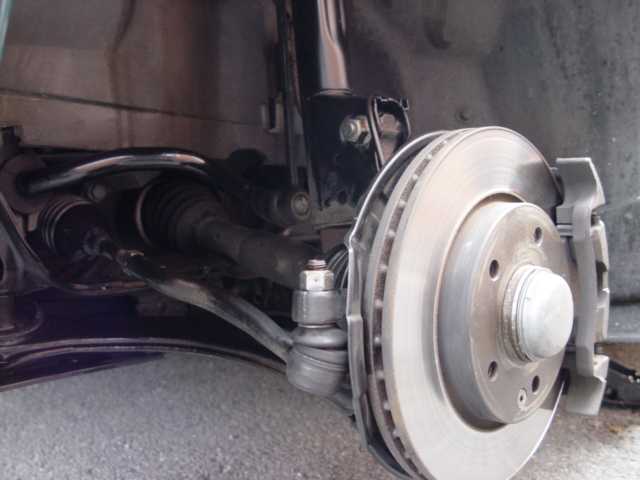
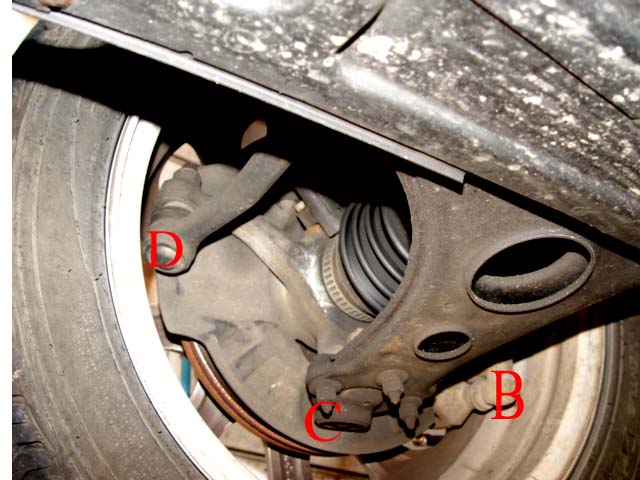
An uninterrupted view of the components on the nearside of the 160/2002.
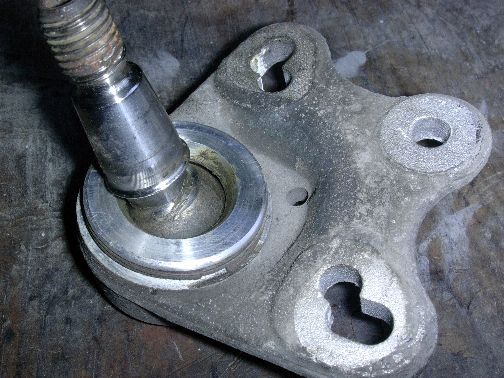
This is the lower swivel joint C MB Part Number-A168-333-02 27 which is this case is well worn. The protective gaiter on this unit has been removed to display the ball joint.
The owner found it necessary to heat the unit to remove as it was not possible to use a ball joint breaker
When replacing this component ensure the new unit is replaced in the exact location that the old unit was found, failure to follow this rule and you will effect the steering on your vehicle.
It can be clearly seen from the old unit where the metal was protected by contact with the wishbone, this pattern can be used as a template for fitting the new unit.
Ensure the new unit has been packed with grease and that the protective gaiter is correctly fitted and undamaged.
This part would be available from most good motor factors the owner has kindly attached this link although he used a genuine Mercedes-Part.www.oscaro.es It would also be available from UK distributors. Thank you Felix for this information and photograph.
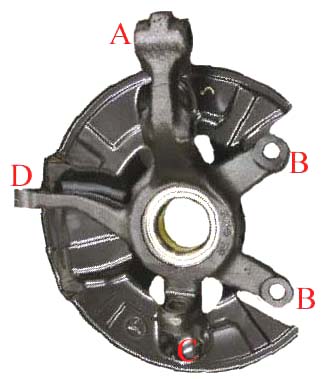
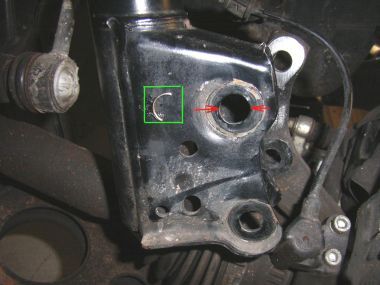
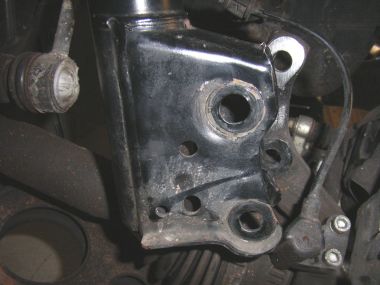
Remember you are looking at the swivel joint from the back, A connects to the suspension strut. Twin bolts. B Are the location holes for securing the calliper C Is the connection for the lower swivel attached to the wishbone. D For the Steering track rod end. This complete unit turns on the swivel joints of the strut lower, swivel joint attached to the wishbone. and the track rod end attached the the steering wrack.
Wishbone Swivel joints
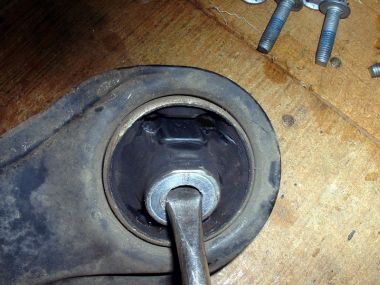
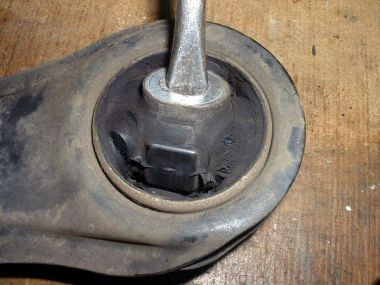
There always has to be a first and in this case it was on Sergio's car (SVC Global) the car having covered approx 50000 miles (80000kms) As can be seen in the photograph the vulcanised rubber part of the bush located in the wishbone has deteriorated and split. This will without doubt affect the steering and affect tyre wear but is not an easy defect to identify unless the wishbone is partially/fully removed. So if for any reason are working on the wishbone (lower suspension bracket) check this bush by placing a large screw driver or rod into the bush axis and by levering on the rod, while doing so check for signs of splitting and perishing of the rubber surround/bush. If either is detected the bearings/swivel joints should be replaced. These are available separately, in this case Item 10 in the parts list below, part number W168 333 0614. applies, so it is worth checking before purchasing the complete unit. If you do confront this problem then the old bush can be pressed out of the wishbone and the new one fitted, in both cases a large socket will be found to be a useful tool.
It is however essential that the new bush be set square to the wishbone before applying pressure making sure that it is fully housed on completion.
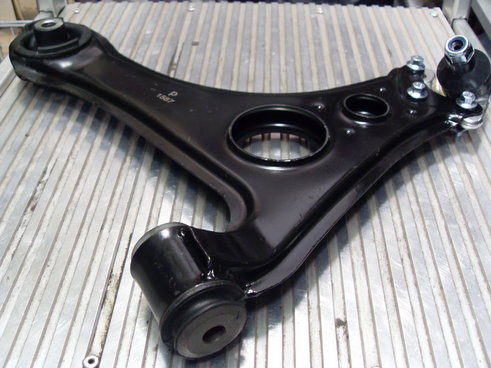
If your wishbone is corroded or you want to fit a ready assembled unit then the wishbone (Lower suspension bracket) is complete with all bushes and swivel joints ready fitted from Mercedes Part Numbers
W168 3301 807 Right hand &
W168 3301 707 Left hand apply. Parts.
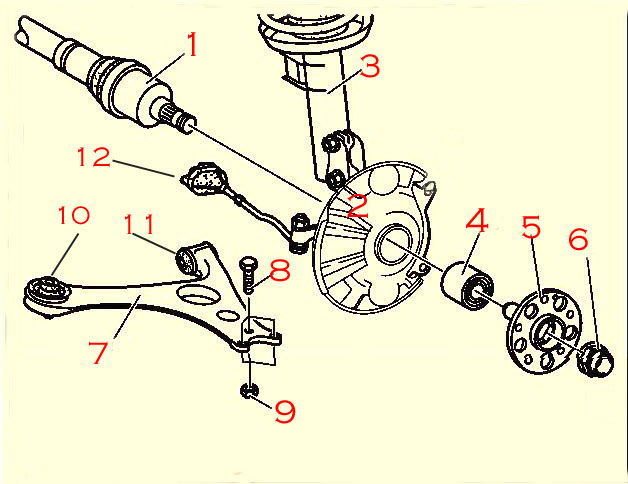
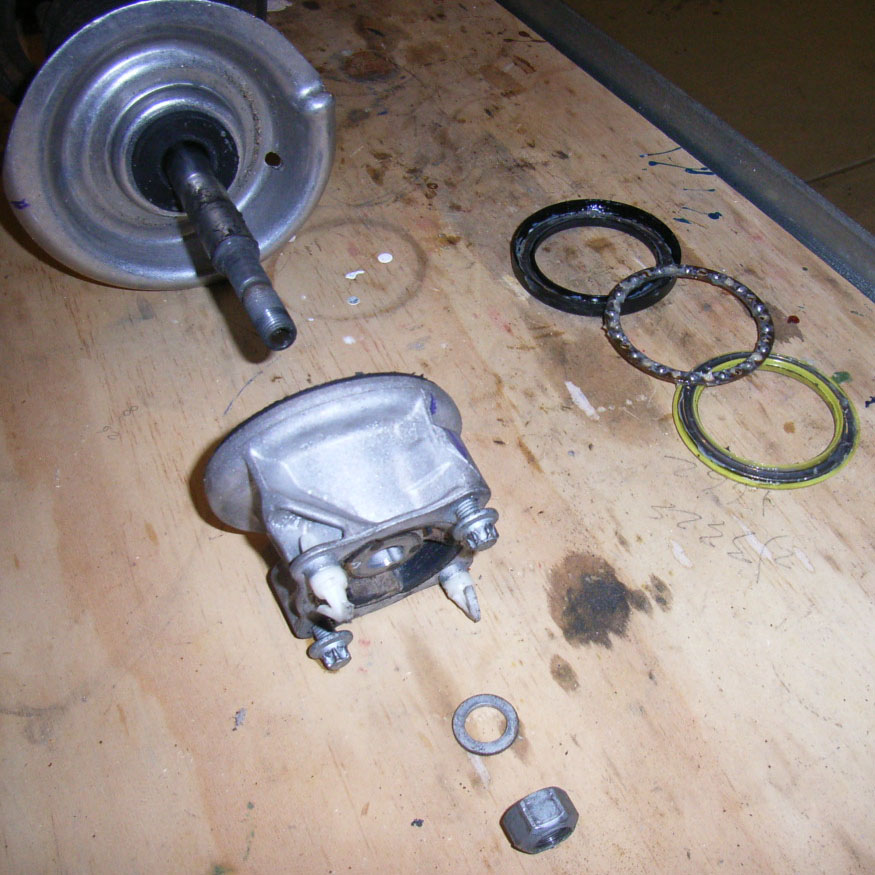
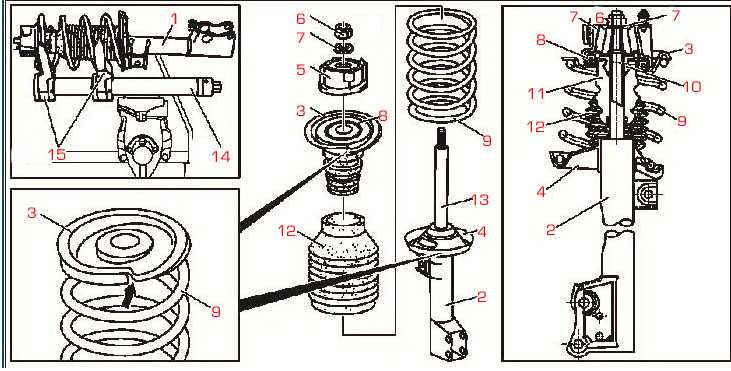
The front hub assembly 1. Drive Shaft 2. Swivel bracket complete with back plate 3. Bilstein Strut 4. Double race ball bearing 5. Wheel flange 6. Securing nut 7. Wishbone 8. Securing bolt 9. Securing nut 10. Swivel joint 11. Bush 12 Steering track rod end
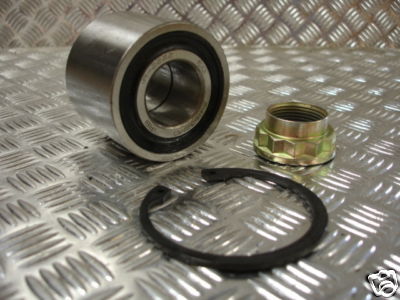
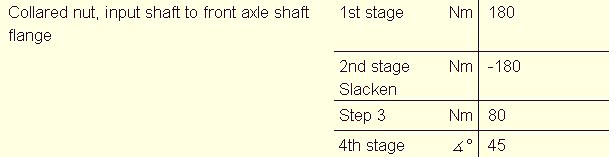
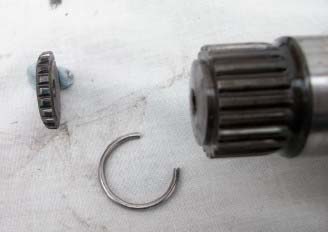
The front wheel flange is fitted with a single double race bearing retained by a cir-clip, if removing the wheel flange retaining nut it will be necessary to fit a new nut. This must be tightened using a torque wrench, this is vital to ensure the nut is tightened to the correct torque and that any movement of the drive shaft spline within the wheel hub is totally eliminated.
For the full procedures for replacing this bearing please see details on my CD.
Before attempting to replace this bearing remember it will be necessary to remove the swivel bracket from the strut to remove the bearing which should be firmly fitted into the swivel bracket, where this is the case the camber angle and toe (tracking) will need to be checked using specialist equipment. If this work is done by a garage ask for a print out of the results of such a check. For more details see the report received following the test on my own car. If the garage is using up to date equipment then such a printout should be available. Few garages have the sophisticated equipment to carry out these checks on modern vehicles, it is therefore worth watching you front tyres for unusual wear following such repairs. Any unusual wear or sensation through the steering wheel when driving should be investigated.
Drive shafts Generally speaking drive shafts do not present a problem and I have heard of few problems or need to replace these units.
However this week 22/02/2009 I have heard of a horror story which comes complete with photos where the end that enters the gear box end of the drive shaft has sheared off where the 'C' Clip which retains the shaft in the gear box differential and encircles the shaft. Having sheared it had no option but to fall into the gearbox. Initially it was thought that the engine complete with gearbox would have to be removed to with all that entails, just to retrieve the coin sized shaft end, however the mechanic involved NOT MERCEDES-BENZ was able to modify his stick magnet and retrieve it without having to do so, saving the owner many hundreds of £££££
This to my mind is a very serious defect and one which could not only end the life of the gearbox but the occupants of the car as well . If the coin sized solid steel disc 3/8" approx in width had got jammed in the gear mechanism while the car was running at speed, there is no telling what the outcome would have been.
Lets sincerely hope this is a one off and that this defect does not rear it is ugly head on other cars. So what were the symptoms, well this is the story for the owner:- Quote As to how I knew it had gone, I pulled out of a junction turning right, accelerating as traffic gaps not massive but not absolutely flooring it. Got to centre of road and it was just as if car had jumped out of gear, revs went sky high and could not get any drive, coasted to side of road and found I could not get any gear. No crunching or other funny noises.
Local garage recovered car and on inspection (after trying your gearbox reset procedure) the mechanic noticed near side, (L/H), drive shaft appeared to be just over half inch further out than it should have been, he removed drive shaft and found the problem, strange thing was the retaining clip was still in view and easily recovered but the end of the shaft had disappeared into the box.
As a temporary measure he put the shaft back in place and drove the car down the car park with no apparent problems but obviously not wise to leave the bit in there and drive as consequences could have been severe. Unquote
Having now had time to consider the full implications of this incident/defect, I do not think that Mercedes-Benz have a case to answer, for a change!.
It is my opinion that at some point work has be undertaken on the car that required the stub axles to be dropped, or swivel joints to be broken, which in my opinion has caused the drive shaft to slip/be pulled from the differential/gearbox.
The drive shafts are like most modern cars are only held into the gearbox by their positioning and the sprung loaded 'C' clip located at the end of the drive shaft. These shafts can be easily and accidentally pulled from the fully housed position, if work on such items as 'drop links' is not carried out without due attention being paid to the position of the shaft. I.e. by making sure that tension is not placed on the shaft's thus pulling them from the gearbox. You will note that on my drop link replacement page Mypage.29. that I have placed a jack beneath the wishbone to ensure the drive shaft is kept horizontal while undertaking the replacement. I now understand from the owner that the drop links were replaced by the garage from which the car was purchased approx five months ago, and it is the wife, a steady driver who normally drives the car and has only done between 1200-1500 miles since they were fitted. I am of the opinion that the shaft has been partially withdrawn from the gearbox since that work was undertaken and is the reason the drive shaft, extreme end sheared, that was the only part of the shaft spline engaged with the differential gears (crown wheel & pinion)with maximum torque being applied. Only by chance has the car continued to run without problems, until like so many things circumstances caused it to shear. The owner himself stating that he was accelerating and turning right which would slightly shorten the shaft, and put it under maximum torque, which was transferred to the tip/end of the shaft.
Lessons to be learned.
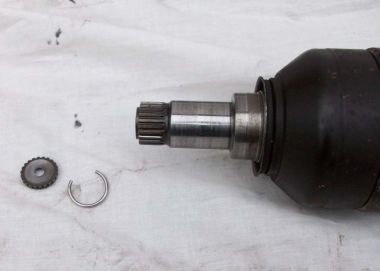
When ever working on the front suspension, or undertaking work that requires the front stub axles to be lowered , always ensure on completion of the work that the drive shaft's inner stub has not been inadvertently pulled from the gearbox. These are simply a push fit.
If for any reason you deliberately remove the drive shaft or are fitting a replacement shaft's lightly oil the 'C' Clip, which will allow it to slid into the gearbox engaging in the ring recess provided. When offering the drive shaft inner stub to the gearbox ensure it is fully aligned, thus preventing damage to the oil seal which is housed in the recess of the gearbox. Failure to do so will result in a damaged oil seal and loss of gear box fluid in the long term.
The only other failure on drive shafts is experienced after a great deal of wear when they get noisy when turning the steering wheel, this wear is normally on the (Hardy Spicer) universal joint(UJ). Problems can arise when the gaiters (bellows) are damaged during a repair , or get old whereupon they can split. This fault will like the rubber composite dust covers on ball joints cause the car to fail the MOT (Ministry of transport test) unless they are in sound condition.
Although this reader, Chris has a 'B' Class (an almost identical power pack to the 'A' Class) his car suffered that fate and it caused him a more than a few problems putting it right :- Another issue I've had with my B Class which I assume may manifest itself on the A Class as well is replacing Drive shaft gaiters, Boots, bellows which ever you choose to call them!
Note that there have been a number of ESP/ABS problems caused by the detector ring on the drive shaft coming loose as well as breaking, from the point that the ring moves or breaks the ESP/ABS lamp will show , this will cause your car to fail to MOT so check you drive shafts for rusting which can be the cause of the problem, spray with duck oil or 3 in 1 oil anything to prevent the rusting and the problems that result.
Please read this mail if you loose/need to replace. the ESP ring on the drive shaft: Hi Lofty
If the following is of use to you and your site feel please free to use it.
First many thanks for your site. My partner has an A-class 170D on a Y plate. With the help of your site I have serviced said car for the last few years. Recently I have needed to replace the rear brakes (drum kind) lower rubber mounts for rear springs, and this weekend the front ABS reluctor ring (ABS light on dash was constantly on Traced fault to corroded missing ABS ring on OSF driveshaft) on the drive shaft-took about one 1.5 hours. Mercedes do not sell reluctor rings only whole driveshaft at £580.
Loctite 638 3ml
Procedure (See break down of parts above )
Loosen drive shaft nut + wheel bolts
Jack up car, remove wheel, remove brake pads, & calliper and secure out of way, remove brake disk.
Split track rod ball joint and move out of the way
Remove both bolts from lower end of suspension strut. These must be replaced in precisley the same position when replaced so make position beforte removal.
Use hub puller to remove hub from drive shaft if needed (just pushed mine out by hand)
Now clean up the driveshaft where ring should go, check fit of ring, mine was a snug fit.
coat contact surfaces with Loctite,
Fit ring, leave to cure for ten mins.
Refit all parts.
Take for a test drive
Reset ABS light if required. Fitting the new sender ring should delete the light, turn the steering wheel fully left. Fully right this is best done while driving/moving the car slowly
Regards
John
Thanks John any thing that helps keep running costs down is welcome on this site.
At last years MOT I noticed both gaiters had split so I had to replace them.
I got new boot kits from the factors and they advised they were original equipment standard.
On getting into the job it was obvious the originals and the new replacements were made of a much more rigid plastic rather then the very pliable rubber most cars have.
I thought fine, they will be more durable, good quality MB standard.
It was a bit of a struggle to squeeze the clamping bands tight (I assume there is a special tool to do them at the factory/dealer) but I did them as tight as I could with some long handles pinchers.
The car passed the MOT and I was happy.
A few weeks later I noticed the right side one had a split boot again and there was grease all over so I got another one as a credit and fitted it. Judging from the way it had split I suspect I may have got the inner part twisted slightly in relation to the outer part as I clamped them tight the first time, but I didn't tell the factor this.
I checked the other side (left) and that seemed OK but a few weeks later some strange noises were coming from the left side and on inspection the boot had popped of the joint and was rattling around the drive shaft. I re-packed it with grease and refitted the boot again clamping the bands as tight as I could.
However, more noises were apparent from that left side so I got a new CV joint off E-bay and fitted that. I assumed grit had got in while the boot was off and damaged the joint. The replacement had a conventional rubber type boot and that went on without drama.
In the mean time the right side popped its boot off again so this time I resorted to suitable sized jubilee clips to hold the damn thing on. I just had to be careful where I positioned the screw part of the jubilee so it did not foul the suspension strut but it has been holding for some time now and no grease appears to be leaking.
I guess the hard plastic type boots are more difficult to secure unless you have the right tool and being less pliable they are more easily forced off the joint when the wheels are in the lock, especially if the clamp is not as tight as it could be.
I suppose the moral is, go for rubber non-original boots next time like normal manufacturers use, or visit MB parts and check out the quality before purchase.
& John:- On the issues of driveshaft boots - I had my local garage replace a CV joint at the last MOT (ABS ring had disappeared from the old one), and a couple of months later was under the car and noticed that the driveshaft boot had come loose - after fitting a new securing band (and using the proper tool to fit it!) the band came off again. I must have fitted about 6 or 7 bands in total, but never could get them tight enough - have now resorted to an 8mm wide jubilee clip (Draper do a kit that you can cut to suit to make your own up) and this time it's been a success. Seems to be that as one of your other correspondents noted - the MB driveshaft boots are very inflexible due to the material used.
Thanks Chris & John for your comments, your points are noted. Drive shaft gaiter clip are normally secured using special pliers, you are unlikely to be able to fit them securely without the correct tools. However John above had the special tool and was still unable to get the clip to stay secure, he eventually resorted to an alternative methode /clip. see above
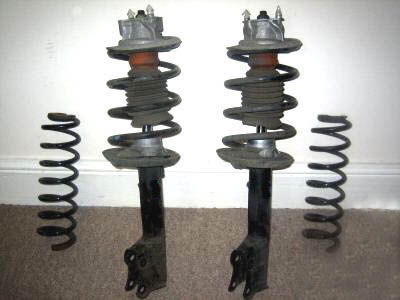
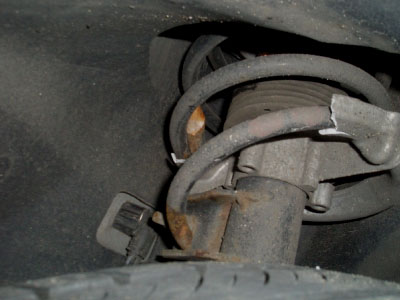
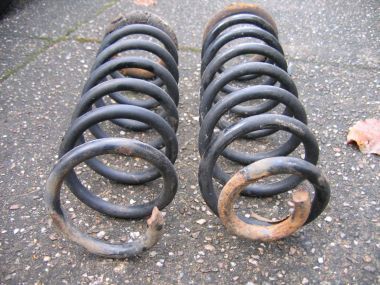
Front Struts If you have just bought or are thinking of buying a used 'A' Class vehicle then one of the things to look for is defective suspension springs and in the case of the front struts broken spring support plates. this is a common problem on earlier models of the 'A' Class and should be watched for. Note that the two rear coil springs shown either side of the front struts in this photo are fitted the vehicle the other way up.
Very easy to inspect, when taking off front wheels look for seepage of fluid around the area of the shock absorber piston, early signs that that you will shortly have to replace a strut. In the case in picture the apparent fluid, is cleaning fluid applied as part of my service/inspection, which will be cleaned off in due course. It will be noted that when the when the car is jacked up the shock absorber piston is exposed beyond the plastic gaiter, due to the wheel hub having dropped, this exposes the polished piston, ensure that this does not become contaminated with dirt and grim during your service. Although the piston 1 is made of very hard metal it can still be damaged by sharp partials of grit etc. If necessary at all, it is preferable to blow it off with an air line rather than wiping with a cloth Note Ensure you are wearing suitable eye protection if doing so. Another alternative is to use an industrial vacuum cleaner, either way loose partials should be removed.
The swivel bearings are situated at the head of the struts and can be replaced separately from the main strut, these can be purchased from MB parts and come complete with all fittings bolts etc. If you have a grumble or the steering sounds gritty when you turn the steering wheel this could be the problem . The bearing assembly is pre-packed with grease during manufacture , however these units do wear and water does impregnate them over time causing them to deteriorate. When fitted the corrugated gaiter, see in the photograph shields the top of the shock absorber, which helps to protect the moving parts of the shock absorber.
Details of the bearings found on my own car confirm what Tony found is a standard, why is anybodies guess. I am attempting to find out from the bearings industry if this is normal practice or a one off. To date I'm unable to say although I believe that this bearing does play a part in the breaking of front suspension springs and may also be causing a greater loading on the steering column components than should other wise be the case. Hence the steering column problems that are being experienced by owners of W168 and already one case on a new W169 All I know is that since I have owned the car I have always kept the complete strut area sprayed with duck oil as well as the column parts well greased , even having taken those precautions I've never been impressed with the degree of difficulty when slowly reversing to park the car, the steering has always felt heavy during this manoeuvre despite the electrically operated power steering pump.
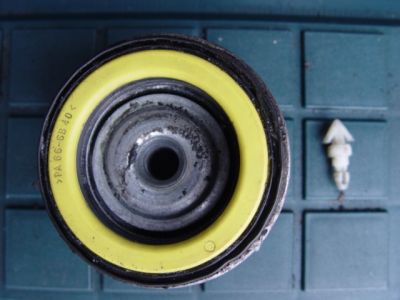
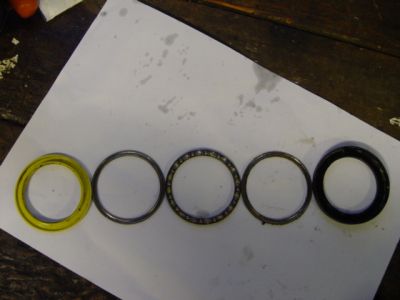
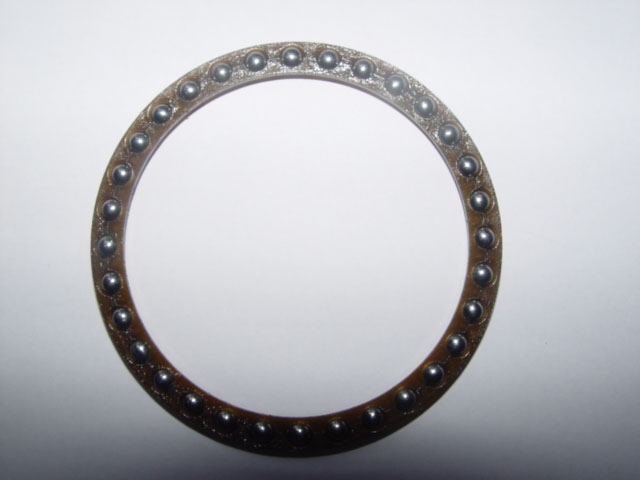
This is the complete bearing as fitted at the head of each strut the yellow casing facing down towards the spring during assembly . The bearing is shown situated in the bearing housing and is held there by the suspension spring and top spring plate when fitted. The white arrow object is one of two fitted to the top of each strut and has to be released along with the two bolts before the strut can be removed as a complete assembly
This is the bearing stripped. top casing, upper ball cage carrying 16, 5mm ball bearings, Note every other bearing housing (16 holes ) has been left empty, the reason for this as yet is unknown. The lower half of the casing simply clips into the upper half when correctly assembled.
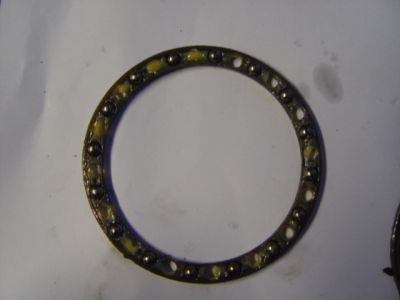
Cage from my car complete with 16 bearing.)Note the empty holes which in my opinion would weaken the cage and 16 balls would carry twice the load of 32 making, it more difficult for the balls to roll easily on the 2 ball race's top and bottom on which the balls roll. ( In fact bearing on the right shows 17 balls, I tried a new ball bearing to ensure it popped and stayed located in the cage as do the other ball bearings.)
I purchased 100 new 5mm ball bearings, as Tony of Australia has done and replaced the cage with 32 balls each side The immediate reaction when steering the car is that it is smoother on the steering and when reversing to park the steering is much easier . So why is there only 16 balls per cage when it is obviously been made to carry 32 per cage? At present we just do not know the answer to that. If I manage to get answer from people in the technical field of bearings or indeed Mercedes -Benz. I will print the outcome on this page.
Well I have heard from Mercedes customer service this morning 19/11/08 and they have said that their technical staff will be looking into the information I have forwarded and have requested the photographs.
20/11/08, Well well, phone call from the charming Helen on the MB customers service line, apparently the technical department of Mercedes were most interested in this information and were pleased with the photographs , they have now promised to look into the reasoning of the 16 ball bearings, I have asked if they will communicate their finding to Customers and have been told, No it is not customary for them to communicate such information to customers!
In other words even if if they agree that their is a major problem and that it has contributed to the hundreds of steering column wear problems and broken springs along with front strut spring supports, we the customers who have paid millions for our cars will never be made aware of the outcome. Quite appalling, this in turn hides any problems and prevents owners taking action themselves to remedy the situation by simply fitting 64 new ball bearings in the existing cages, built to contain that number.
All I know is I will not be removing the extra ball bearings I put into my bearing cages as I feel the benefits are well worth the cost This is one response I had to the question 16 or 32:- I won't disclose the originator but it is precisely what I thought in the first place:- Quote. There's technically no reason not to increase the number of balls, probable that economics in production was the reason for the 16 or even a heavier engine later model being the reason for allowance of more to be fitted at a
later date. Unquote
The heavier engine being a good point/reason for more bearings. So has the Diesel Model 'A' Class got 32 each side?
If you decide to follow 'Aus' and me by fitting these extra bearings, please remember we used all new 5mm ball bearings of at least 100 grade both sides. I for my part replaced the original balls as they could have been slightly worn and new and used should never be mixed in the same cage.
I also contacted VOSA as a follow up to the spring problem as the swivel bearing plays a large part in the position of the spring, when turning the steering wheel. I still maintain the springs are being coiled and uncoiled because of the way in which the bearings have been build or rather not built. VOSA were unable to help in this instance as it wasn't considered that it presented a danger to the occupants or other road users. They never the less are aware of the situation and have the information on file.
However I'm not giving up easily, I have now contacted our local expert for his views on the subject, if John doesn't know the answer it is not worth knowing! And being the Managing Director of the Largest Independent Mercedes Garage in the Country, if not Europe, he like independent owners, is free to make comment when things aren't right unlike, it appears the employees of Mercedes-Benz/DaimlerChrysler who have to remain lips sealed! John Haynes Autotechnics If I hear from John with his views I will let know.
I have also mailed Febi/Bilstein the manufacturer to see if they will provide the answer. Fibi-Bilstein say they manufaxcture to MB specification!
Follow up mail from a fellow owner 17/01/2013.:-
Dear Lofty,
It was interesting to log on to your site again as my own front shock absorbers now need replacing. I remembered your section about the vacant bearing spaces in the races of the A class front shocks and noted back then that you stated that they were made by febi- bilstein.
I thought to myself, what would the chances that if I ordered OEM bilstein shocks that they too would be lacking the full 32 bearings?
I decided to buy some Meyle shock absorber mounts and I took the bearing races apart on receiving them and hey presto there are 32 ball bearings mounted in the tops well packed with grease.
Has any one else been in touch with you who have replaced their shock mounts with original Bilsteins and do they have 16 or 32 ball bearings in them? It would be interesting to know if I am justified in buying the Meyle with a full complement of bearings in them. Ian, (Cornwall.)
My reply:- I took this up with MB and they said they would investigate, however they also said they would not be touch because they do not discuss the outcome of complaints such as this with customers .of course not it may result in a recall which be below mercedes.
Utter ballshit and quite wrong .there should have been a re-call by Mercedes
Very few owners have commented on my findings and yet the quality of steering after fitting 32 each side was quite different and I'm convinced this is what sends so many steering columns off to the scrap yard that along with the ceased UJ at the bottom of the column
You were wise to use the alternative bearing /strut
Lofty-
This is mail from Australia.
We emailed before and I use your CD regularly - most useful.
I discovered that my mid 2004 built A160 Classic LWB front springs have a double red dot designation, ground clearance is low , suspension harsh and ~4 degrees of negative camber.
My neighbour just bought an Elegance A190 - very comfortable, parallel front wheels and springs coded with a single blue dot. The centre of the front wheel arch is 20mm higher than my Classis.
As my Classic was a run-out model ( One of the last of the face lift models I got the 4 wheel discs, alloys etc and I suspect a younger mans go fast suspension package. Can I change to these higher (softer?) springs and get rid of the negative camber look? Unquote
Having answered the questions the best of my ability, Tony has now taken the bull by the horns and is sorting his car out to get a better ride and to remedy the appearance of the car, as the camber of the front wheels was not standard to most 'A' Class. This work has included removing the front struts
and ordering springs which will put the height of the car back to normal. He has ordered front springs (non Mercedes-Benz Supplied) from www.kingsprings.com.au which he is hoping will give a more comfortable ride, and has promised to keep me informed of the outcome.
Tony had earlier had the car in the garage because he considered the steering was stiff, the garage changed the top swivel bearings telling him he wouldn't suffer the problem again! so while he had the struts off the car he checked his bearings his new bearings also have 16 ball bearings, every other ball missing, although this is unusual it appears to be how the unit was constructed and not that balls have gone missing. I have taken this up with my parts department in the UK Mercedes-Benz of Chichester in West Sussex who are always helpful. On my recent visit to the branch the parts department produced a used bearing assembly which confirmed that only every other ball is fitted in the the housing, they are unable to explain why this is. Note that in Tony's photo he has laid the component parts out in order of fitting.
It is also worth noting that if your car suffered from stiff steering this can also be caused by the lower universal joint on the steering column ceasing up. See page.49/50)
Removal of suspension struts.
Before getting carried away and removing struts, do remember that the struts are set so as to give the wheels the correct camber (Vertical angle of the wheel in relation to the road) if you do not take this into account before slackening bolts and removing components you will almost certainly finish up having to get the camber checked by either Mercedes-Benz workshops or a very good garage or tyre retailer who would need the sophisticated equipment to do the job.
Another method for ensuring that the strut is replaced in it is original position is to spray the assembled area with Grey under coat allow to dry and then remove, the fresh paint acts as an accurate guide when replacing. However this only works if your replacing springs, if the complete strut is being replaced getting the camber correct can be more difficult.
Having had my struts off the car to re-build the swivel bearings and replaced them as accurately as possible, I decided some months later when I needed two new front tyres to get the camber and tracking checked.
Minor adjustment was required to the camber on the n/s as I had got the strut assembly slightly too upright this also affected the toe on that side of the car, although the toe had never been touched, so this was either affected by the camber angle or had been like it from new.
The rear wheels are also checked and again the near side rear is very slightly outside the manufacturers spec, as the rear wheels position on the 'A' Class cannot be altered this has obviously been like it since new, the degree that it is out is a very small and at this time is of no concern, it doesn't cause unnecessary tyre wear.
However if this situation got worse it would show in tyre wear, then I would need to check the wheel bearings and trailing arm bearings, at this point I know that both are OK so no improvement would be achieved by stripping and rebuilding either the wheel bearing or trailing arm bearing on that side of the car.
If you do decide to get your car checked, you best bet is to look for a good tyre fitting company who have the specialist equipment required to do the job, I would not use Mercedes for this task.
The cost of the work for checking all-round and correcting the minor faults found was £79.00 inclusive of VAT 114/09/2009 a little over the cost of a short Diagnostics test by Mercedes-Benz Workshops and I can feel the difference when driving even though the adjustments made were small. This in turn because the car is rolling (moving easier in a straight line ) should add miles achieved per litre of fuel. The figures in red indicate where slight adjustment was required. as previously mentioned the rear wheels are not adjustable and so those figures remain unchanged.
The adjustment of the camber is achieved by the securing position of the bolts, the upper hole at the bottom end of the strut is larger than the shaft of the bolt, this allows slight movement which alters the camber considerably.
The half round 1mm thick spacer ( Shown in the green box) sited inside the hole and located with a small amount of grease applied will ensure it stays put while the strut is located in the desired position and therefore achieve the correct camber. This is Tony's Idea and is not standard MB parts. In effect it prevents the strut moving whilst the bolts are being tightened and torqued. Failing using a spacer as Tony suggests you would need an assistant as two pairs of hands are required to locate the strut onto the brake disc/hub assembly. It would be advisable to locate the lower bolt first and lightly tighten, leaving sufficient movement to be able to adjust the hub on the strut.
Do remember that getting the camber correct is vital, your tyre wear depends on it, too much negative or positive cam will quickly wear the inside or out side edges of the front tyres. If you are in any doubt what so ever as to whether it is correct then you would be well advised to get it checked by a professional company. However you will need to seek these specialist companies out Budget tyre companies, such as 'Quick fit' will not be able to do this specialist work.
www.dtstyres.co.uk This Company is in Worthing West Sussex. But it really is worth driving the miles to ensure you are dealing with a company that know what they are doing and do not charge the earth for the privilege
Please visit this companies web site so that you can see the type of company you are looking for, This Company is able to undertake the specialist work required to get maximum life from your tyres and ensure that your steering & wheel alignment is correct.
Tony has gone to great lengths here to advise us on the camber settings, there is certainly sufficient information for you to be able to understand the reasoning for caution when tackling strut replacement, sadly that job does confront owners in large numbers because of the problems associated with the front springs breakage not being spotted before it damages and breaks the aluminium support cup which is secured to the strut.
Thanks you Tony for the photographs and some of the technical information
The steel springs fitted to both front and rear are notorious to breaking . On the front it is not unusual for the tail of the spring to break off at the top of the spring, with the rears its the bottom of the spring . However there have several instances where the tail of the front spring has broken /rusted off at the bottom and then due to the end not being to the correct profile damages the aluminium spring cup at the base. which eventually causes it to split and fracture under the tension of the spring. In this instance the driver was lucky, the damaged spring & cup collapsed as he was getting into the car , So how is that lucky? Well he could have been travelling down the motorway at seventy! There really is no telling where he might be now? One thing is for sure even with ESP & ABS, belt & braces, the car could easily have gone out of control and have been responsible for the deaths of not only the driver but third parties as well.
When looking round your car under wings, check for signs of rusting springs and damaged splitting cups. I spray my springs about twice a year with duck oil as a precaution against rusting of the spring tails, it also helps to reduce the Sulphation of the aluminium (rusting oxidization = white power coating on the surface)caused to a large degree by road salt, washing under wings also helps by removing accumulated salt deposits.
Another owners car, another day, same old problem!
It is obvious that this is a common problem on the earlier 'A' Class and all the examples I have seen where springs have broken they have suffered considerable damage by corrosion and rust. So is spraying with lubricant (duck oil ) the answer? Well it works well in my case, no broken springs and both front and rear springs are free of rust. In this case both defects were discovered on the same car one already broken along with the support cup and in the second case the whole assembly showing signs of severe corrosion. The rear springs also had to be replaced. Owners really do owe it to themselves and the car to check for this type of failure.
If you are not up to doing it yourself get your garage, any garage will do, check for spring damage prior to MOT. This type of failure will fail your car on the MOT and will add another £40 plus pounds to the repair bill for the re-test.
I can almost hear owners saying 'Well I do not need to worry because my car has a 'full Mercedes-Benz Service History' from new!! Sad as it may seem that can not be relied upon to prevent defects caused by mechanical failure or from rusting caused to a large degree by the rock salt applied to our roads in the winter months, 'But my car is washed after every Mercedes-Benz service!' The body work may well be washed over to impress, the underside gets little if any attention which is precisely where the emphasis needs to be placed, we can all wash the body work, we get a little dirtier when we do the underside, inside the wings etc.
As with many of the other units photographed these suspension components, front and rear were also removed from a car with a Full MB Service History If I was the Branch Manager of the Mercedes-Benz garage concerned I would be ashamed that a car that had been placed in my care, costing the owner thousands of ££££ over the years was found in this condition. Mud and grim allowed to accumulate as on these struts prevents the components being inspected for defects and rots the metal, if you have to choose which to wash, body or underside, choose the underside it will save you money. There is an old saying, 'If you want it done well do it yourself' and sorry to say it certainly applies in this case. Non of us can undertake all the maintenance on our modern cars, but we can ensure they are kept clean, even if we use the carwash and many of those do now also wash the underside with high pressure jets.
Please see my comments re-spraying these components with duck oil or a similar product. it really does pay.
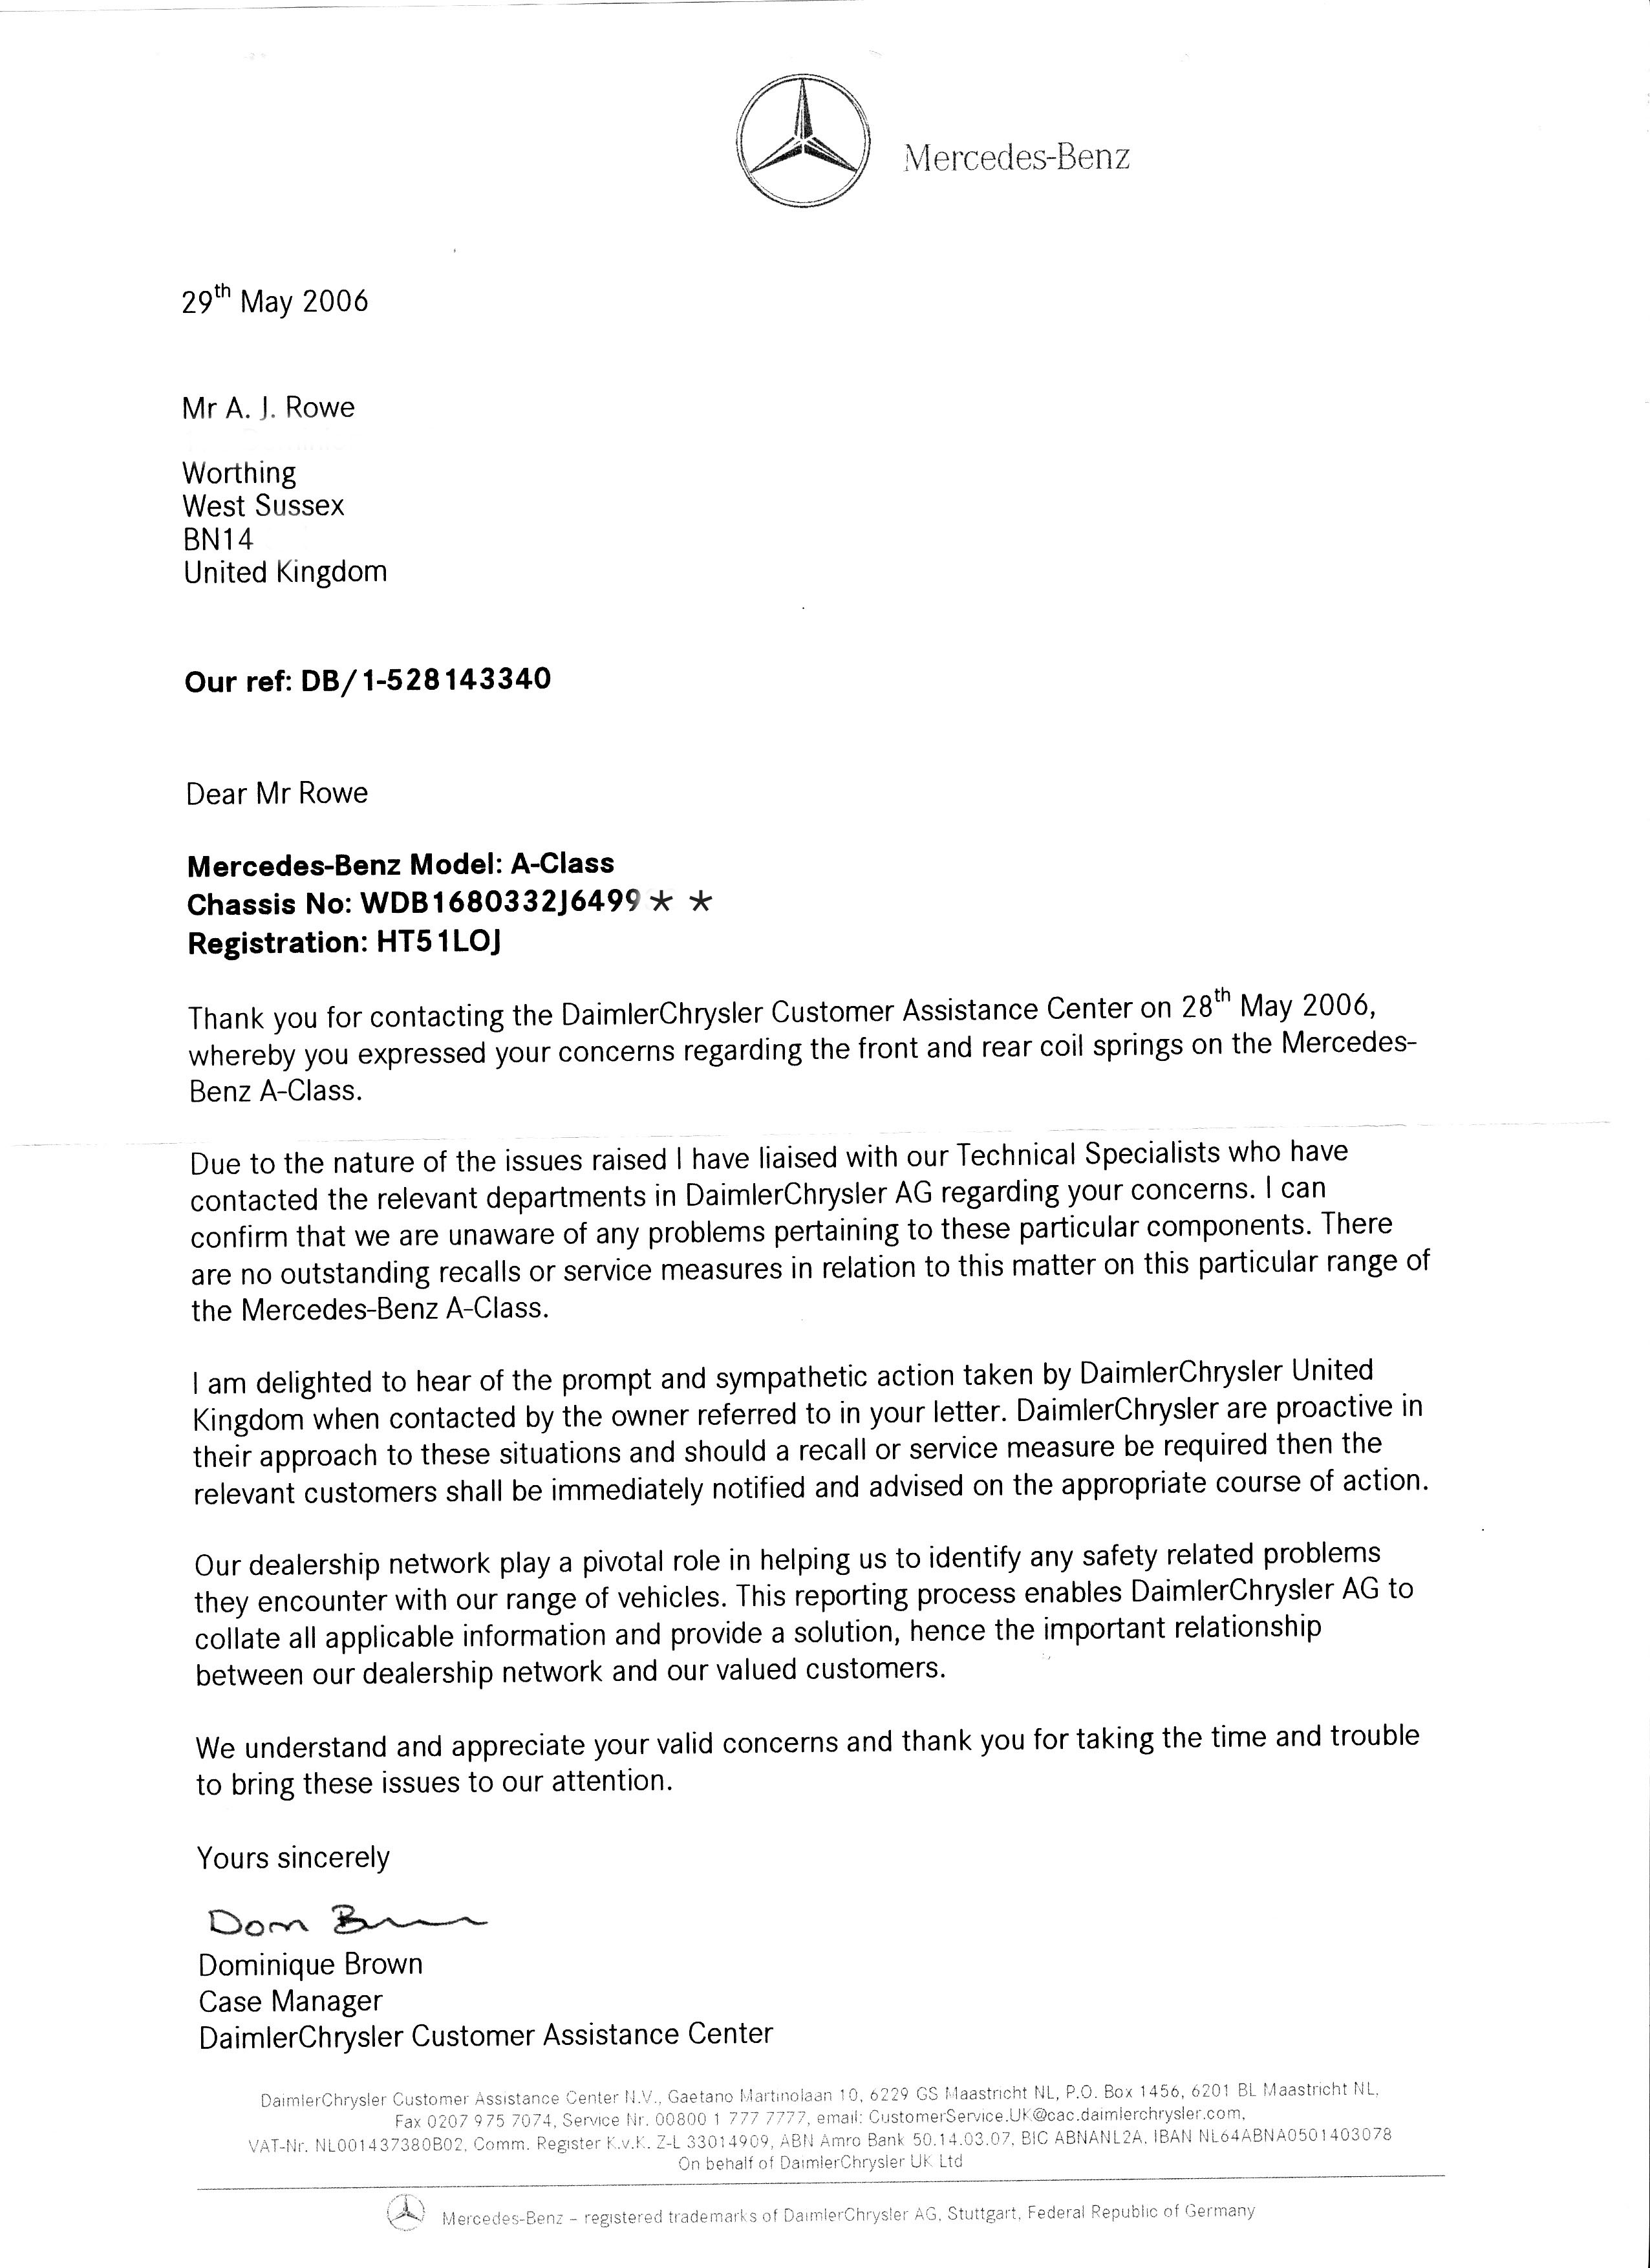
As a result of the defects I was aware of I sent Daimler Chrysler HO Germany a letter, this was the reply I received. So there is no problem, You are seeing things!!!!!
In affect Mercedes are saying there is no problem because they have not had feed back from their branches, or have not bothered to collate it! Would Owners who have and are suffering problems with springs please write to Mercedes using the reference and contact name on this letter and give them your story/experience of broken springs and spring cups as appropriate. also keep an eye on the replacement units fitted they are no better than the originals.
Since taking this matter up and getting no where there have been a number of cases of damaged lower support cups, however this next example, to present it is self is a slightly different problem.
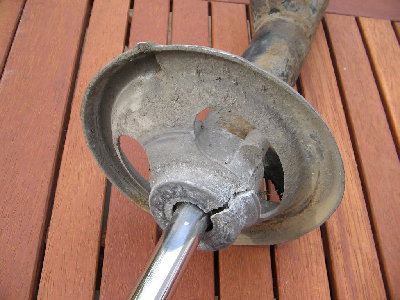
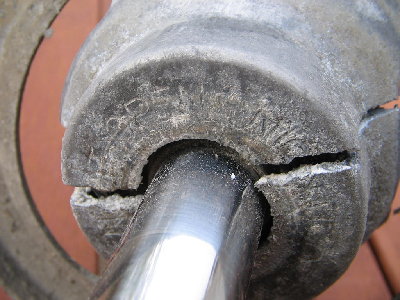
A fellow who who takes pride in his A160/W168 1998 model car, with 68000 miles on the clock and who has had it serviced for the last 4 years by Mercedes-Benz was horrified when his newly appointed service agent (Mercedes Independent) told him both of his front struts where in such a bad state that they needed replacing straight away, How was this possible? The car was only MOT' ed in September 2006, just six months ago!! The owner does point out that the corrosion was very difficult to see while the units and wheels were on the car.
It can be seem the corrosion which was almost certainly caused by the reaction of the aluminium and steel reacting with one another (electrolyse) is deep, and there are clear signs that the aluminium has simply sulphated away, this situation would not of course have been help by the rock salt that is put on the roads during the winter months.
Well I leave you to decide I wouldn't want the car down a country lane, let alone drive it on the motorway. This owner very responsible and did the work straight away, fitting genuine 'Blistering' parts as supplied by Mercedes parts departments, for £62 + plus Vat,(£72.85)each John managed to obtain his new units from Euro Car Parts same part provided for £59.80 each inclusive of VAT a saving of £28+
I feel sure that a number of owners will be after seeing these units be checking up on what state their units are in , Please remember Mercedes Service departments do not take the wheels off your car for any bulk standard service be it 'A' or 'B' UNLESS their is a problem in which case they will contact you for the authority to undertake extra, work and of course charge you extra money!!
In this instance John the owner picked up the parts using another vehicle and did the job himself, he has mentioned that was easier to remove the strut complete with the swivel bearing and reassemble the whole unit prior to refitting to the car.
If you are worried or concerned by what you have read and seen here, and are not able or capable of inspecting you front struts then any garage would be able to undertake this inspection. In fact It might be wise NOT to use your normal garage for this inspection! I would recommend removing the wheels for this inspection. I would like to thank John for the photographs and information supplied.
One again 4/8/08 inspection following reading this page has resulted in yet more photographs of owners car suffering this major defect, For Mercedes Benz to say they are not aware of a problem is nothing short nonsense, there is problem albeit down to servicing of the car. I maintain that if these units are sprayed from time to time with duck oil or a similar product the spring and cups will not suffer the problems shown on this page.
I make this statement on the basis that I keep mine sprayed and to date have suffered not spring damage front or rear . please if your car suffers this problem follow the procedure below.
It appears it is the only way we are going to resolve this ongoing problem if at all. The address for your mail is :- For the attention Dominique Brown, Daimler Chrysler Customer Assistance Centre, NV , Gateman Marginalia 10,6229 GS Maasttricht NL, PO Box 1456,620 BL Maastricht NL. Case ref no MB / DB /1-528 143340 I will now be contacting VOSA to inform them of the background with photographic evidence, if only to ensure they are aware and inspect any 'A' Class involved in a serious accident with a view to discounting this know problem from their list of possible
causes. lofty
In view of the ongoing problem 4/8/08 I have now written to the manufacturer I will keep you posted if I get a reply
And the reply from Bilstein who claim on their site the manufacture struts is a little surprising unless there has been a language misunderstanding! 08/08/2008:-Good morning Albert,
regarding your a.m. e-mail we kindly inform you that we don’t have developed no component. We only delivered on demand of Mercedes Benz. An answer regarding your question you can get solely from Mercedes Benz.
Mit freundlichen Grüßen/With best regards
Tanja Feddersen
Let me make it clear I wasn't blaming Bilstein for the problem merely trying to bring it to their attention as it is obvious that the problem is caused by the electrolysis between the two metals used in the struts construction and the salt that is plastered on our roads during the winter months But of course Mercedes Benz just will not accept that the problem exists.
Its very obvious that if the contacted their Workshops throughout the UK in particular they would see the amount of work that is created by such a defects and that would only show a small percentage, as a lot of owners I'm sure replace their own units or have them replaced by other than MB workshops for obvious reasons!!
Struts/Suspension Details
www.Carparts Direct
Normally I say go to Mercedes Parts but in this instance it is cheaper to purchase else ware See link where the cost is approx £90. no doubt plus VAT .However One Mercedes main dealer quoted £800 to replace the two front struts one of which had a split suspension spring cup .
These units take no more than an hour aside to replace and that includes the servicing of the swivel bearing which in this case wasn't even included.
The owner did find an alternative Mercedes dealer who did the job for £500. plus however the bearing was not inspected or serviced and as a result she finished up with another bill for £300, plus the fact that she needed new tyres because the camber angle had not been checked and set by the garage concerned and if the claim they did then they certainly didn't get it right.
In all cases where the struts are replaced the camber angle MUST be checked and corrected as necessary this is done by movement on the top securing bolt, failure to carry out this action and your tyres will either wear on the inside or outside edges dependent on whether the wheel is located at a negative or positive camber. If the camber is correct the tyre will wear evenly over the whole surface the tyre tread. This setting should not be confused with the tracking which is an entirely defend setting and is associated with the wishbone and track rod ends settings. Mercedes appear to term this action Chassis alignment either way it must be carried out if tyre damage and unnecessary wear is not to occur.
I found the easiest way to fold these wings down to allow them to pass through the location hole as the strut is with drawn was to push a piece of aluminium tubing over them, a small socket also does the job. do not cut them off as spares are not available without purchasing the whole bearing assemble as seen above. The sole function of these is to locate and support the strut while being fitted, as they are pushed through the location holes the wings are folded in and then spring back out, forming a support and guide.
Remember if you are removing you front struts for any reason they are removed and replaced as an assembled unit and then serviced
To release the complete strut from the wing the two winged latching hooks will need to be compressed to allow them the drop through the hole in the car body
If changing the springs or wishing to access/replace/service the swivel bearing, you will need some sort of spring tensioner as the bearing is located between the spring top plate and the bearing housing this is just one set of tensioners, the problem is they do tend to slip on coil springs to over come this a place a piece of *rubber under the hooks top and bottom before starting to tension the spring, this does help. Nylon luggage belts with the self tensioning ratchet lever also work When collapsing the spring do evenly both sides until the upper plate 3 it is clear to move with out contacting the spring. Always treat a spring under tension with caution Remove the large nut 6 at the head of the strut/piston.
It is not unusual for the plunger of the piston to turn when you attempt to undo the large nut, if this is the case, rap a piece of *rubber or padding around the piston as near to the top as possible, and then clamp with a pair of 'Mole-Grips', The padding is essential to prevent damaging the smooth piston surface 13 * ( I used a piece of old wheel barrow inner tube kept for just such a job)
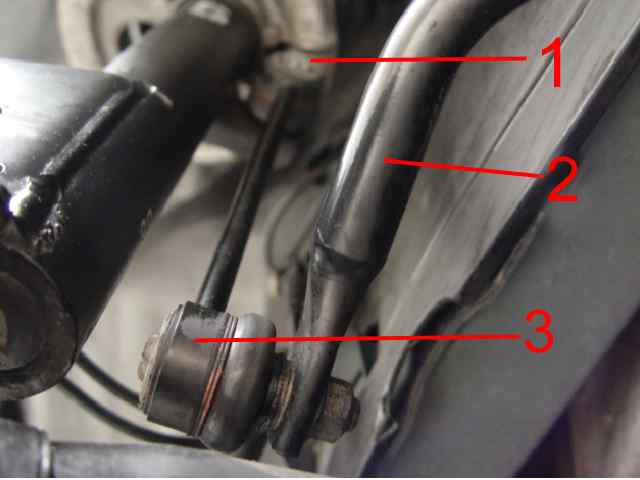
Drop Links A168 320 11 89
Drop link/stabilizer located to the underside of the front spring housing 1 and the anti roll bar.2 Both ends are fitted with a ball joints 3 that are subject to wear, easily replaced and not too expensive, if you can do it yourself!
Both ends of the Drop link can be seen in this photo If they are worn or the ball joint rubbers are split your car will almost certainly fail its MOT. Ministry Of Transport Test)
I am reliably informed that one way of checking your drop links is to follow this technique of test.
To quickly test the drop links is to open a front door. Car in natural, hand brake off. Wheels choked and on level firm ground.
Then rocked the car from side to side by pushing up and down on the roof frame of the door opening. Do not open the window and simply push the door's window frame as this will cause it to bend.
If a loudish clicking noise is heard, it could be the drop link. Now turn the steering wheel to a full lock. Ask someone to apply pressure to the drop link while the other person rocks the car again. If the noise reduces, then the drop link is faulty.
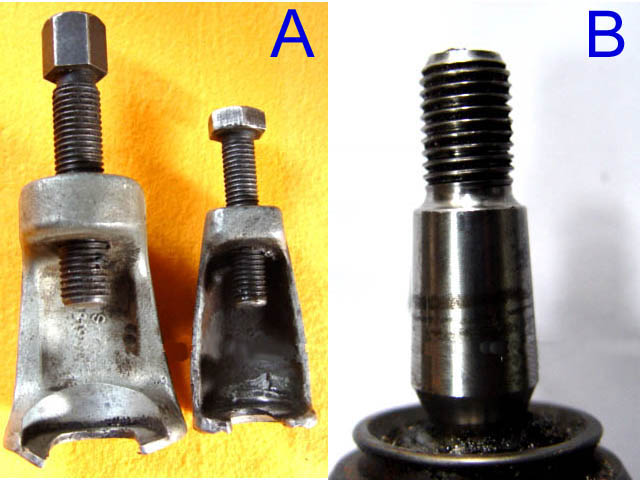
When it comes to replacing ball joints or track rod ends a ball joint breaker A will almost certainly be needed, either way it will make the job a lot easier. They are available in different sizes and I do not doubt different makes, these two are many years old and have removed all sorts of joints on all sorts of vehicles. The smaller of the two is suitable for light vehicles while the larger one is used on light commercial. Wedge shaped breakers are also available placed into position and then hammered home. I prefer the type photographed which is a little less aggressive but still does the job. B Shows the typical taper on the fixing spindle of such items as ball joint, track rod ends, & drop links. It is this which achieves a tight joint when installed but also makes removal difficult and therefore a ball joint breaker invariably has to be used.
Operation/Use , the bolt in the ball joint breaker is withdrawn/unscrewed to allow the toes T of the breaker to be forced between the rubber cover and knuckle, and the underside of the securing/housing. The nut of the tapered spindle on which you are working must be pre-slackened not removed slacken the nut until the top is level with the end of the spindle. Do not remove the nut completely, This is vitally important where it is intended to re-locate the component, track rod end or similar units where repairs on a different component requires the removal of another. If the nut on the tapered spindle is completely removed there is a very good chance the thread or edge of the spindle will be damaged beyond repair, making it impossible to re-fit the nut, hence a new unit, track rod end or ball joint, will be required. The bolt in the breaker is then screwed/re-adjusted to bring it into contact and inline with the nut on the tapered spindle, as the bolt is turned, either using a ring spanner or socket so pressure is applied to the nut on the head of the tapered spindle, along with the underside of the unit from which it is forced/removed. Invariably there is no apparent movement even though the whole assembly is under severe pressure, slightly more pressure applied will result quite often in an alarming bang, do not panic, the bond between the two components is broken. On some occasions very little pressure is required to break the joint but in exceptional circumstances the bond cannot be broken, even though a very high pressure is applied. In such circumstances you may need to resort to more dramatic measures, place a heavy hammer or block of metal one side of the housing from which the tapered spindle is being removed and while it is still under pressure give the opposite side of the housing a sharp smack with another hammer, the bond will almost certainly be broken. Heat is always a last resort as damage is invariably caused to the rubber components in the immediate area.
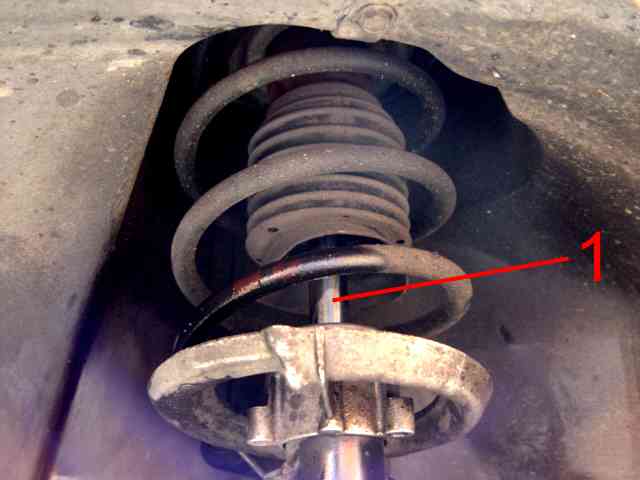 Very easy to inspect, when taking off front wheels look for seepage of fluid around the area of the shock absorber piston, early signs that that you will shortly have to replace a strut. In the case in picture the apparent fluid, is cleaning fluid applied as part of my service/inspection, which will be cleaned off in due course. It will be noted that when the when the car is jacked up the shock absorber piston is exposed beyond the plastic gaiter, due to the wheel hub having dropped, this exposes the polished piston, ensure that this does not become contaminated with dirt and grim during your service. Although the piston 1 is made of very hard metal it can still be damaged by sharp partials of grit etc. If necessary at all, it is preferable to blow it off with an air line rather than wiping with a cloth
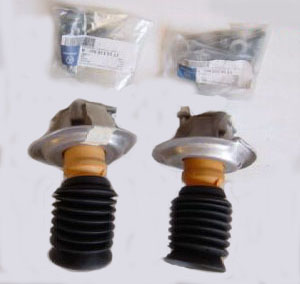
 www.dtstyres.co.uk
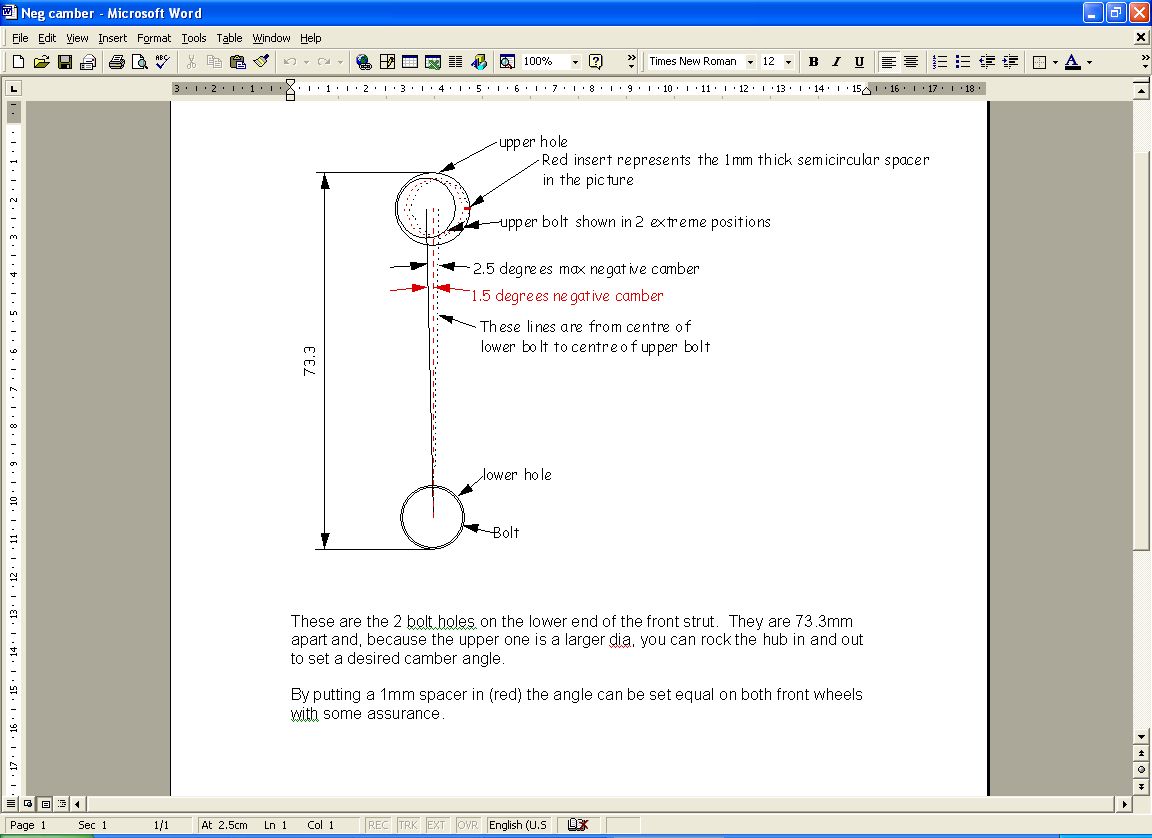
 The steel springs fitted to both front and rear are notorious to breaking . On the front it is not unusual for the tail of the spring to break off at the top of the spring, with the rears its the bottom of the spring . However there have several instances where the tail of the front spring has broken /rusted off at the bottom and then due to the end not being to the correct profile damages the aluminium spring cup at the base. which eventually causes it to split and fracture under the tension of the spring.
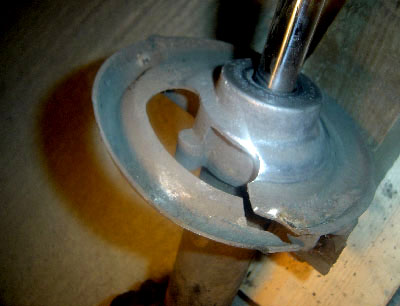


 It can be seem the corrosion which was almost certainly caused by the reaction of the aluminium and steel reacting with one another (electrolyse) is deep, and there are clear signs that the aluminium has simply sulphated away, this situation would not of course have been help by the rock salt that is put on the roads during the winter months.
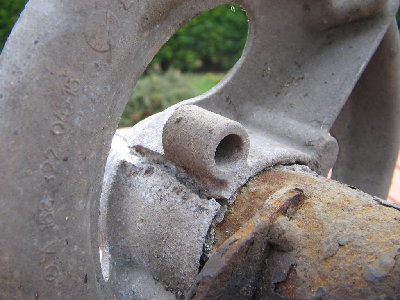 Well I leave you to decide I wouldn't want the car down a country lane, let alone drive it on the motorway. This owner very responsible and did the work straight away, fitting genuine 'Blistering' parts as supplied by Mercedes parts departments, for £62 + plus Vat,(£72.85)each John managed to obtain his new units from Euro Car Parts same part provided for £59.80 each inclusive of VAT a saving of £28+
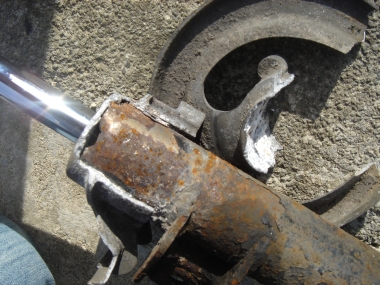
 If changing the springs or wishing to access/replace/service the swivel bearing, you will need some sort of spring tensioner as the bearing is located between the spring top plate and the bearing housing
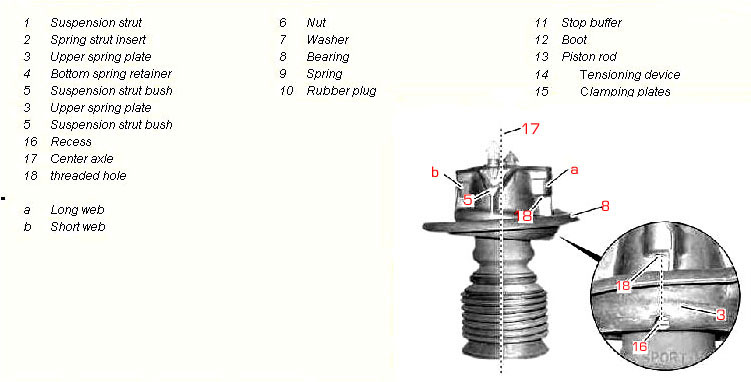
 Drop Links A168 320 11 89
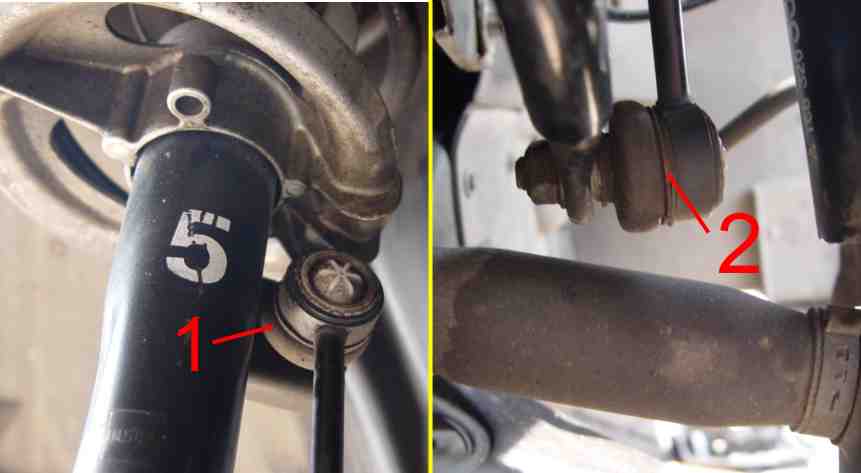
 When it comes to replacing ball joints or track rod ends a ball joint breaker A will almost certainly be needed, either way it will make the job a lot easier. They are available in different sizes and I do not doubt different makes, these two are many years old and have removed all sorts of joints on all sorts of vehicles. The smaller of the two is suitable for light vehicles while the larger one is used on light commercial. Wedge shaped breakers are also available placed into position and then hammered home. I prefer the type photographed which is a little less aggressive but still does the job. B Shows the typical taper on the fixing spindle of such items as ball joint, track rod ends, & drop links. It is this which achieves a tight joint when installed but also makes removal difficult and therefore a ball joint breaker invariably has to be used.
  Operation/Use , the bolt in the ball joint breaker is withdrawn/unscrewed to allow the toes T of the breaker to be forced between the rubber cover and knuckle, and the underside of the securing/housing. The nut of the tapered spindle on which you are working must be pre-slackened not removed slacken the nut until the top is level with the end of the spindle. Do not remove the nut completely, This is vitally important where it is intended to re-locate the component, track rod end or similar units where repairs on a different component requires the removal of another. If the nut on the tapered spindle is completely removed there is a very good chance the thread or edge of the spindle will be damaged beyond repair, making it impossible to re-fit the nut, hence a new unit, track rod end or ball joint, will be required.