Remember you also require the right tools, incorrect size spanners and sockets can round of the bolt heads making it virtually impossible to remove them.
Then how will we ever learn? Get a Mate or somebody with mechanical experience to assist you, you can then either tackle the job under their supervision or watch closely while they undertake one side leaving you to tackle the other. Either way remember your life and that of others may depend on the job being done correctly. Remember also to always test the brakes after even the smallest of jobs not forgetting to check the brake fluid level.
The first method on this page covers replacing the pads and clips and 12mm bolts only. The second method involves removing the calliper complete. I have no preference, both get the job done and both save a lot of money. The only thing I ask is if you are going to work on your brakes and need the contents of this page to assist you then study the whole page before tackling the job. thank you. Lofty

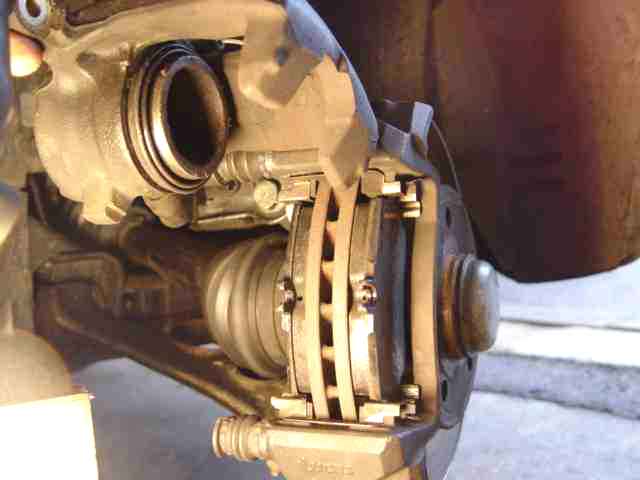
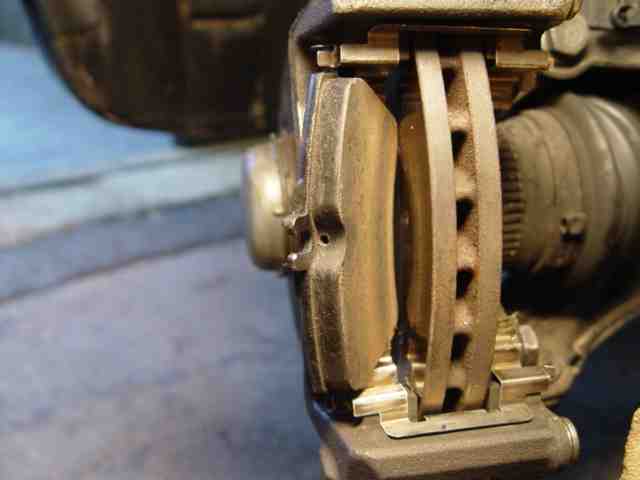
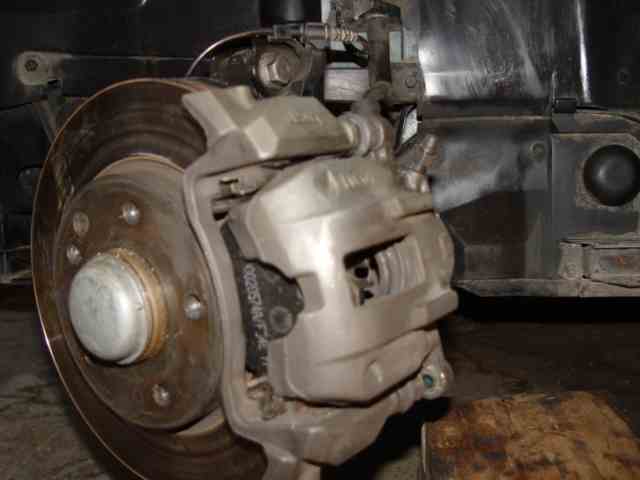
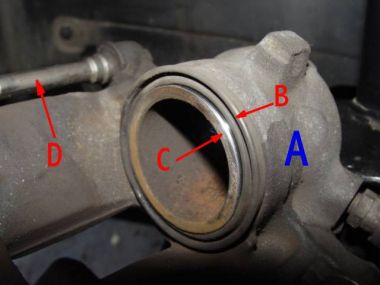
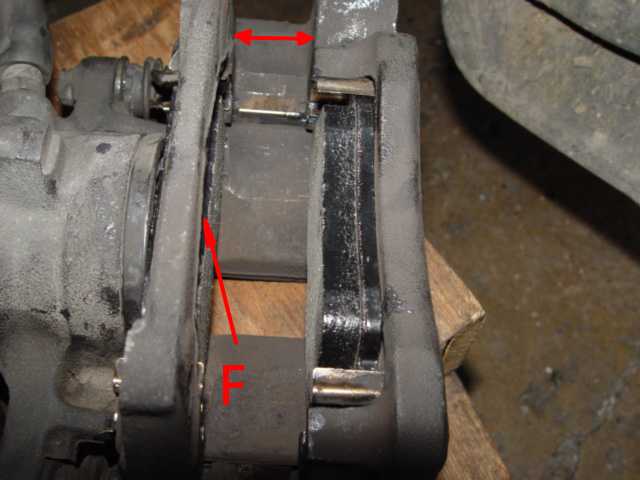
Front brake pads can be checked without the need to remove them. Having removed the wheel, the pads can be seen by looking into the area of the pads this is easiest done by tuning the wheels at an angle so that you can look straight into the opening in the calliper. The features in the photo are :-
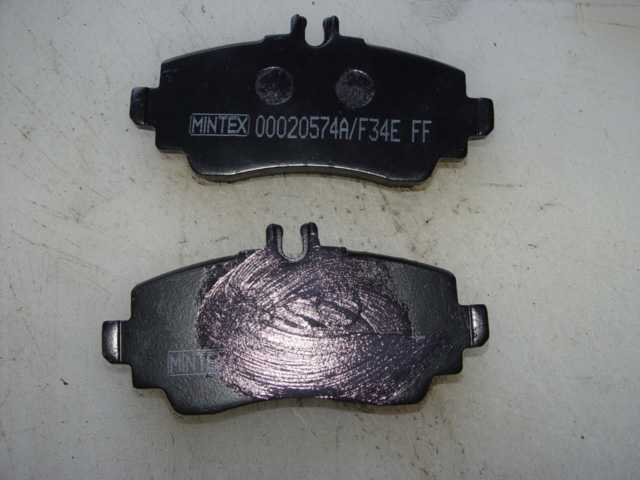
1 Original pads at 25400/Feb 02.
2 Layout of component parts.
3 New pads fitted at 27750/Nov.04
A The width of the Vented Disc sometimes known as the Rotor.
B The Remaining Break Pad.
C Metal Backing Plates onto which the pads are bonded.
D Calliper Piston & Gaiter.
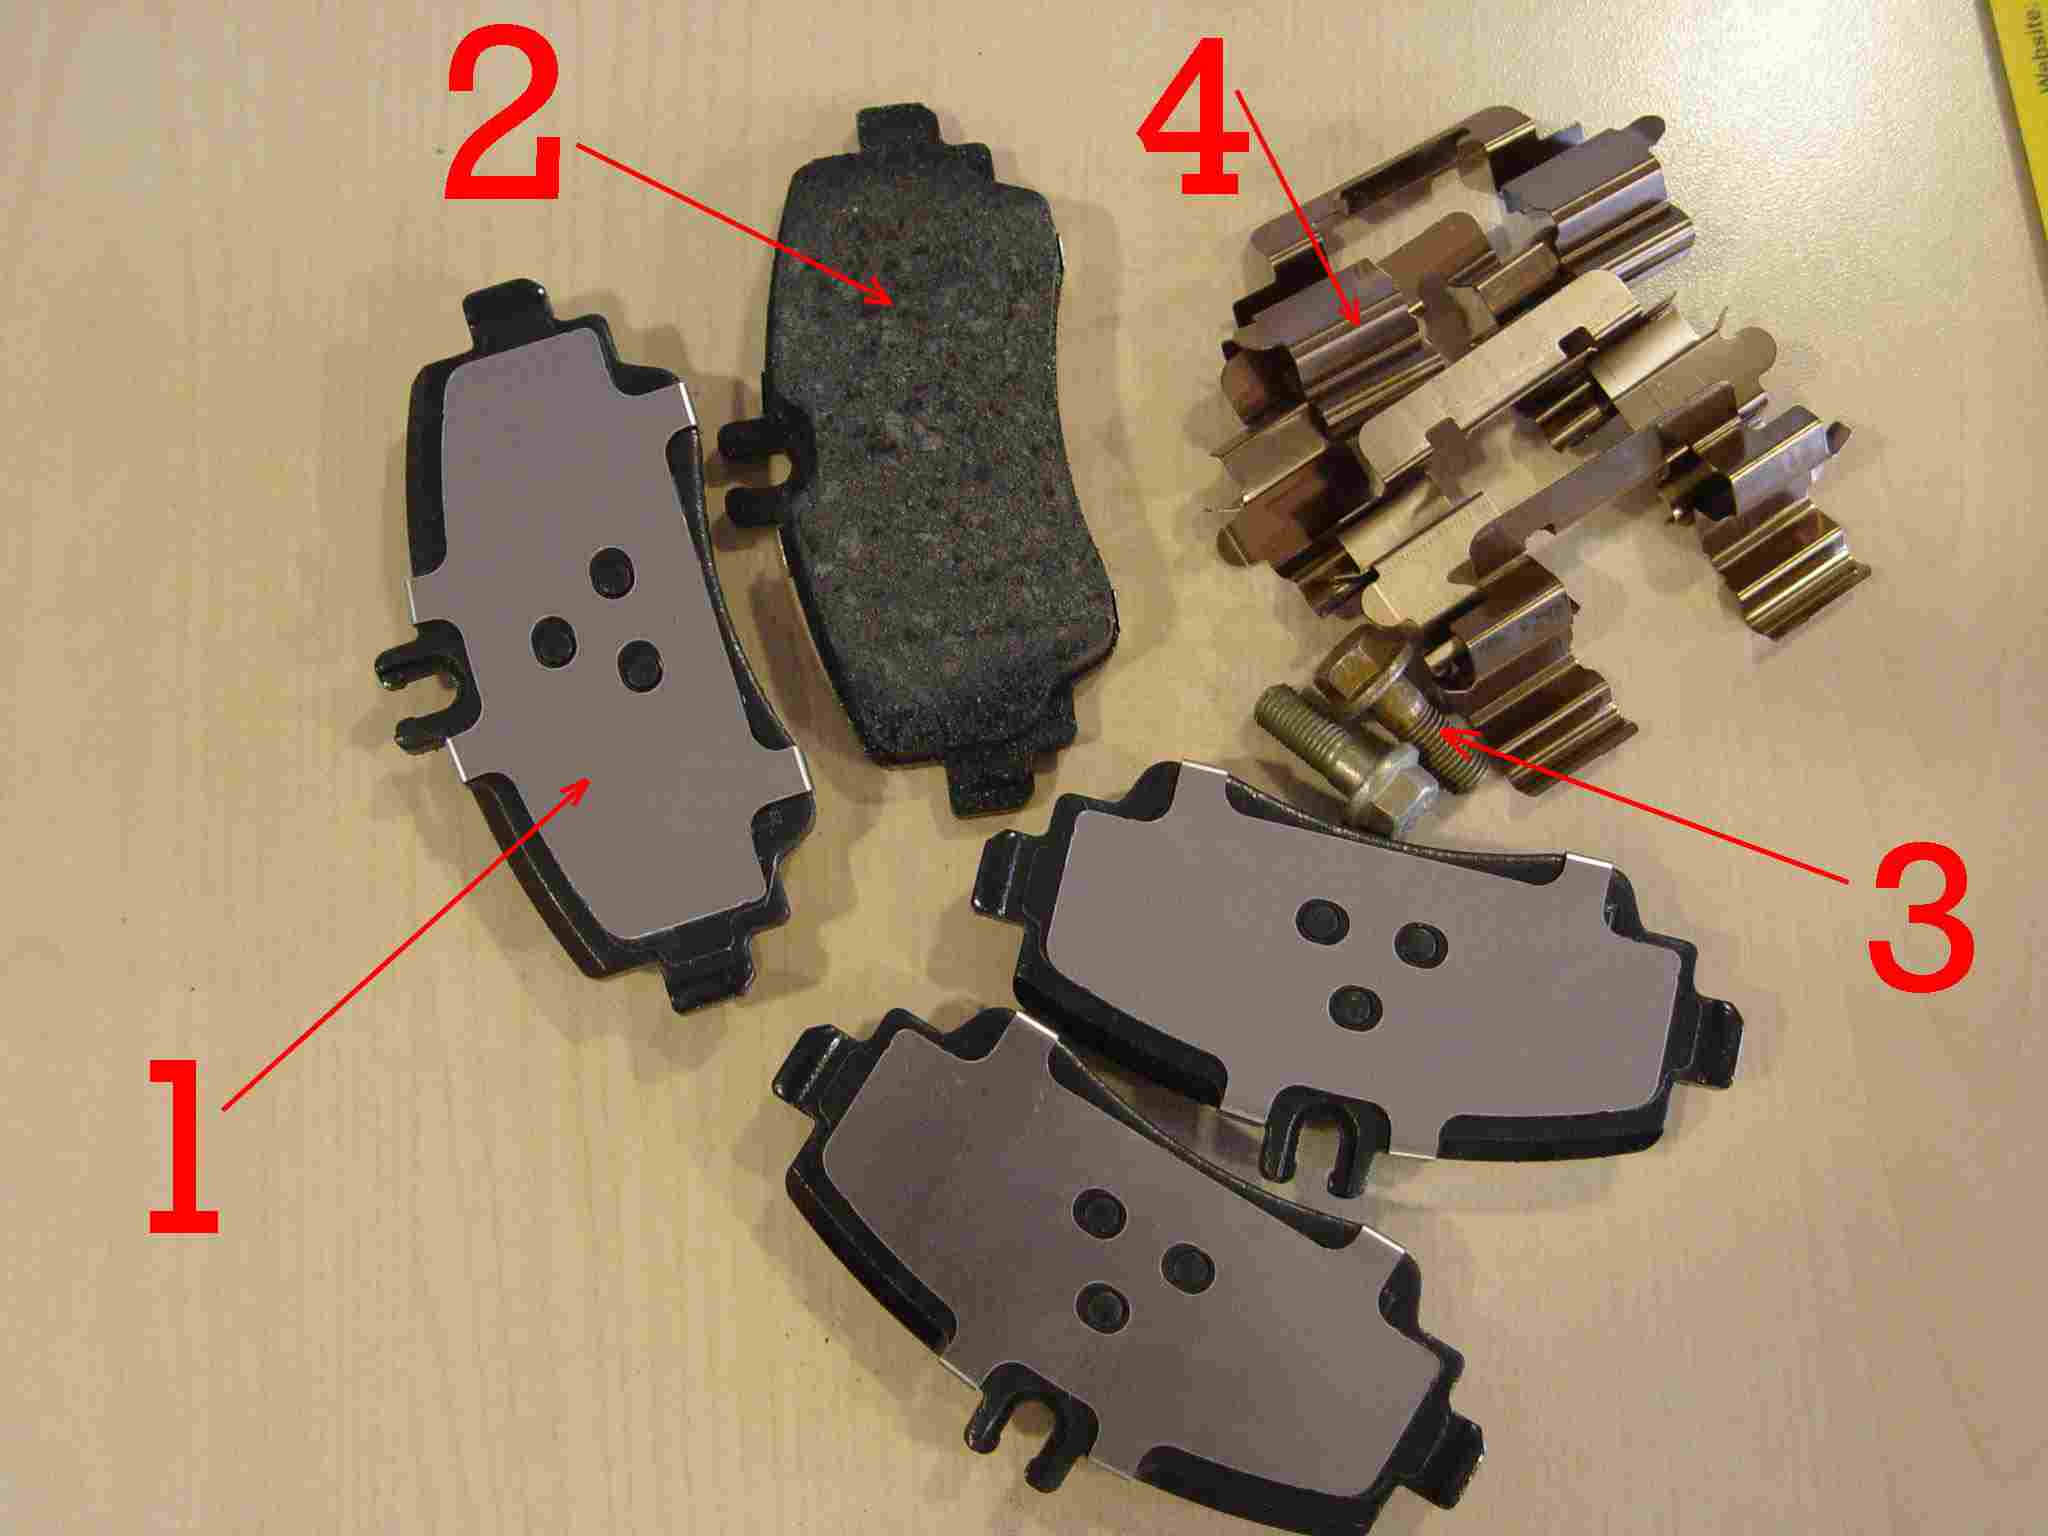 Before we start we do of course need to purchase the new pads. These can be purchased from Mercedes Benz you will pay more but at least will be assured that they are suitable for your car & they will be provided with two new 12mm Guide pin bolts
3
new pad clips
4
4 shims
1
and 4 pads
2
There should also be two information documents. One warning of the hazards of brake dust and precautions and the other directing which callipers should and should not be fitted with the shims. They should not be fitted unless your callipers fall in the the groups mentioned. See notice Below :-
Before we start we do of course need to purchase the new pads. These can be purchased from Mercedes Benz you will pay more but at least will be assured that they are suitable for your car & they will be provided with two new 12mm Guide pin bolts
3
new pad clips
4
4 shims
1
and 4 pads
2
There should also be two information documents. One warning of the hazards of brake dust and precautions and the other directing which callipers should and should not be fitted with the shims. They should not be fitted unless your callipers fall in the the groups mentioned. See notice Below :- Pads kit Part number A168 420 14 20. Cost £43.86 inc 04/05
Another reason to buy MB parts. Contained with the MB pad kit is this information.
Quote New Brake pad kits, A168 420 11 20 & A168 420 14 20
Casting 7320/C, D. The brake pad has to be installed with the metal shim. The casting number is located on the end of the carrier." Unquote
The subject of the shims since posting has caused considerable controversy, as a result I contacted MB customer service and after some months have received this reply.
QUOTE
21st April 2005
lofties@ntlworld.com
Ref: CS-1-250661329
Dear Mr Rowe
Thank you for your correspondence dated 7th February 2005, regarding the fitting of brake pads to the Mercedes-Benz A-Class.
Can we firstly apologise for the time it has taken to get back to you with an answer to your question, we can assure that no disrespect was intended.
We have been advised by our Passenger Car Technical Department that when changing the front brake pads, the shims that are provided should not be installed.
We hope this answers your question and clarifies the position of Mercedes-Benz. Thank you for contacting the DaimlerChrysler Customer Assistance Centre.
Should you have any further requirements, please do not hesitate to contact us at Should you have any further requirements, please do not hesitate to contact us at . CustomerService.UK@cac.daimlerchrysler.com . CustomerService.UK@cac.daimlerchrysler.com
Yours sincerely,
Michael Bacon
Customer Service
DaimlerChrysler Customer Assistance Centre N.V.
Gaetano Martinolaan 10 NL-6229 GS Maastricht, The Netherlands
. UNQUOTE
I trust that mail clarifies the situation certainly there is nothing I can add accept it may be dangerous to fit shims against the manufacturers instructions.
Other outlets sell pads only and in some cases kits that include bolts. Note that Bolts, clips, and shims are not available from MB separately.
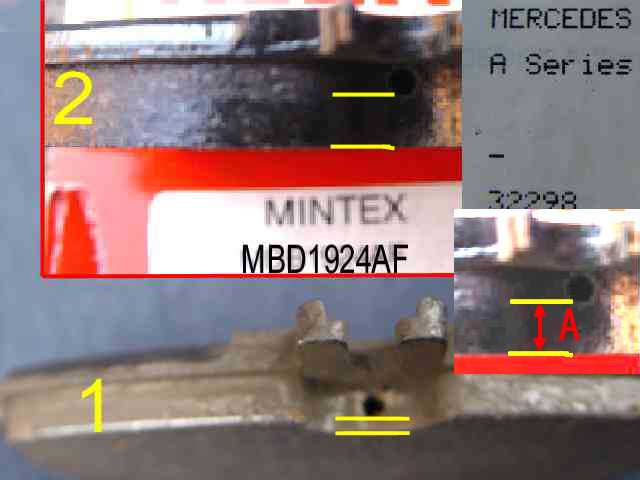
These original pads removed from my car were manufactured by Lucas, however Mintex & Girling both well know brake manufactures make pads for this car. Mintex MDB1924AF. Girling GirGDB1293. having used Mintex parts for many years I in my ignorance ,being unaware of the other components contained in the Mercedes Pad Kit purchased Mintex pads Cost £25.46, (Partco Autoparts.) to replace mine in about two thousand miles, or prior to my next service.
# Partco Autoparts, Part of the Unipart Automotive limited, I will buy MB genuine parts next time round. www.unipart.co.uk
All of the procedure mentioned in the earlier page 'Working around and Under your car'(Page 4) apply, short cuts lead to accidents so take care.

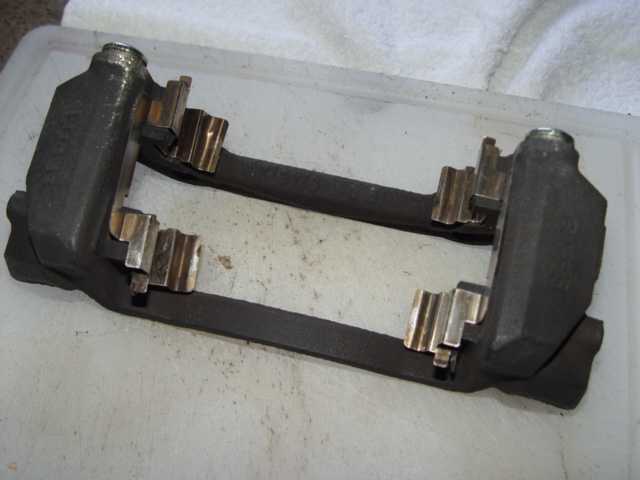
Component Parts/Calliper
1 Brake Pad Carrier.
2 Calliper Body, Piston Housing.
3 Brake Pad.
4 Pad Clips.
5 Brake Disc Locking Screw
6 Vented Brake Disc or Rotor.
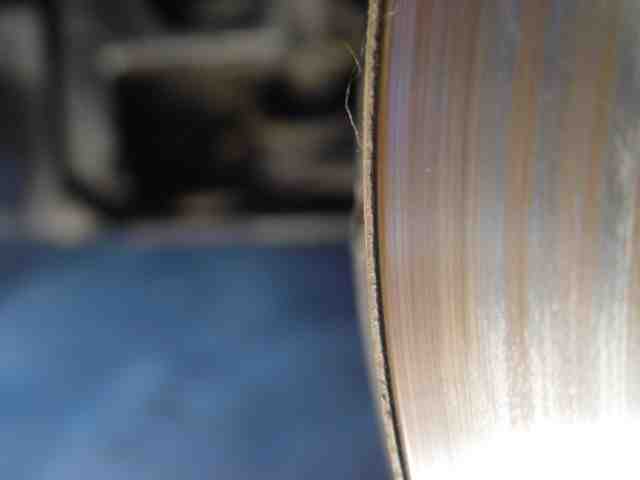
Recorded Mileage 25400
Having compared my present pads 1 with the new pads 2
I have about 25% of usable pad left, it is of course vital that pads are not so worn that metal come into contact with metal. Yes you will have been warned by the Low pad warning light! if it is working? And you will in all probability had to top up the brake master cylinder reservoir but it can happen! And as a result you may well want New disc's I suspect an expensive item. Oh, yes you will need to keep the balance right, so you will probably need a pair. In the same way that both sets of pads are replaced at the same time.
It should be noted that section of pad between the two yellow lines marked A inset is the usable portion of the disc Once you go beyond that point damage will be caused to the Low pad Detector contact albeit a replaceable sacrificial component
.
 Recorded mileage 27750
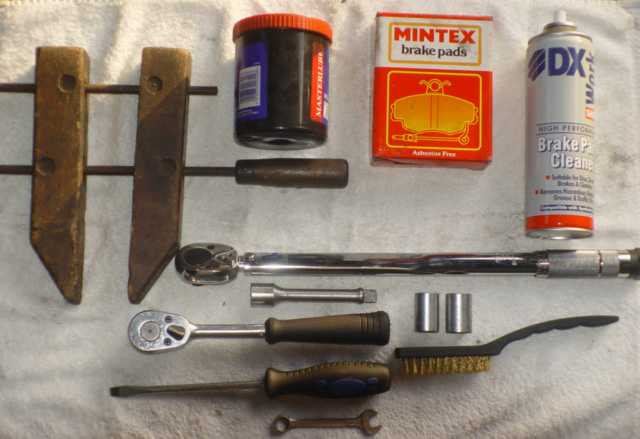
The pads now need to be replaced, a small number of tools are required for this job:-
1 Socket set, 12mm, 17mm, 18mm sockets.
2 Torque wrench for the wheel nuts and also the calliper securing bolts.
3 Brake cleaning fluid
4 Small amount of high melting point grease, or copper slip grease
5 A suitable clamp.
6 A small tube of loc-tite 'loc-N seal '
7 A cleaning brush and cotton rag.
8 I have also included a 11mm ring spanner for checking the bleed valves.
8 Medium size screw driver.
9 You will also find an old piece of carpet or a opened corrugated cardboard box useful for putting on the floor beneath the area you are working, this will absorb any hydraulic fluid that happens to drip or over spray when cleaning the calliper assemblies. Brake fluid will stain concrete and damage tarmac.
10 An old plastic bowl or seed tray, to place the components in as they are removed , thereby keeping them free from grit etc.
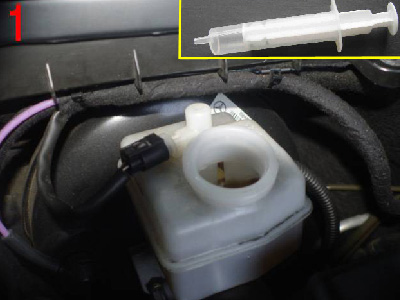
Bear in mind that when fitting new pads the brake fluid level in the reservoir will rise as the pistons are forced back into their bodies to allow the new pads to fit. If the fluid is high in the reservoir then using syringe or suitable devise take off some of the fluid, if my case the fluid was only just above the min mark , so I took no action but kept a close watch on the level as the pistons on each wheel were forced back. when both sides had been replaced the fluid was up to the maximum mark.
Now we can remove the wheel, I only Jack up one side of the vehicle at a time, Having removed the wheel the brake disc and calliper will be exposed.
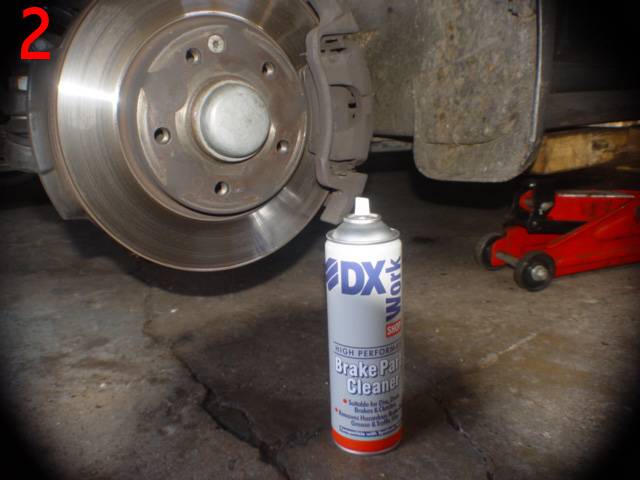
If you take a look at the component parts you will see that they are contaminated by fine black dust, under no circumstances should this be brushed or blown off, the dust will irritate the fine tissue of the lungs and can cause real problems so be warned. The documentation that comes with your pads will also carry a warning notice, take a few minutes to read it. Brake cleaning fluid can be purchased for a few pounds and will make a reasonable job of cleaning the break parts and deal with the dust aspect.
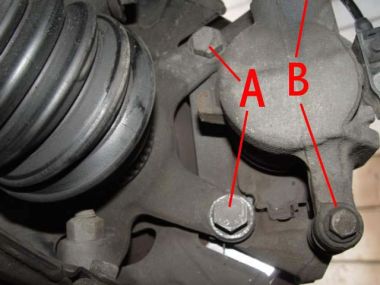
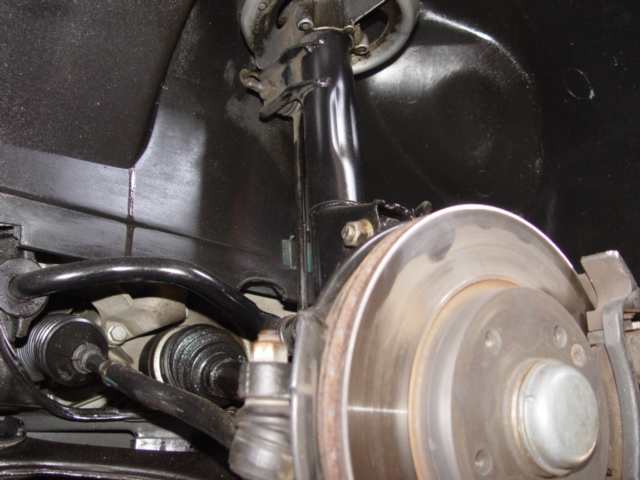
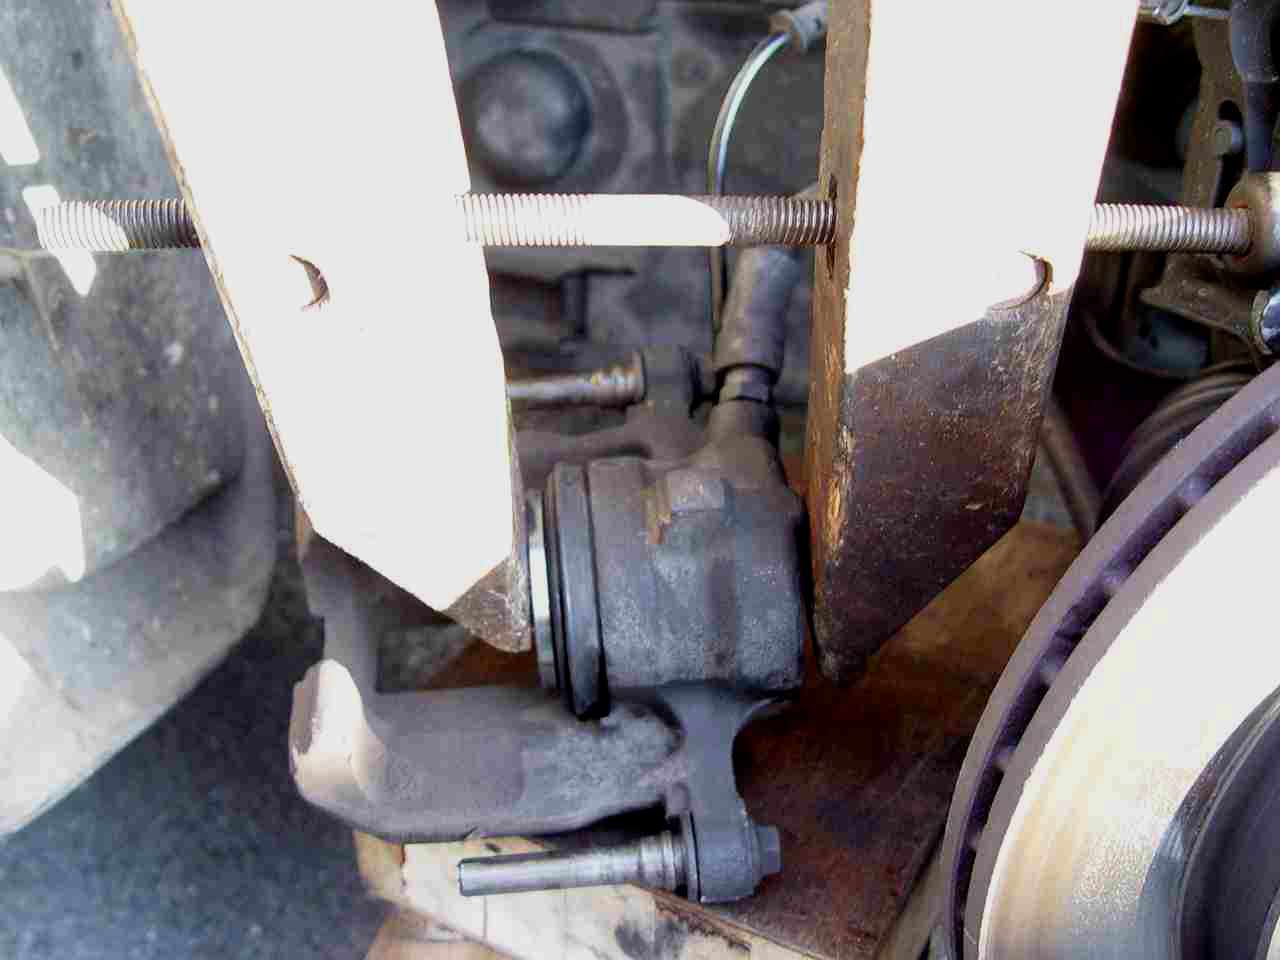
The Calliper has two pairs of bolts A & B To remove the pad carrier only remove the lower bolt B and slacken the top bolt, both being 12mm calliper guide securing bolts. This will enable you to lift the pad carrier and inspect the pads
However if you are going to service the complete calliper, remove pair A the 18mm bolts, take precautions to ensure the weight is not taken on the flexible brake hose attached to the calliper.
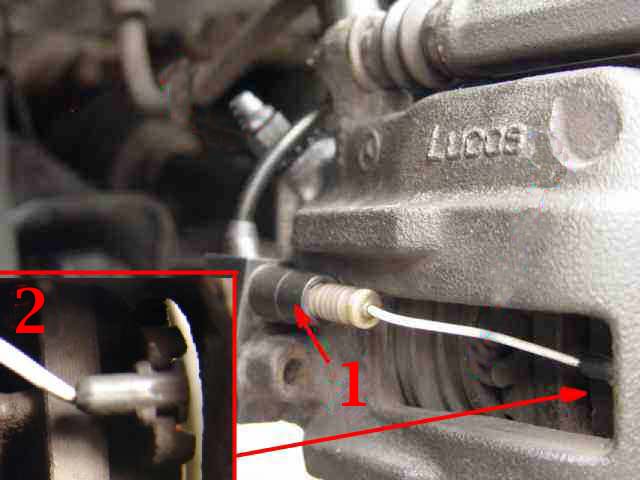
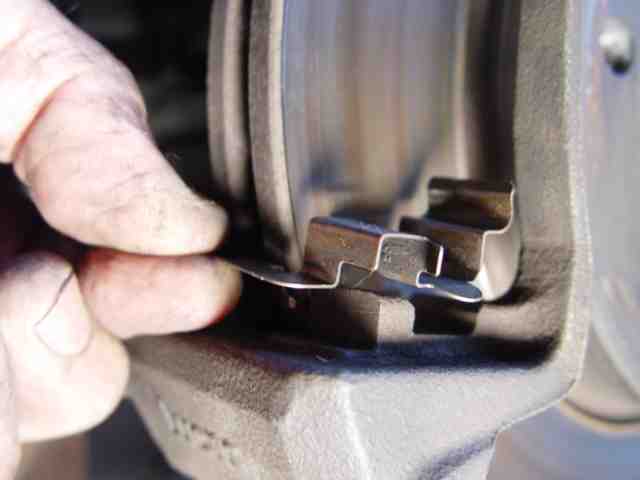
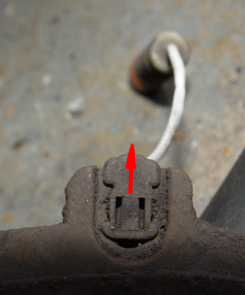
The Low pad connection 1 is a push fit and can be withdrawn by simple pulling on the connection The other end 2 which slides into the horse shoe like housing on the pad is the contact which when coming into contact with the brake disc due to wear of the pads will light the indicator in the cabin, warning of Low Brake Pads.
Although there is still some pad left their replacement should be considered a priority. The contact is a sacrificial unit and should be replaced when pads are changed.
1 Low Pad Warning Device Connection
2 Low Pad Warning device Contact MB Part No. A126 540 21 17
It should be noted that there is only one low pad warning indicator, that is situated on the O/S this should be disconnected from the connection before attempting to remove the pads. 1 Remove 2 Withdraw See also pictures below
 If it is your intention to change the brake pads & clips then you only need remove the one lower 12mm bolt and slacken the other, which will allow you to lift the calliper piston housing up & away from the pad carrier.
Having lifted it up it can now be slid towards the inner wheel arch and removed completely from the calliper, it will have the upper guide
pin located as well as the flexible hydraulic brake hose and therefore
care needs to be taken to ensure that weight is not applied to this hose or that the calliper piston housing is left hanging.
HAVING REMOVED THE CALIPER FROM THE DISC, DO NOT OPERATE THE BRAKE PEDAL OR THE HYDRAULIC PISTON WILL BE FORCED FROM it is HOUSING. NECESSITATING it is REPLACEMENT AND BLEEDING OF THE SYSTEM
Excessive pedal travel
This informative e-mail was received from Dan, please note the content as it confirms my thinking that when replacing pads, discs shoes or drums the complete brake assembly should be serviced, always service brake's in pairs i.e. both front, both rear.
I bought my car '99 A-class with over 200,000 miles on the clock.
Amongst many other trivial faults and problems, the brakes were by far the most serious issue. Although they did stop the car, there was excessive pedal travel (nearly 2 inches), terrible vibration when braking, especially when almost stopped, lack of servo assistance and what is sometimes referred to as 'diesel pedal creep'.
My fear was that the expensive master cylinder or the servo vacuum reservoir needed replacing. I also considered the possibility that the vacuum pump fitted to diesel engines to operate the servo assistance may have been worn and just couldn't generate enough 'suck', or that a diaphragm in the reservoir had a small split in it, resulting in the loss of servo assistance. The terrible vibration, I put down to worn/warped discs at the front. It is worth mentioning that there was no loss of brake fluid at all.
I decided that I could possibly live without servo assistance for a while as the braking effort wasn't too bad but the terrible vibration indicated that the discs were on their last legs, and that was pushing it a bit too far.
I duly purchased some new discs and pads for the front and started stripping down the old brakes. Upon removal of the calliper and pads I noticed that the pads had worn down in a tapered fashion and that the disc was excessively worn on the inside friction surface. One pad was almost completely worn away and the other only half worn. The taper was a giveaway that something was too stiff or seized. It turned out to be one of the slider pins that should allow the calliper to 'float', thereby applying equal force to each brake pad, had rusted-up and seized in the brake pad carrier. Upon closer inspection I discovered that the small protective rubber gaiter had split allowing dirt and water to do the damage.
With generous amounts of brute force and penetrating oil, I managed to work the pin loose and remove it. I then cleaned it, and the hole it lived in, with a wire brush and wet & dry paper. The pin was 'lubricated ed' and the whole lot put back together with the new discs and pads.
Working on the other side, I experienced exactly the same problem; a seized pin and a split gaiter.
Having put it all back together with the new discs and pads I took the car for a test drive and to bed the brakes in. To my surprise, I discovered that the diesel pedal creep and excessive travel had completely gone and the servo assistance restored! So much so that I nearly put myself through the windscreen with the first application of the brakes whilst moving on my driveway! Of course, the vibration also disappeared, as expected with the replacement of the discs.
I hope this will help other owners encountering this problem. D It is also worth reminding readers that the low pad indicator is only fitted on one front wheel of the car therefore imbalanced wear may not be detected. Always service and replace brake pads and shoes on pairs i.e. both rear brakes, both front brakes this helps maintain the balance of the braking system.
Having removed the calliper piston housing, the pads will be seen still in location in their clips on either side of the brake disc. To remove the old pads simply ease them out of the clips. Please note that these are new pads
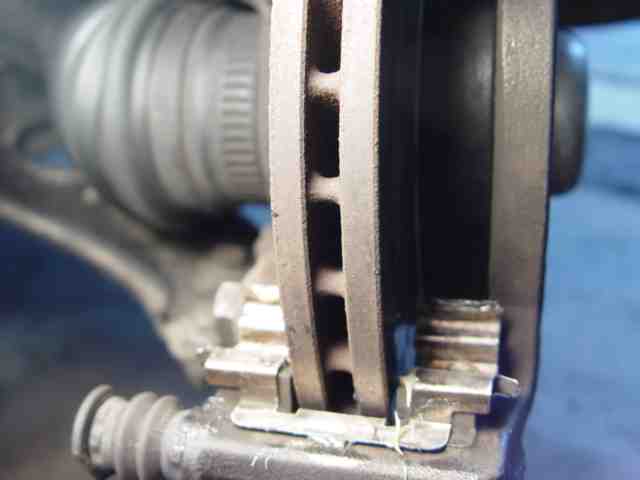
The clips also need to be removed, If they are being replaced, you wish to retain them, if they are sound as spares. If however they are being re-used then they will need cleaning and lightly greasing before being re-installed, take care they are quite fragile, they also have sharp edges. Note the profile of the casting on which the clips engage.
If you are not fitting new clips with the New pads ensure the new pad is held firmly in place by the old clip, failure to check this and you may well finish up with the pads chattering (rattling) in the clips when driving on uneven surfaces
These clips can be bent slightly but take care not to damage or break as they are not available separately from MB.
Some companies other than MB are now supplying clips with New pads, paying that little extra is in my opinion worthwhile.
When fitting the new pads I found it easier to position the pads at an angle of 45% place the bottom of the pad into the clip then offer the top at the same time holding the upper clip away from the pad, gently push in to position, ensuring the are firmly housed against the disc. Before fitting the rear pad, smear the area that will contact the piston face with grease.
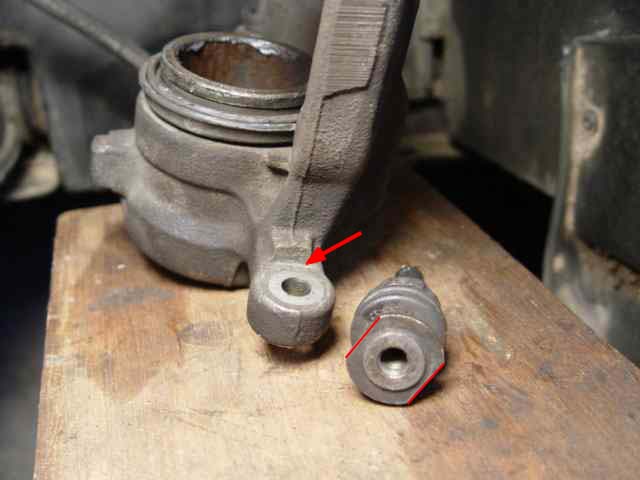
Before re-assembling the component parts you may wish to familiarize yourself with the calliper guide pin The face that goes to the carrier has two flats top and bottom this marries up with the flat on the piston housing casting.
The gaiter 2 should also be in position and in good condition. Note also the flat
1 which was mentioned earlier.
These gaiters 2 along with the guide securing bolts and special grease are available in kit form from Mercedes parts , part No. 168 421 00 86 priced at £12 01 plus Vat. 8/2007
 Where/if it becomes necessary to replace the pad cradle/carrier, due to wear of the guide pins or wear to the pad carrier body, the gaiters are included with that unit. part No 168 420 15 15 priced @ £68.00 plus Vat. 8/2007
Note The cradle/carrier does not come with pad clips, and the new calliper does not come with the pad cradle/carrier. Basic calliper body is complete with the wheel cylinder. priced at £94.00 plus vat, As previously indicated calliper cylinder repair kits are available but my not be in stock at your MB parts.
Having replaced the pads and clips The calliper piston housing can be refitted, apply a film of grease to the calliper guides. Slid the lower guide complete with the gaiter into it is location in the carrier, the corrugated gaiter will snap over the shoulder of the carrier effectively holding it in place. Having pre-greased the upper guide, position and raise the calliper piston housing, locate the guide and slid it forward into the carrier, ensure the upper gaiter sits correctly. Now lower the piston housing down to meet the carrier. Ensure the flats on the guide pins locate.
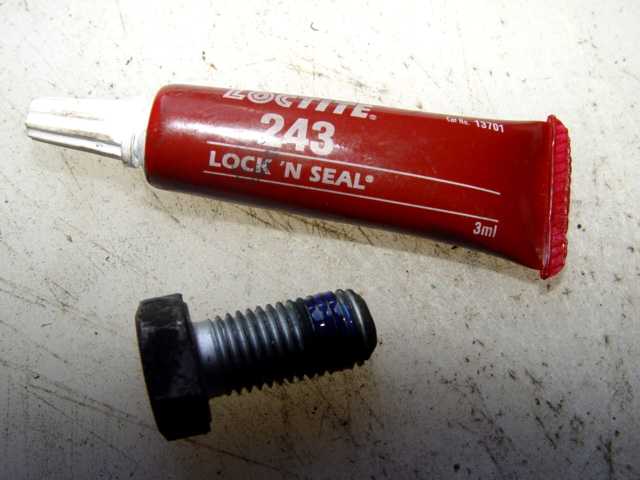
Whether you are fitting new or used bolts apply a small dab of 'Loc N Seal' to the thread, fit the lower bolt ensuring the flat on the guide is correctly located, hand tighten., Remove and replace, or treat the upper bolt in the same way. When both bolts are correctly located, tighten evenly to a torque of 30Nm (22.5 ft.lbs) REMEMBER TO PRESS THE BRAKE PEDAL BEFORE ATTEMPTING TO MOVE THE CAR.
Having now tried the pads only method, I found it more fiddly than removing the complete calliper, the amount of work involved was about the same. Although the piston was easier to move away from the existing pads which were left housed against the disc. Where the complete calliper is removed I experienced minor difficulty in removing the calliper away from the disc, which had to be levered to clear the old pads, this was caused by the very slight shoulder that was present on the braking surfaces of the disc.
If you do not intend replacing the existing pads, take care not to damage the braking surface on this sharp shoulder which is caused by previous pad wear. Alternatively if you have the tools, you can grind the protruding edge off the brake disc. I used an angle grinder, with the car in 3rd gear engine, engine ticking over the disc brake disc spins slowly, the grinder disc revolving against the edge of the brake disc removed the metal step caused by wear on the disc, leaving a nice clean edge.
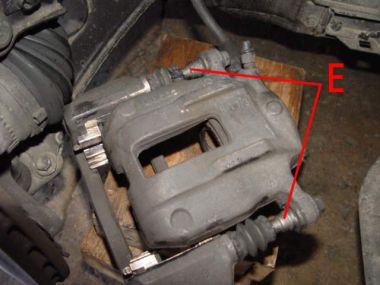
Calliper securing bolts, If you wish to remove the complete calliper then remove the 18 mm bolts indicated A in the photo above. Either way you will be working from the back so make sure you are turning them anti clockwise to undo them, and not tightening them further, the 18mm bolts are tight so if possible use a well fitting socket. both bolts need to be removed if you intend removing the calliper.
As with the previous procedure, Before removing the calliper place blocks close to hand on which you can place the calliper once the top bolt is removed. Under NO CIRCUMSTANCES SHOULD THE CALIPER BE LEFT SUSPENDED ON THE HYDRAULIC TUBE OR DAMAGE MAY BE CAUSED. Having now removed the calliper the old pads can now be removed from their respective locations.
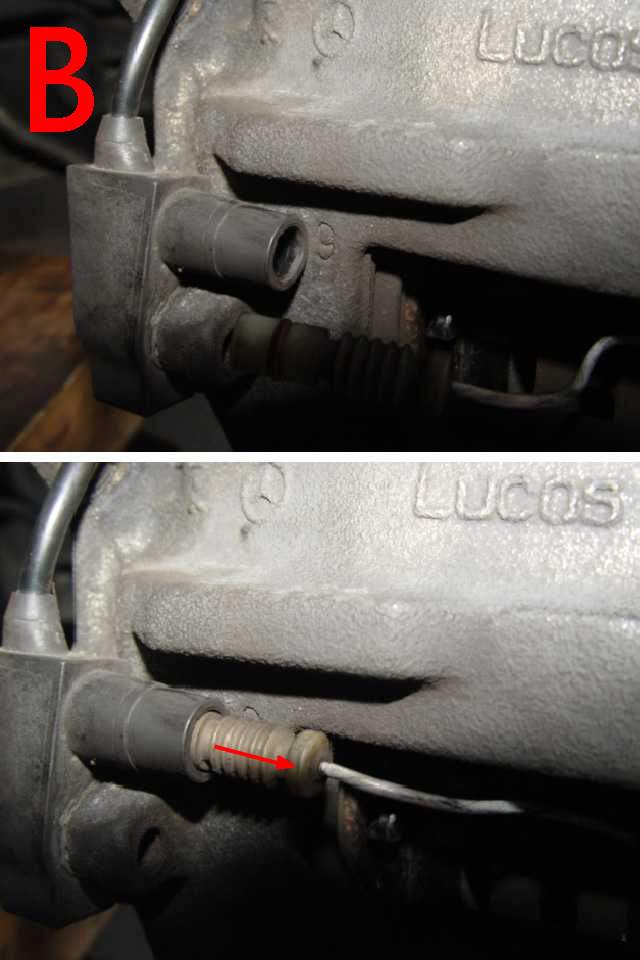
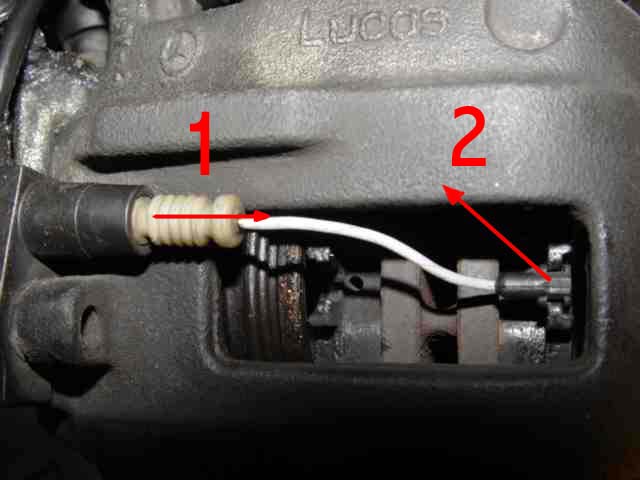
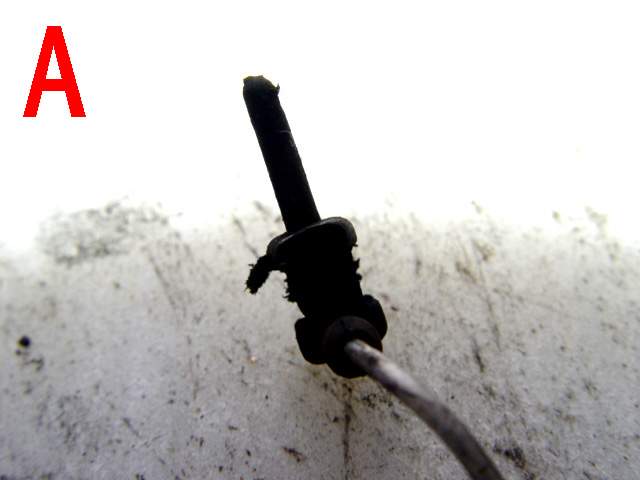 Having removed the connector from its housing
B we can now remove the pad.
Having removed the connector from its housing
B we can now remove the pad.The detector contact/pin A can now be withdrawn from the pad for re-use. If the warning light has alerted you to low pads then you will need to replace the contact/pin, these can be purchased from Mercedes Benz, who have indicated that these are normally replaced and can be found unusable as the plastic casing of the contact splits when removed from the old pad.
 If you have removed the complete calliper you will now be able to split it into two parts, removing the pad carrier from the calliper body. To do this ease the two rubber gaiters from the calliper body and slid the pad carrier away from the calliper body, this action will fully expose the two calliper guides which on this occasion will remain bolted to the piston housing They will still need to be cleaned and re-lubricated before re-installing, but need not be disturbed otherwise..
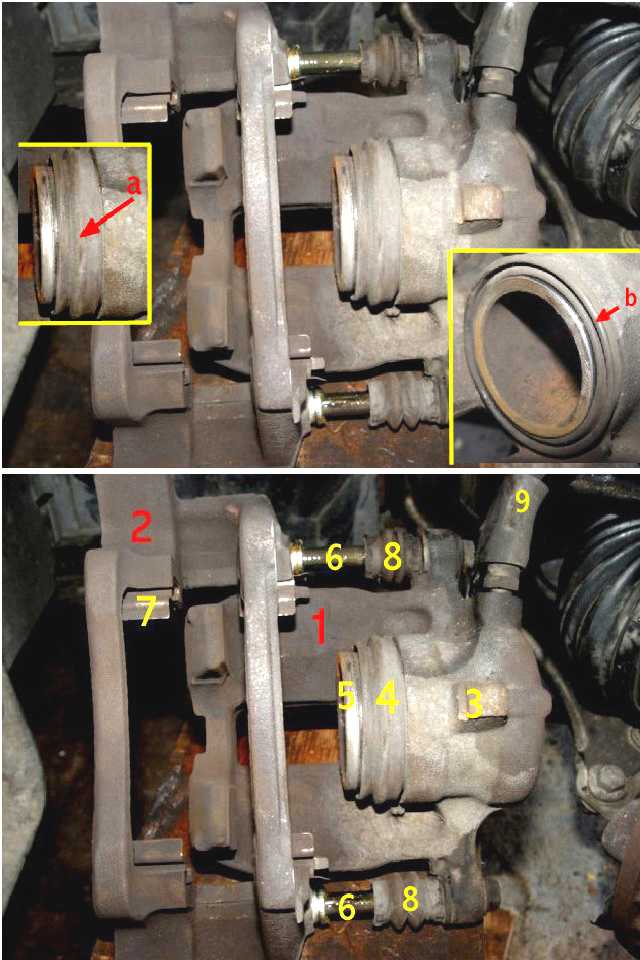
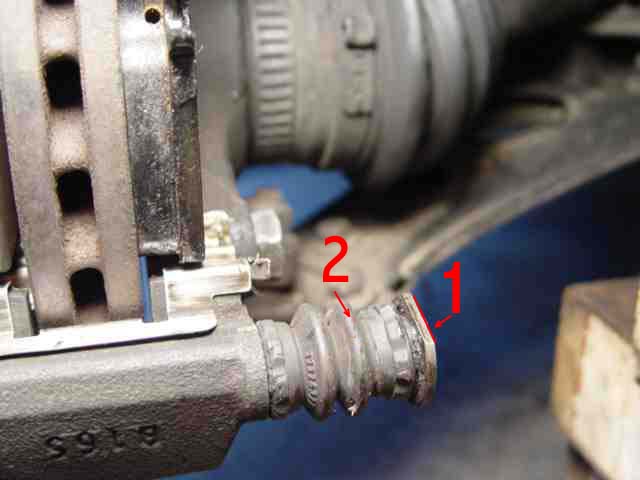
It is worth noting the position of the piston, and gaiter a the corrugations are open/exposed the piston projecting about 1.5cm/ 3/4" from it is housing, in the inserted picture b after the piston has been compressed/retuned into the cylinder the corrugations are closed, the piston face being almost flush with it is housing.
As with all gaiters it should be in a sound condition, a repair kit which contains this item can be purchased from Mercedes Benz parts.
1 Calliper body
2 Pad carrier
3 Hydraulic cylinder
4 Rubber gaiter
5 Piston
6 Calliper Guides
7 Brake Pad clips
8 Corrugated guide gaiters
9 Flexible Hydraulic hose
Please note
Although the procedure of compressing the piston back into its housing is as carried out by Mercedes-Benz, some problems can arise if the fluid is forced back into the system pipe work quickly, there is also a line of thought that by compressing the fluid back up the feed hose any contaminated fluid could reach the ESP/ABS pump and cause potential problems. To reduce the risk when compressing the piston back into it is housing, do so slowly thereby reducing any chance of this problem arising. The problem is also less likely to arise if the brake fluid has been changed in accordance with your service manual I.e. 2 yearly
Before compressing the piston back into it is housing we need to clean the front edge C thereby ensuring that it comes into good contact with the new pad, this can be cleaned quite easily using fine wet & dry or sand paper before applying a smear of HP grease. Keep all grease application to a minimum, the last thing you want is grease on the pads. Take care also not to damage the rubber gaiter B surrounding the piston.
 I use a very old wooden clamp for returning pistons to cylinders, if you do use a metal clamp put something between the piston face and the clamp to prevent damage to the metal surface of the piston
 The calliper guides D will normally only require wiping with a clean dry cloth before being lightly smeared with HP grease. a small amount of grease can also be placed into the guides holes of the pad carrier this will be carried into the guide when it is re-fitted.
Although the guides are a separate item only bolted to the calliper body it is understood that they cannot be purchased separately.
If you have purchased a pad kit from Mercedes Benz you will have replaced the clips, if you have purchased pads only you will need to clean the old units taking care not to bend or damage them in the process.
Using a suitable tool clean out the two calliper guide recess holes in the pad carrier before placing a small amount of grease ( M.P. Grease or copper slip) in the neck of each hole. I also smear a small amount of grease over the exposed areas of the clips thereby ensuring that the pads move easily & smoothly, albeit the amount of movement when they are in position is very small.
Having cleaned and serviced the calliper components, the pad carrier can be lubricated as above and then re-located onto the main body of the calliper
We now need to prepare the new pads for fitting, The metal backing plate of the pad that is going to be placed against the piston needs to smeared with grease. This will allow fine movement and also stop the pad binding against the piston face. If working on the Off Side (O/S) calliper, remember you will need to refit the Low Pad Warning Detector contact. The pin section slides into the hole pre-made in the pad, the top section locates in the horse shoe shaped recess of the pad. all pads carry the facility although only one detector is fitted on the front of the 'A' Class. Make sure that this component is undamaged. If you were alerted to low pads by this warning devise you would be advised to replace the detector, or false alarms on this facility may result.
The new pads can now be positioned in the pad carrier, when correctly located the space for the brake disc remains clear. It can also be seen that the inner pad is flush with the carrier, if this is not the case the piston may not be fully housed. The outer pad also lays clear and will not foul the disc. When placing the assembled calliper back on the disc the calliper should re-mount the disc without resistance being met with, If this is not the case re-check that the piston is fully housed or the new pad surfaces may be damaged.
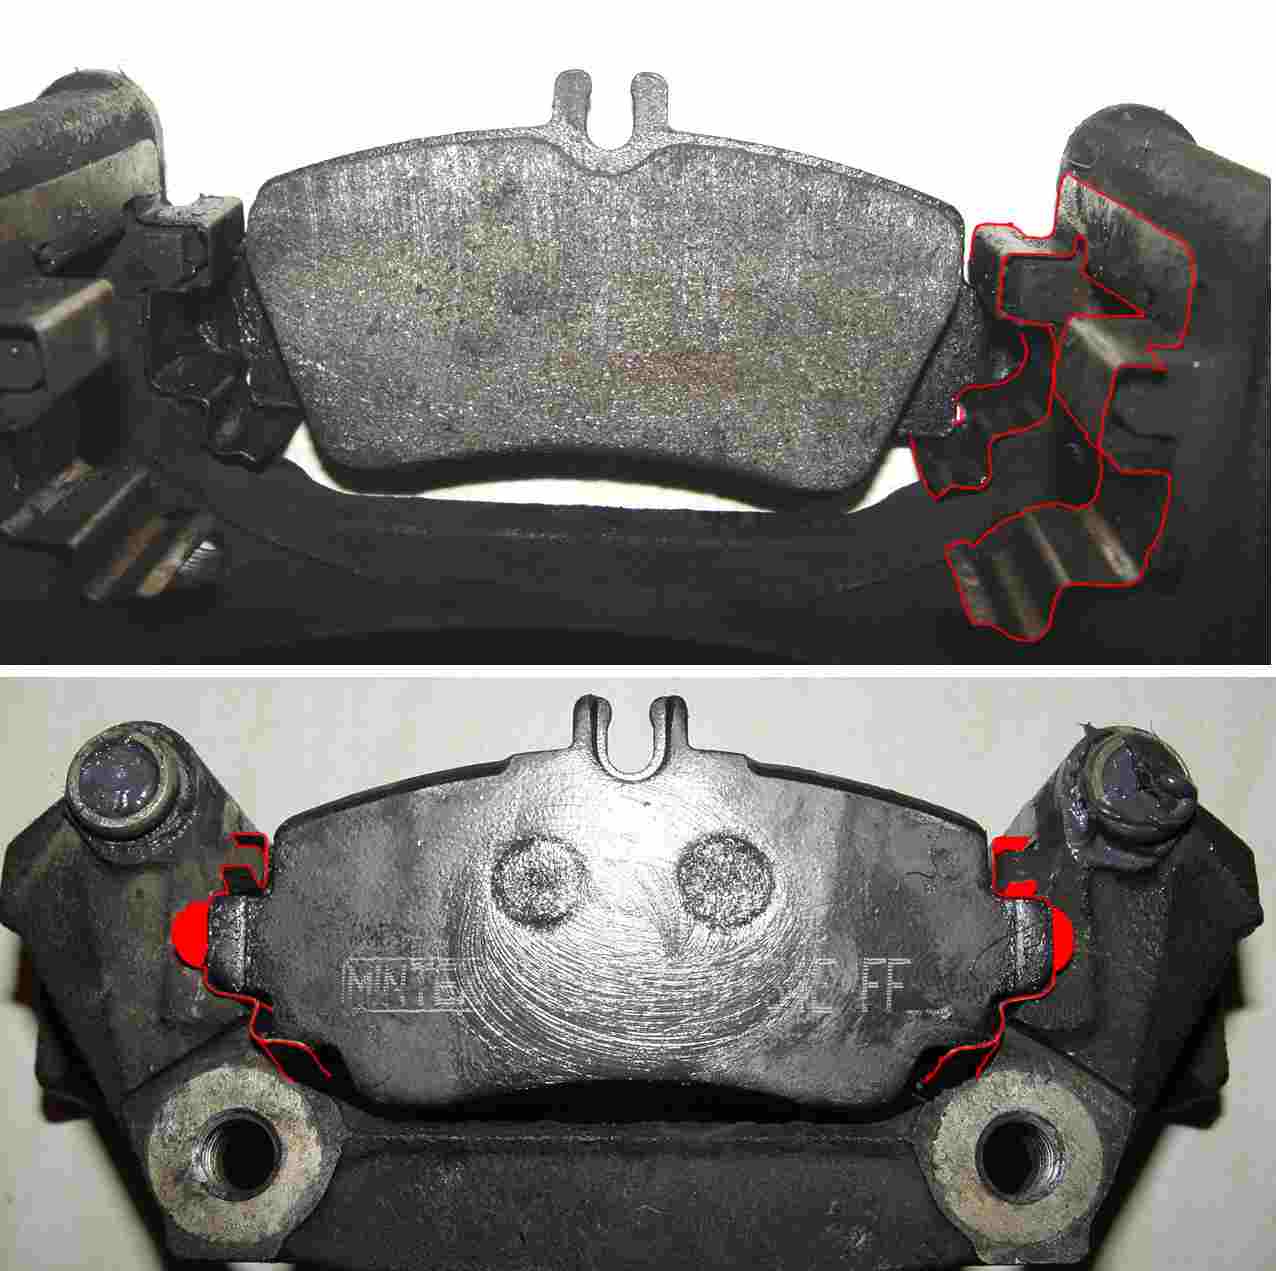
Irrespective of which method you use the pads must be correctly located in the pad clips. This photo is only to show the position of the new pads in relation to the clips, Note where the complete calliper has been removed the pad carrier is re-assembled on the calliper body before the pads are re-located into position. Note that the tabs on the clips are pre-bent to retain them in the calliper.
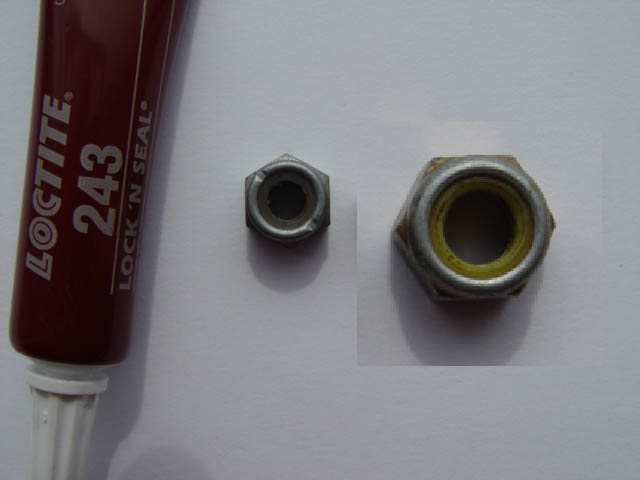
Nyloc nuts are some times used in modern vehicles where this is the case new nuts, are normally required for the nyloc to be effective, loc-tite is not required with these nuts.
However it appears that MB have yet to use these during their car building and so loc-tite is required on certain nuts on the 'A' Class
Torque settings
* Self locking Bolt (floating calliper to steering knuckle)115Nm.
*Guide bolts to brake calliper support 30Nm
* Brake bleed valve with 'O' Ring 10Nm without 'O' Ring 7Nm.
*Brake pipe to brake flexible hose 18Nm
*Brake pipe to brake cylinder (wheel ) 14Nm
*brake line to brake cylinder 16Nm
*brake hose to floating calliper 18Nm
*Nut ,master brake cylinder to brake unit 20Nm
WHEN RE-LOCATING THE CALIPER MAKE SURE THAT THERE ARE NO TWISTS/KINKS IN THE FLEXIBLE HYDRAULIC HOSE .re-locate the calliper, using the upper bolt, apply 'Loc N Seal' to the lower bolt and finger tighten, remove the upper bolt and repeat, finger tighten both bolts initially ensuring they are correctly located, then using a torque wrench tighten evenly MAIN CALIPER BOLTS 18mm,. 115Nm (85 ft.lbs) In this instance the guide pin bolts will not have been disturbed and can therefore be disregarded. Note if you are tempted to check the torque you will need to remove and apply Loc-tite, 'loc N seal' before you re-torque.
Complete the job by replacing the wheels etc, the wheel bolts/studs will benefit from a small amount of grease on the threads, ensuring that they take up evenly, torque to 110Nm (81 ft.lbs)
REMEMBER BEFORE MOVING THE CAR TO PRESS THE BRAKE PEDAL UNTIL THE PEDAL GOES HARD, THIS ACTION WILL BRING THE NEW PADS INTO CONTACT WITH THE BRAKE DISC. RECHECK THE FLUID LEVEL IN THE RESERVOIR, TOP UP ONLY IF REQUIRED REFIT THE FILTER & CAP Where new pads and brake shoes have been fitted brakes may not be as affective as the old ones until bedded in, it is therefore advisable to take extra care until you are satisfied with their performance. Record the maintenance in your DIY service records.
Next.
Back to Index,
Purchase DVD.
Please Make a Donation.