Seat, Headrests, Adjustment, Height adjustment, Head rests Removal, Seat removal
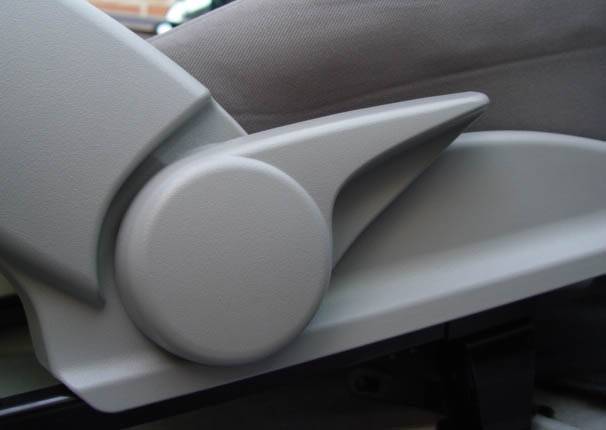
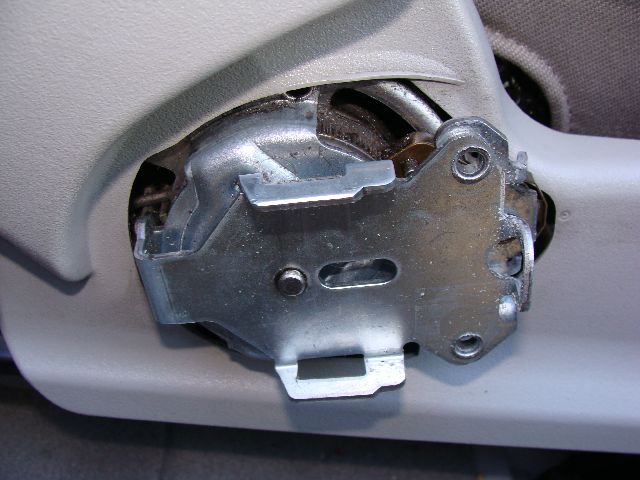
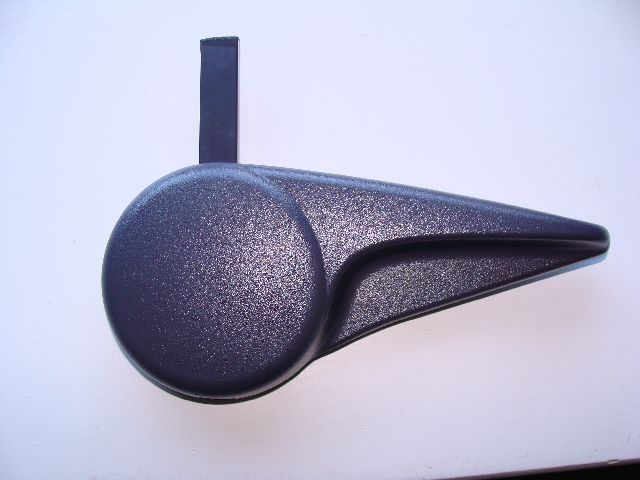
One of the items to give me most trouble is the drivers seat adjuster lever, located on the onside of the drivers seat. This is a plastic moulded (ABS construction) unit which fits onto the seat adjustment mechanism with lugs which engage onto metal clips, it just isn't up to the job.
The moulding would have cost pence to produce, and is relatively cheap to replace at under a fiver, is easy to fit but it just should not fail in the way it does. I have had mine replaced 3 times during the last 18 months, not good if you are having to pay. Part No A168 919 10 60 make sure to order the correct colour as it is moulded in different colours, (Colour coded)
When it comes to fitting look for the lugs inside the moulding there should be four, three on short legs and one close to the back of the moulding.
A
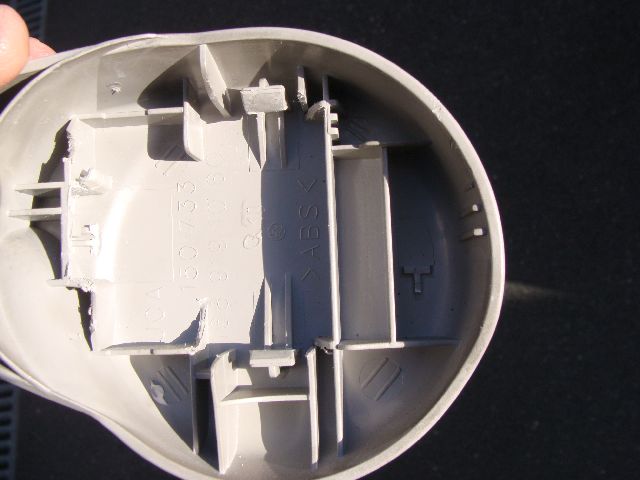
because the moulding one photographed has been used and then removed one of the four had snapped off, making it unusable, without it keep coming off. Fitting, If I were doing one I would warm the moulding to at least room temperature 60-70F first which will make the clips more flexible and less likely to snap off as you fit the moulding, apply a very small amount of lubricant onto the face of each clip that contacts the fixing point this will assist in in sliding into position without snapping the clips off the moulding.
Don't attempt it on a cold day or you will need another New moulding unless you are very lucky.
line up the lugs with the clips and position central to the seat push firmly home, making sure it is kept square witht he side of the seat,A smart stike from the side of a clenched fist will do the job. These units are not designed to be removed without breaking the clips.
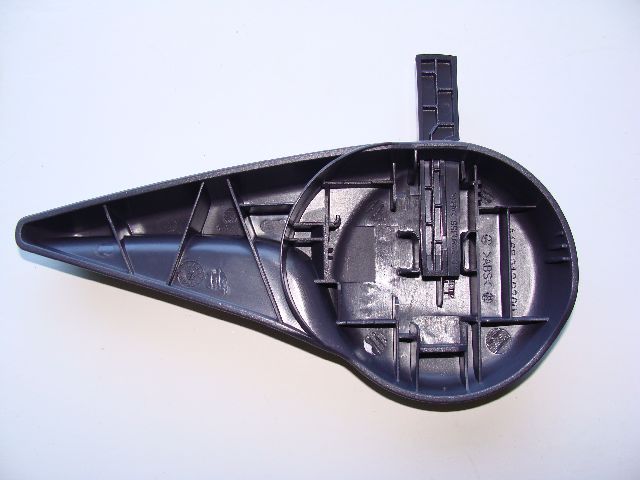
However things move on :- 11/09/12 re-designed to enable a pin supplied with the unit to be fitted thereby removing the need for the fragile clips. The part number remains the same, along with the colour code on the end either slate grey or light grey, because of the location of this component it makes little difference which you fit. Hopefuilly this will prevent having to keep replacing this unit . I have ordered one today so will keep you posted along with some photographs when I receive it . Thank you Mercedes-Benz of Exeter tel 01392 822711 who supplied the part by post next day delivery.
Lofty ,
Thanks you David for the information.
This is without doubt the best modification to a component that I have seen on the A Class .
It should save us all a lot of grief and prevent the continued need to replace this lever as well as cost.
Fitting this unit is very simple indeed the photographs below explain the procure.
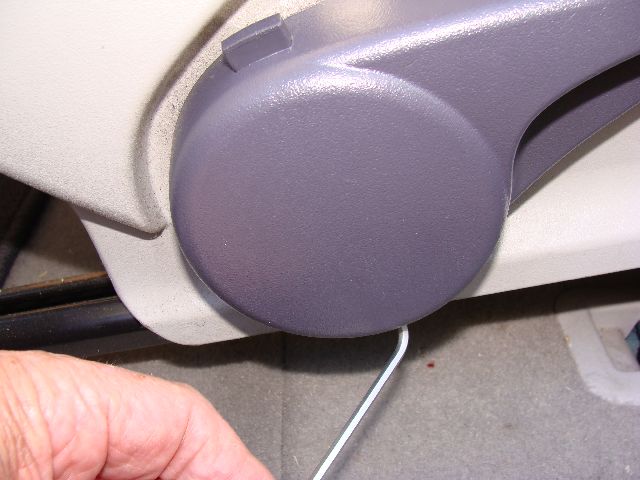
1.Obtain your spare part from Meredes-Parts part number MA168 910 02-00/ followed by your colour code, slate grey or light grey.
I have used a slate grey unit Colour code(7D88)which does not look out of place as other components like the steering wheel are slate grey on my car.
2. Remove the old unit which will not be difficult, if indeed it has not fallen off already! in my case the bottom clip was missing which accounts why it was loose fitting. 3. Take the opportunity to clean and lubricate the mechanism.
4 Ensure you are aware how the peg fits through the height adjusting mechanism.
5 Fit the new lever pushing it fully home until you can see it is fully aligned with the metal slots in the mechanism.
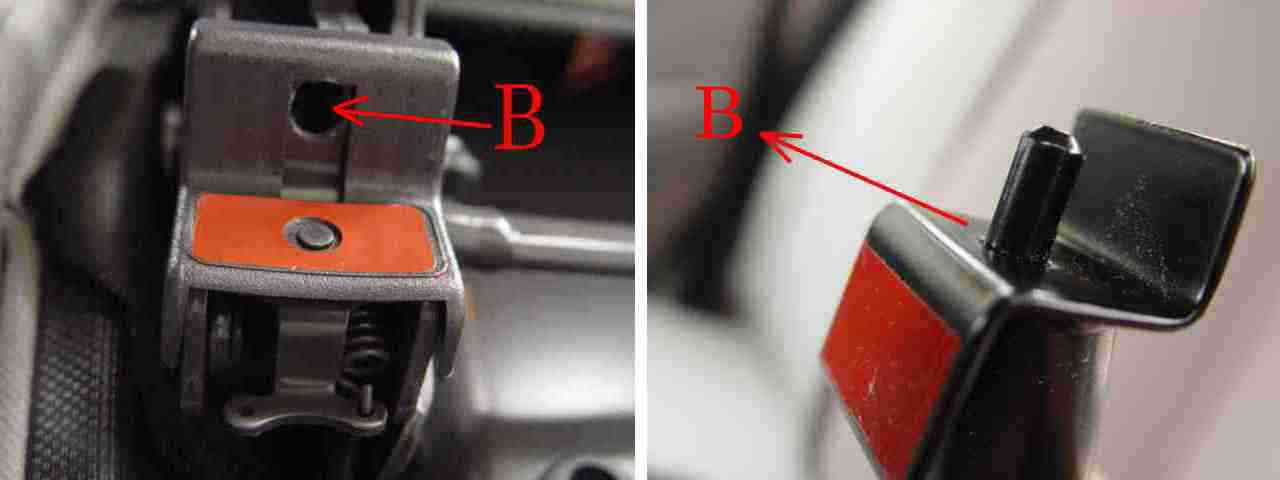
6. Fit and push the plastic retaining peg fully home until flush with the top of the lever. 7.Should you at any point wish to remove the lever, place and allen key into the hole at the base of the lever and push the retaining clip up, which will allow you withdraw the clip from the lever.
8.Time taken to fit this component 10 mins including cleaning and lubricating the mechanism. it can be removed in minutes. A worthwhile modification long overdue.
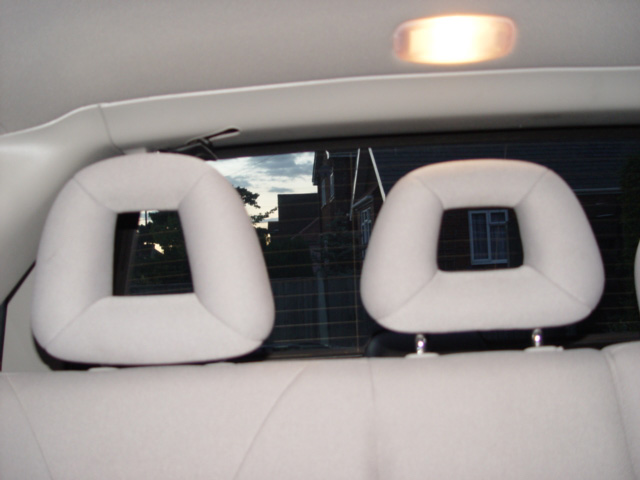
Head Rest/Restraints.
There are five headrests, restraints are provided as standard, four larger than the remaining one which is normally located in the centre back seat position. However my centre rear headrest is removed to it is stowage area.
This allows the driver to see when reversing. There main task is to prevent wipe lash (sudden and severe whipping of the head in a backwards direction causing injury to the soft tissue and vertebra of the neck) Normally caused by rear impact accidents (other drivers driving to close to the rear of your car and thus unable to react and avoid a rear impact collision with your vehicle.
To get the best protection they need to be adjusted so that the top of the cushion is at least level with the top of the passengers head.
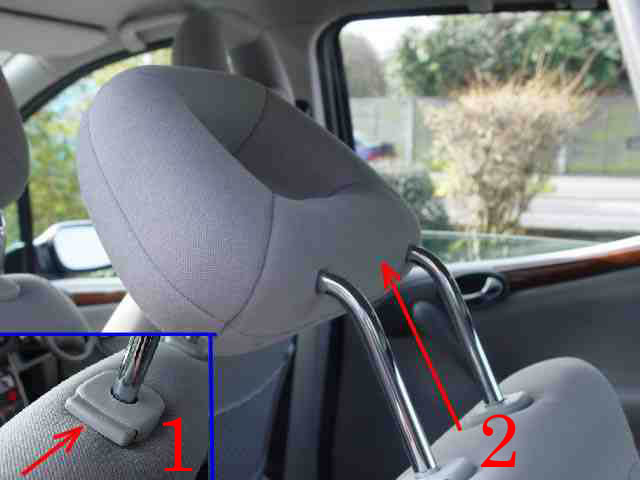
All headrests are interchangeable, and can be completely removed to allow the folding of the rear seats. When fully adjusted to their maximum height and not in use there is a tendency for them to drum & vibrate, to overcome this lower them fully towards the top of the seat. remember to re-adjust to your passengers height, as required and as and when you need them. To reduce the noise level, remove the rear seat rests in turn and slightly spread the legs, then replace. To remove the rest simply press the clip
1 at the same time easing the rest from the seat 2
The centre rest can be completely removed and stowed in a pre-allocated stowage rack at foot level, centre to the rear seat
A, B, and C
The centre rest can even be left in that stowed position when the seat is parked in the folded position. The other two rear headrests will however have to be removed from the seats
To adjust the rest up
simply pull it up, there is a stop to prevent it coming right out of its location.
To lower press 1 indicated inset above
push down to the desired height,
When removing the headrests from the outer and front passenger seats the headrests can be stowed in the doors as shown.
One of the most annoying things about the headrests is the vibrating noise they make while the car is being driven, This more often than not can be cured by either spreading the legs on the rests themselves making them a tighter fit or by replacing the restraint location guides in the backs of the seats.
If you are replacing these units then they should be purchased in pairs ,locking and non locking. one set per seat. In my experience it is only the two outside rear seats that require replacing, I use the alternative location for the rear centre seat and the fronts are OK.
I appreciate that some owners won't want to undertake this next modification, but I removed the restraint guides and ground of the sealed bottom off the guide to allow the restraint metal legs to be pushed down further, this in its self helps to reduce the vibration.
Now if you do wish to lower your head restraints The you will need a tool like we used to remove the dash cowling. A hooked tool
4
the hook needs to be approx 7mm long and has to be inserted into the guide 60mm so allowing for the handle I made mine 16cm overall, The clips that retain the guides are on the cushion side of the guide
2
(Front) Having removed the head restraint Push the tool inside the guide and feel for the slot in the front slightly to either left or right Having engaged the hook into that slot turn the tool
3
towards the middle of the guide and the same time gently pull the guide up from inside the seat, you will feel when the clip has released. It is a fiddle, bit like breaking into a safe! But it can be done, and it is how MB technicians do the job. The only difference is it won't cost you anything to do it. Having removed the guide trim off the minimum amount of plastic
A.1
to open the bottom of the guide , this will leave a ring of plastic approx 3mm wide at the bottom of the guide instead of the blank end as is at present. This modification allows the head restraint to be pushed down further, thereby reducing or eliminating the vibration completely. If you have problems please go to page 45, the principle for removing the restraint guides is the same as removing the dash board cowling.
Although the distance between the back cushion and the head restraint is not a great deal different it does make a difference. However when carrying passengers do remember to adjust the restraints to suit.
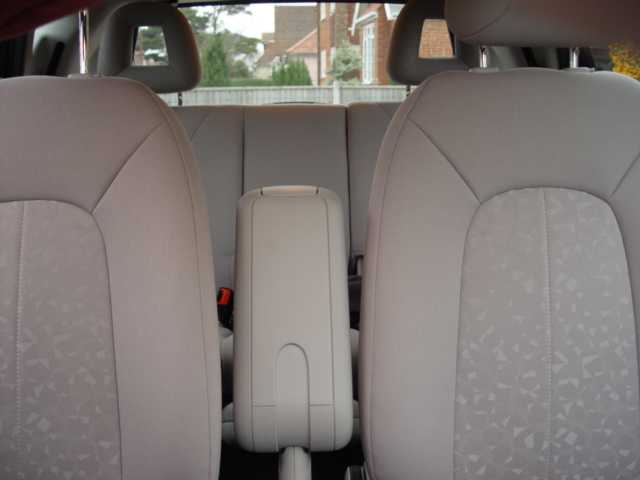
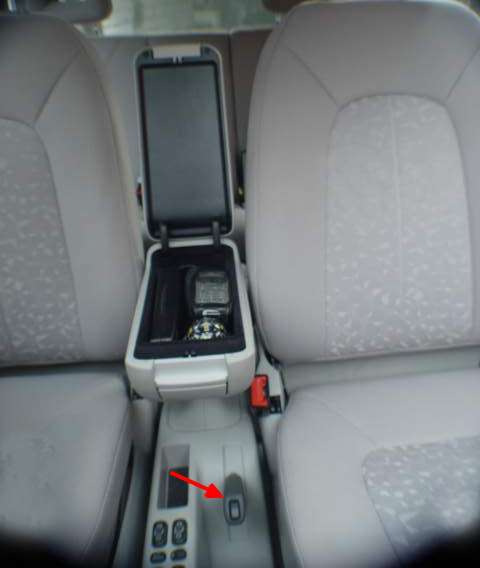
Arm Rest
The arm rest comes as an extra, who ever designed it never thought about the handbrake being used nor took into account the difficulty it would cause when fitting and removing seat belts. There is no doubt that having got one I wouldn't now part with it although it took a bit of getting used to. I have quite long arms and initially keep banging my elbow on the folded rest, however I have now got used to it and have little bother. I always use it when on a medium to long run although it is impractical to have it down in town as the rest obstructs the handbrake, even though there are three positions in all. Neither of the points mentioned are an insurmountable problems as it easy to stow away, simply push it up. run.
carried safely, the lid which forms the actual arm rest snaps closed, so when in the folded up position you items are firmly held. Note, the position of the handbrake when the rest is down!
The armrest from the rear, only one cup holder is remains in the rear passenger compartment.
A useful item used as an arm rest for rear seat passengers and can be easily removed complete with the picnic meal. available from mercedes Parts.
The drivers seat on the A class is multi adjustable, having a seat height adjustment, using the lever on the outside of the seat. To increase the height, gently pull the lever up, continue to to operate the lever in the upwards direction on the ratchet, until the height or max is reached. To lower the seat press down on the lever continuing to operate the lever on the ratchet until the seat reaches the position you require or lowest setting is reached.
As well as the pitch of the seat back being adjustable, this adjustment is continuous and the back of the seat can be lowered to inclined position. Move towards
A
and the back rest moves towards the driver Turn towards
B
and the seat inclines away from the driver.
As well as the seat being adjustable to meet the drivers leg room, simply lift the handle and slid the seat backwards of forwards when you let go of the handle gently try to move the seat to ensure the teeth of the adjuster of correctly located in the slots provided in the seat adjustment mechanism. Don't be surprised if the plastic moulding comes off in your hand!! It simply clips back onto the metal lever. The passenger seat has back rest and backwards and forward adjustments only On the rear seats the back rests only are adjusting having two inclined positions, us the grey outside handle in each case to make this adjustment. If stowing the parcel shelf to the rear of the back seat as shown below the back rest of the rear seats needs to be in the forward position. See information below to locate lever.
If you want to create even more space in the boot area then the rear seats both the double and single seat can be moved forward on their adjustment.
Simply lift the lever either on the single or double seat and slide/move forward, if the parcel shelf is removed a considerable space to the rear of the back seats can be achieved.
Please note this section
I have only been a member of the baby-benz.com owners club for just on seventeen months and already I have heard and read stories of great concern where owners have installed the seating back into their cars incorrectly, which has in turn cost them quite a bit of money to sort, so lets include a section on the seating and sort out some of the problems.
As we are all aware there are two single seats in the front and three in the rear, what doesn't register with some owners is that
THE DOUBLE SEAT MUST GO TO THE O/S or DRIVERS SIDE OF THE CAR ON RIGHT HAND DRIVE CARS As a precaution against making a mistake , ALWAYS FIT THE DOUBLE SEAT FIRST,
whether you car is left or right hand drive this will prevent accidental installation of the single seat into the wrong position.
If incorrectly fitted? Yes it does apparently fit but for reasons best known to the seat, it cannot then be removed without expert help. At least that's how the stories go and I can only take the owners involved words for it. Now if two owners have owned up to getting it wrong, how many haven't owned up? I wonder!
If by your misfortune or ignorance you have already fitted the seats incorrectly then all you can do is follow these words of advise form MB Summed up as brute force and Ignorance, I say that because there doesn't seem to be anything scientific about putting the problem to rights. A little more thought on the part of the designers and this annoying and costly problem could have been avoided
Information which might help solve the problem:-
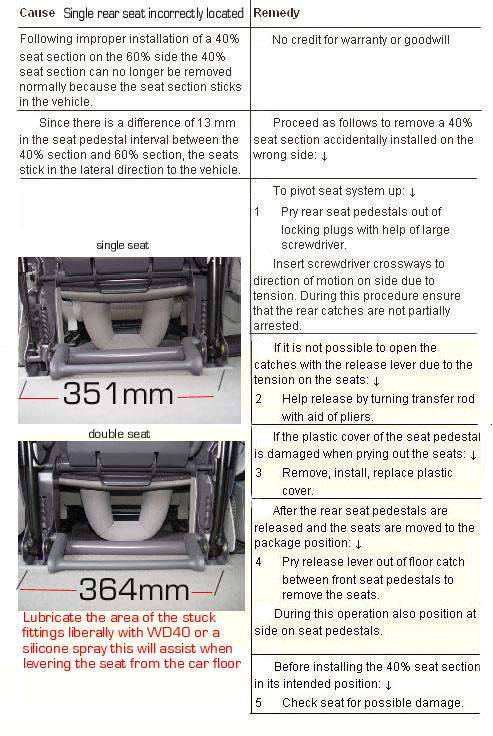
the single seat front engagement claws are set at 351mm apart
The double seat front engaging claw is 364mm apart, so the single seat claws are effectively spread when engaged in the wrong position.
Using a lubricant spray Silicone or WD40 liberally spray the area of the jammed fittings this should assist when levering the seat from the floor.
Please note that in the last instance of this happening which came to my attention, the lady in question received a quote from her MB garage for £750 to remove and rebuild the seat as necessary. it having taken her two days just to get the quote. This Owner did not accept the quote she collected her car and wrote to MB. At the end of the day and weeks later the seat was removed with little damage the job having cost £350.00. Mercedes-Benz paid half the cost. Still a costly mistake, so please heed this warning.
But why would Owners want to take the seats out? Well you only have to look at this photo to see why! You could nearly move house in the 'A' Class without the seats in it.
And take the co-pilots seat out and you have even more room, So how do we do that then?
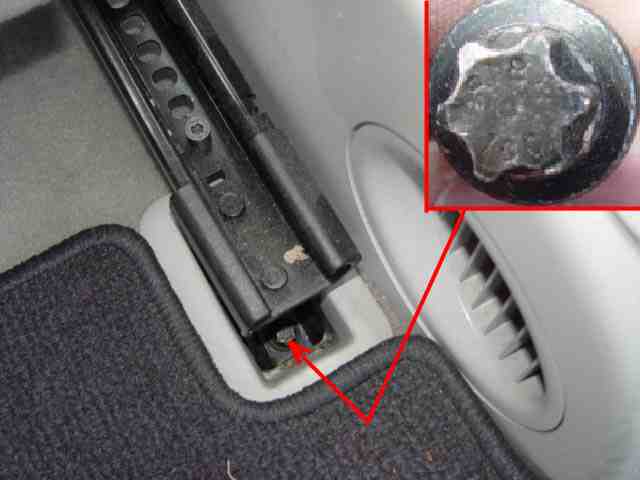
Firstly you need some tools, Ideally you need a 10mm star drive socket, not something in ever toolbox, you may like me get away once or twice using a 10mm standard socket but, the correct tool is the star drive. Andrew who has a 2003 model tells me his seat bolts are 12mm so this is something else that varies from car to car.
That's the one top right hand corner, and that's where you will find them, four, one in each corner, front and rear of the seat adjusters.
In an ideal world we would all have a set of star drive(torx) sockets where this is not the case you may get away with using a standard socket
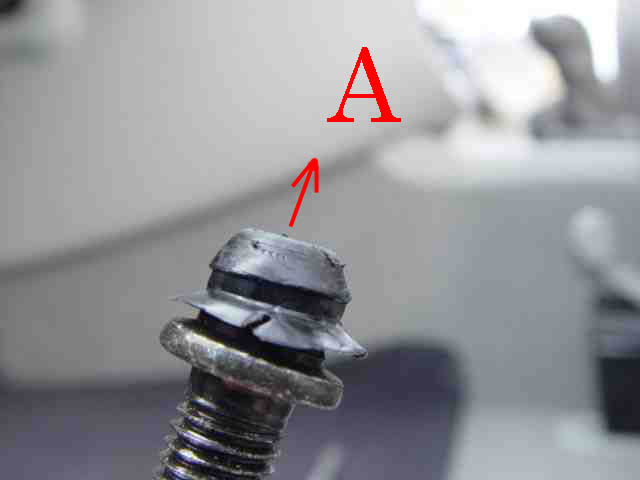
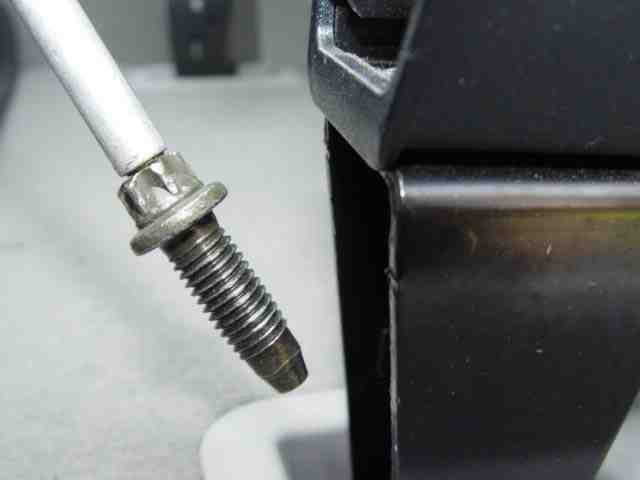
Now when it comes to replacing the front seat you might have fun getting the bolts back into the holes due to the deep recess, pointed nose pliers or a magnet will do the job and that information comes free! Note also that some bolts are fitted with caps
A
which have to be removed .
Now before you remove the seat disconnect the air bag electrical contact plug (SRS)from it is block, which will remain attached to the seat. the plug can then be tucked under the carpet BUT remember we will need to reconnect when we refit the seat or your SRS lamp will illuminate permanently on the dash display.
also the air bag light between the front seats which continue to flash when the ignition is on.
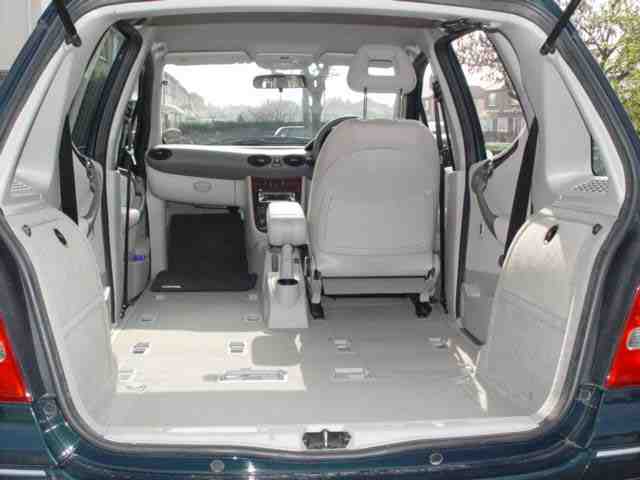
Right then now lets remove the single seat in the back. Don't forget to store your seats where they will be dry and safe, they will cost the earth to replace.
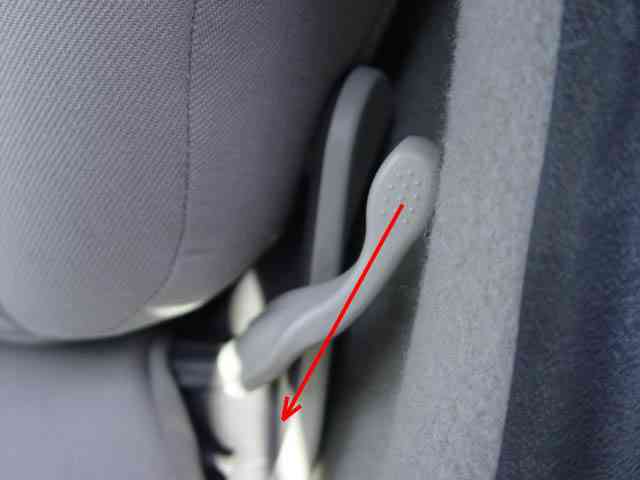
The first thing is to locate the seat back release lever , which is tucked down the side nearest the N/S wheel arch. (Double seat O/S). Having located it pull the lever forward fully at the same time easing the back of the seat forward.
Rear seats can be folded with the headrests in situ providing they are fully housed (Down) Should you wish to remove the headrests, press
1
towards the headrest supports, at the same time ease the head rest up from the top of the seat
2
These can be quite difficult to remove for the first time, and they cannot be completely removed with the backrest upright. Be assured they do come out! For more details on headrests us this link
Now tip the back of the seat fully forward.
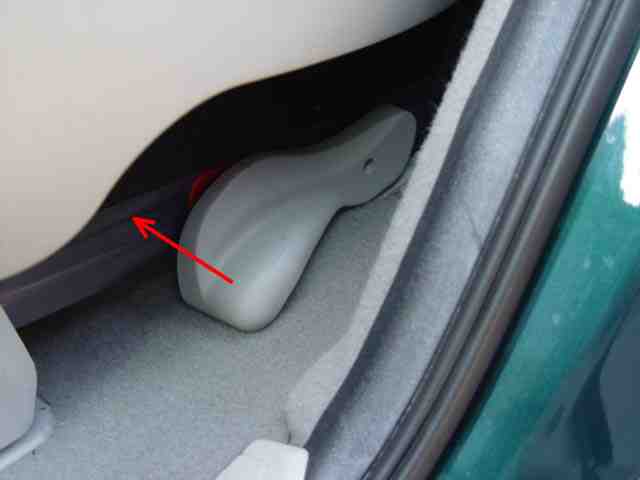
Next, lift this lever up towards you at the same time gently lifting the seat.
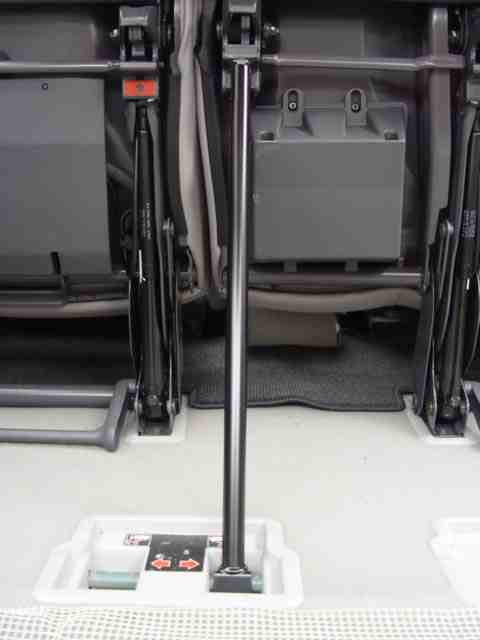
As the seat rolls forward so the back of the seat will tuck it is self in eventually sitting behind the passenger seat.
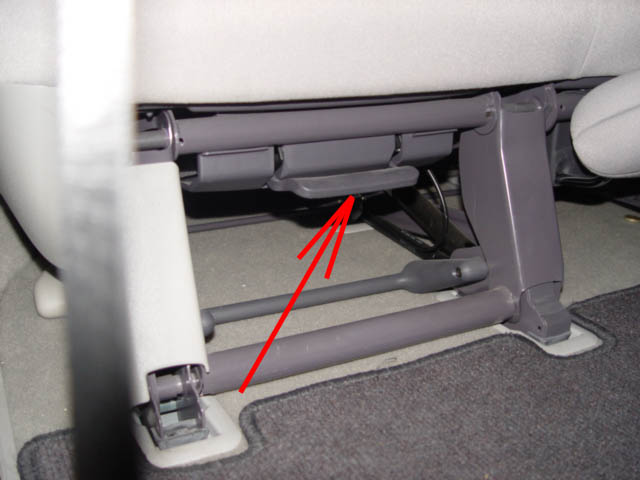
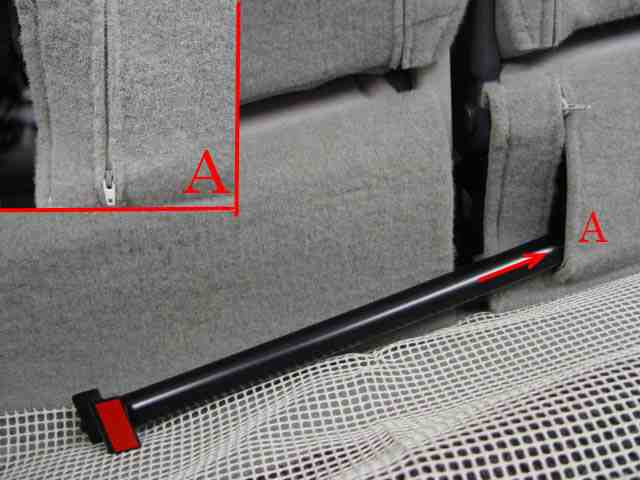
If you intend leaving the seats in the vertical position there is a support pole located in the back of the double seat, lower back covering, (Boot side) undo the small zip
A
and withdraw the pole.
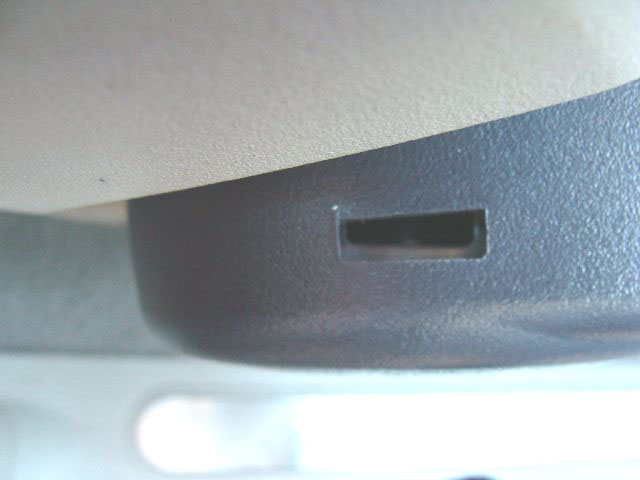
If you do move the headrests the central one can be stowed between the two rear seats in its stowage position and the two outer ones can be stowed in the arm rests of the rear doors.
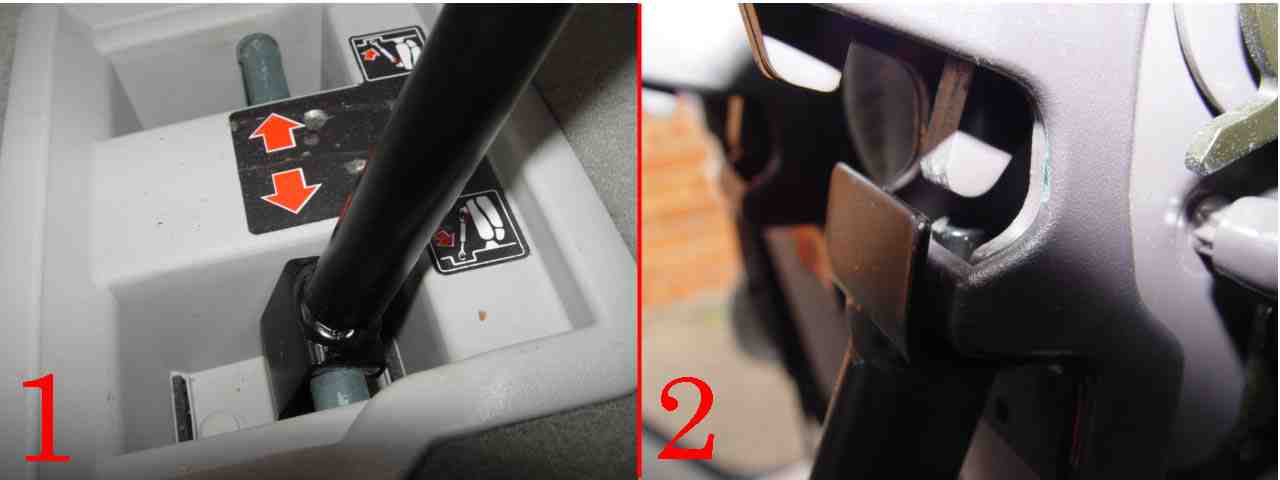
This is designed to fit onto the seat location rail in the floor
1
and a special fixing in the folded seats. At the head of he pole the is a location bracket and pin,
2
this fits into a hole in the seat support facility. When fitting go
red to red
with the indicators on the pole.
There are in fact two positions for the pole but in the case of my car only one is usable due to a part of the seat structure fouling the bracket position.
Removing/replacing the seats
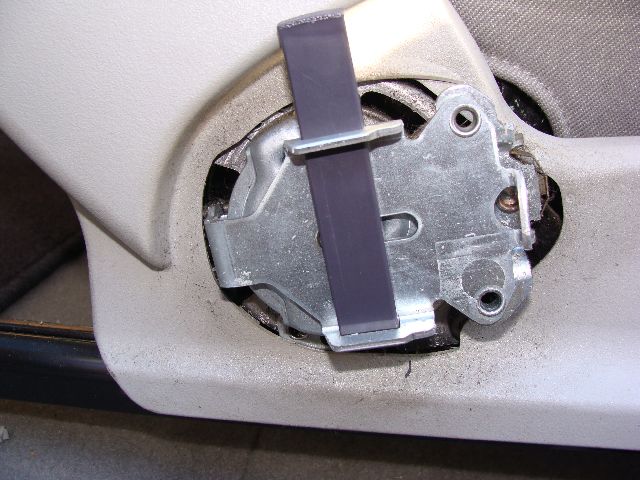
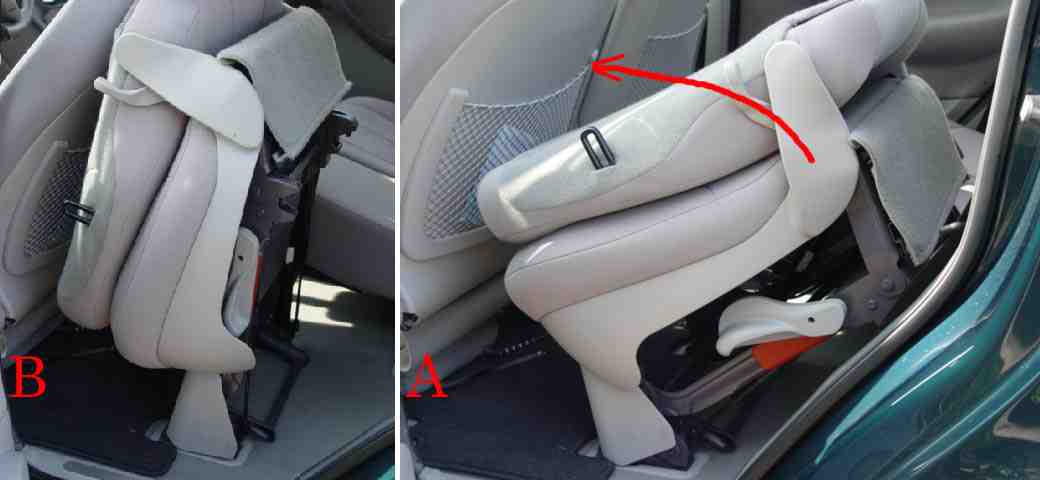
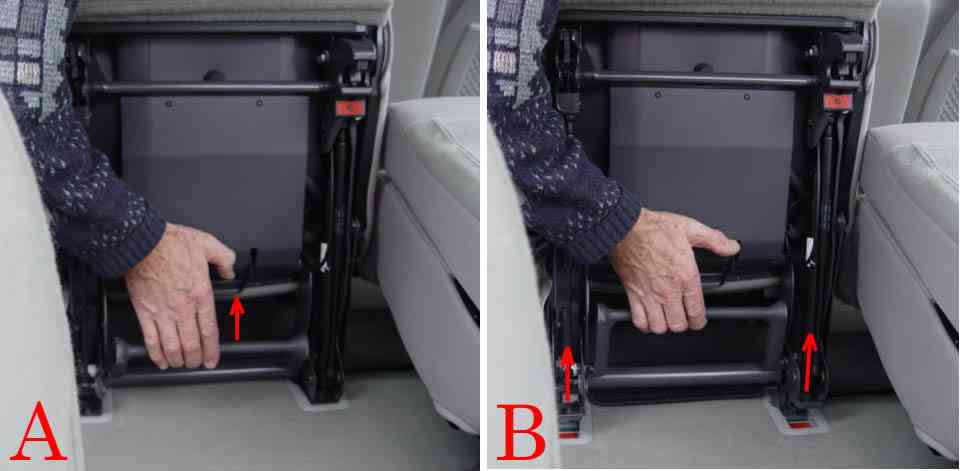
If it you intend fully removing the seat, then lift the horizontal bar
A
fully, this action releases the locking claws/devise holding the seat in the car. At the same time lift the seat
B
away from the locking points.
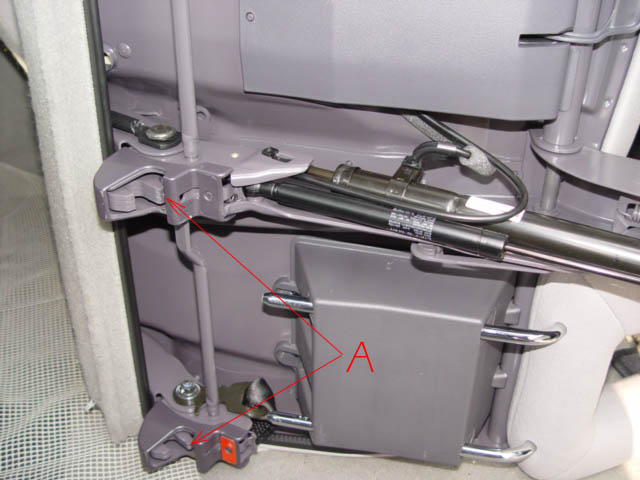
When preparing to replace the seats ensure that both claws are open see
A this is achieved by pressing the release bar firmly against the underside of the seat which is held in the vertical position, this action on your part holds the clamps open allowing them to correctly engage with the locking bars in the recessed wells
.
When it comes to replacing the rear seats ensure the horizontal lever is held fully up and ensure the projecting legs are fully in the recess fixing point before letting go of the lever. Check to see that the seat is secure.
When replacing the front passenger seat don't forget to connect the air bag connection, and note that the back seat backrest has two positions, pushing it back fully will help to stop the parcel shelf rattles.
Take care not to damage your paintwork or upholstery while removing/replacing the seat.
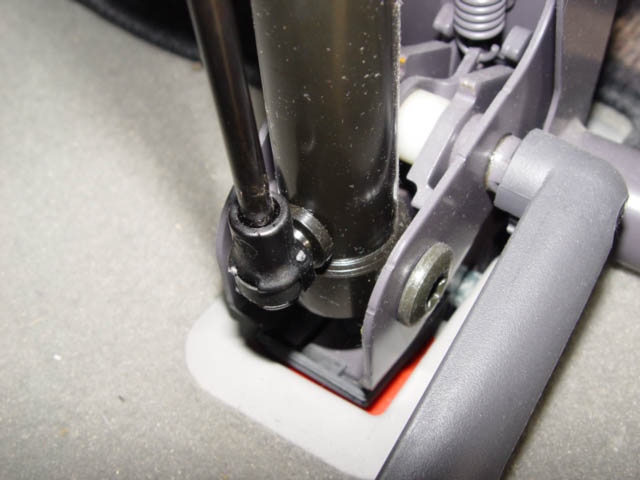
This is one of the seat locking locations which also forms a rubbish trap, it is advisable to keep these clean so that precise locking of the seat mechanism takes place. A small amount of thin oil rubbed or sprayed on the horizontal bar will do no harm.
This will leave your double seat in position, the removal method is the same as for the single seat but you may need some assistance when it come to lifting it from the car. you can just see the seat back release lever in the picture O/S.
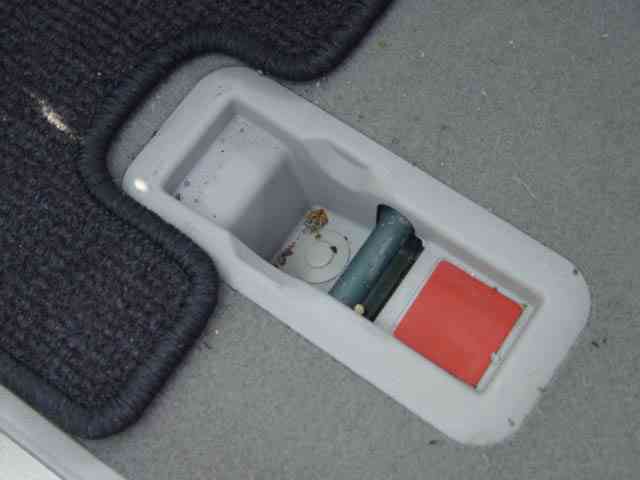
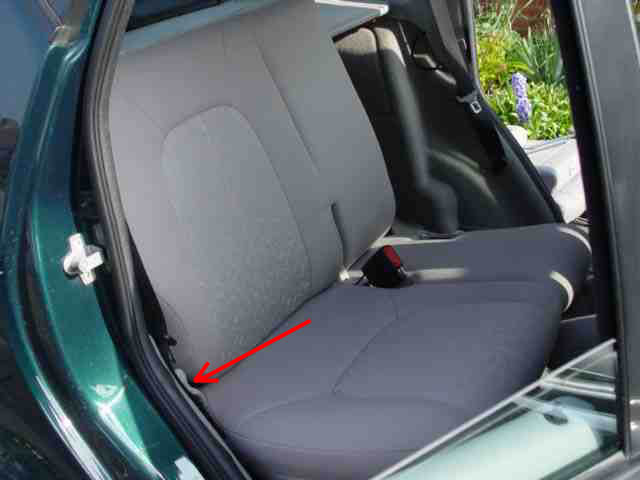
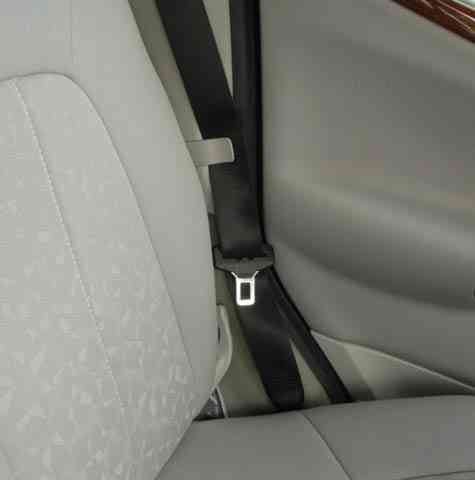
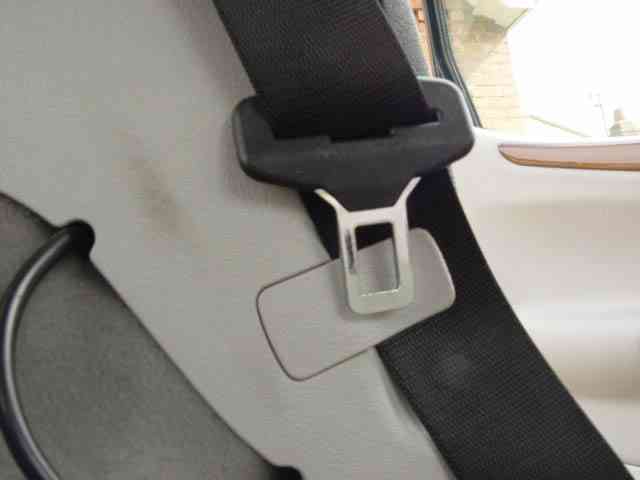
Stowing your seat belts away in the clips provided will assist you when it comes to lowering & raising backrests.
However make sure the buckle is allowed the fall below the clip or your car will develop yet another unidentified noise, the tapping of the buckle on the plastic clip.
 One of the items to give me most trouble is the drivers seat adjuster lever, located on the onside of the drivers seat. This is a plastic moulded (ABS construction) unit which fits onto the seat adjustment mechanism with lugs which engage onto metal clips, it just isn't up to the job.
The moulding would have cost pence to produce, and is relatively cheap to replace at under a fiver, is easy to fit but it just should not fail in the way it does. I have had mine replaced 3 times during the last 18 months, not good if you are having to pay. Part No A168 919 10 60 make sure to order the correct colour as it is moulded in different colours, (Colour coded)
One of the items to give me most trouble is the drivers seat adjuster lever, located on the onside of the drivers seat. This is a plastic moulded (ABS construction) unit which fits onto the seat adjustment mechanism with lugs which engage onto metal clips, it just isn't up to the job.
The moulding would have cost pence to produce, and is relatively cheap to replace at under a fiver, is easy to fit but it just should not fail in the way it does. I have had mine replaced 3 times during the last 18 months, not good if you are having to pay. Part No A168 919 10 60 make sure to order the correct colour as it is moulded in different colours, (Colour coded)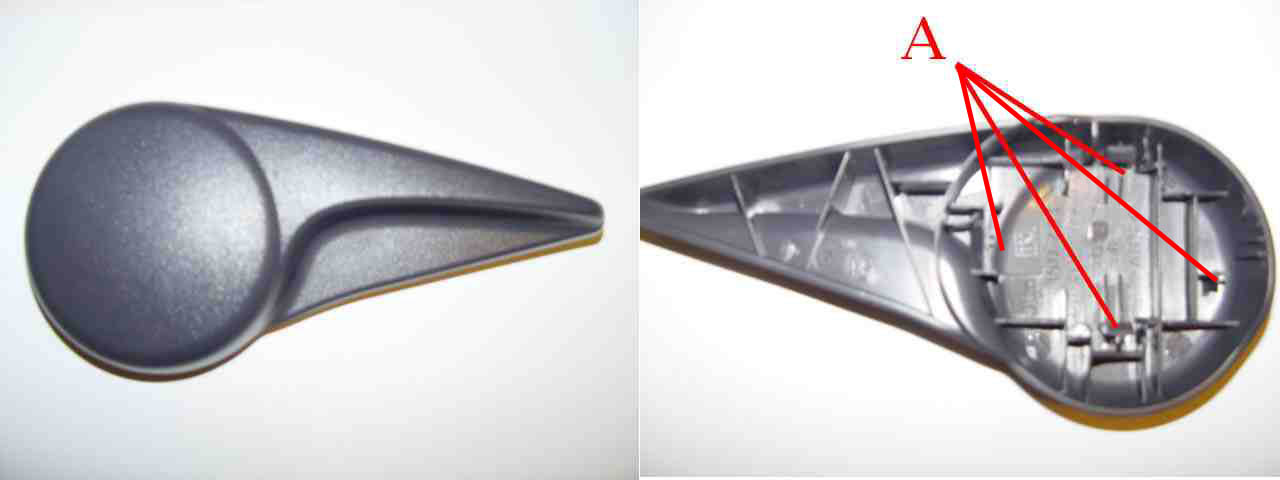

 Head Rest/Restraints.
There are five headrests, restraints are provided as standard, four larger than the remaining one which is normally located in the centre back seat position. However my centre rear headrest is removed to it is stowage area.
Head Rest/Restraints.
There are five headrests, restraints are provided as standard, four larger than the remaining one which is normally located in the centre back seat position. However my centre rear headrest is removed to it is stowage area.  This allows the driver to see when reversing. There main task is to prevent wipe lash (sudden and severe whipping of the head in a backwards direction causing injury to the soft tissue and vertebra of the neck) Normally caused by rear impact accidents (other drivers driving to close to the rear of your car and thus unable to react and avoid a rear impact collision with your vehicle.
 All headrests are interchangeable, and can be completely removed to allow the folding of the rear seats. When fully adjusted to their maximum height and not in use there is a tendency for them to drum & vibrate, to overcome this lower them fully towards the top of the seat. remember to re-adjust to your passengers height, as required and as and when you need them.
 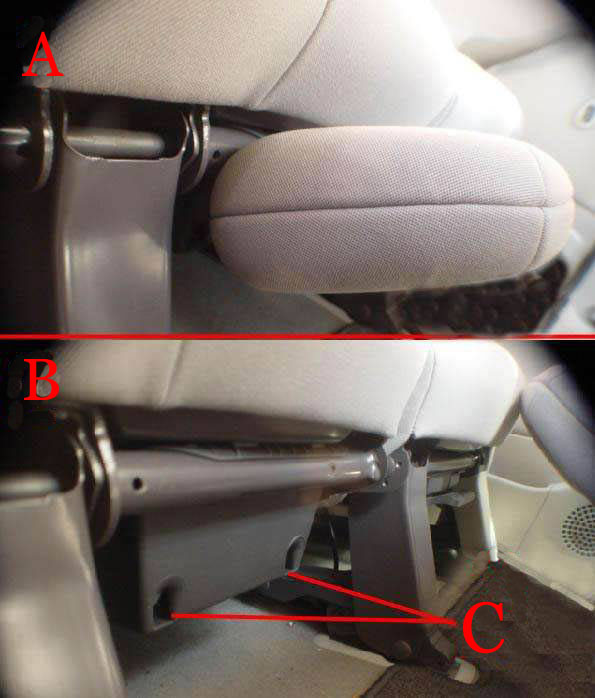 The centre rest can be completely removed and stowed in a pre-allocated stowage rack at foot level, centre to the rear seat
A, B, and C
The centre rest can be completely removed and stowed in a pre-allocated stowage rack at foot level, centre to the rear seat
A, B, and C 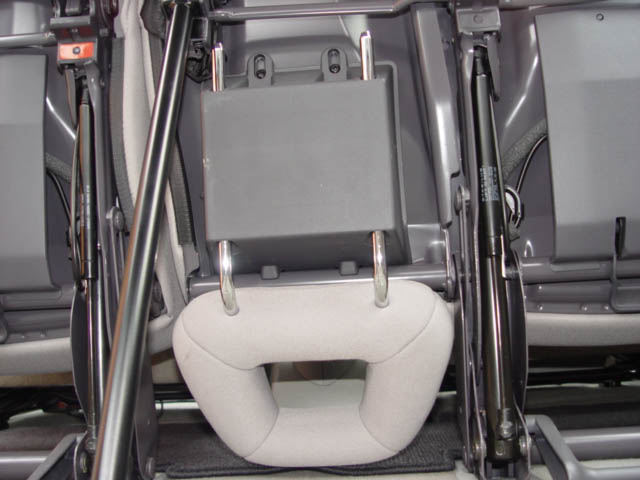
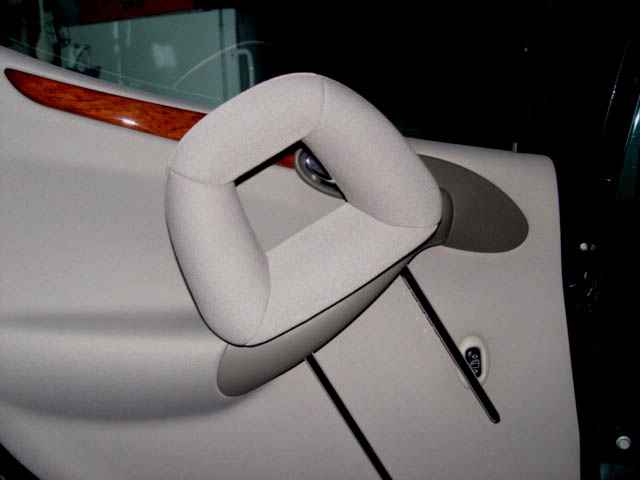 When removing the headrests from the outer and front passenger seats the headrests can be stowed in the doors as shown.
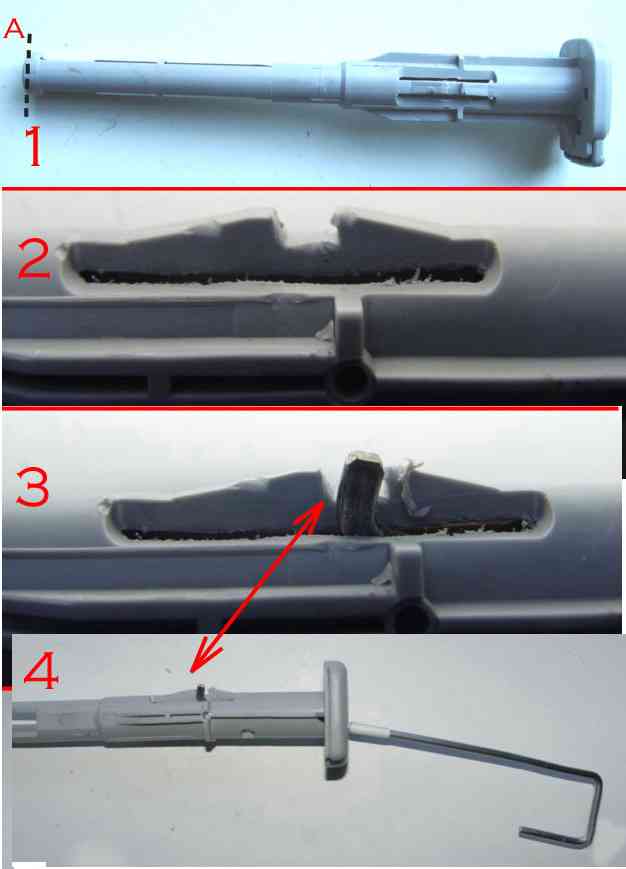
 carried safely, the lid which forms the actual arm rest snaps closed, so when in the folded up position you items are firmly held. Note, the position of the handbrake when the rest is down!
 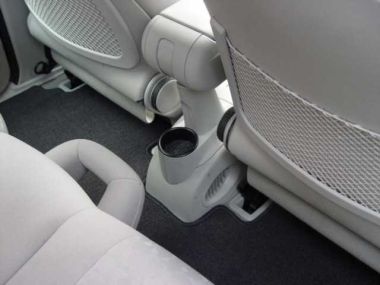 The armrest from the rear, only one cup holder is remains in the rear passenger compartment.
 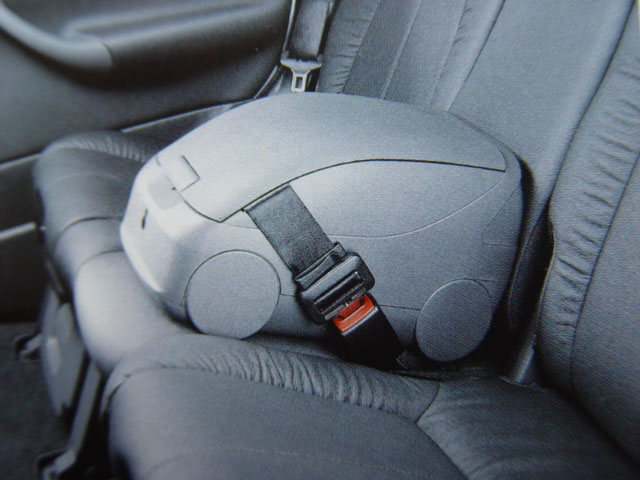 A useful item used as an arm rest for rear seat passengers and can be easily removed complete with the picnic meal. available from mercedes Parts.
  The drivers seat on the A class is multi adjustable, having a seat height adjustment, using the lever on the outside of the seat.
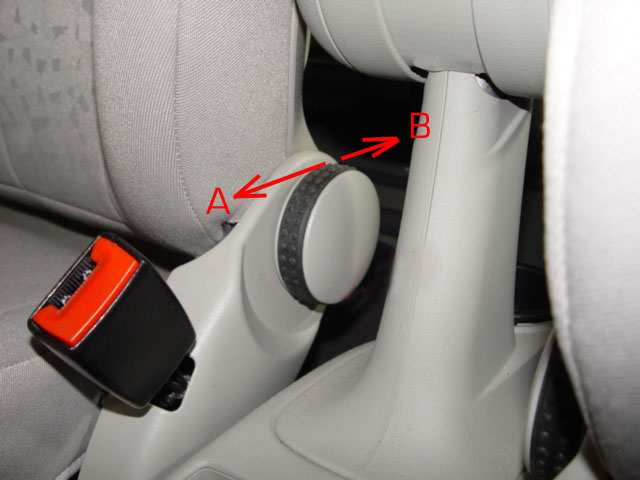 As well as the pitch of the seat back being adjustable, this adjustment is continuous and the back of the seat can be lowered to inclined position. Move towards
A
and the back rest moves towards the driver Turn towards
B
and the seat inclines away from the driver.
As well as the pitch of the seat back being adjustable, this adjustment is continuous and the back of the seat can be lowered to inclined position. Move towards
A
and the back rest moves towards the driver Turn towards
B
and the seat inclines away from the driver. 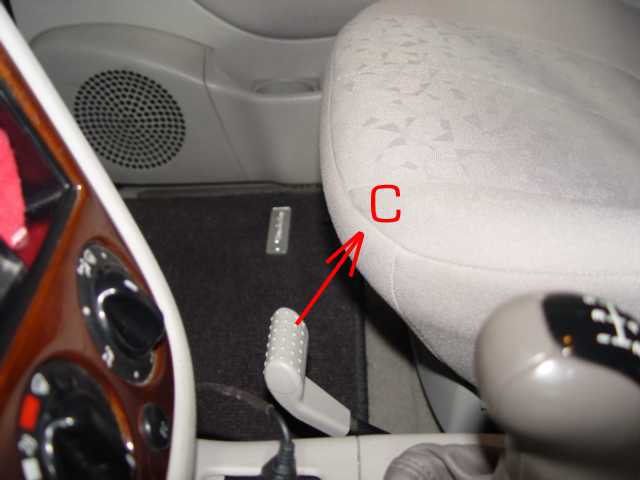 As well as the seat being adjustable to meet the drivers leg room, simply lift the handle and slid the seat backwards of forwards when you let go of the handle gently try to move the seat to ensure the teeth of the adjuster of correctly located in the slots provided in the seat adjustment mechanism.
 Simply lift the lever either on the single or double seat and slide/move forward, if the parcel shelf is removed a considerable space to the rear of the back seats can be achieved.
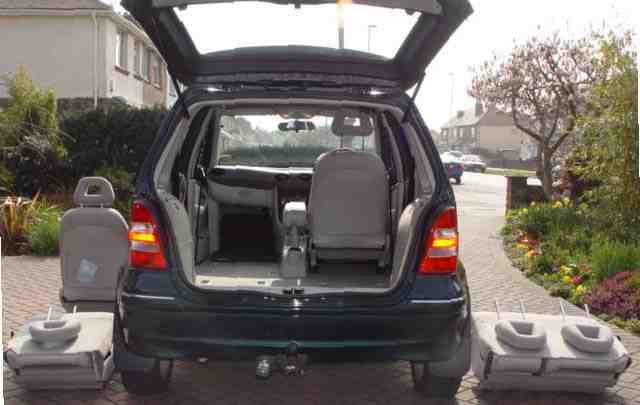
 If incorrectly fitted? Yes it does apparently fit but for reasons best known to the seat, it cannot then be removed without expert help. At least that's how the stories go and I can only take the owners involved words for it.
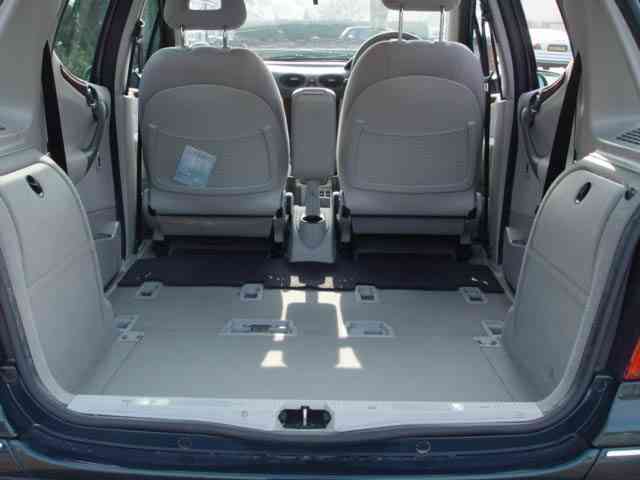
 That's the one top right hand corner, and that's where you will find them, four, one in each corner, front and rear of the seat adjusters.
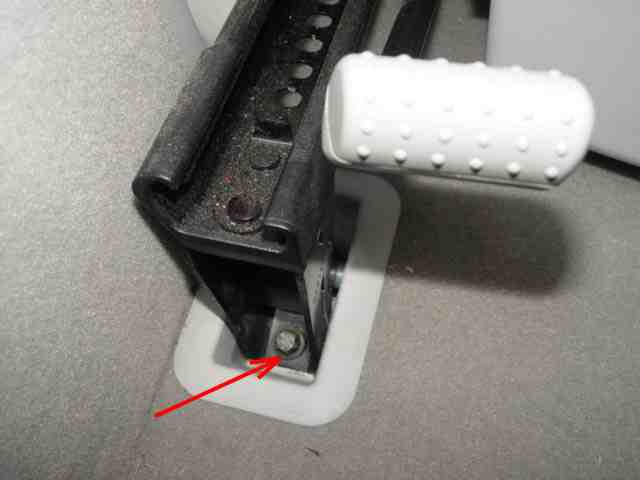
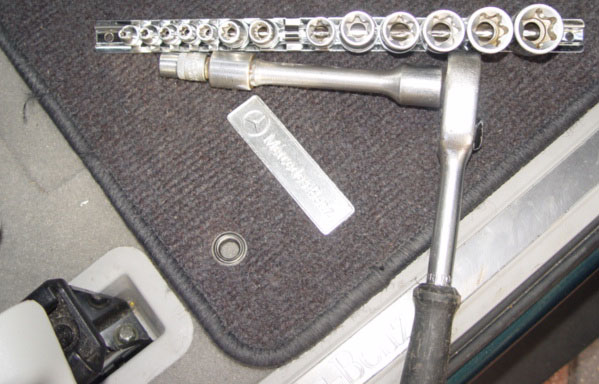 In an ideal world we would all have a set of star drive(torx) sockets where this is not the case you may get away with using a standard socket
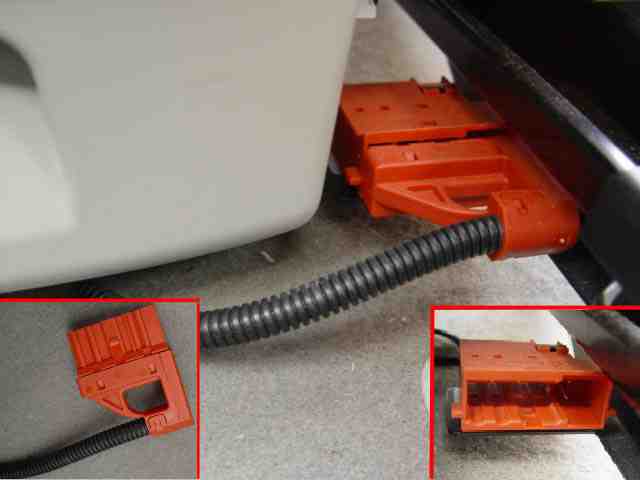
 However make sure the buckle is allowed the fall below the clip or your car will develop yet another unidentified noise, the tapping of the buckle on the plastic clip.