Component parts and Assembly
Windscreen Wipers & Washers.
The job done by the windscreen wipers is by most drivers just taken for granted with little or no attention be given to the wiper blades or mechanism.
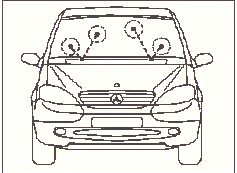
The 'A' Class is fitted with two front wipers and one rear. But do be aware that blades not only wear but also perish, the wiping edge of the blades being very thin can easily be damaged and also split or feather away from the body of the wiper blade Damage to the feather edge can be easily done while pulling the blade away from a frozen windscreen, or by running the wipers on a dry screen.
To overcome this problem carry a can of de-icer during the winter months, Remember operating your screen washers, both front and rear will cause the blades to move which again may tear or damage the feather edge of the blade if frozen to the screen.
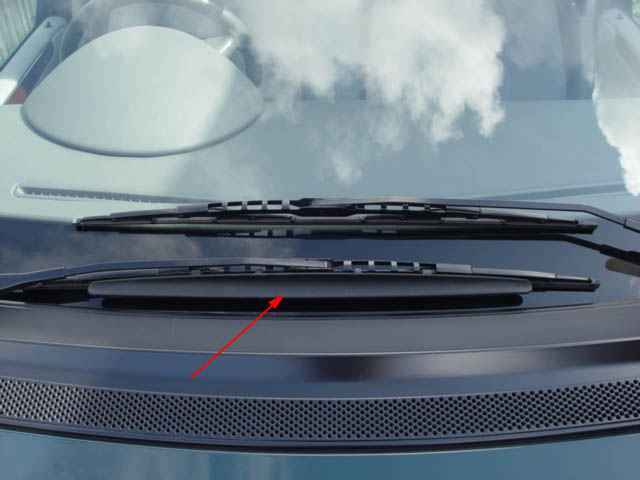
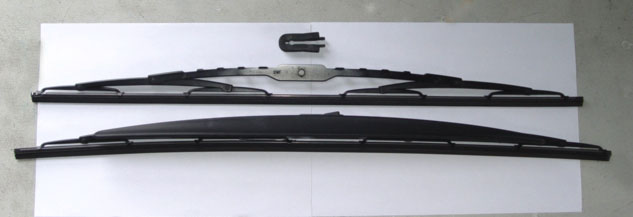
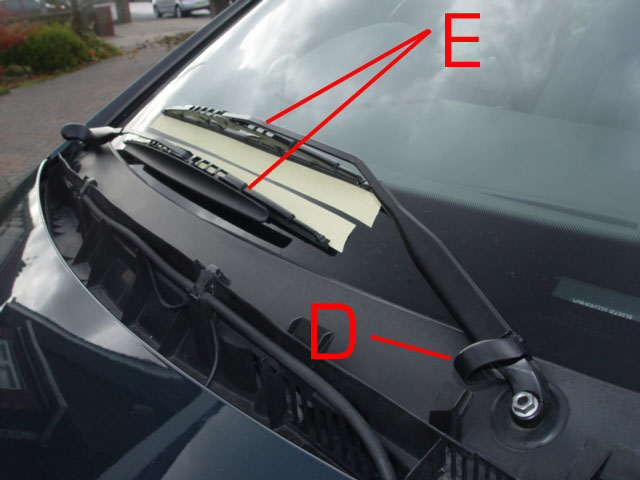
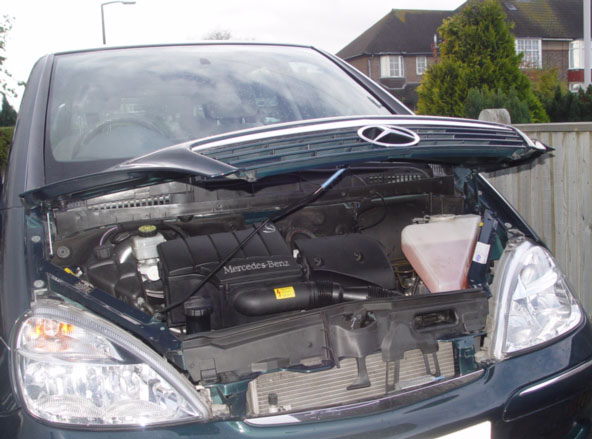
I am aware that some owners replace the original blades with shorter ones, this is because some of the earlier blades clashed while in the wiping mode. Very minor adjustments have been made to later models. However changing the length of the blades should not be necessary if the arms are correctly adjusted. As can be seen from this photograph the two blades do get very close whilst wiping the screen. That aside if attention is paid to the marking and adjustment of the wiper blades when they are removed then they should not collide. It is worth bearing in mind that it is necessary to remove both wiper arms from their drive spindles, when changing the Activated Carbon Filter. If your car has recently had a 'B' Service and then develops this fault contact the garage who serviced your car, as there is every chance that one or both of the arms were not re-fitted in their original positions, just one tooth on each spline can cause a problem. When the blades reach their maximum position they should be vertical and not striking the rubber seals at the edge of the screen..
Front Blade's
The Standard lower blades on the front are 650mm long for the lower blade which is also fitted with an air foil, and 600mm for the upper blade.
Rear
The rear wiper blade is 350mm long this blade does not appear on the 'B Service schedule so I can only conclude that it is not automatically replaced.
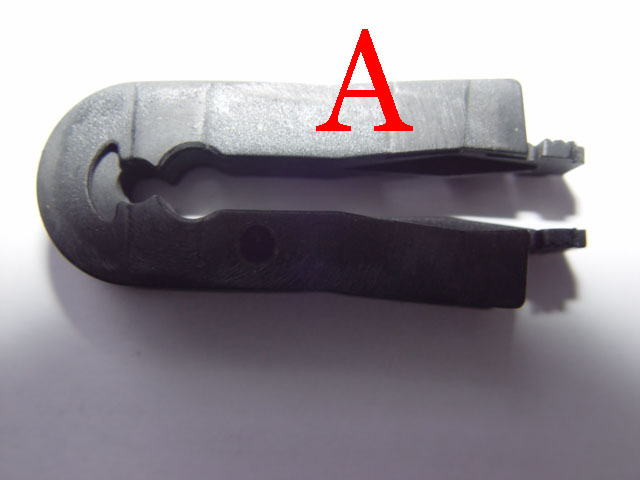
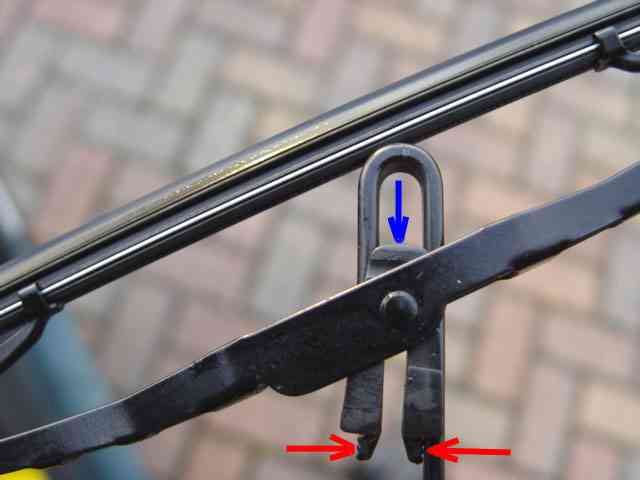
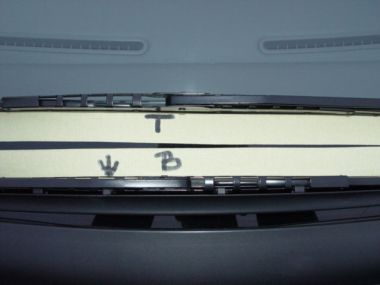
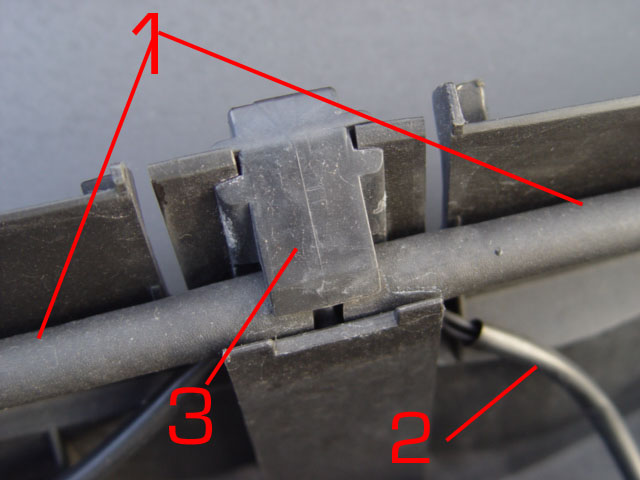
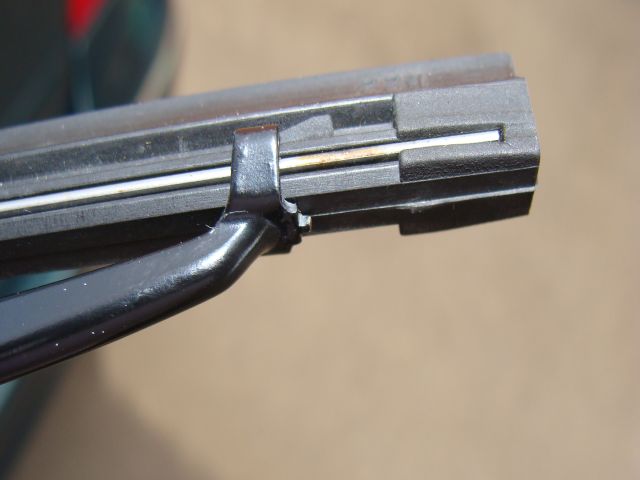
In all three instances the blade is secured to the arm by a plastic horse shoe clip
A
which locates onto an axle
B
build into the Blade holder.
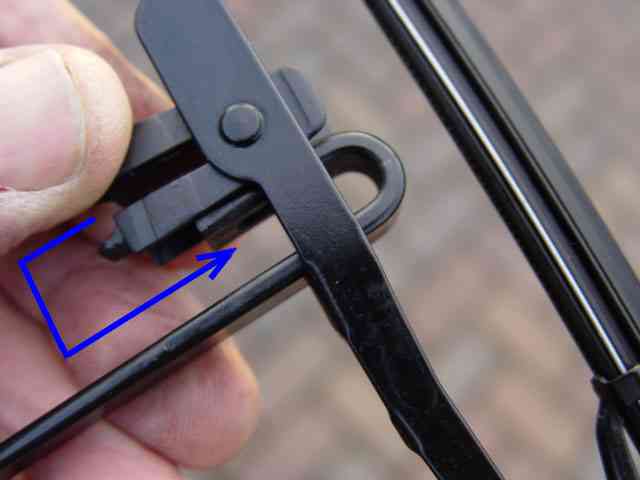
To release the blade from the arm squeeze the tabs of the clip together and slide the clip back away from the loop at the top of the arm.
When re-locating the blade, ensure the loop at the head of the arm is placed correctly, slide the blade clip into the loop until it is fully housed. Ensure the blade moves freely when housed. When the arm and blade are correctly positioned the open loop at the head of the arm will be towards the screen. Only work on one blade at a time that way you will have a reference if you need by looking at the still assembled unit.
The profile of the blade 1 is such that as it moves on the screen the feather edge
3
tilts in favour of the direction of movement sliding across the screen leaving a completely clean screen, If lines of water are left, then this normally indicated that the blade requires replacing
In some instances a juddering, of the blade as it moves across the screen is experienced, In such cases it is worth checking to see that the arm or blade holder is not damaged.
2
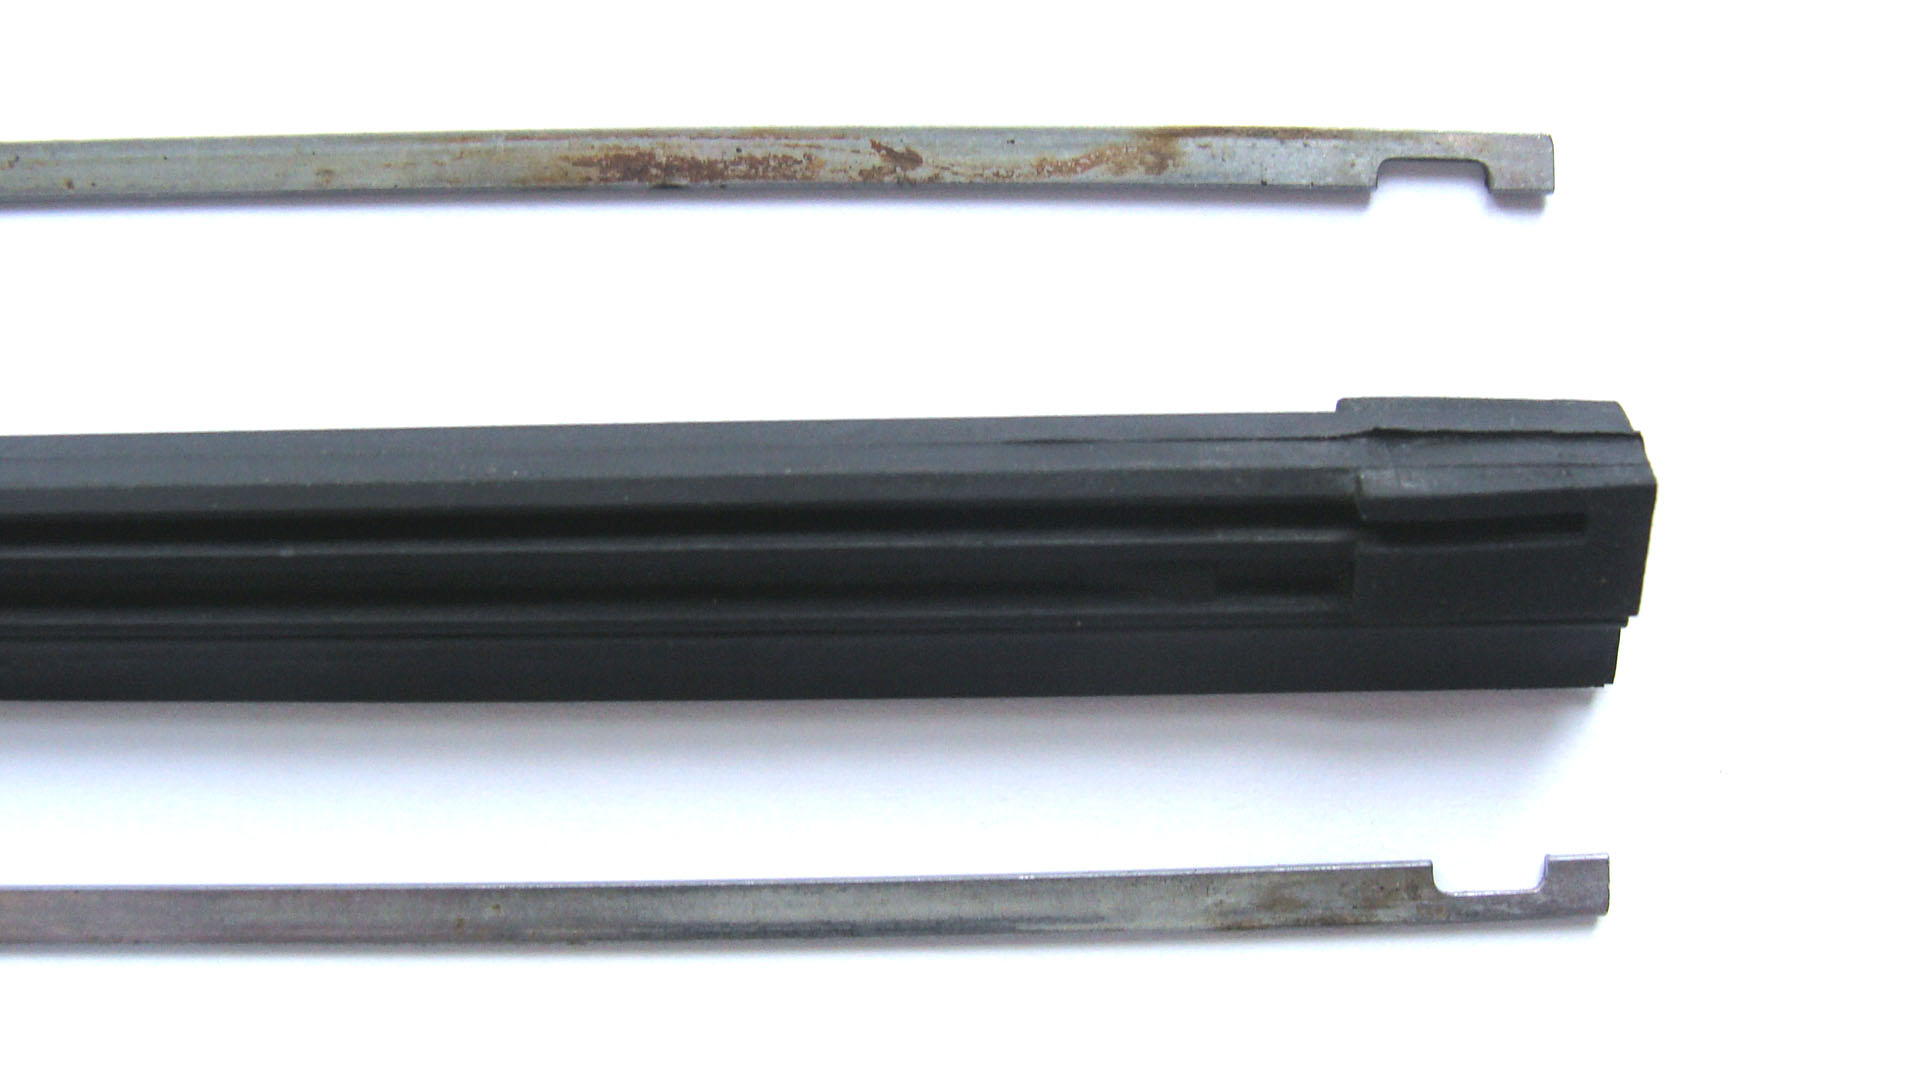
if this is the case an incorrect wiping action is experienced, this can also makes the wipers noisy and a screen is not fully cleared of water on each stroke. The rubber/neoprene blade is retained in its holder by two thin metal strips which engage is moulded slots in the blade
4
one metal strip each side of the blade, they run the full length of the blade supporting and retaining it in the holder.
If the wipers are working efficiently the larger part of the screen will be cleared of water .
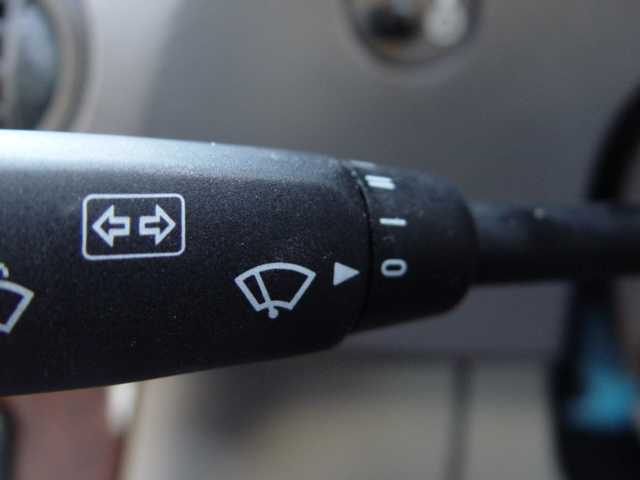
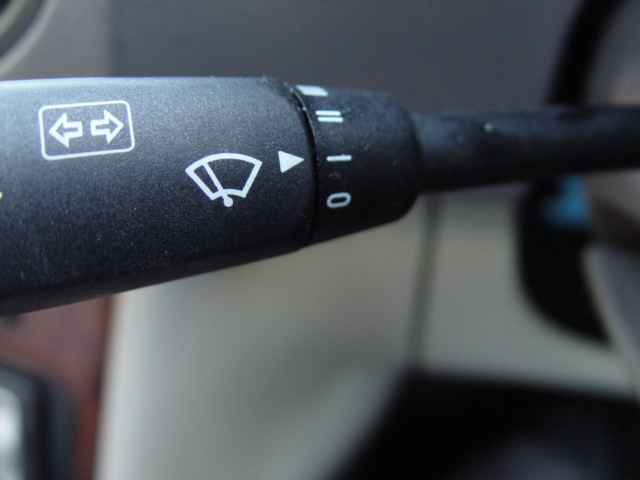
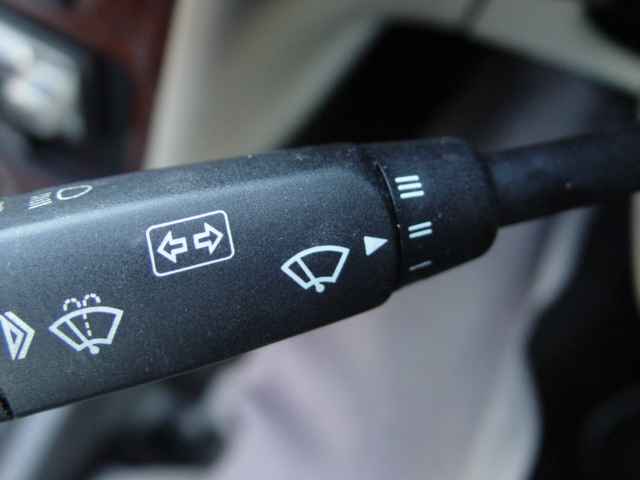
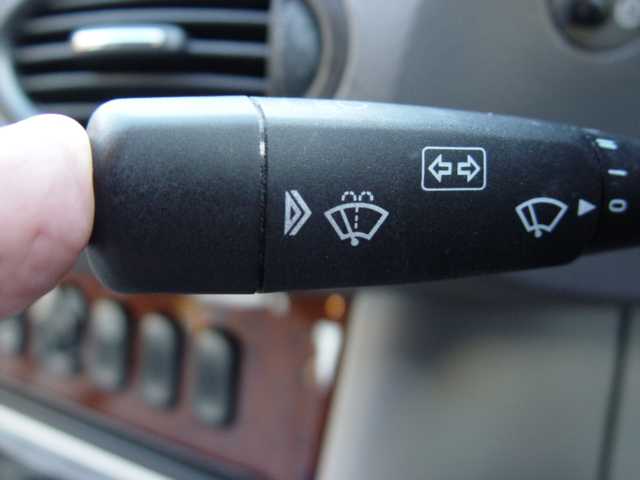
Wiper Speed Control Settings
*1 Intermittent action approx.14 stokes per minute.
*2 Approx. 32 stokes per minute.
* 3 Approx 48 strokes per minute
*Screen Wash Position, two (2) complete stocks auto stop.
* Rear wiper, Intermittent action Wipe position 16 strokes per minute.
* Wash Action, two (2) complete stokes auto stop.
The fuse controlling the flow of power to the wiper motor is a 40amp
location main fuse layout
position 9.
I strongly suspect that the screen wash pump is also serviced by this fuse as it is controlled by the two combination switches that control front and rear wipers. Special Notice Removal/Replacement of Wiper Motor. Working on the wiper mechanism can be seriously dangerous unless strict rules are followed Wiper mechanism can cause pinching, crushing, and amputation injuries
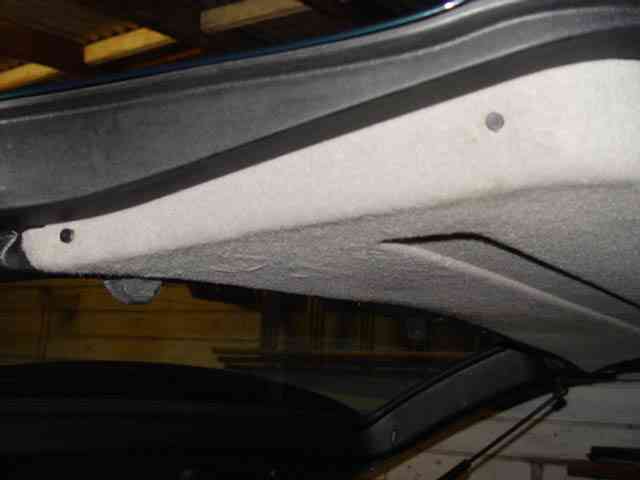
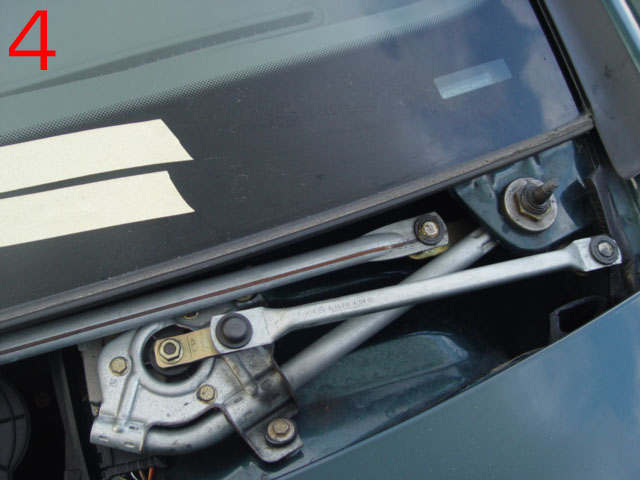
It can be seen from this photo that the grill has to be removed before the arms can be removed. However remember the wiper arms positions MUST be marked before you remove them.
TOP-TIP,
If the tape won't stick to the cold screen run the engine & heater on for a few minutes, problem solved!
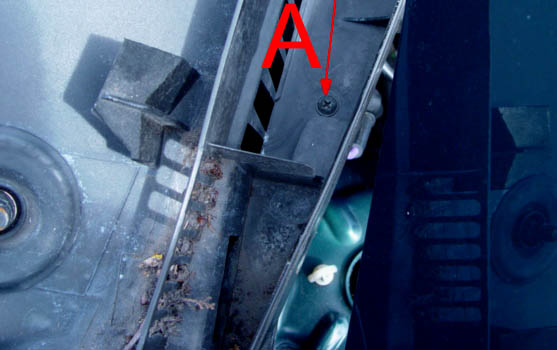
Our next job is to locate the seven screws that secure the metal grill and filter cover in place
A
Remove all seven screws and put a side for safe keeping.
Lower the bonnet and ease the metal grill up towards the top of the screen then away, effectively releasing the retaining clips
B
on the back of the grill. Having now removed the grill, you will now be free to remove the wiper arms complete with blades Firstly we need to raise the drive spindle covers, this I found was best done using two fingers placed close to the shoulders, located by the spindle ease the cover away from the arm at the same time easing it up
.
Note The cover only flips up it does not totally remove. they are made of plastic so take care not to damage them!
The procedure for accessing the wiper mechanism is the same as for changing the Activated Carbon Filter with one main Difference, in that we MUST on this occasion mark the blade positions while the arms and blades are in the 'Parked Position'.
I.e. at the bottom of the screen
E
This procedure is required
because if the motor is test run whilst detached from the wiper mechanism, the only position that can positively duplicated is the 'parked-position' which can be automatically obtained by operating the wiper switch.
The procedure of lifting each blade in turn to
release any tension the blade is under
should still be followed before placing your arm& blade markers.
.
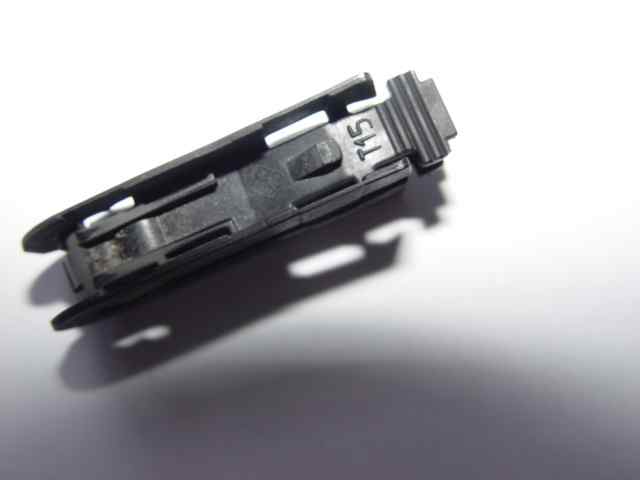
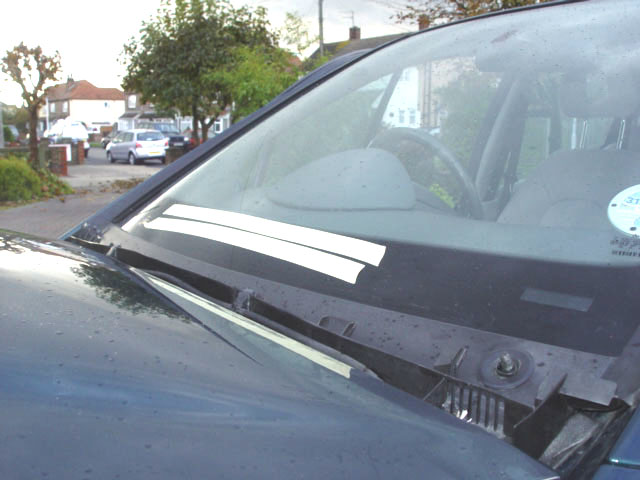
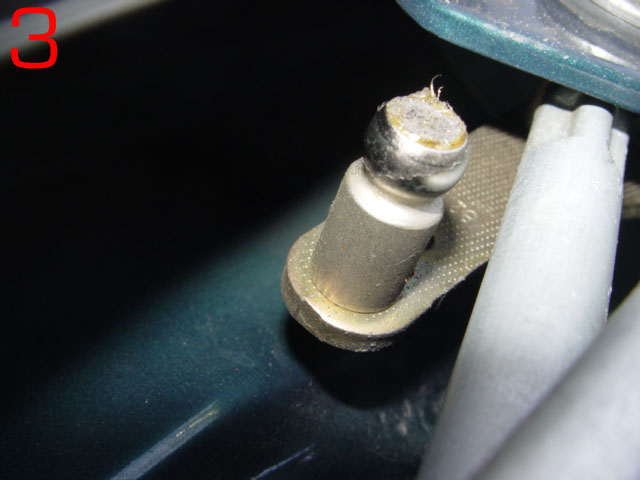
Using the 1/2"AF /15mm Spanner ( Check the size because I've been informed that in one case the nuts were 13mm )either way, slacken the wiper arm retaining nuts, anti clockwise to undo, Note
that these nuts are NOT TIGHT! and when being replaced must not be over tightened, or damage will be caused to the spindle drive mechanism. In this photo I have already removed the nut. Note also the wiper arms have been lifted away from the screen and are now 90% to the screen, take care the springs are quite strong. This will enable us to take hold of the arm, very close to the screen and to then gently but firmly rock/tilt the arm from side to side, this will loosen the arm on the tapered spindle & spline and allow the arm and blade to be removed, if there is no movement initially, persist they do come off! Repeat the procedure with the second arm.
You may find like me that it's more convenient to work with the bonnet slightly lowered from it's normal position. To achieve this and yet still maintain a stable position put the stay through the catch, Do not apply pressure on the bonnet while working on the car, the weight of the bonnet alone will not damage the catch or stay.
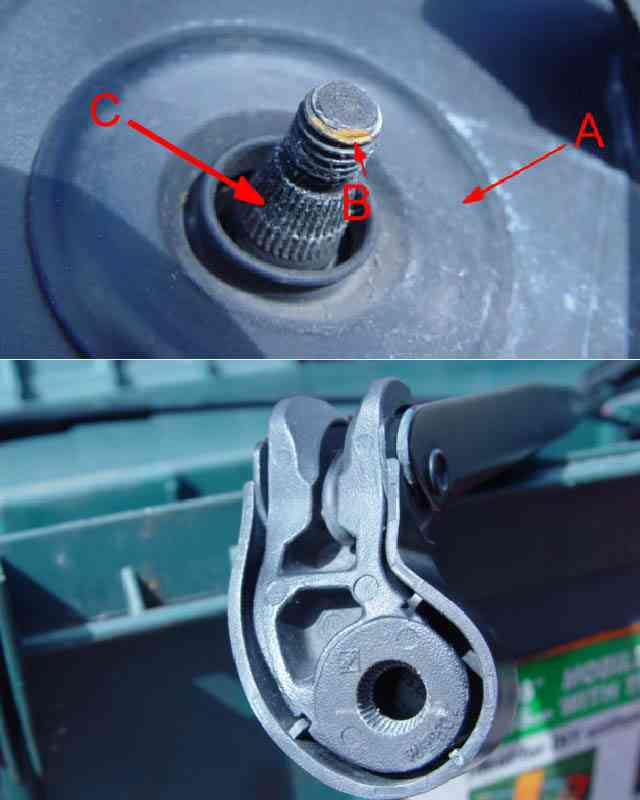
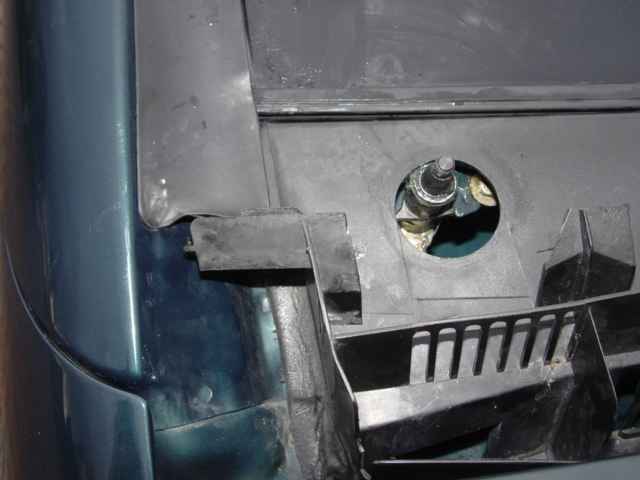
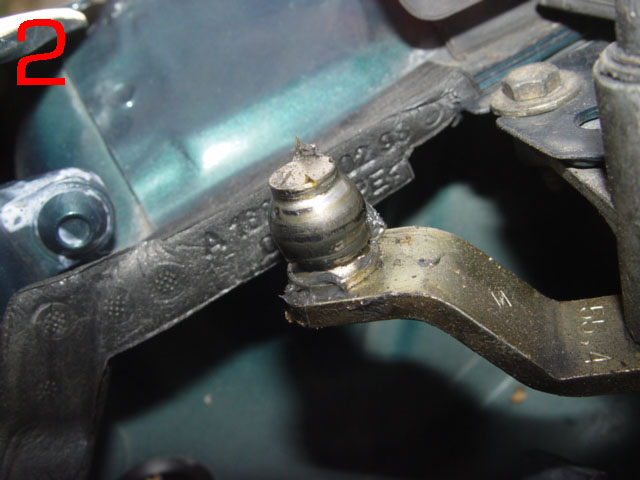
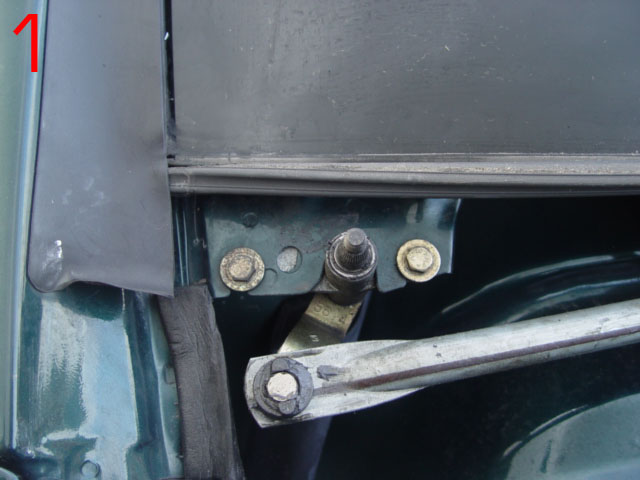
The tapered spindle from which the arm has been removed can now be seen, the grooves within the aluminium body can also be seen, it is these that engage on
C
the spline's to effect the drive of the arms, and on which the arms are engaged to re-align them on the spindle. Surrounding the spindle is a rubber grommet,
A
Do not be concerned if this is dislodged as it easily replaced
We are now ready to remove the last two screws that are still holding the water collector
. A
One either side, All the screws removed will be of the same type and length so there is no need to keep them separately.
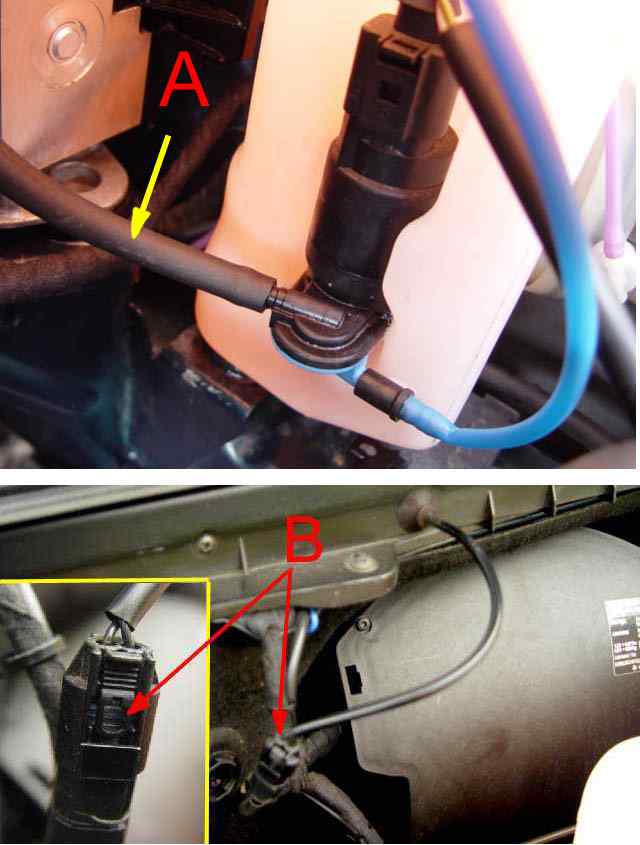
Now we are in a position to remove the water collector, (Plastic tray) which runs the full width of the car, this will enable us to fully access the wiper motor and mechanism. We firstly need to disconnect the front screen washer tubing from the windscreen washer pump.
A
Have your Blu-Tac of something similar to hand, carefully remove the rubber tube then block the outlet with the Blu-Tac, or your screen wash fluid will drain from the reservoir. Take care not to damage or bend the outlet spigot on the pump.
B
The electrical supply which powers the heated washer nozzles also needs to be disconnected, press on the side of the connector clip and separate the two parts, take care not to pull on the loom carrying the wiring.
When removing the plastic water collector, handle with care. Slide it down & out from its under the vertical windscreen rubbers either side, then tilting and lifting so as to clear the wiper arm spigots. when free completely remove from the car & carefully store it in a place safety.
Being moulded in plastic some of the parts are quite fragile .You may wish to take the opportunity to clean the water exit slots, in which case this is best done with a 1" paint brush and soapy water. C
shows the location of the washer nozzles
D
Is the electrical connection for the heating the nozzles.
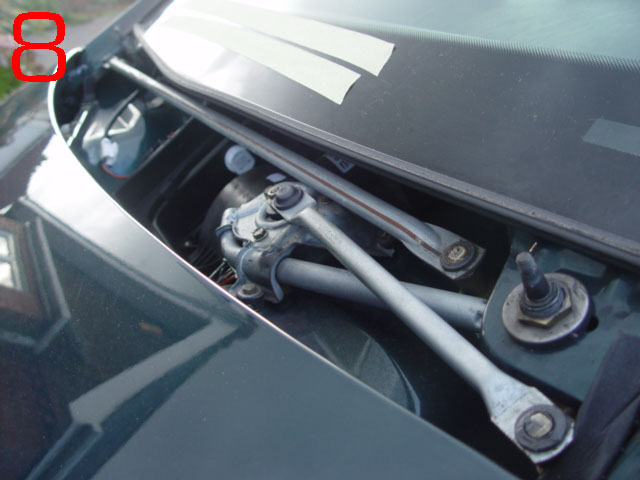
The windscreen wiper mechanism will now be fully visible.
BE AWARE BEFORE TOUCHING OR WORKING ON THE WIPER GEAR AND MOTOR THAT YOU ARE WORKING ON POWERFUL AND DANGERIOUS, AS WELL AS NOW UNGAURDED EQUIPEMENT, ENSURE THAT ALL LOOSE CLOTHING IS REMOVED OR COVERED.
1
O/S Wiper Gear,
2
O/S Wiper Bearing.
3
N/S Wiper Bearing
4
Main Wiper Gear & Motor
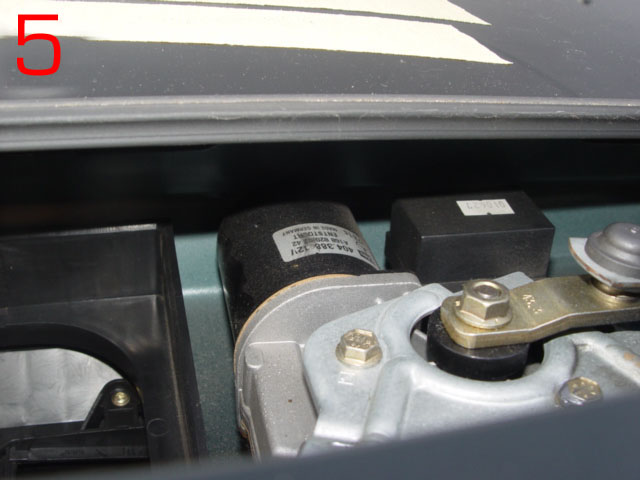
5
Motor
6
Central Wiper Gear Parts
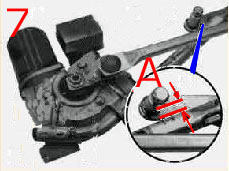
7
Picture Diagram Spacing at position
A .
8
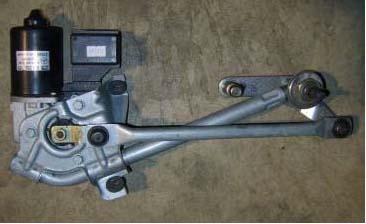
Complete Wiper Gear.
In addition to this assembly there is a straight connector which attaches to the second wiper drive spindle.
If having checked the fuse your examination of the motor is due to it not Operating/Functioning. Then before touching the wiper gear check the electrical connection to the motor then, Re-Test. Check also that power is reaching the electrical contact block.
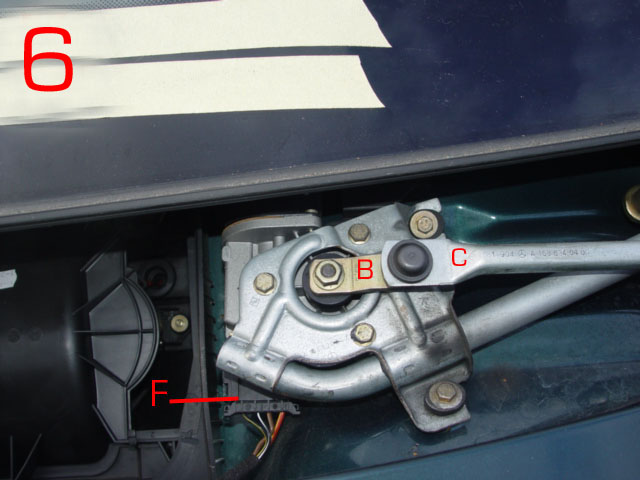
* Should there still be a need to remove/replace the motor?
* At this point the ignition keys should have been withdrawn from the ignition switch
* Disconnect the electrical supply to the motor F
*If the motor is to be removed, repaired, or test run, Tilt & lift the wiper drive *C away from the wiper motor crank
B
*You may also find it easier to work on the motor by removing the long connector rod between the wiper drives, tilt & lift to remove, for ease of replacement you may need to warm the plastic housings at either end.
*For the testing of the motor, an assistant will be required, to operate the ignition and combination switch
*Having removed the wiper mechanism from the motor reconnect the electrical connection.
*With the motor still secured it should be possible to run a test by getting the assistant to turn the ignition ON .YOU DO NOT NEED TO START THE ENGINE. .
(Keep your finger clear of the motor crank arm.) On your directive get your assistant to , operate the combination switch/wiper positions 1,2,3,and off.
*It should also be possible to test the screen wash position by pressing the end of the combination switch, albeit the screen wash facility is disconnected. in this position the motor should operate two sweep movements and automatically stop.
* Having tested that setting check that your 'Blu-tac' or stopper is still blocking the screen washer pump outlet! As that may also have operated.
* Note the size of the gap at point. A
The specified gap is
10.2mm
However mine was not to specification but works well and so I have not adjusted it. I therefore suggest that you find a tool or gauge that will just fit the gap (to measure and re-establish the gap when re-assembling the unit.)
If it is necessary to replace the motor (New or repaired)
you will need to confirm that the motor is in the parked position before connecting the wiper gear back to the motor.
Procedure for Resetting Wiper Motor Position.
With the aid of your reliable assistant.
*
Position the New motor in such a way that it can be connected to the multi-pin connector.
* With the ignition off Connect the multi-pin connector to the motor*
* Hold the motor firmly with one hand
* On your instructions get your assistant to turn on the ignition *
Then turn the Combination switch to position one (1) Then return to the OFF position (0) The motor will run for as long as it takes for the wiper program to reach the 'Parked Position' it will then stop.
* Direct your your assistant to turn off the ignition and deliver you the ignition keys.
* Remove the multi-pin connector from the motor.
* Fit and secure the new motor, and replace the wiper gear in the reverse order to stripping.
* Fit the crank from the old motor to the New motor DO NOT fully tighten the securing nut, as the crank arm may need to be adjusted.
*Re-fit wiper linkage C on to the crank arm (push fit, warm if necessary) on the motor crank arm B both must be inline.
* When this is confirmed the crank arm nut can be tightened.
*It is absolutely essential to maintain the space at A to 10.2mm Since the accuracy of this distance has a direct influence on the wiped area of the screen. Incorrect space may lead to the wiper striking the right hand 'A' post or wiper arms & blades clashing.
*Using your the pre-mentioned gauge check to confirm gap at A
* If satisfactory re-assemble parts in reverse order.
Typical problem of wipers clashing. If for some reason the previous owner or even garage have not marked the screen before removing the wiper arms blade clashing may be experienced at a later date. Remember any tests undertaken on the wipers should be on a wet windscreen, failure to observe this rule and problems will be experienced at a later date. Question:- I have been looking at you fabulous web site. I have a 2001 A140. I have had problems where from time to time the wiper arms clash. I have had to put 600mm blades on both arms now & it is better but they are still very close when in use. Do you think it could be that the arms have been replaced wrongly at some point? If I put a 650mm blade on the drivers side arm it would overlap the passenger side when in use. I have had a look at the wiper blade section on the web site. What is the optimum gap between the blades when in the home position? I'll then then check to see if mine are correct
.
Answer:-
I suspect somebody has replaced the activated carbon filter which requires the arms & blades to be removed without setting and marking their position first, This could well have even have been a garage!
However you should also bear in mind that these components are subject to wear and the problem could be caused by play in the component parts of the wiper mechanism, check this out before making adjustments. All I can suggest is make sure the arms are the correct length, that information is on my site, the longer of the two blades going to the drivers side, the arms are the same length, and satisfy yourself that there is not undue wear in the wiper arm spindle mechanism.
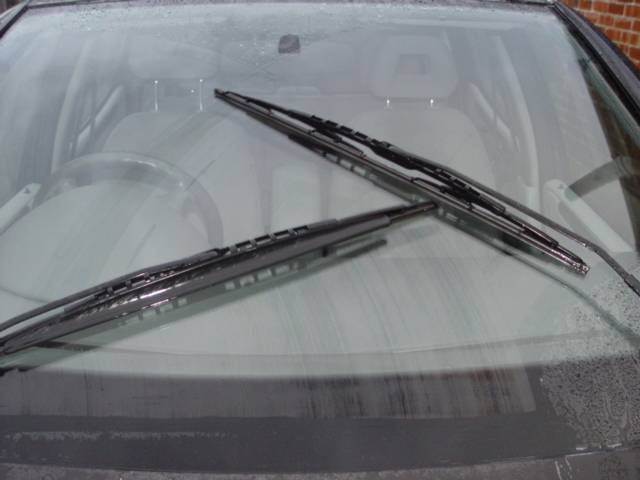
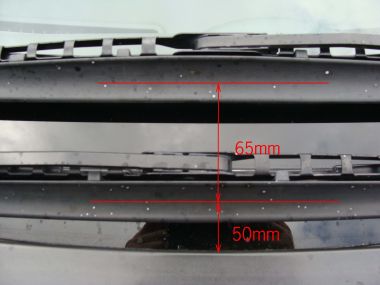
Then looking at the photos on the wiper set the blades square to the base of the screen, both arms laying horizontal
From the rubber at the base of the screen to the feather edge of the wiper blade measure 50mm,remember to lift and lower the blade to release any torque.
There is then a 65mm gap + or - 2mm between the two wiper blades feather edges. The measurement is taken from the central rivet where the arm attaches to the blade holder in each case. (these are the measurements on my own car. I have never had a problem even though they have been off at least 6 times since I purchased the car) as I can find no official information for re-setting these wiper blades & arms.
To adjust remove the metal cover situated over the wiper arm nuts, (release screws under bonnet)
With the wipers turned to no 1, i.e. Occasional wipe, wet the screen either hose or screen washers
Using the ignition key to control the arms sweep the screen
The tip of the drivers wiper on my car clears the passenger wiper by 30mm + or - 2mm at it's closest point
remember we are talking of the distances between the top end of the drivers blade, and the side of the passengers' wiper, rubber blade which is obscured on my car as I have fitted a second deflector.
* When replacing the 'water-collector' do so with care ensuring that the ends fit beneath the vertical windscreen rubbers. you may also wish to clean the the unit first. A 1" paint brush, detergent & water work wonders!
*Take your time when replacing the wiper arms and blades making sure that you are aligned with your tape markers. this can take several minutes to achieve!
* Remember to re-connect the screen wash hose to the washer pump and make the electrical connection.
*When replacing the metal grill make sure the speed nuts attached to the grill go inside the water collector. This means working from the inside and outside the bonnet at the same time, the clips tend to slid the wrong side of the water collector. *
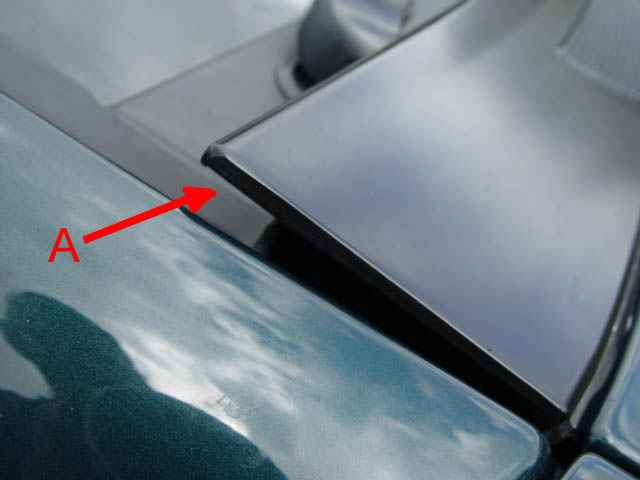
* Having confirmed that every thing is replaced as found the tape markers can be removed refit the grill making sure it is correctly fitted. I.e. laying flat with the screen. This photo
A
shows what can happen if the grill is not correctly fitted.
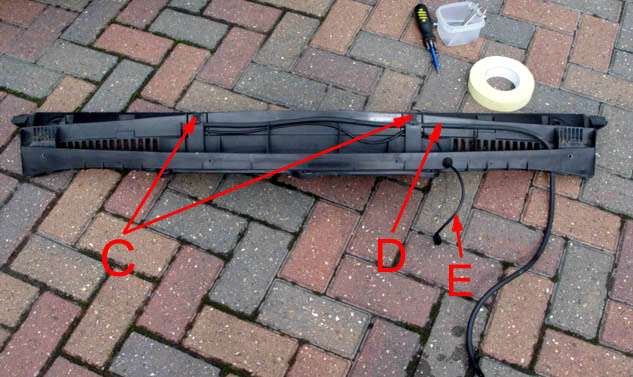
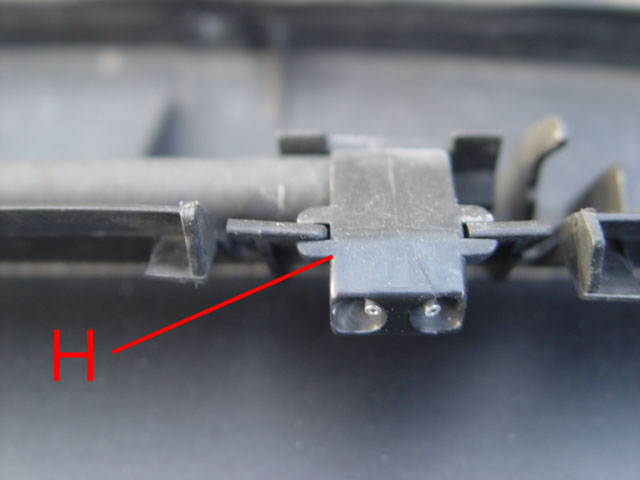
Water Collector and Washer Jets
*In these two photographs the jet assemblies
H & 3
can be seen. slotted onto the 'water-collector' . *The electrical connection
2
can also be seen. *
*1
shows the interconnecting black neoprene washer hose. >
*If the jets are blocked, one wire from a steel or copper wire brush will normally do the trick,
DO NOT
be tempted to use sewing needles as they can snap leaving a portion in the jet. Tilley lamp or old paraffin blow-lamp pricker's are ideal.
*Only use Mercedes- Benz washer fluid, if you wish to change then thoroughly wash the system through with clean water before installing the new fluid in to the reservoir, different fluids do not always mix, causing a coagulated mixture of the various fluids which will find it's way into the washer hoses, this foreign mixture may also block jets.* C heated nozzles
Washer hose
E
Electrical supply for nozzles.
Rear Wiper & Washer
*The rear wiper is controlled from a combination switch on the central dash. Press the upper part of the switch and the wipers will run until the upper part of the switch is pressed again.
*
The screen wash & wiper are activated when the bottom half of the switch is used , the washers will run at the same time as the blades making two sweeps before stopping automatically
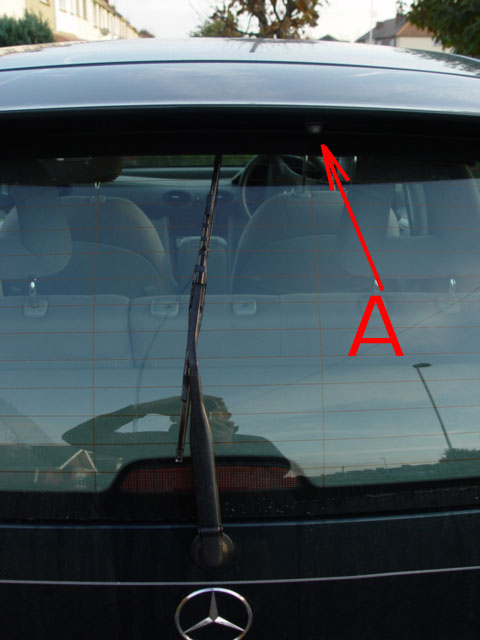
The rear window is equipped with a single 350mm blade, the motor is enclosed within the 5th door.(boot lid) The rear twin jet washer is supplied from the single reservoir located at the front N/S of engine compartment. Washer fluid
A
is supplied to the nozzle via the blue plastic tube.
B
This diagram shows the striking locations of the water jets when the nozzles are correctly positioned, We have all laughed at some time or another, at the car in front that sends jets of screen wash over the top of the car, falling more on our car behind than their own? don't let that be you! Adjusting jet positions.
Should your jets require redirecting they move around in the body of the unit like eyes using a suitable picker move the jet in it's socket to the desired position. it may take you a few goes to get the jet where you want it to fall.
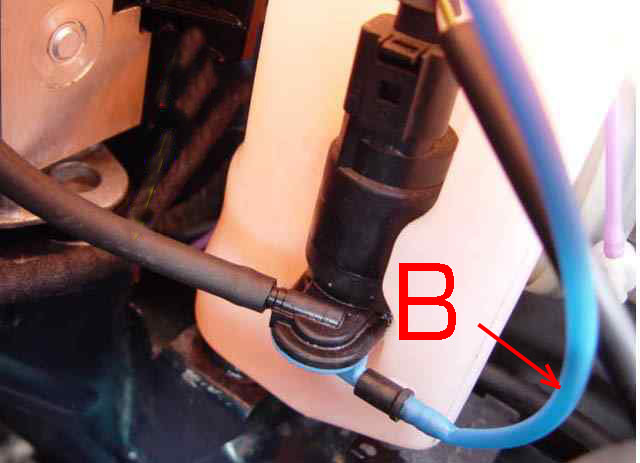
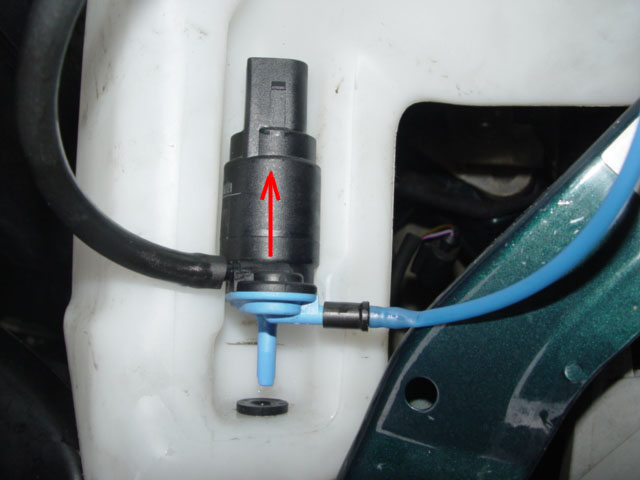
Replacing the Screen Washer Pump * Empty the reservoir of fluid, disconnect the electrical connection on the head of the pump * For ease of working partially remove the reservoir from it's housing. * Withdraw the pump by pulling the pump spigot from the sealing grommet in an upwards direction.
*The black tube is easy to remove * The blue tube will however have to be heated for both removal and fitting to the new pump Take great care not to break the spigots off the pump. *
TOP-TIP One alternative is to use a short collar 1" of the black tube to fit to the rear outlet, then push the blue tube inside the collar. Both tubes are then connected to the pump via black neoprene tube.
Rear Wiper
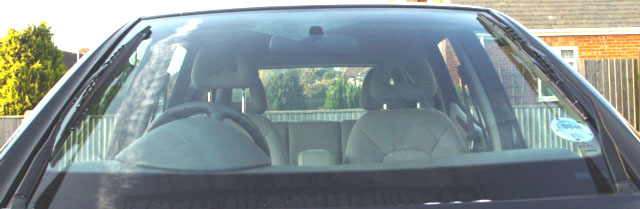
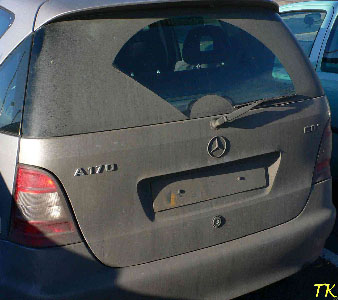
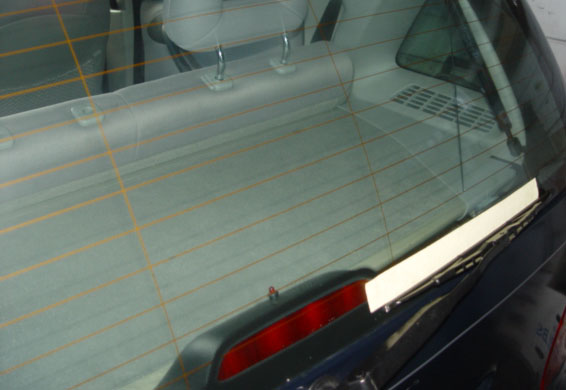
The job undertaken by the rear wiper should equally not be under estimated, one could ask what did we do without them? This car had done several hundred miles and it can be clearly see that vision would be nil without the rear wiper.
It is also worth noting that this car was not fitted with rear mud flaps, although they are not the cure all, they help to dramatically reduce road filth gathering on the rear screen. See page .18 It is worth mentioning that the law requires the driver to ensure that the number plate can be read at all times, to this end drivers should not only check there number plates for road grim but also ensure the number plates bulbs light. See page.11
Replacement wiper blades only (just the rubber blade) both front and rear are readily available from mercedes Parts and I recommend you buy from them, that way you know the blades will fit the existing arms and blade holders and they then become easy to fit, buy a different make as you will possibly have to buy complete Holders and Arms which do not come cheap.
Remember if you are having your car serviced by Mercedes these are included in the 'B' Service routine so check to ensure they have either been fitted or not charged.
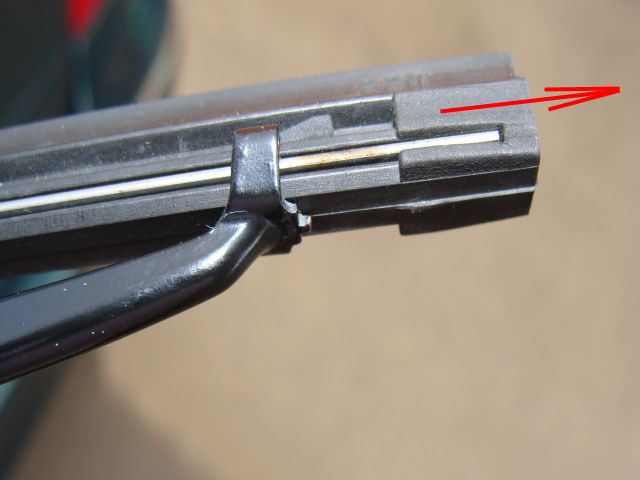
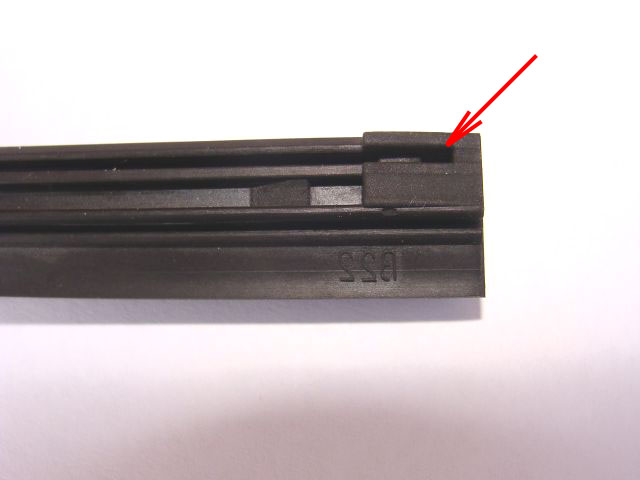
To change the rear blade simply pull the blade from the head end and the rubber blade complete with the two metal inserts will slide free of the 4 claws.
Ensuring the toothed end engages in the rubber blade at the head end where you will find a recessed into which the tooth locates. When correctly located the blade is firmly held in the blade holder . Only run wipers on wet screens or the blades may become damaged. Clean the metal inserts if tarnished and fit back to the replacement rubber in reverse order
Only one end of the blade is fitted with a recess for the tooth on the metal insert. this goes to the head end of the blade when operating on the screen.
If the need arises to work on the rear wiper motor then then rule of marking the screen while the wiper blade is in the parked position still applies. Lift the blade from the screen before marking albeit there is not such a problem at the rear of the car as there is only one wiper, that said we do not want the wiper leaving the rear screen during operation.
To access the wiper motor we need to remove the boot lining, to do this we need to remove the plastic moulding by the boot lock first.
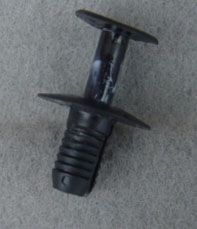
There are three stud heads approx 1 cm in dia. the heads ease out of the body, having withdrawn the stud , which can be stiff to move, the plastic moulding will come away from the bottom of the door. TOP_TIP
Before you put them back put a small amount of grease on the pin they come out easy the next time then!
TOP_TIP
If you should and break a head off one or more of the Black plastic pins heads don't panic. Using a suitable tool drive the centre pin only, through into the boot, and simply remove the body of the clip. When replacing the damaged unit find a suitable stud to hold the clip in place until a spare stud & pin can be obtained. I used the aluminium head section of a 3/16 rivet. Remember all the pin is doing is holding the black plastic moulding in place to stop coming away from the boot.
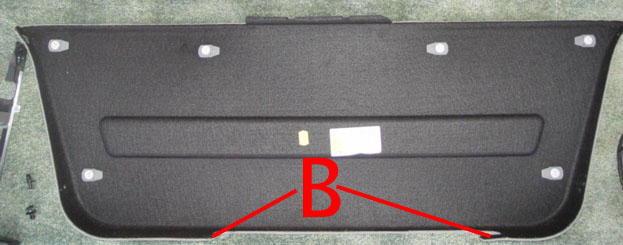
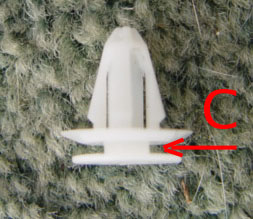
The boot lining is now only held in place by six clips and two screws, the white clips can be seen,
B
indicates the location of the two screws.
The white clips can be pulled from their location holes, take care when re-fitting to get them aligned with their holes, The space
C
at the head of the stud slides into a flat retainer on the boot lining. Note it is note unusual to break these clips.
TOP_TIP
When your next at your MB parts, purchase a few white clips and a couple of the black studs as spares. If you have got spares you are unlikely to need them .'Murphy's law'
Having removed the boot lining the wiper motor becomes visible along with a number of other components Amongst other things will be electrical connections to rear boot lighting etc.
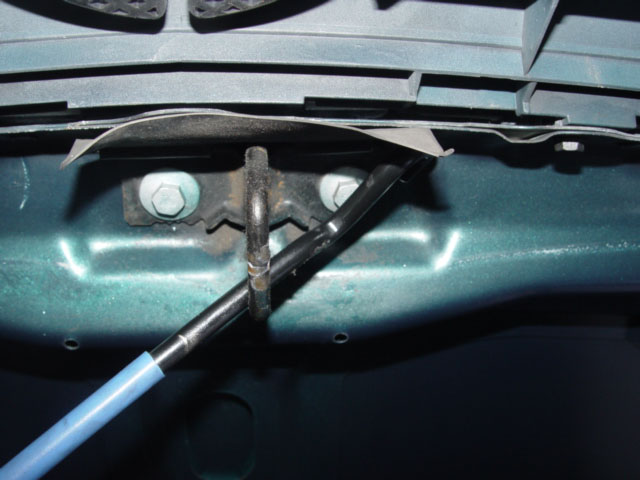
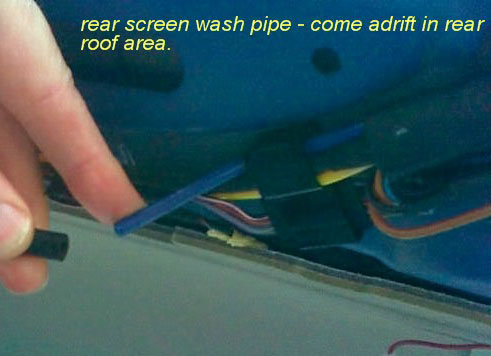
This photo shows the detached hose, which can be caused by a blocked nozzle forcing the tube off the fitting, ice due to using insufficient anti-freeze fluid in the washer bottle , or a shortening of the tube due to aging.
The hose is best replaced by pulling in the new tube as the old is pulled out, Net curtain spring support wire is also a useful tool for re locating the new hose
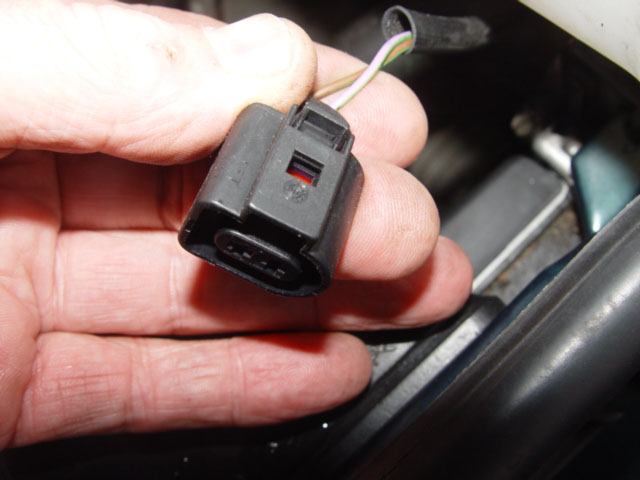
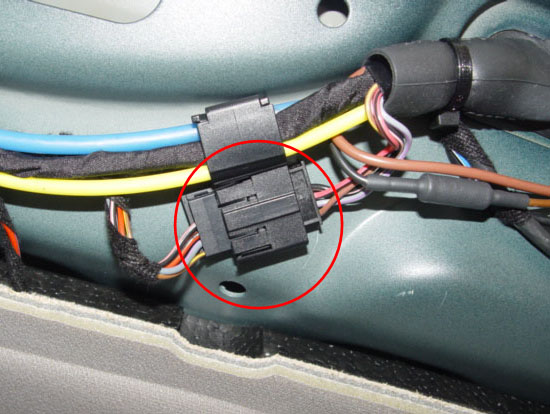
This Electrical connection is prone to becoming contaminated with screen washer fluid if the washer hose for any reason becomes detached. This fault can show itself in that:-
The interior lights stay on when all door switches are open (All doors fully Closed) due to a short circuit in the plug to earth As well as an intermittent sounding of the car alarm caused by the drop in Voltage.
More serious damage can arise due to the fluid entering the well (recess in the lower boot area, into which the vacuum pump for central locking is located) when the vacuum pump for the central locking will become contaminated by screen washer fluid it suffering substantial damage with eventual failure of the central locking system due to pump failure.
When operating the rear screen washer always ensure water reaches the rear screen, failure to notice this defect can be costly and troublesome.
Services for the electrical components, window heater, wiper motor, high level stop lights, number plate lights, along with the vacuum hose for the boot lock, and washer hose for the screen all enter the boot at high level protected by two gaiters I have not pulled these about for fear of upsetting the services and so am unable at this time to indicate what runs where.
If having removed the boot lining you cannot re-secure the lining firmly one was over the problem is to fit four studs to the top and bottom corners (MB invoice number MA201 990 01 92 / 3303 Rivet. Cost about 20p each) I have installed two per side drilling through the carpet lining then positioning the lining in its correct position, then while holding the lining firmly in position drill through the plastic beneath using a 1/8 drill, (Ensure when drilling that the drill is not too large or the rivet will not lock in position) then install the rivets, and apply the spreading pin. The lining is now held very firmly, like the larger stud in the black moulding they are re-usable and will not damage or split the plastic beneath.
These rivets are used else ware on the car and are ideal for the purpose of securing the boot lining. Fitting withdraw the pin, press the body of the rivet home, reinsert the pin this spreads the rivet ensuring it is retained in position. To remove ease the pin out carefully from the body, using two suitable screw drivers. Having removed the pin ease the body from its location.
 Front Blade's
 In all three instances the blade is secured to the arm by a plastic horse shoe clip
A
which locates onto an axle
B
build into the Blade holder.
In all three instances the blade is secured to the arm by a plastic horse shoe clip
A
which locates onto an axle
B
build into the Blade holder.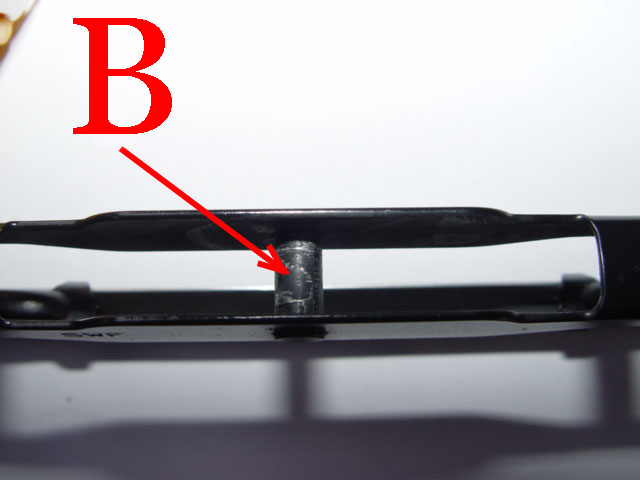
 When re-locating the blade, ensure the loop at the head of the arm is placed correctly, slide the blade clip into the loop until it is fully housed. Ensure the blade moves freely when housed. When the arm and blade are correctly positioned the open loop at the head of the arm will be towards the screen.
 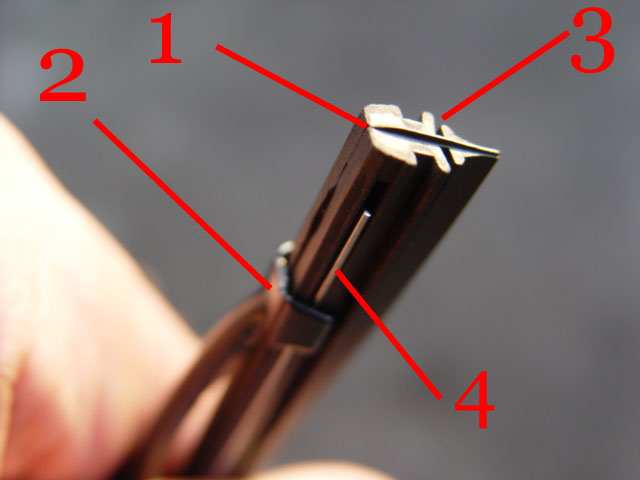 The profile of the blade 1 is such that as it moves on the screen the feather edge
3
tilts in favour of the direction of movement sliding across the screen leaving a completely clean screen, If lines of water are left, then this normally indicated that the blade requires replacing
The profile of the blade 1 is such that as it moves on the screen the feather edge
3
tilts in favour of the direction of movement sliding across the screen leaving a completely clean screen, If lines of water are left, then this normally indicated that the blade requires replacing  It can be seen from this photo that the grill has to be removed before the arms can be removed. However remember the wiper arms positions MUST be marked before you remove them.
TOP-TIP,
If the tape won't stick to the cold screen run the engine & heater on for a few minutes, problem solved!
It can be seen from this photo that the grill has to be removed before the arms can be removed. However remember the wiper arms positions MUST be marked before you remove them.
TOP-TIP,
If the tape won't stick to the cold screen run the engine & heater on for a few minutes, problem solved!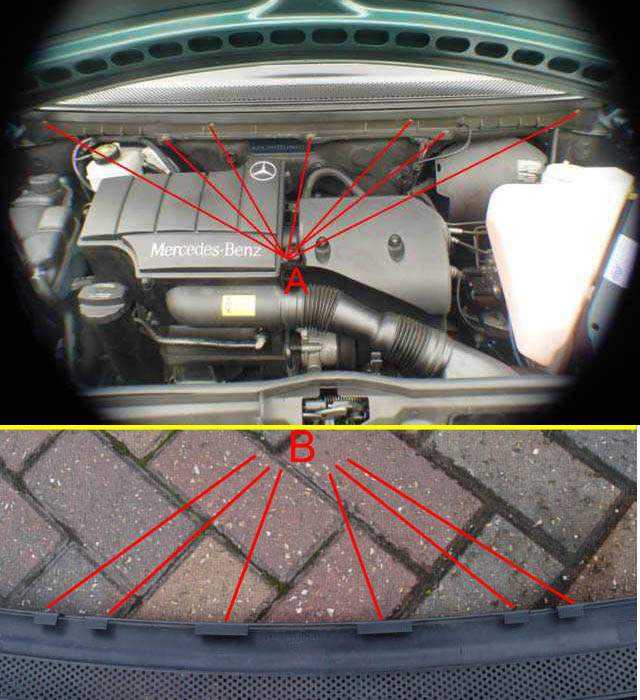
 The procedure of lifting each blade in turn to
release any tension the blade is under
should still be followed before placing your arm& blade markers.
The procedure of lifting each blade in turn to
release any tension the blade is under
should still be followed before placing your arm& blade markers.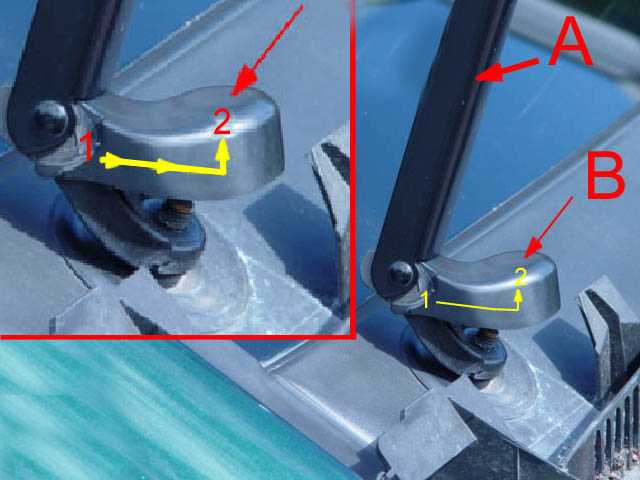 .
.

 It should also be possible to test the screen wash position by pressing the end of the combination switch, albeit the screen wash facility is disconnected. in this position the motor should operate two sweep movements and automatically stop.
 All I can suggest is make sure the arms are the correct length, that information is on my site, the longer of the two blades going to the drivers side, the arms are the same length, and satisfy yourself that there is not undue wear in the wiper arm spindle mechanism.
Then looking at the photos on the wiper set the blades square to the base of the screen, both arms laying horizontal
All I can suggest is make sure the arms are the correct length, that information is on my site, the longer of the two blades going to the drivers side, the arms are the same length, and satisfy yourself that there is not undue wear in the wiper arm spindle mechanism.
Then looking at the photos on the wiper set the blades square to the base of the screen, both arms laying horizontal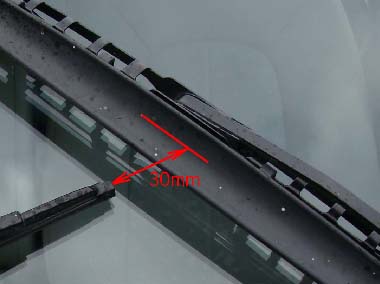 The tip of the drivers wiper on my car clears the passenger wiper by 30mm + or - 2mm at it's closest point
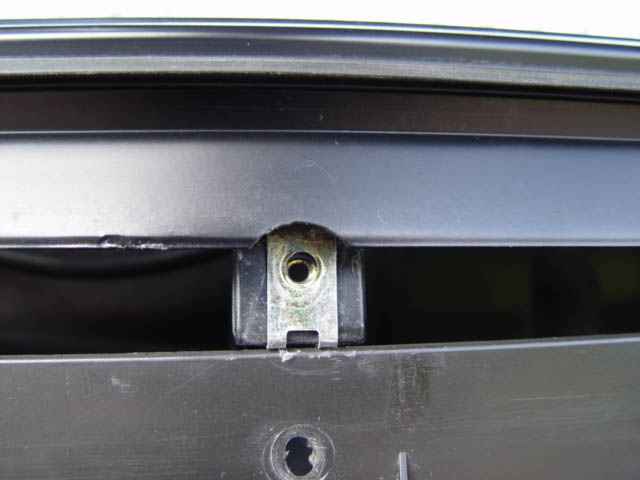

 *In these two photographs the jet assemblies
H & 3
can be seen. slotted onto the 'water-collector'
*In these two photographs the jet assemblies
H & 3
can be seen. slotted onto the 'water-collector'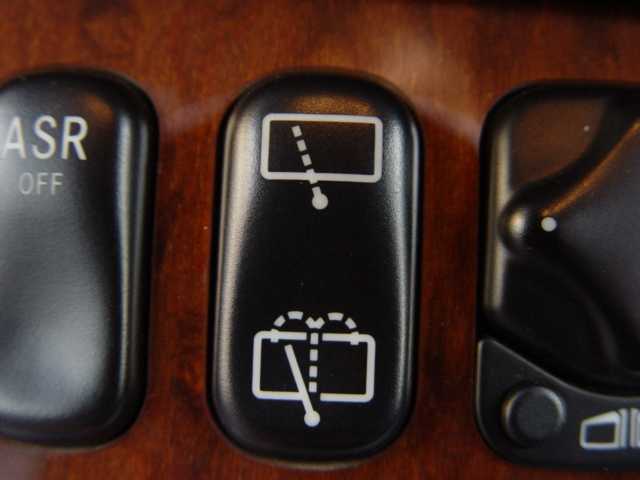
 The rear window is equipped with a single 350mm blade, the motor is enclosed within the 5th door.(boot lid)
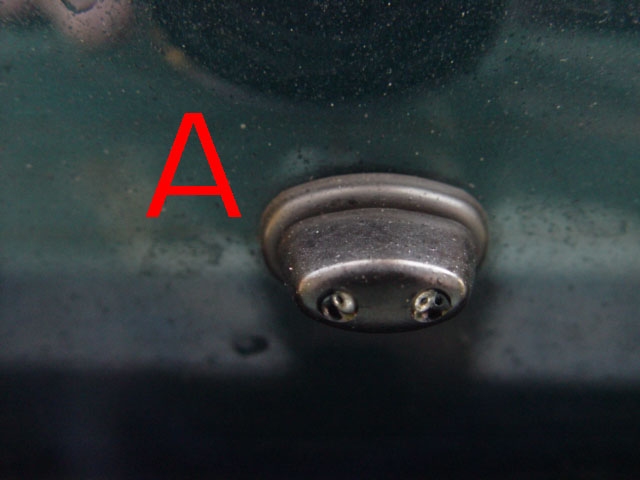
 The job undertaken by the rear wiper should equally not be under estimated, one could ask what did we do without them? This car had done several hundred miles and it can be clearly see that vision would be nil without the rear wiper.
It is also worth noting that this car was not fitted with rear mud flaps, although they are not the cure all, they help to dramatically reduce road filth gathering on the rear screen. See page .18
The job undertaken by the rear wiper should equally not be under estimated, one could ask what did we do without them? This car had done several hundred miles and it can be clearly see that vision would be nil without the rear wiper.
It is also worth noting that this car was not fitted with rear mud flaps, although they are not the cure all, they help to dramatically reduce road filth gathering on the rear screen. See page .18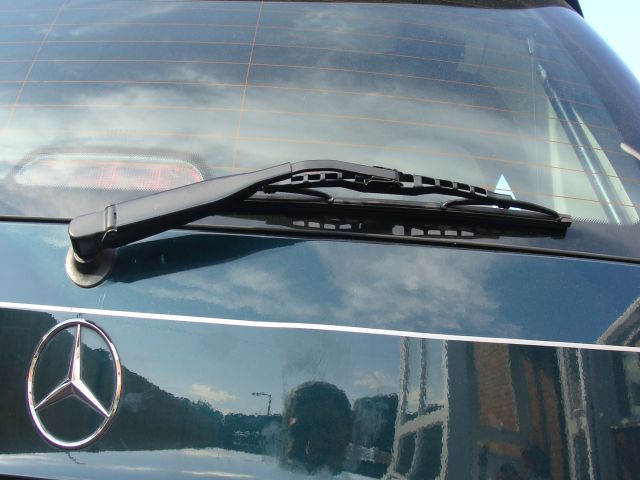

 If the need arises to work on the rear wiper motor then then rule of marking the screen while the wiper blade is in the parked position still applies. Lift the blade from the screen before marking albeit there is not such a problem at the rear of the car as there is only one wiper, that said we do not want the wiper leaving the rear screen during operation.
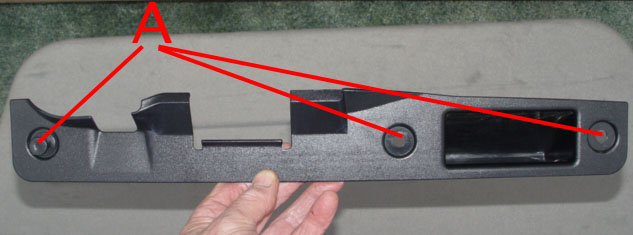
 To access the wiper motor we need to remove the boot lining, to do this we need to remove the plastic moulding by the boot lock first.
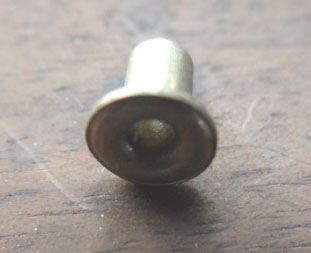 TOP_TIP
If you should and break a head off one or more of the Black plastic pins heads don't panic. Using a suitable tool drive the centre pin only, through into the boot, and simply remove the body of the clip. When replacing the damaged unit find a suitable stud to hold the clip in place until a spare stud & pin can be obtained. I used the aluminium head section of a 3/16 rivet. Remember all the pin is doing is holding the black plastic moulding in place to stop coming away from the boot.
TOP_TIP
If you should and break a head off one or more of the Black plastic pins heads don't panic. Using a suitable tool drive the centre pin only, through into the boot, and simply remove the body of the clip. When replacing the damaged unit find a suitable stud to hold the clip in place until a spare stud & pin can be obtained. I used the aluminium head section of a 3/16 rivet. Remember all the pin is doing is holding the black plastic moulding in place to stop coming away from the boot.
 The boot lining is now only held in place by six clips and two screws, the white clips can be seen,
B
indicates the location of the two screws.
The white clips can be pulled from their location holes, take care when re-fitting to get them aligned with their holes, The space
C
at the head of the stud slides into a flat retainer on the boot lining. Note it is note unusual to break these clips.
The boot lining is now only held in place by six clips and two screws, the white clips can be seen,
B
indicates the location of the two screws.
The white clips can be pulled from their location holes, take care when re-fitting to get them aligned with their holes, The space
C
at the head of the stud slides into a flat retainer on the boot lining. Note it is note unusual to break these clips. 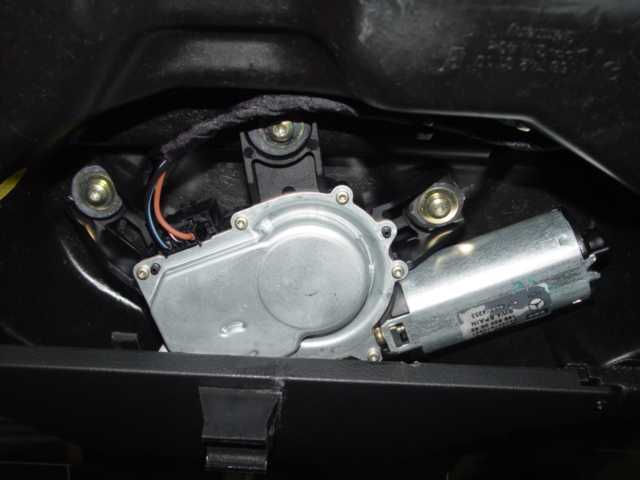
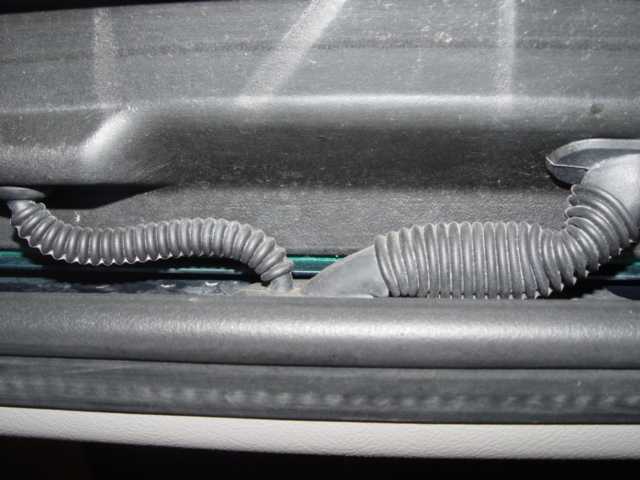 Services for the electrical components, window heater, wiper motor, high level stop lights, number plate lights, along with the vacuum hose for the boot lock, and washer hose for the screen all enter the boot at high level protected by two gaiters I have not pulled these about for fear of upsetting the services and so am unable at this time to indicate what runs where.