Some of us more than others will be aware of the location of the alarm status indicator lamp having operated the alarm inadvertently on a number of occasions. For owners new to the 'A' Class, note that it is very easy to trip the alarm into the armed mode while placing and turning the key in the ignition switch. If the Alarm indicator/switch is flashing as in this photo above then the alarm is armed. Remove the key and disarm the alarm by pressing the unlock portion of the remote. Failure to do so will result in the alarm sounding and the engine cutting out after you have moved off and driven some distance, this is not only disturbing for the driver but can cause danger to other road users
Please Note Under no circumstances remove the ignition key from the ignition switch while driving/moving or the steering wheel lock will operate as the steering wheel is moved/turned.
Red L.E.D has other Important Functions
The Red L.E.D has other Important Functions, situated on the R.H.Side of the dash on the 'A' Class. It has a much greater part to play in this alarm system than was first known to me, and yet nothing appears in the 'A' Class Owners Manual. This came to my attention as a result of my having a problem/fault where the LED continued to flash about every 15 secs after the car was started. Although initially I was concerned I came to realise that it did not affect the car in anyway, however as the car was at that time still under warrantee I got my MB service centre to take a look. The first thing they did was to replace the alarm control module. When that didn't cure the problem they had the car back and this time replaced the siren unit which apparently has an integral rechargeable battery which is built into the siren PCB. Because this was not retaining the correct voltage the automatic diagnostic facility on the alarm was indicated a problem. When MB used the Diagnostic facility to locate the problem it indicated the fault, low battery power in the siren, and displayed eight flashes to the technician. Having replaced the siren the alarm is now fully functional, The LED does not flash in normal circumstances after the alarm has been disarmed.
I have extracted the relevant material from the two pages of information I was given and combined into one but the user will have at this point to read the location of the various facilities, like the red LED and touch key socket, and the location of the Red LED, into the document. I have spoken to Electro Systems (Scorpion)who are the manufacturers. It appears there is little if anything to add to the information except that the information is intended for the use of MB service departments. As an Owner I can see no reason why the DIY/Owner should not be able to determine a fault using the available information and fit such items as the siren when the batteries fail, Electro Systems (Scorpion)Technical dept, have confirmed the new siren is required when the batteries fail. Location Directly in front of driver under metal grill above bonnet. Follow the procedures as for working on Front windscreen wipers page 42
Note. The complete alarm cannot be purchased from Scorpion as they are under contract to MB. However Scorpion have said that they can repair alarms modules. Scorpion Parts Direct Tel 44 (0)1257 240938.for details.
 To return to this page click Back.
This Red light, shown is rarely seen by owners, it is situated on the n/s small remote motion detector which are situated on the 'A' post, the one on the O/S has not got a red indicator, both of these are movement sensors, part of the alarm system, not dissimilar to a PIR (Passive infra red) detectors used in a domestic intruder alarms. Any movement in side the vehicle when the alarm is set will cause the alarm to go off. Should there have been an intrusion into your car, then the red indicator light on the monitor will flash when you return and start your car.
Should you for some reason wish to remain in your car with the alarm set, then there is a sequence that has to be followed.(model A160 2002.) To de-activate the Interior Monitoring System (movements sensors):-
1. Remove keys from ignition.
2. Open drivers door.
3. Press the Alarm indicator/ switch situated on the dashboard (this red indicator light also doubles as a switch press once to de-activate the movement sensors )
4. Close the door.
5. Arm alarm in the normal way. This de-activation is only valid for the period of the one alarm setting.
Observation I can see no useful purpose for this feature unless you wish to set your alarm leaving an animal in the car! with a window or roof partially open, bearing in mind that from the point of view of car thieves, when the car is being driven the auto door locking devise should have operated, I.e. doors cannot be opened and traffic lights road junction etc by people outside the car,
If your doors do unlock, then they can be relocked by pressing the switch below the hazard warning light on the dash.
having reached your destination they can be opened by opening the drivers door from the inside or by pressing the switch again on the dash.
Mention has been made by some members to there being an adjustment sensor on one of the monitors this is not the case on my A160/2002 model
The bonnet Alarm Activation Switch
A Will activate the alarm if the bonnet is opened after the alarm has been set. The Alarm switch is well protected laying to the rear of, and tucked in against the plastic cowling running across the front of the car. Twin cables can be seen going to the protected switch.
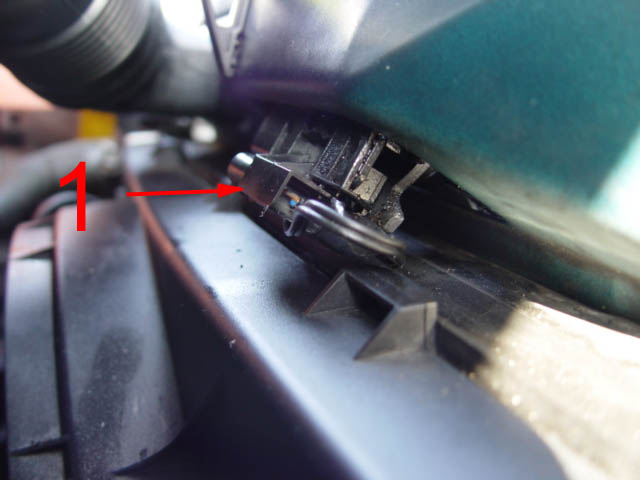
To test the switch Ensure the bonnet is fully closed, open the drivers window, set the alarm using the remote fob, after a minute or so pull the bonnet release, the alarm should instantly sound. Alternatively deactivate the movement sensors if fitted, and while sitting in the car, pull the bonnet release, again the alarm should sound.
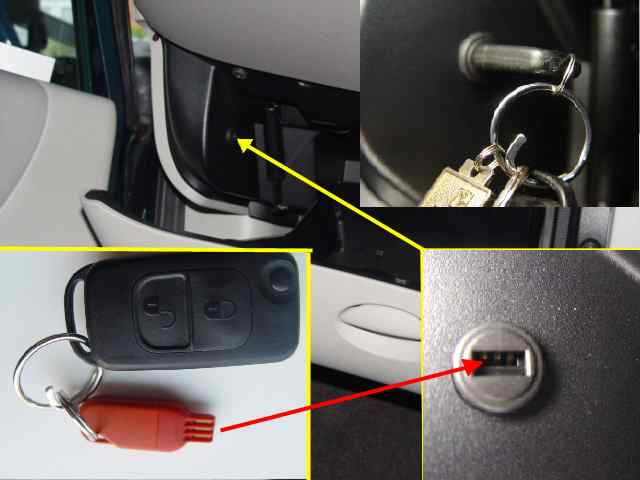
Should for some obscure reason the battery in your remote fail or the remote fail for any reason to unlock the car, then you will have to resort to manually unlocking your car using the key. However if you secured the car with the remote, the car alarm will have been set and will therefore sound as you open the drivers door. You will now need to use (touch key) alarm key, to de-activate the alarm and engine immobiliser.
Note
If you disconnect the battery for any reason or the battery goes flat, when the battery is re-connected or recharged the alarm may sound all indicators lights will also flash, this may also be accompanied by the alarm horn sounding.
To stop these features re-set the alarm using either the ignition key or use the alarm touch key to re-set key in the glove box socket, near side.
However open the glove compartment, situated on the n/s side panel on R/H/Drive cars there you will find a small port into which the car Touch key (alarm key) fits, by placing the key in the alarm port and then removing, we are assured the alarm along with the engine immobiliser will be de-activated.
This unit forms part of the scorpion alarm system and comes complete with the alarm keys ,red & Black For obvious reason I will say nothing further about the unit or it is location.
Mercedes-Benz Security System Booklet (MBSS 2b)
The Owners handbook page 41, makes reference to isolating the alarm by placing the keys in the ignition and turning the key to position 2. My contact at my MB service dept has indicated this does not apply to cars purchased in the UK, which have a different alarm system. Thank you Liam.
Touch Keys Like all electrical contacts, if they are dirty they are unlikely to operate the equipment correctly, if at all. In view of the fact that we carry our keys invariably in our pockets or handbag along with every thing else including coins etc it is wise to protect the contacts on this vital (touch Key) alarm key if we are to be assured that when, or if ever we do require it, it will disable the alarm.
Other circumstances where you may need to use the key, one of which is while in transit on ferry crossings, if the alarm is set it is certain to go off. ferry companies require the alarm to be unset. Depress the three door locks, secure your boot by locking with the key, then manually lock the drivers door. Your car will now be fully locked.

In normal circumstances one would not disclose where the alarm siren was on the car. However on this car it is so well placed that it takes at least 20 mins, and a good few tools to reach it. The give away to Mercedes-Benz 'A' Class owners is the activated carbon filter! Find that and you have almost located the alarm siren.
The information number I suspect is the part number for the siren unit which would be available direct from Scorpion see link below. Keys can be found on their site. Direct Link below.
Alec has kindly provided this link for replacement batteries which have not been previouysly available. I have not used or installed these batteries so cannot say what is involved other than to refer yopu to the information on this page,
Lofty.
E-bay.UK Mercedes-Benz Scorpion A-Class Car Siren Alarm Rechargeable 170mAh Battery Pack
 If you alarm system /Horn unit does require a new battery then when you first start the car the LED on the dash will flash 8 (Eight) times, the horn unit complete is very easily replaced. See purchase details below.
The latest information 26/09/05 Mercedes-Benz Parts claim that separate components for the alarm are no longer available although the parts can be bought direct from Scorpion. the siren will cost £30.24 plus vat 15/11/08 and that cheaper than when I enquired in 2006! plus carriage, Post & VAT the part number is SIR002 this can be ordered from their sales department by phone
see up to date phone number on web link.
Please note
It appears from enquiries made at my branch of Mercedes 11/12/08 that 'scorpion' alarm parts are no longer available from Mercedes Parts. However as indicated above they are available from Scorpion direct details telephone numbers etc are available via the links on this page.
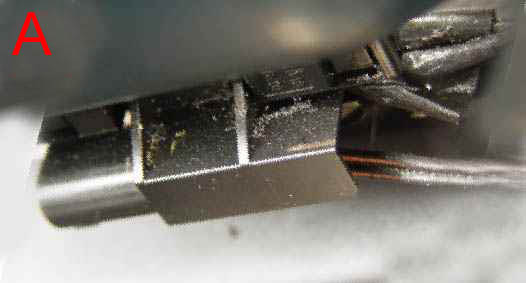
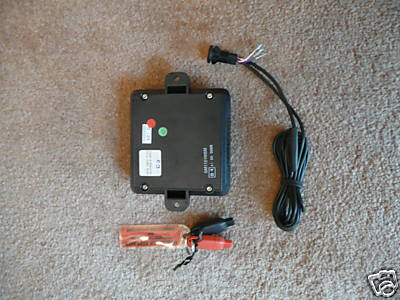
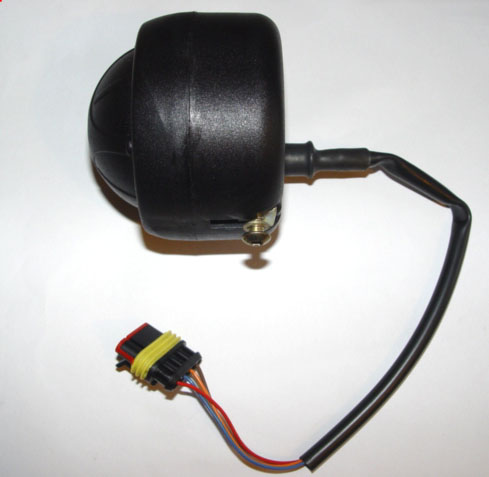
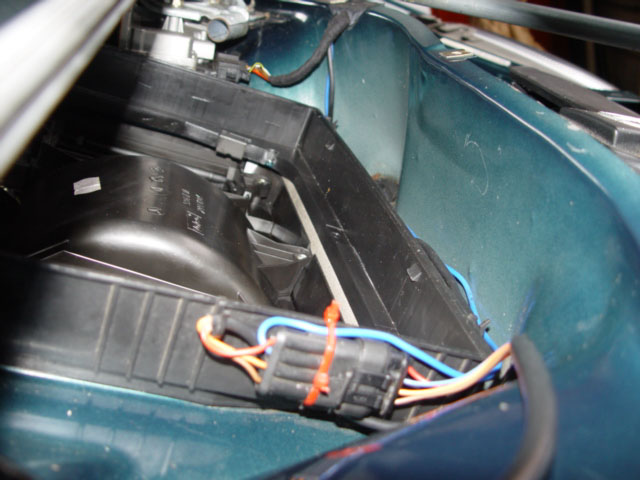
If ordering the horn unit please be aware that it will not arrive with a pre-fitted plug,as in the photograph, this is the horn unit reomved from my own car used for demo purposes.
The company currently providing spares are not the original manufacturers and are not therefore able to supply the plug.
Advise given by their technical team however suggest that if the existing plug fitted to the defective horn cannot be re-used ,then the wires should be soldered colour to colour and the joints covered with shrink tube, this is to ensure the alarm components which are quite exposed are protected from the damp conditions.
Horn Units ordered from Scorpion are only available next day delivery Plus vat on the delivery charge plus the horn unit making the cost approx £45.00 the expected life of the re-chargeable battery is 5-6 years so it still good value. I do not want to spend that money on my alarm what effect will it have? Once the battery life has expired, each time you start the car the alarm LED will flash 8 (eight) times if your car is broken it to, bonnet opened etc and the power from the main battery cut the Horn/alarm will cease to function. If the horn alarm battery is in good order the horn unit will continue to sound until the battery is dead, even though the main battery power has been cut.
The scorpion alarm has a self diagnostics fault indicator (see link below) if your car is 6 + years old then there is every chance that the rechargeable battery in the siren will have come to the end of it is life, it is this battery that powers the siren if the electrics are cut to the remainder of the cars systems.
You may have found that your alarm has gone off as you disconnected the battery, that is precisely what it is supposed to do, so keep your keys at the ready.
When the battery does fail there is not a lot of option but to change the siren unit, yes it is on record that a few owners have managed or attempted to replace this battery BUT is is not a straight forward job by any means . mainly because the 6 cell Varta battery is no longer available in the format it is stowed in the siren. The individual 'Varta' 250H cells I'm told by Varta are still available but they then have to coupled up and the siren unit opened to fit, which again is not an easy job.
There is also a question of the certification of your alarm becoming invalid, which could in turn affect you car insurance, if you have claimed it has an approved alarm system? In fact your insurance could even become invalid if you make changes without notification to them, and remember in this case we are talking about the vehicles security.
If your replacing like for like from the alarm manufacturer or his supplier , then there should be no problems.
Please also note that there is an attachment to this page which outlines the self diagnostics feature of the 'Scorpion alarm'. You might like to read this through before you spend out on the new siren unit.
Having confirmed it is the siren unit battery, obtain your new siren
Remember your car isn't going to break down because a rechargeable alarm battery is defective so wait and if doing the job yourself allow at least 90 mins to do the job, if you have changed you carbon filter on the W168 car then you will be familiar with the procedure and the job will take a lot less time. follow the procedure outlined on mypage.42.
DO NOT use the information on PAGE 23 as there may be a need to test the electrical supply to the siren unit on completion and the windscreen wiper settings may be lost if accidentally operated.
Safe working practice
If the ignition is turned off and the keys withdrawn from the switch the windscreen wiper motor SHOULD be safe. However because of the power of the windscreen wiper mechanism, which could easily severe a finger or two I would disconnect the battery before attempting to work on the electrical components in this area.
yes it does mean you will have to re-set your windows and re-set the ABS/ESP but both procedures are on this site and only take minutes.
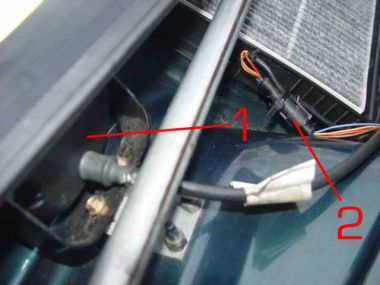
Fitting a new siren unit
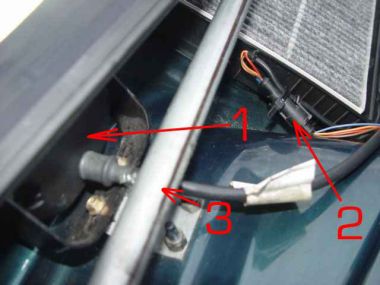
1.Siren unit.
2. Electrical connection
3. Drive rail/bar for wipers which will obstruct the removal of the siren unit

 Having now accessed the area in which the siren is located, you will see its behind the windscreen wiper mechanism.
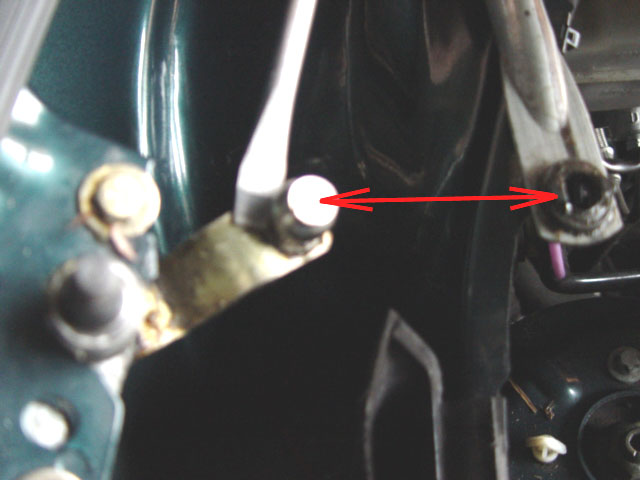
 The first job is to release the off/side windscreen wiper drive bar that runs just forward of the siren, this is easiest done using a wide flat bladed screw driver, support the wiper mechanism and simply prise the bar of the ball, it will be tight. Having removed it move it to one side giving your self room to release the siren.
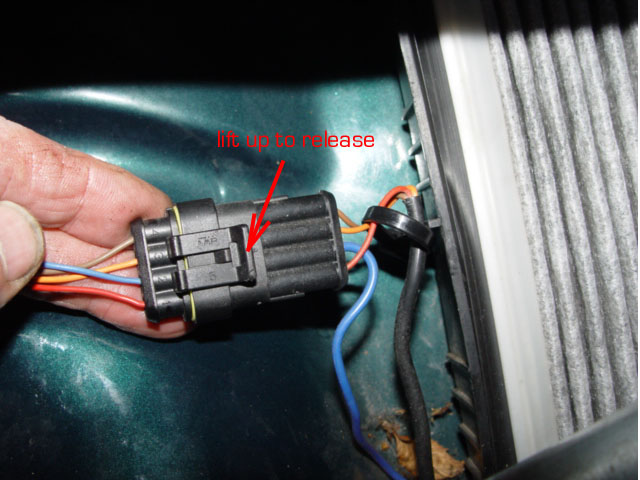 Next disconnect the electrical connection to the siren unit.
Lift the clip and ease the two components parts of the connector apart again this is a water tight fit.
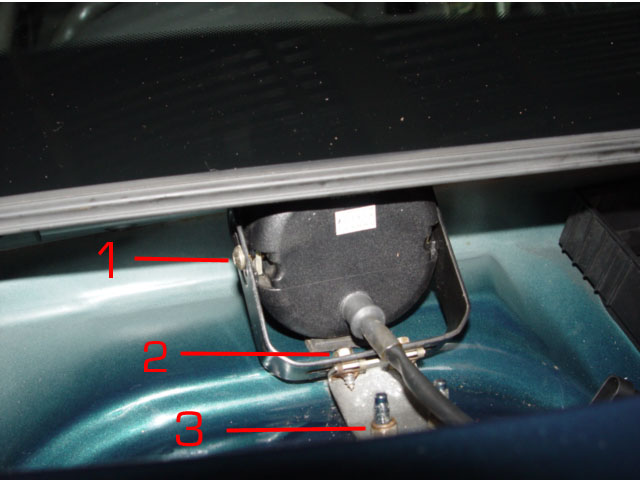
You are now able to access and remove the siren unit.
You will need a 5/16 ring or open ended spanner to undo the screw bolts marked 2 this will allow removal of the siren complete with the bracket by moving it towards the nearside.
Releasing Torx screws 1 or removal of the nuts 3 from the encapsulated studs will NOT allow removal of the siren.
I'm unsure if the new siren comes with the Torx bolts & nuts (T9 Torx) along with the bracket, so bear in mind these may need to be switched from the old to the new units.
Replace all components as found
Reconnect and secure the electrical connection, I drilled two small hole in the side of the plastic carbon filter tray through which to pass the cable tie, unless you wish to do this there is no need to remove the filter.
Refit the drive bar to the off/side wiper ball this may have moved? Simply move it to the hole in the drive bar. Support the wiper mechanism and push the bar firmly home until it snaps into its housed position.
If you disconnected the battery re-connect at this point.
When reconnecting the battery put your light switch to at least side lights, this will help reduce the surge of power going to the ECU when the battery is reconnected which has on a number of occasions been responsible for causing the Engine control Management light in the instrument cluster to stay lit when the ignition is turned on.
This will require you to take your car to the MB garage to get the light/fault deleted UNLESS you car is OBD2 complaint (2001 onwards ) and you have a OBD2 diagnostics tool as explained on page 69
Reconnect the postive (+) teminal first followed by the negative (-)
Now using your remote key lock the vehicle and wait 30 secs or so The alarm should sound because the bonnet is still open. Switch off the alarm.
Complete the re-assembly of all parts paying attention to not drop screws! and positing of cross pieces .
Ensure the wiper arms and blades are replaced precisely as removed or the blades may clash, ensuring the blades match your markers follow all assembly information on page 42
Wipers should always be tested on a water sprayed or wet screen .
Still want to have a go at trying to change the batteries?
NO problem just link to this page
How to replace the batteries in the scorpion alarm siren & good luck.
Protect your Alarm Keys
To ensure your touch keys (dongle alarm keys) work when required ensure that the contacts are kept clean and protected, having them attached to a key ring and put into a pocket with loose change etc is not the best of ideas.
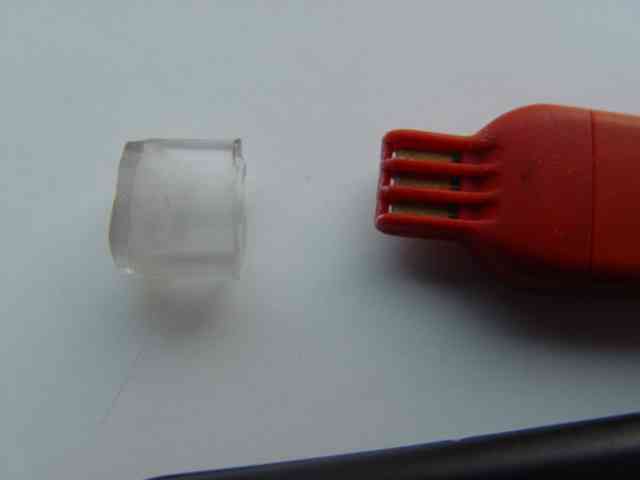
For next to nothing you can make yourself a polythene boot to slide over the vulnerable portion of the key thus protecting it from not only the day to day dirt and grime but mechanical damage as well. I was also told not only to take care of the red touch key but to limit its use to emergencies, it appears that the Red Key is required to re-programme replacement keys.
For information for re-placement Black alarm keys REF.TK1074 use this link:-
Some other parts, including Black alarm keys are still available direct from Scorpion, however they will only sell you a black key if you can provide the red key! so I hope you got both when you purchased your
Materials One very short piece, of one cm diameter . polythene tubing, cut in half, slice open part of the salvaged portion and flatten out, apply super glue to edge of one end of the short length to be used as the boot, place the flattened salvaged piece over the end and hold in position until stuck. pinching the piece of tube slightly to give an oval shape, when dry trim of any waste, tidy up any edges on a piece of sand paper or grindstone where available. Cut the finished boot to length using a Stanley knife or sharp scissors, fit over the contact end of the alarm key thus protecting, job done, remember you will require two!
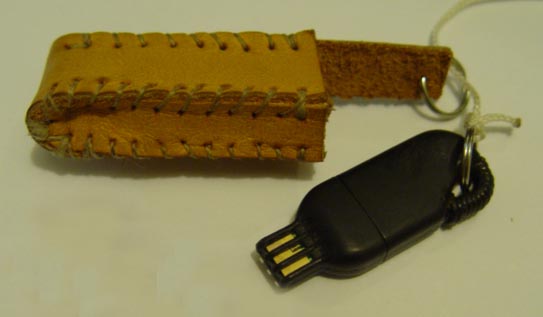 Alternatively you go one step further and make yourself a leather boot to hold the alarm touch key, you only need some small scraps of leather a needle and some thread!
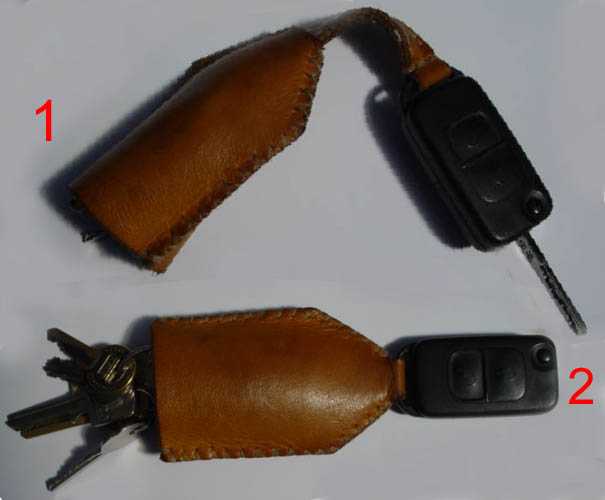
The ordinary car keys need 1 to be protected not just from loss but from damage as well, I have found that the other keys on my bunch 2 are damaging both the touch key and the remote /key as well as my pocket lining. I have therefore afforded them protection in the form of a leather wallet the touch key already being damaged in that the securing loop wore out and then split, it has now been located in the car where both my wife and self can find it in an emergency. Even the loop section of my remote/key was wearing thin, I have therefore removed the metal key ring and replaced it with a leather strap. hopefully the leather will wear out first. The house keys etc can still be removed when necessary, although I use the spare set when leaving the car at the Garage. We also take both sets of keys on holiday if we are using the car, two reasons one we could loose one set? & two my wife can enter the car on her return, if we have gone shopping in different directions. nothing worse than waiting for the boss to arrive with the keys!
Additional information on your alarm can be accessed by using these links. Use your 'back key' to return to this page . Replacing Batteries in in horn unit
Next.
Back to Index,
Purchase DVD.
Please Make a Donation.