WARNING As a precaution against an accidental electrical short circuit I disconnected the battery , In the case of vehicles with airbags in the doors as with the 'A' Class the last thing you want is an accidental Air bag activation, or accidental operation of the Electric windows while your hands or arms are inside the door skin. Disconnecting the battery avoids this possibility.
Note There are differences in the removal and re-assembly of the inner door panel and fittings on the pre 28.2.2001 and the cars produced after 1.3.2001 the procedure shown on the page for removal of inner door panel is for that face lift 1.3.2001 onwards car W168
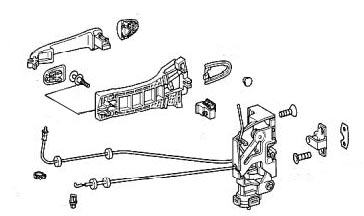
The lock mechanism shown on the lower part of the page appears standard to both cars, please ensure you quote your VIN number when ordering parts.
WARNING
Please also note this information forwarded by Darren, another 'A' Class owner:
Please be aware that the electric window motors in each door are all handed, left, right, front and back? they all look the same and that they are activated along a communications bus - Ie, so if you remove the passenger window motor and swap it into the drivers door, when you press the passenger window switch, the driver window will move! It makes deciding if its a motor or switch at fault very difficult as you cannot swap motors to rule it out.
Thank you Darren,
So you have been warned , if your tempted to use Second hand/used parts make sure they are compatible and suitable for the intended use or you may be wasting your money and confusing yourself as well as the car! Lofty
 .
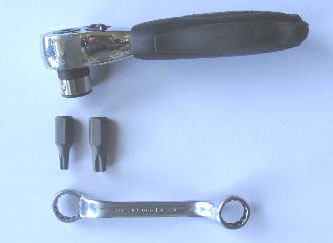
The first thing you will want are a few tools dependent on what you intend doing having gained access to the door. If you intend replacing the door lock , then you will need a special tool namely a T20 Torx driver, this needs to be a one piece tool Torx bits are of little use and the driver has to penetrate the door lining via a hole provided which limits what you can & cannot use. (see below)
In my case I only wanted to see if I could relieve a dent that had been placed in my rear door by another inconsiderate person.
.
The first thing you will want are a few tools dependent on what you intend doing having gained access to the door. If you intend replacing the door lock , then you will need a special tool namely a T20 Torx driver, this needs to be a one piece tool Torx bits are of little use and the driver has to penetrate the door lining via a hole provided which limits what you can & cannot use. (see below)
In my case I only wanted to see if I could relieve a dent that had been placed in my rear door by another inconsiderate person. You will need plastic wedges, I used my good old faithful bicycle tyre levers and the end of a wire brush ground off to a wedge these did the trick, You will also require a long reach T30 'Torx' bit for removing the two screws from the door handle after having removed the outside cover of the handle.
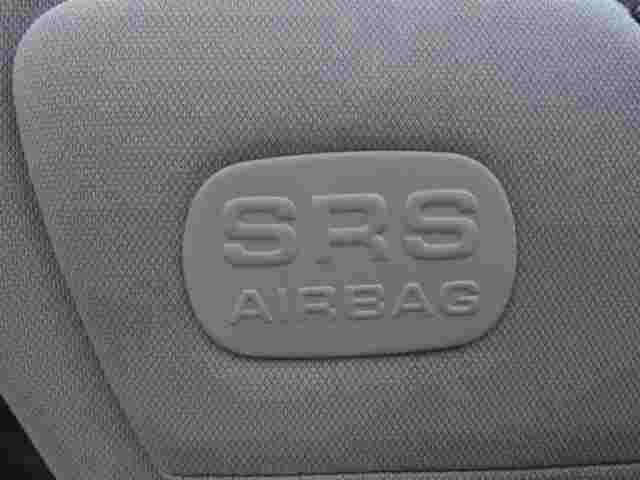
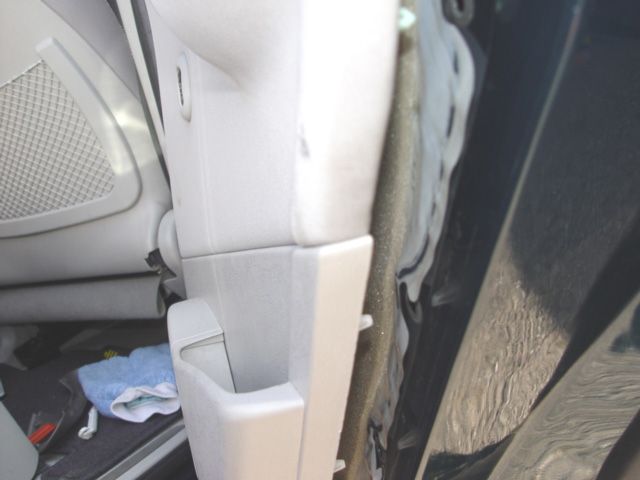
 If working on the front doors then their is another 3rd screw behind the plastic SRS plate which you will need to remove.
The SRS plastic plate is attached by a clip I did not remove this as I'm unaware what its attached to, it is possible to remove attached to the panel.
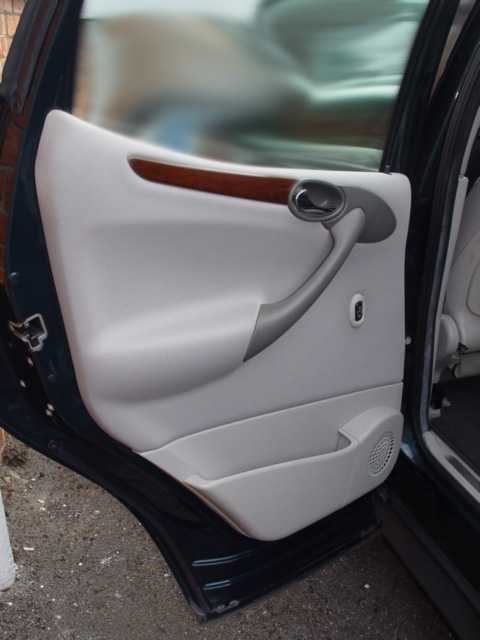
One of the mysteries of this car along with many new cars is how to get the door panels off to get at the various services, door locks window winding motors, audio speaker etc. There are no visible signs, screws, to indicate what comes off where and that of course is how the manufacturers want us to see it. But for the DIYer that is not the answer, we are not looking for maintenance and repairs in garages, with high costs to do the minimum of work, we want to be able to service our own cars with all that entails, pleasure and pain!
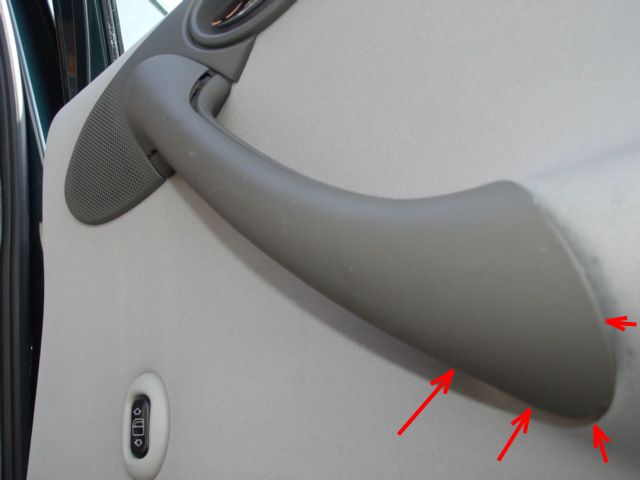
The first job using the plastic wedges is to remove the outer cover of the door handle, Starting at the bottom carefully push the wedges between the cover and the handle, increasing the gap slowly and carefully. when possible insert the second wedge and the cover will start to pop off, work you way around the cover until it is fully released from it is clips. When returning this position it carefully and apply pressure , it will snap back into place.
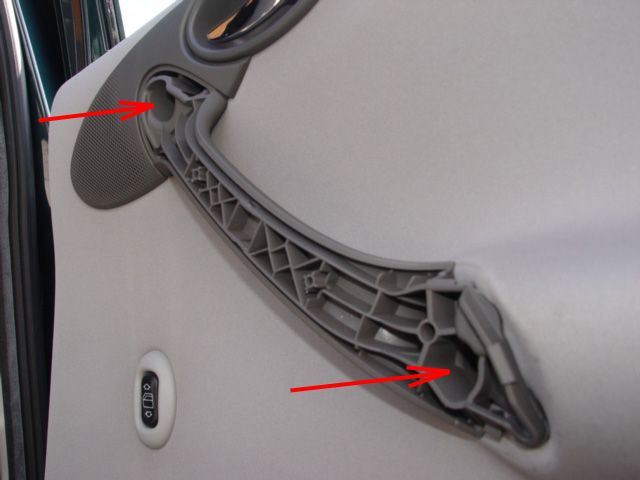
Having removed the cover, remove the two screws using the T30 'Torx' bit.
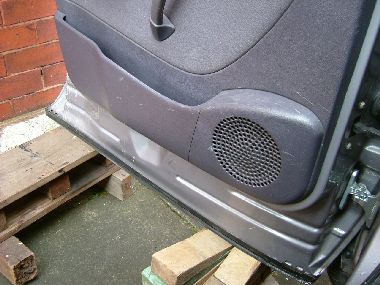
Now using the wedges unclip the main inner door panel. I started from the outside edge, ease the wedges under the door trim, again working carefully and using both wedges as soon as possible. Work your way around the complete door trim unsnapping the plastic clips as you go. The fabric covered section and plastic bottom quarter are one panel. If by chance you break the odd stud/clip they can be replaced but with care this should not be necessary.
As the panel is eased out so the pop studs will be released from their holes in the door,
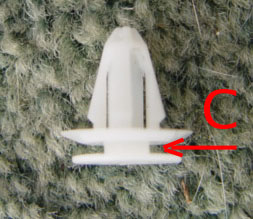 When you are next in a Mercedes Parts department It would pay you to purchase a few of these studs to cover any broken ones you may encounter when doing the various jobs they also standard on the boot lid inner lining.
 Having fully released the panel the inner door seal will become visible. This is a polythene membrane sealed by a mastic and can be re-used with care. Gently ease the plastic away from the sealant, the components become visible.
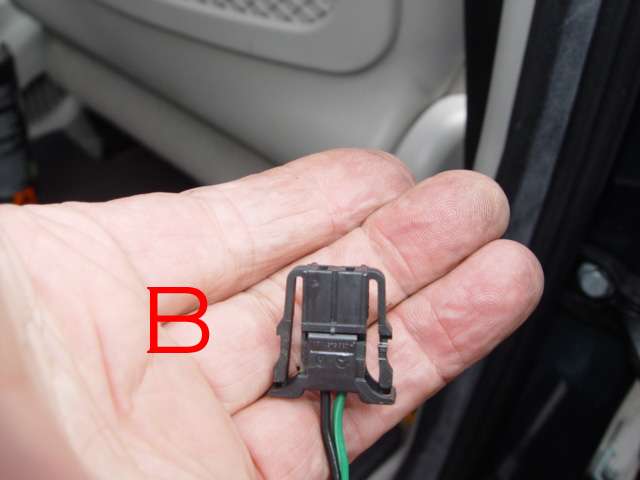
The speaker cable B. can be disconnected form the socket. The door lock plunger C can be unclipped. The Electric window switch cable A can be easily disconnected using a fine blade screw driver to lift the bar on the switch, this done you can then work on the other components. I had an assistant which saved me the job of unclipping the locking mechanism fully.
You will need to examine this and record how it is fitted if you intend removing the panel completely also check for other electrical connections.

However If like me you are trying to relieve dents rather than deal with some mechanical defect you may be disappointed as most of the outer skin is not reachable due to the door being double skin (double layer of metal)
Rear door lock problem.
Confirmation of the defect. Obviously the door will not lock, and security button on the door stays down at all times.
If by chance the button is up you will be able to lift it up which clearly indicates the cable/rod is broken. The coincidences in the two stories is almost unbelievable , both owners had only had the car weeks, so if your considering purchasing a used 'A' Class do check that all doors lock with the remote
In all case the security button. plunger should move up and down.
Having recently bought a Mercedes W168 A170CDI 1998 I convinced myself I had bought a nice car, however I had a nasty surprise when I discovered to my surprise that the right rear door failed to lock most of the time, although it would occasionally work but totally refused to lock manually, the internal actuator knob would not work either, Strange because the other doors worked fine.
 I was aware that the previous owner had just spend some 500€ (euro) on the electric windows in the front doors, so I instantly on my guard and thought if I go near that garage I could well finish up with a bill of the same magnitude, or even larger, I therefore decided to tackle the job myself and try to save the garage bill!
I started with taking off the inner door panel, no problem at all. (Readers please note this is a pre-face lift model) Then came the door lock, I started with the 2 Torx bolts in the lock. The door lock was attached to the door handle mechanism but I was unable to locate the linkage. So I figured that the door handle mechanism had to come off as well.
I noted the small hole in the door covered by a plastic cap. I removed the plastic cap but could not see a screw. It did not feel right to try to approach the door handle from the outside but I knew that some of the older models Like the German VW you did.
I searched for help on the web and found lofty's site.
However the the information I required was not available in his pages and so I send him an e-mail.
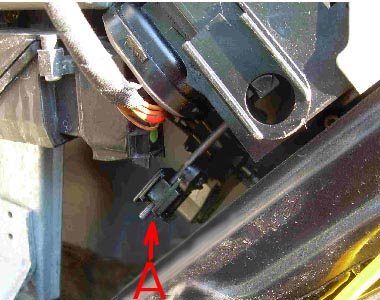
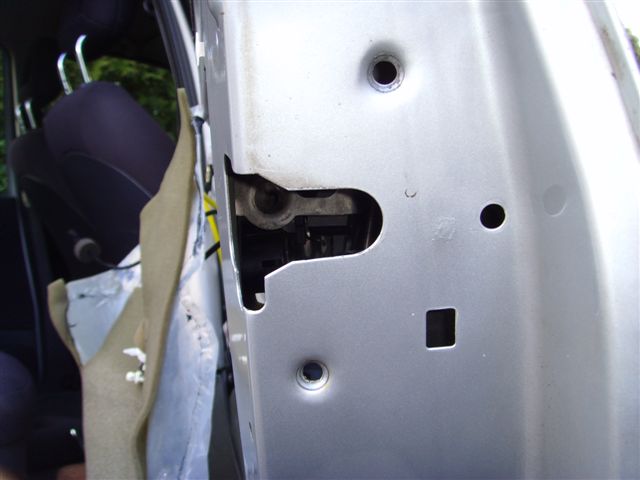
Lofty replied sending me some very useful information and that indicated that behind that plug there was a size T20 Torx screw, that I had to find and undo. This Torx screw was located approx 10cm, deep inside the door obviously attached to the outer skin of the door and so I had to purchase a Torx driver to reach it. (Note that the photo shows the only the minimum of plastic door seal has been pulled back) the plastic is retained by a mastic sealant and can be re-used with care.
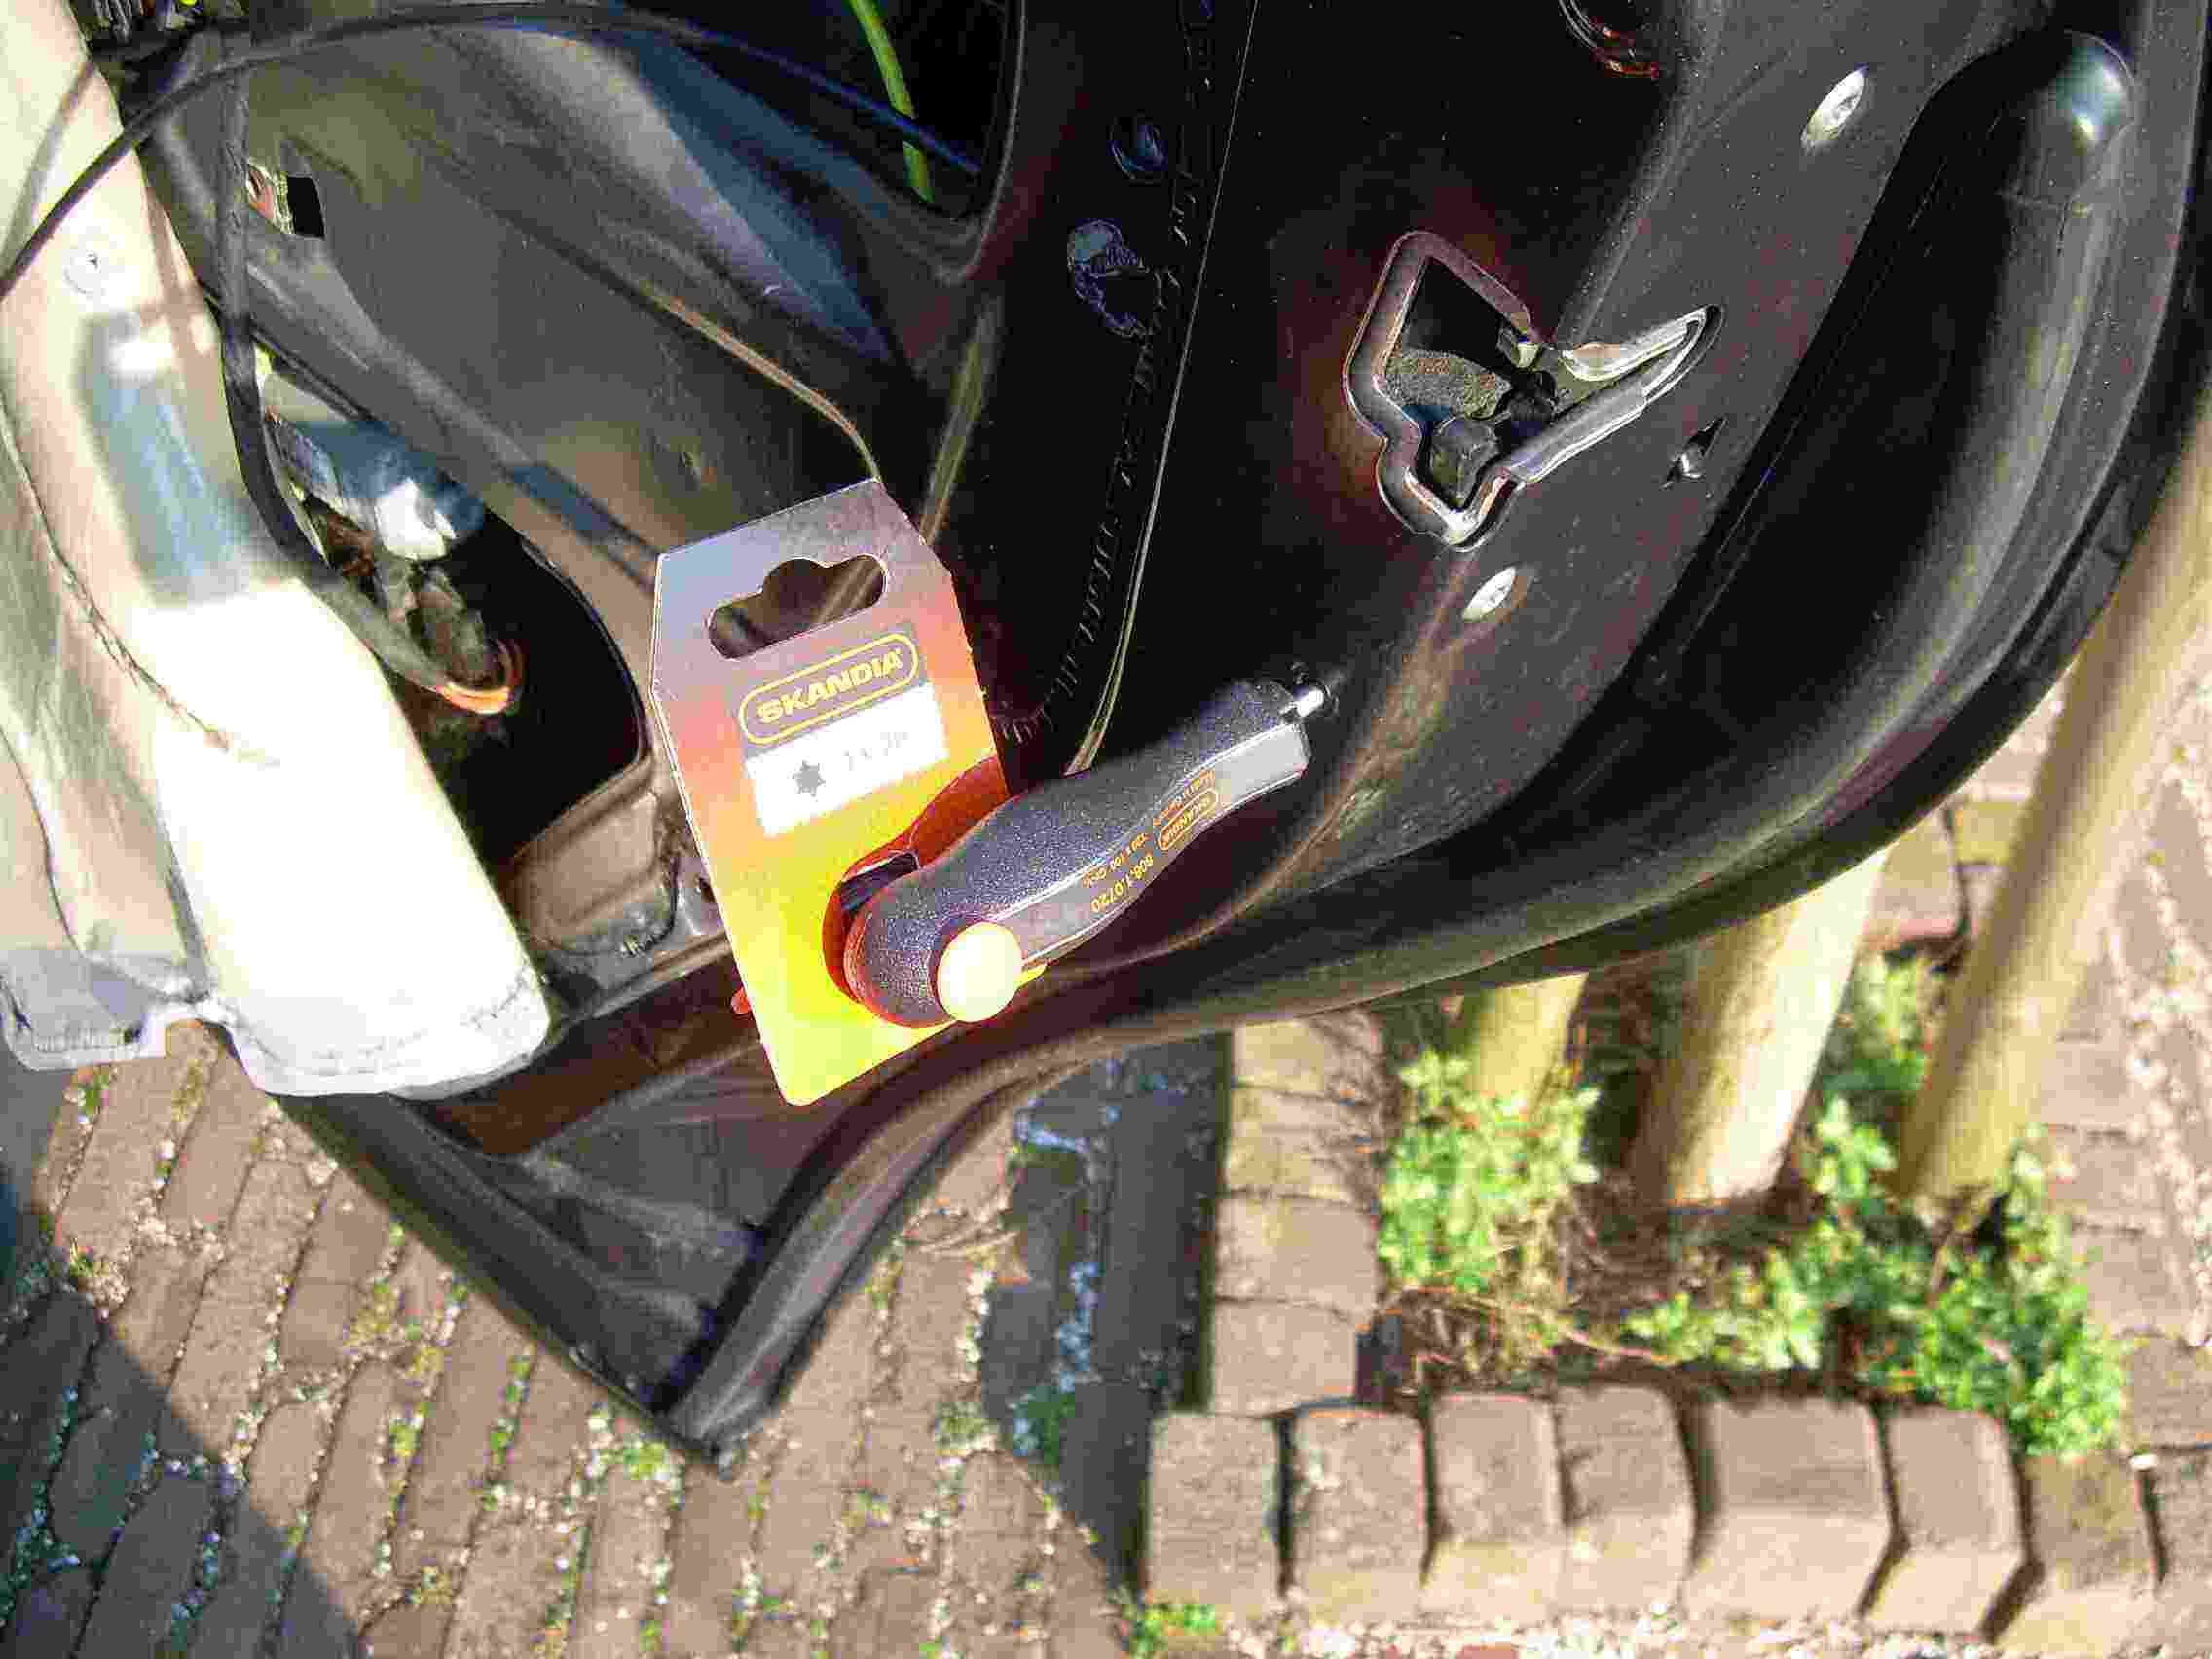
This photo shows the tool fitted into the location of the plugged hole.
This Torx screw must be fully unscrewed from the door handle but it is secured against falling out so you do not need to worry! Simply unscrew and leave it in the mechanism.
After unscrewing this screw the door handle can be slid out.

Next the other Torx -see photo - from the door handle can be removed and the door handle mechanism can be removed.
 I initially tried to remove the vacuum cylinder but afterwards felt that it might be better to disconnect the vacuum tube from the cylinder.
Lofty's Note These tubes and fittings are difficult to remove, however having now assisted with the job outlined below I found it was easy to carefully lever the connector off the vacuum unit with a flat bladed screw-driver, when it comes to replacing, simply hold the connector and yellow tube square with the vacuum unit and push on , it will snap into place.
However this tubing proved too difficult to remove and so I opted to lower both mechanisms towards the electrical window motor and was then able to locate the linkage.
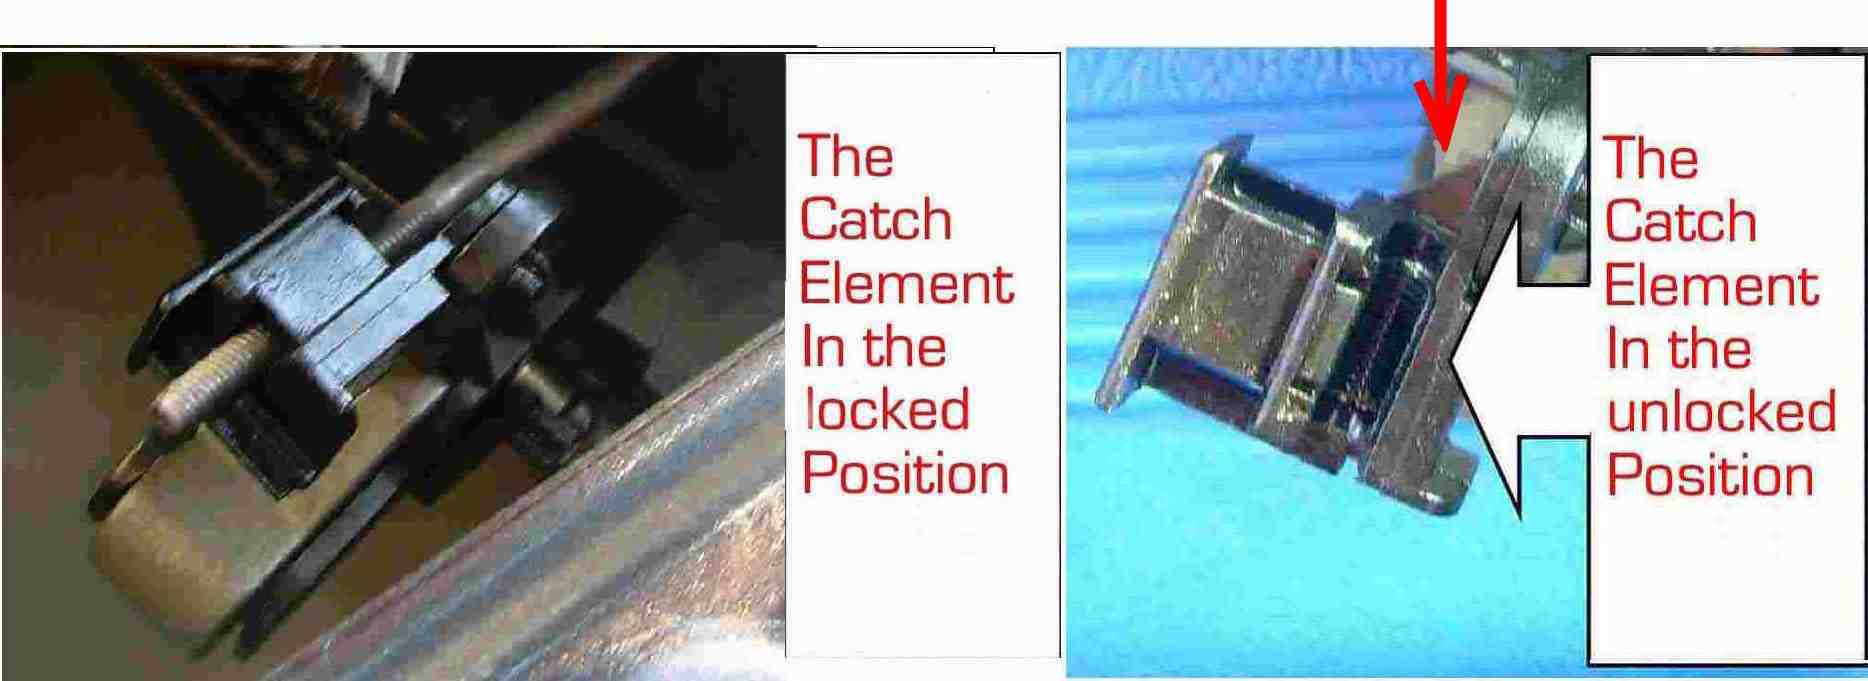
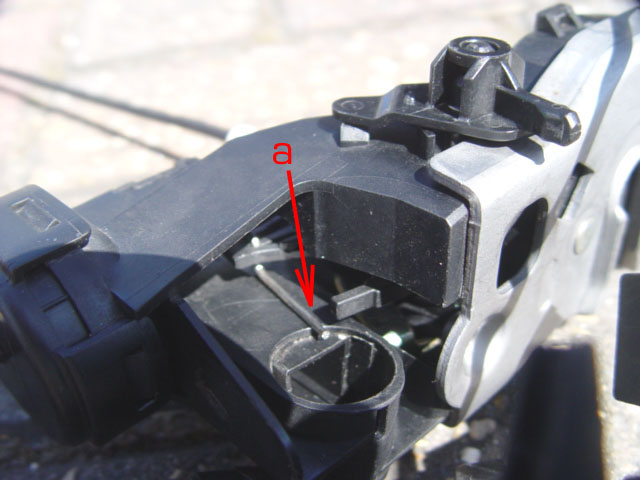
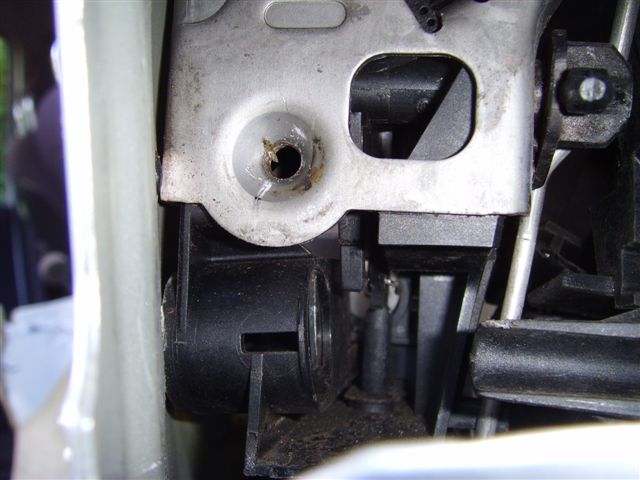
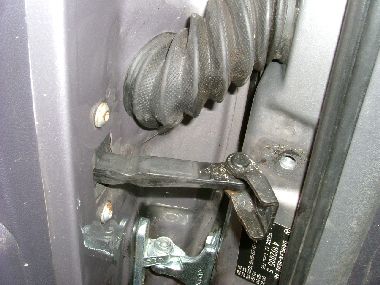
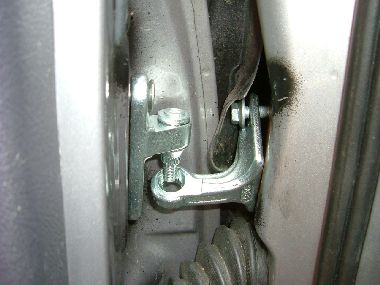
A Shows the linkage locked into the catch element.
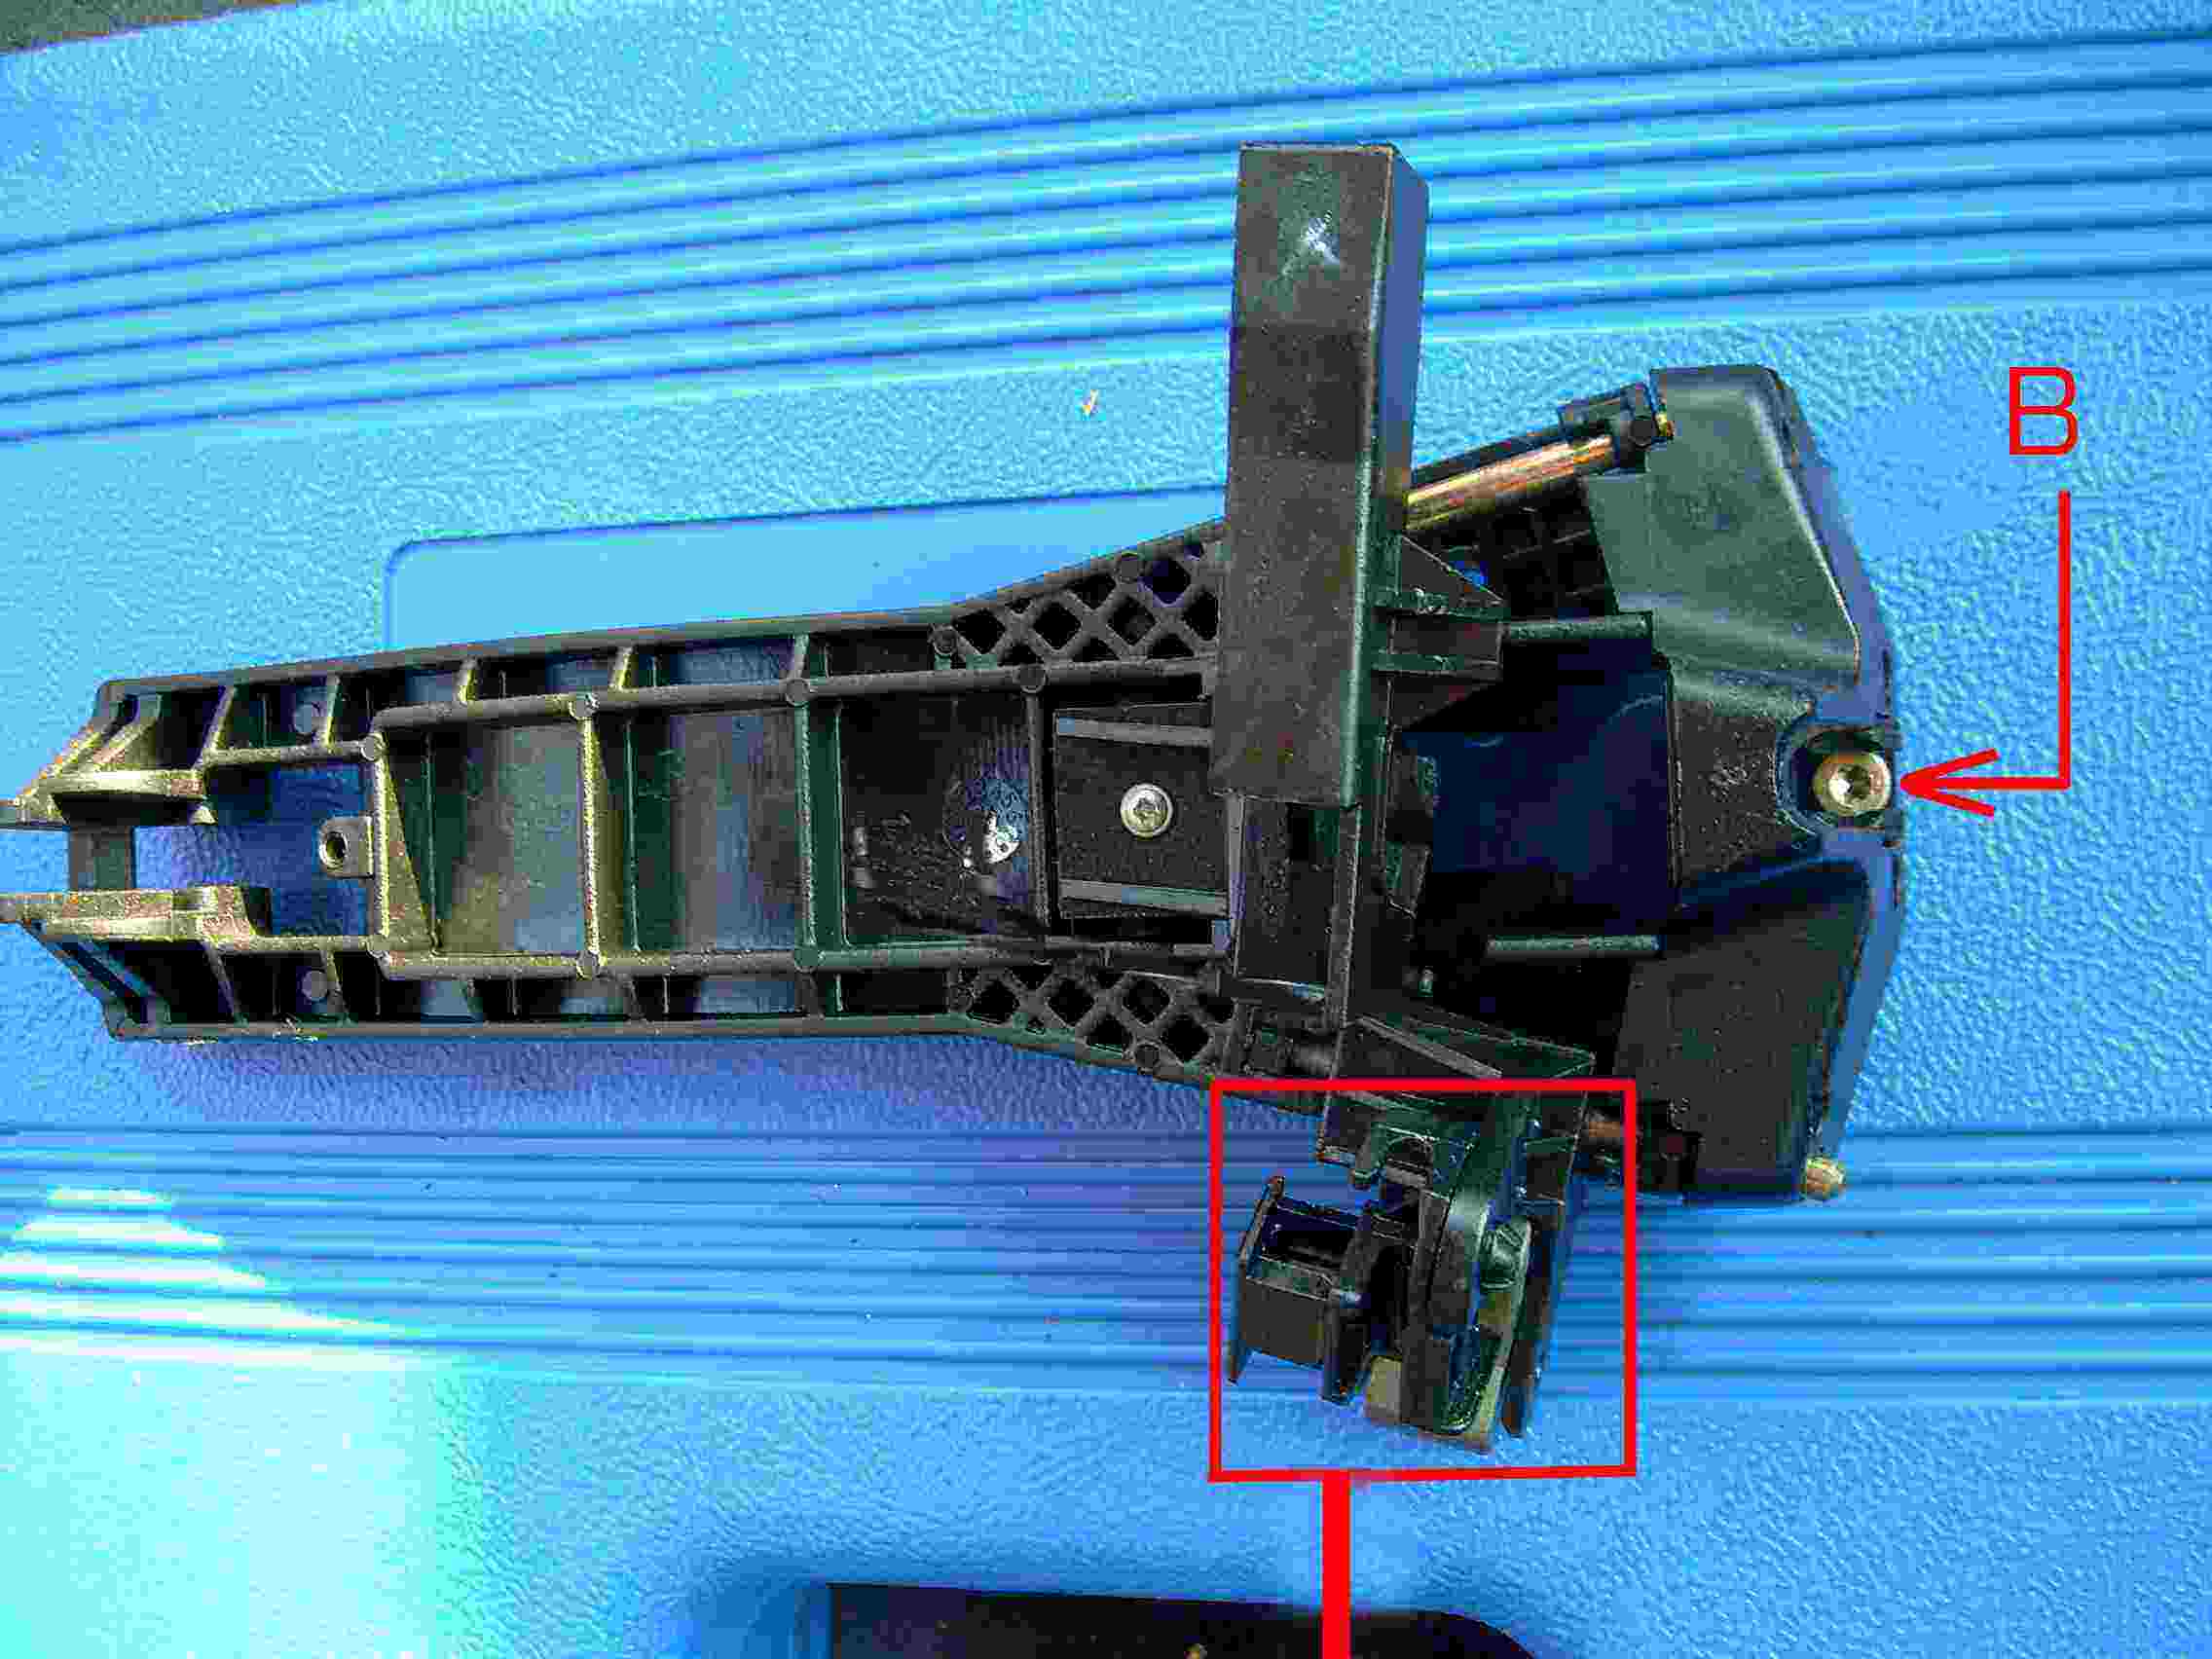
By opening the catch element (see photo) the linkage is released and both elements, lock and door handle base can be taken out the door.
Note the hard to spot/locate Torx screw on the right of the photo. B
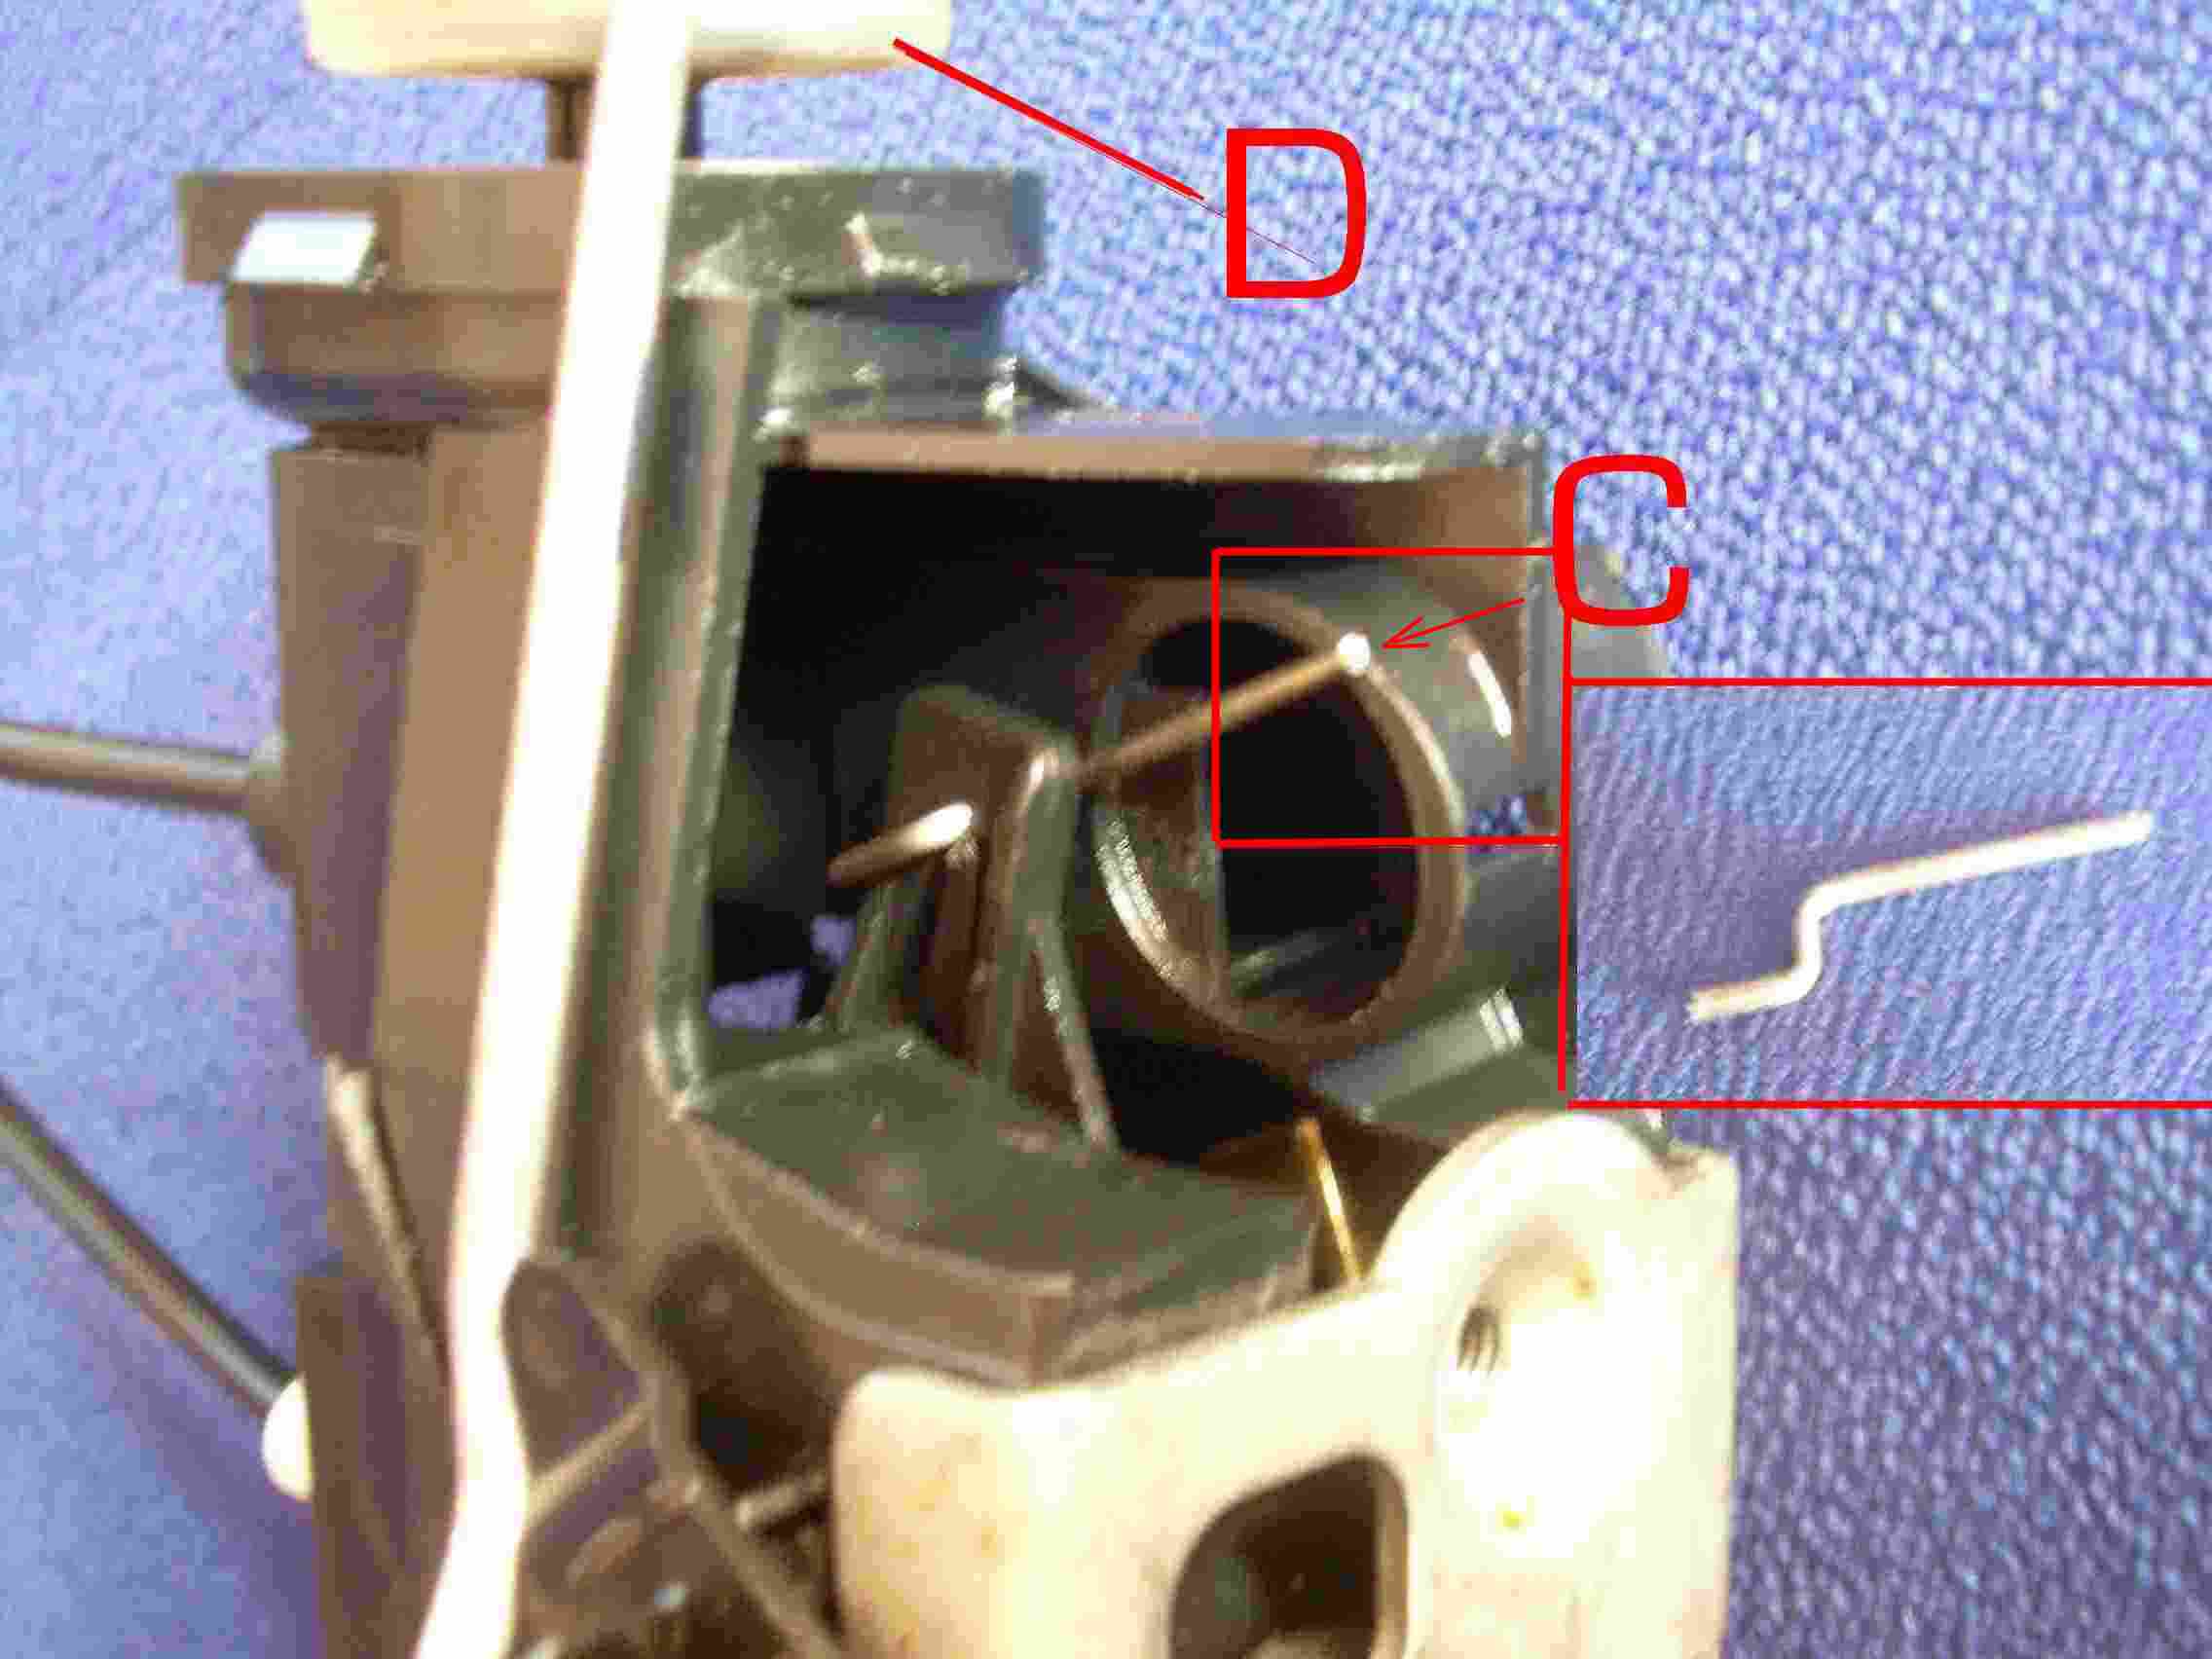
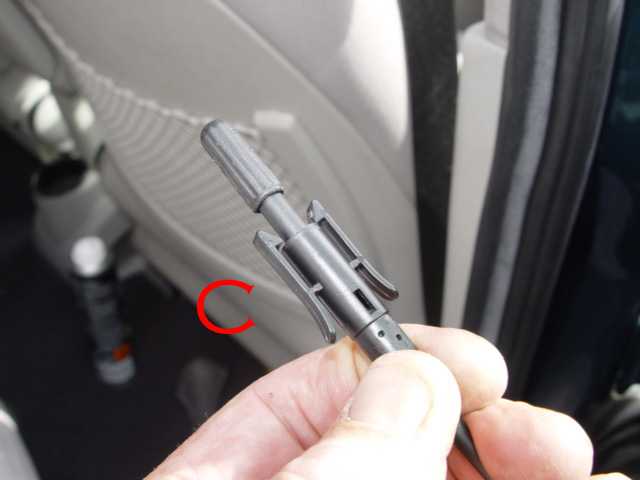
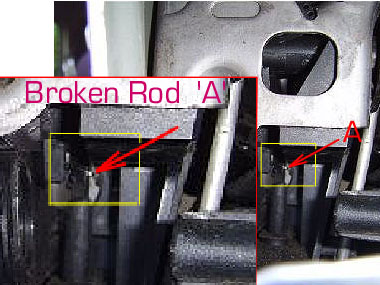
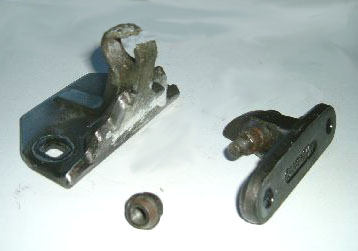
Finally I had the door lock free for inspection. I found that the actuator linkage was broken and the broken part ( see inset photo C) was of such a length that it was blocking the movement of the vacuum cylinder D indicates the location of the vacuum unit in relation to the locking mechanism.
I figured that a working actuating knob was of little use and decided to not replace it.
Having removed the broken section of the linkage the problem was solved. Basically that was it.
I carefully fitted all the parts back and all worked fine!
I would like to thank lofty for his help by supplying me the additional info! I have forwarded this information and photographs to lofty in the hope that it will help others with a similar problem.
Regards André
The Netherlands/Holland.
Well that's just what happened because within almost days of posting this information another owner contacted me with not only a rear N/S door that wouldn't lock but a Boot (5th Door )door that was jammed and couldn't be opened. See page 25.
The circumstances were uncannily alike both owners had purchased used 'A' Class both had only owned them for a few weeks. and the door lock problem turned out to be an identical problem, in that the internal locking button cable had broken at the lock end leaving an 'S' shaped length of the cable/rod a see below, which prevented the vacuum locking mechanism from working.
Let me warn owners if you are going to attempt a repair of this item yourself the degree of difficulty, I would rate as **** out of ***** this is mainly due to removing the lock mechanism from, and returning the new unit through the restricted opening in the door skin, the internal surface of the door is lethally sharp and you really do need to protect yourself from the sharp edges.
We did manage to complete the job and the replacement lock worked well But you would not want to do too many replacements of this item in a day.
In comparison I would rate replacing spark plugs ** out of *****
It was our intention to replace this cable/rod albeit the lock would have to be taken apart to insert the new cable end. However when the owner phoned Mercedes-Benz Parts the lock is sold as a unit, the cable cannot be purchased as a separate item. Cost of the lock component complete with the two cable/rods £55.00 + VAT which I thought was good value and saved the job of pulling the lock apart, a very time consuming and intricate job.
The second problem was that the new lock wouldn't be available for a couple of days.
 Before starting the removal of the mechanism from the door, you really would be well advised to wear protective gloves as the inside of the door is lethally sharp.
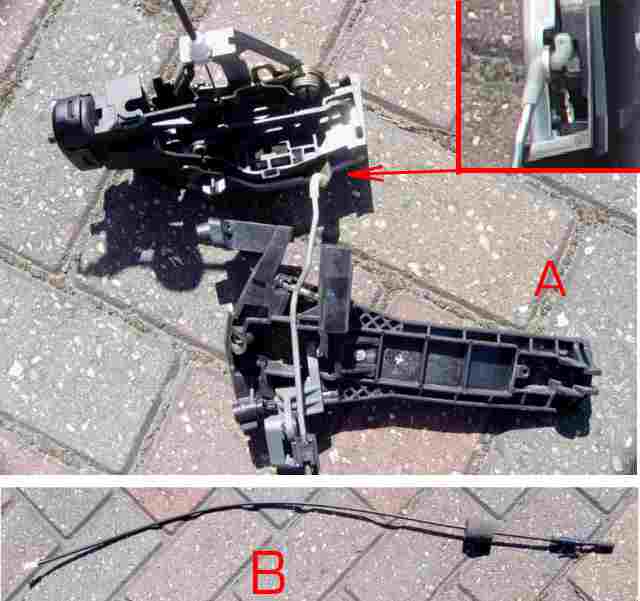
 Getting the locking mechanism A out of the door is not by any means straight forward, as mentioned the yellow vacuum tube can be unclipped from the vacuum unit with the blade of a screw driver, this is a push fit to re-install on the new unit. And of course the locking button cable/rod was all ready disconnected because of the breakage.
It will be noted that the two components are connected by a rod threaded into the locking mechanism. If you are going to fit the new rod supplied with the new lock, you will need to undo this and replace the rod before fitting the rod was threaded into the block block 36 complete turns get this wrong as there is every chance your lock will not work.
The inserted photo shows that the rod connects to the mechanism which was square on the new lock, it can be seen that is is twisted on the old unit, it is not considered that this was done on removal and in this respect both worked so it may be a modification.
When removing the back plate from the handle to the lock take care to ensure it is correctly located, I had taken a photo when we removed the old unit and this saved the day, a bit like a puzzle out of a Christmas cracker, a complicated mechanism.
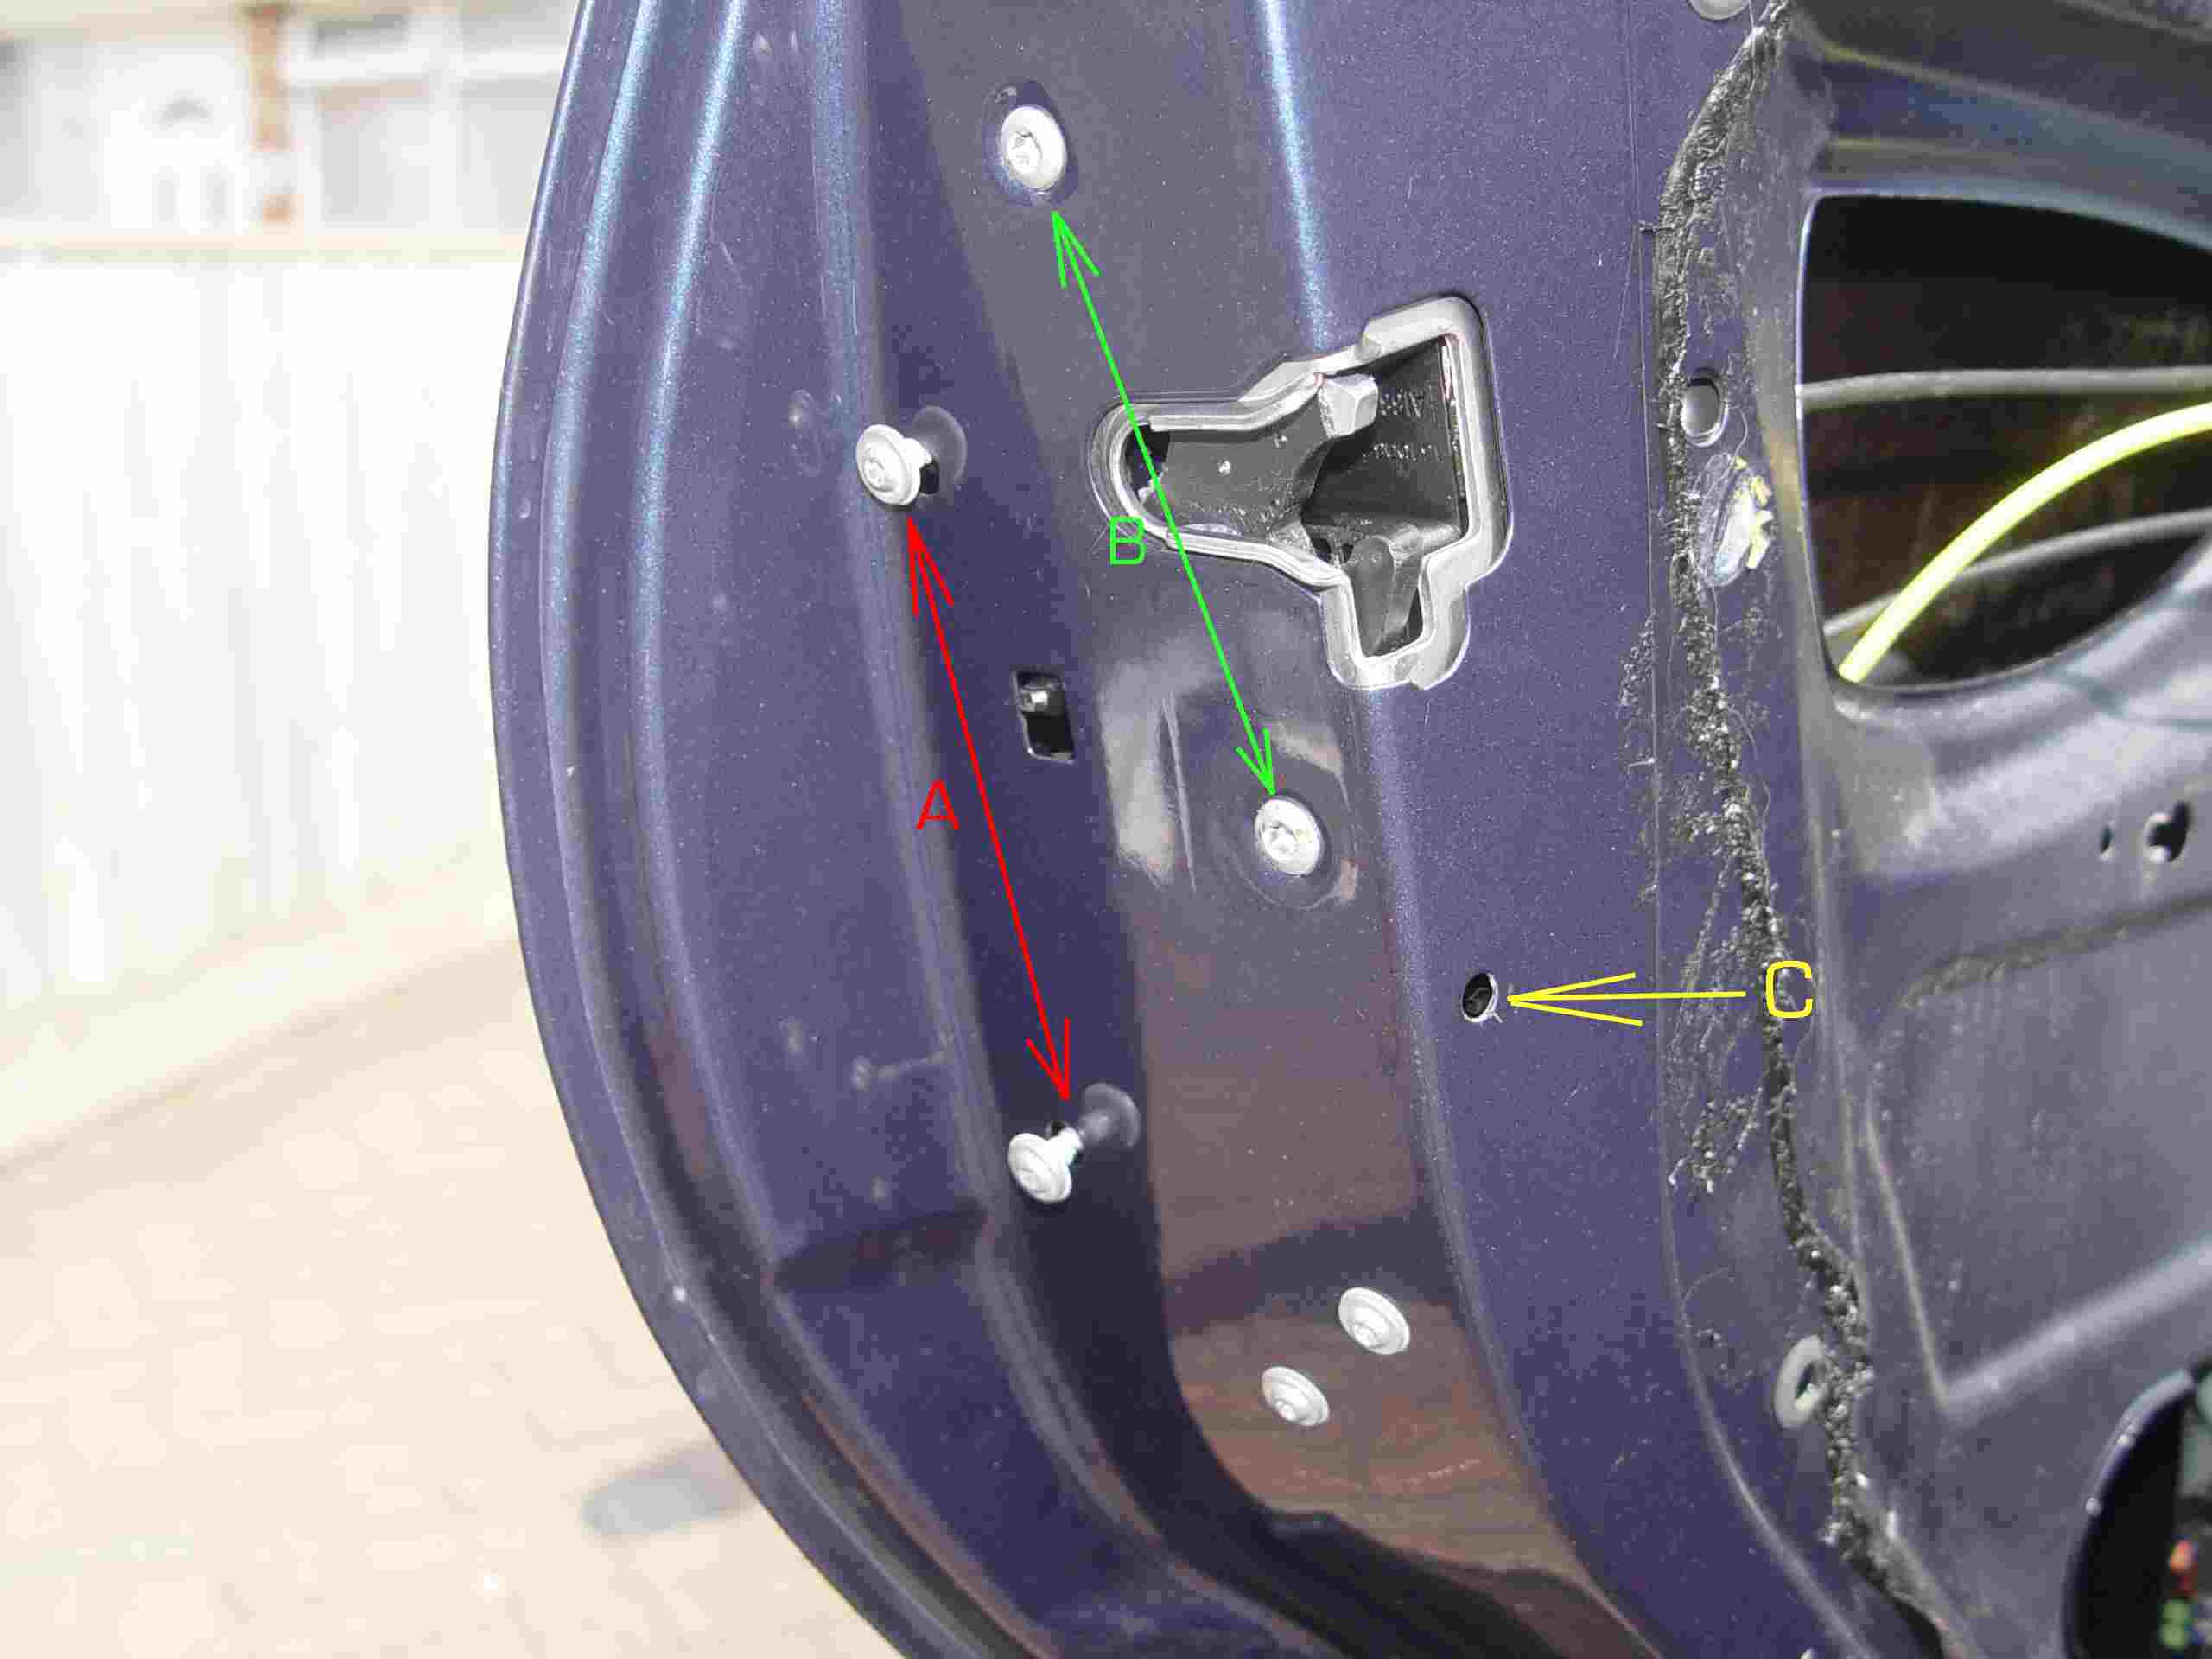 there are including the Torx screw through the hole in the door which is captivated inside the door skin, five screws to remove.
The photo shows the whole of the mechanism removed as a unit, to try and re-connect the two components inside the door I'm sure would prove impossible by removing two extra screws the combined unit can be removed A Screws hold the inside handle in location , B Hold the lock in position, C Access for Torx screw holding end cap of outside handle, Note the small blanking grommet has already been removed.
Removing the lock and attached interior handle backing plate was done through the top access however it was found that supporting the mechanism from the access hole below made the job a little easier, albeit meant easing more of the plastic inner liner away from the door skin, which if carefully done can be re-used rather than replaced,
How to Close an electric window if stuck down due to a falty electric motor.
Before even thinking about working within the doors take precautions to avoid severe accidents.
1.Disconnect the Battery
2.Wear gloves to protect against severe cuts on the razor sharp metal in the door frame.
Hi there Lofty,
Power Windows
If you ever get a situation where one of your power windows fails when the window is open, and you can’t get it fixed for a while, and you need it closed ASAP!
Note: Try the obvious things first, like fuses, faulty switches, loose wires…
Remove the door panel as per this page
You won’t be able to just pull the window up because it is locked into position with the regulator/cable system. You will need to manually “run the motor”.
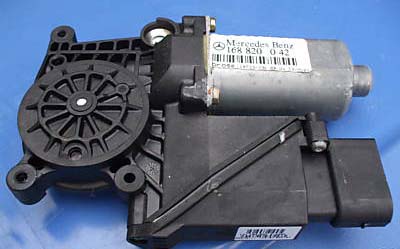
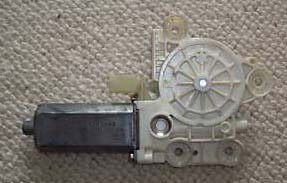
You should be able to see/access the Power Window motor / Regulator (it looks like the one below, note this one has been taken out.
Leave the entire thing attached inside the door and remove the 4 Torx screws from the grey motor housing unit.
Have a telescopic magnet to hand in case you drop the fixing screws which will fall to the bottom of the door
Carefully remove the grey unit, and then slowly rotate the now exposed motor component in the direction required to get the window to slowly start to raise.
Continue until window is fully closed (this might take a while).
Put everything back together. And presto! Your window is closed (permanently) until you can get it fixed properly by a professional or yourself (That’s if you have checked the obvious things first, fuses, fault switch, loose wiring) and you are sure it’s the regulator or motor.
This got us out of real trouble, leaving the window down over many days is just not practical!
Cheers
Chris
Thanks Chris, anything to save MB getting their hands on our Money!
But work safely at all times or it will cost you your fingers
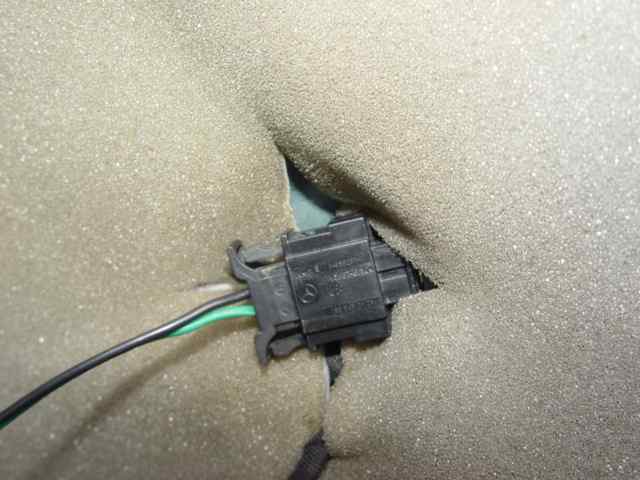
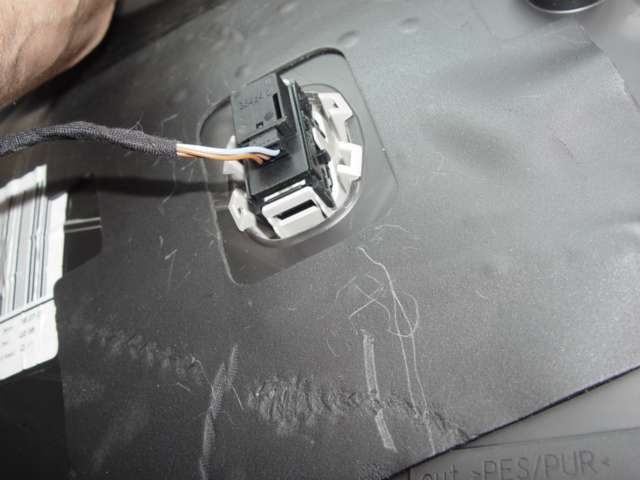
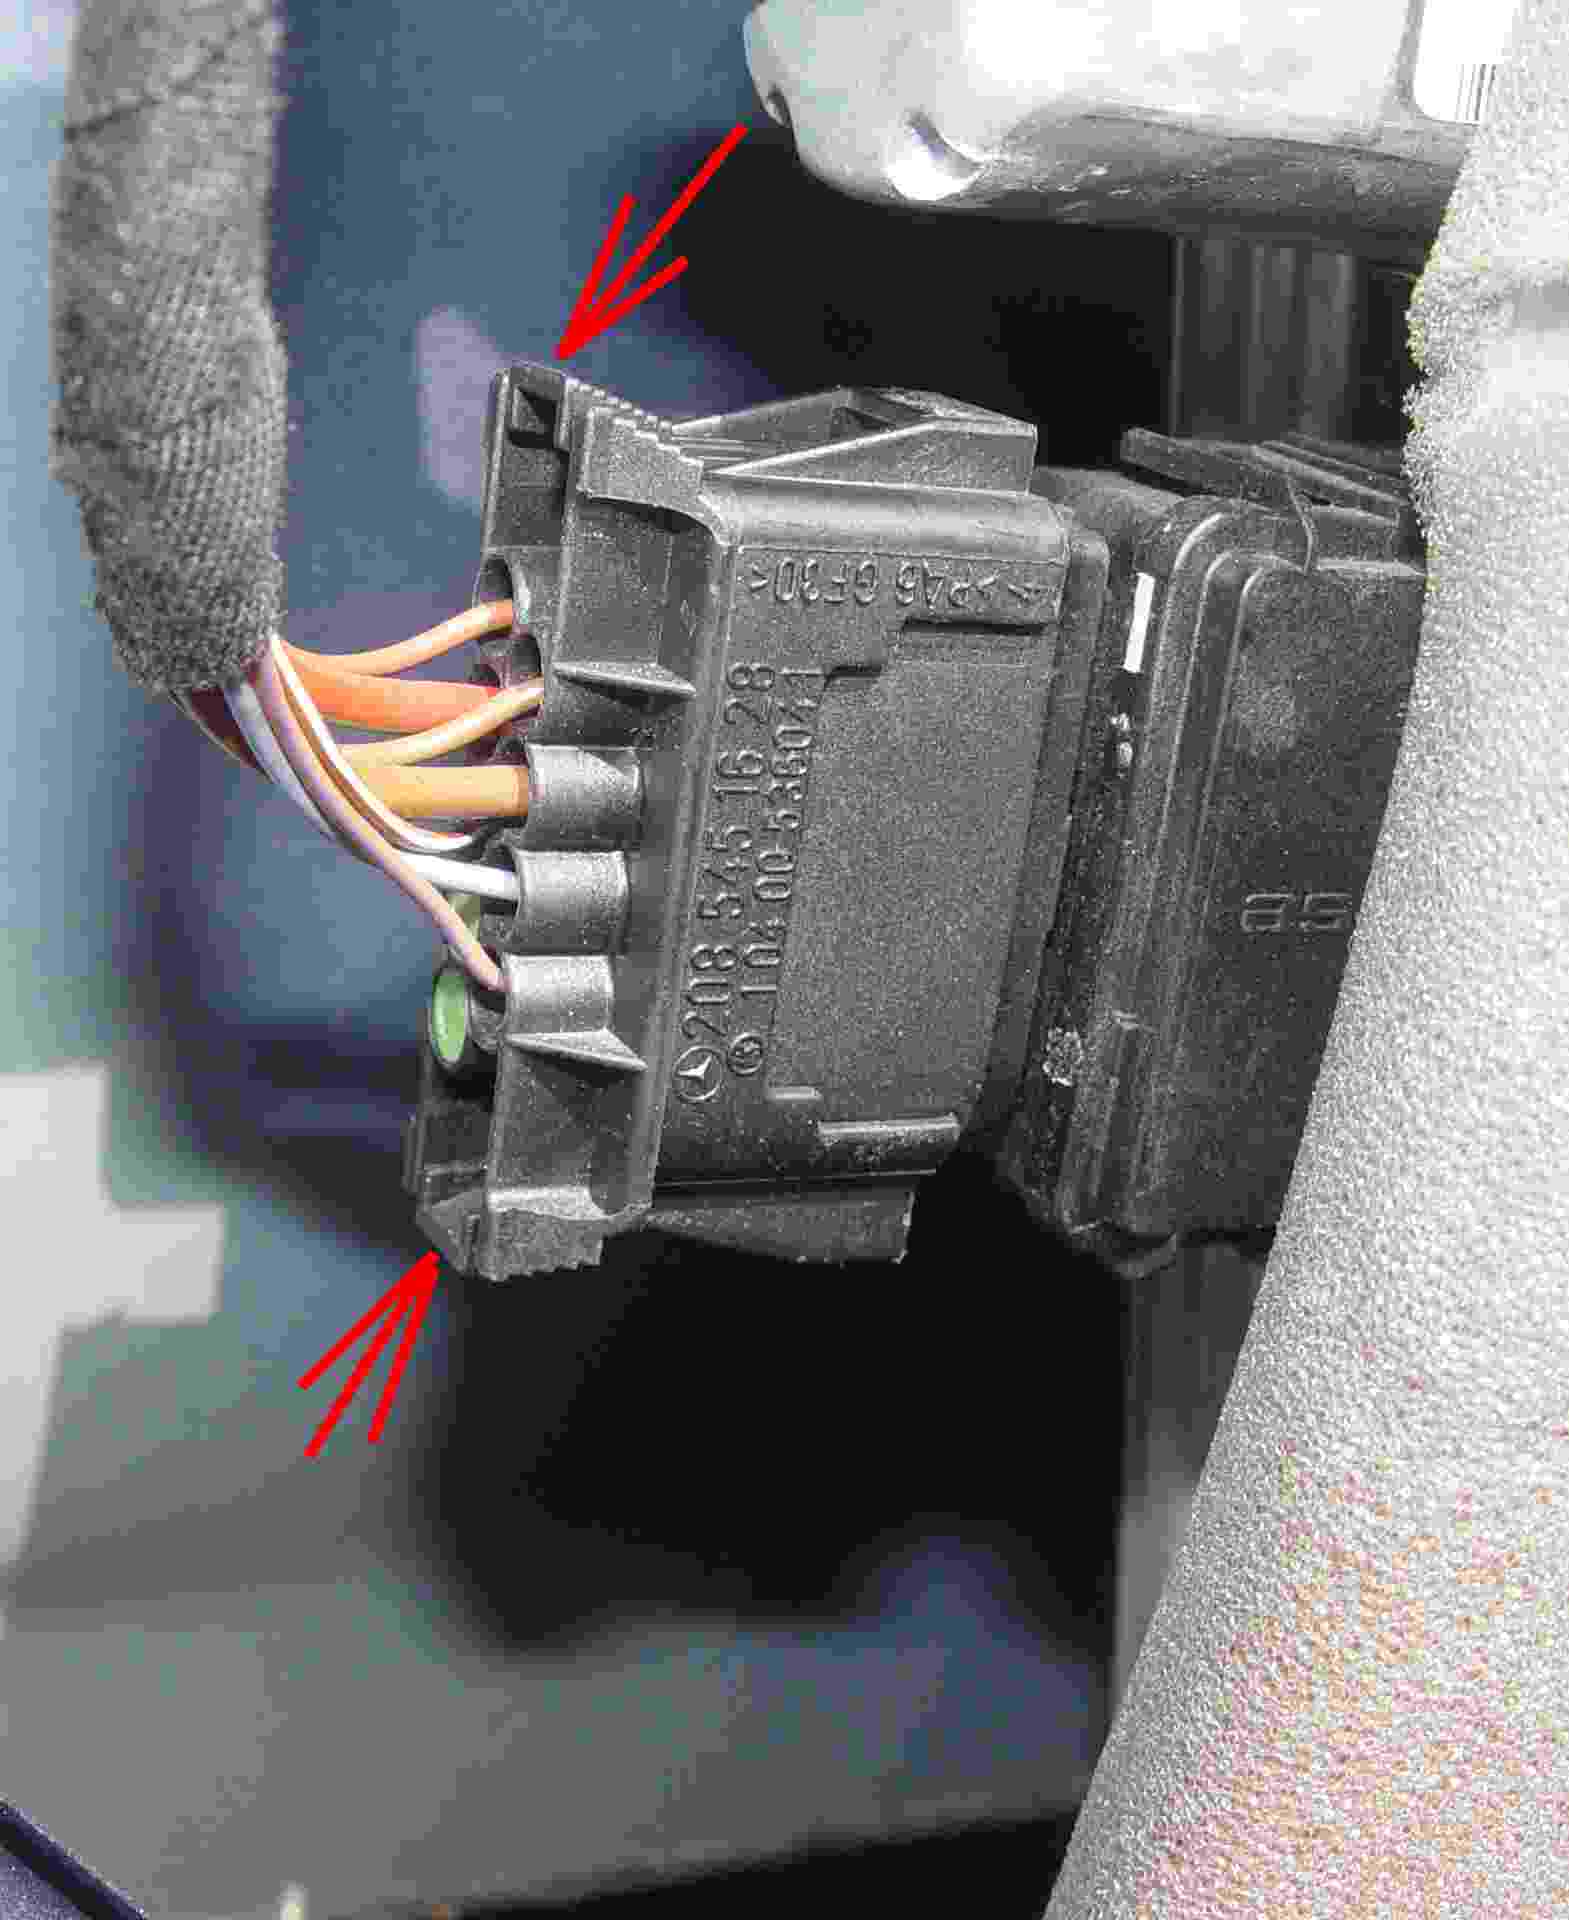
Disconnecting the electric plug if only to allow more room for movement helped, it also ensure the electric window motor shown is isolated.
this is done by pressing the two ridged tabs to release the plug from the multi-pin socket, these just snap back into place when the plug is re-connected.
In respect of electric windows whether you have two or four see the note above about their specific allocation to the vehicle.
Remember to use your Vin number when ordering spares, If buying off such outlets as
E-bay ensure the part is suitable for your car
To make the point both of these electric motors are for an 'A' Class, as can be seen they are different and come in left and right hand fitting .O/S & N/S
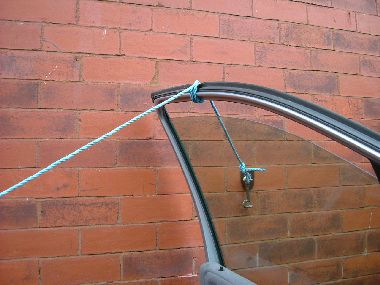
Having removed the lock assembly (see above) unit and located the cause of the lock failure we opted to tie the door closed and wait for the new parts to arrive.
How do I know the fault on my lock is the same as the two highlighted on this page?
the security button does not pop up and down as in the example above you can be certain you have the same problem.
if you are faced with this problem purchase you new lock first, then you can complete the job same day.
Another consideration, if you are not replacing the lock straight away.
Having removed the lock it is then very difficult to tie the door closed sufficiently tight to hold the interior light switch in the closed position, the switch was therefore removed and tapped in the closed position, so as to avoid the interior light draining power from the battery overnight.
It would be easy enough to remove the broken end of the cable and replace the lock , yes it will work. However I suspect that like many of you when locking the car we watch the locking buttons retract into the door thereby confirming that the door has locked, with out replacing the lock the only confirmation you would have is by physically checking that or those if more than one door's. Not replacing these components leads to a slow erosion in the quality and value of the car .
Refitting the cable to the door latch was quite a puzzle! this photograph clearly shows the layout and will save you the same problem
 Ian a fellow owner had difficulty in removing the locking mechanism from the door which is not an easy task, was able to remove the offending broken part of the cable by filing off the end of the link which engages in the mechanism this then allowed him to remove the broken section which is what prevents the door locking.
Although this is an option remember you will not be able to undo the door from the inside and will have no confirmation that the door is locked without a physical check.
I may also raise a problem when you come to selling the car, albeit your car will not be the first to be sold with a defective door mechanism, which causes annoyance to buyers if they are not made aware of the problem by the seller.
Quote
Ian,
Using the photos on your site I managed to recognise elements of the lock whilst it was still in the door, with the lock moved forward within the door and put at an angle-looking through the hole on the edge of the door
 (where the capture mechanism would be) I could see the end of the rod, by wedging the broken part to stop it rotating whilst filing I could get an engineering "Swiss" file on it approx 2.5" into the door so could only get small file movement on it but it seemed relatively soft material, the end came off that meant the remainder could be removed from the lever.
Unquote
Regards Ian
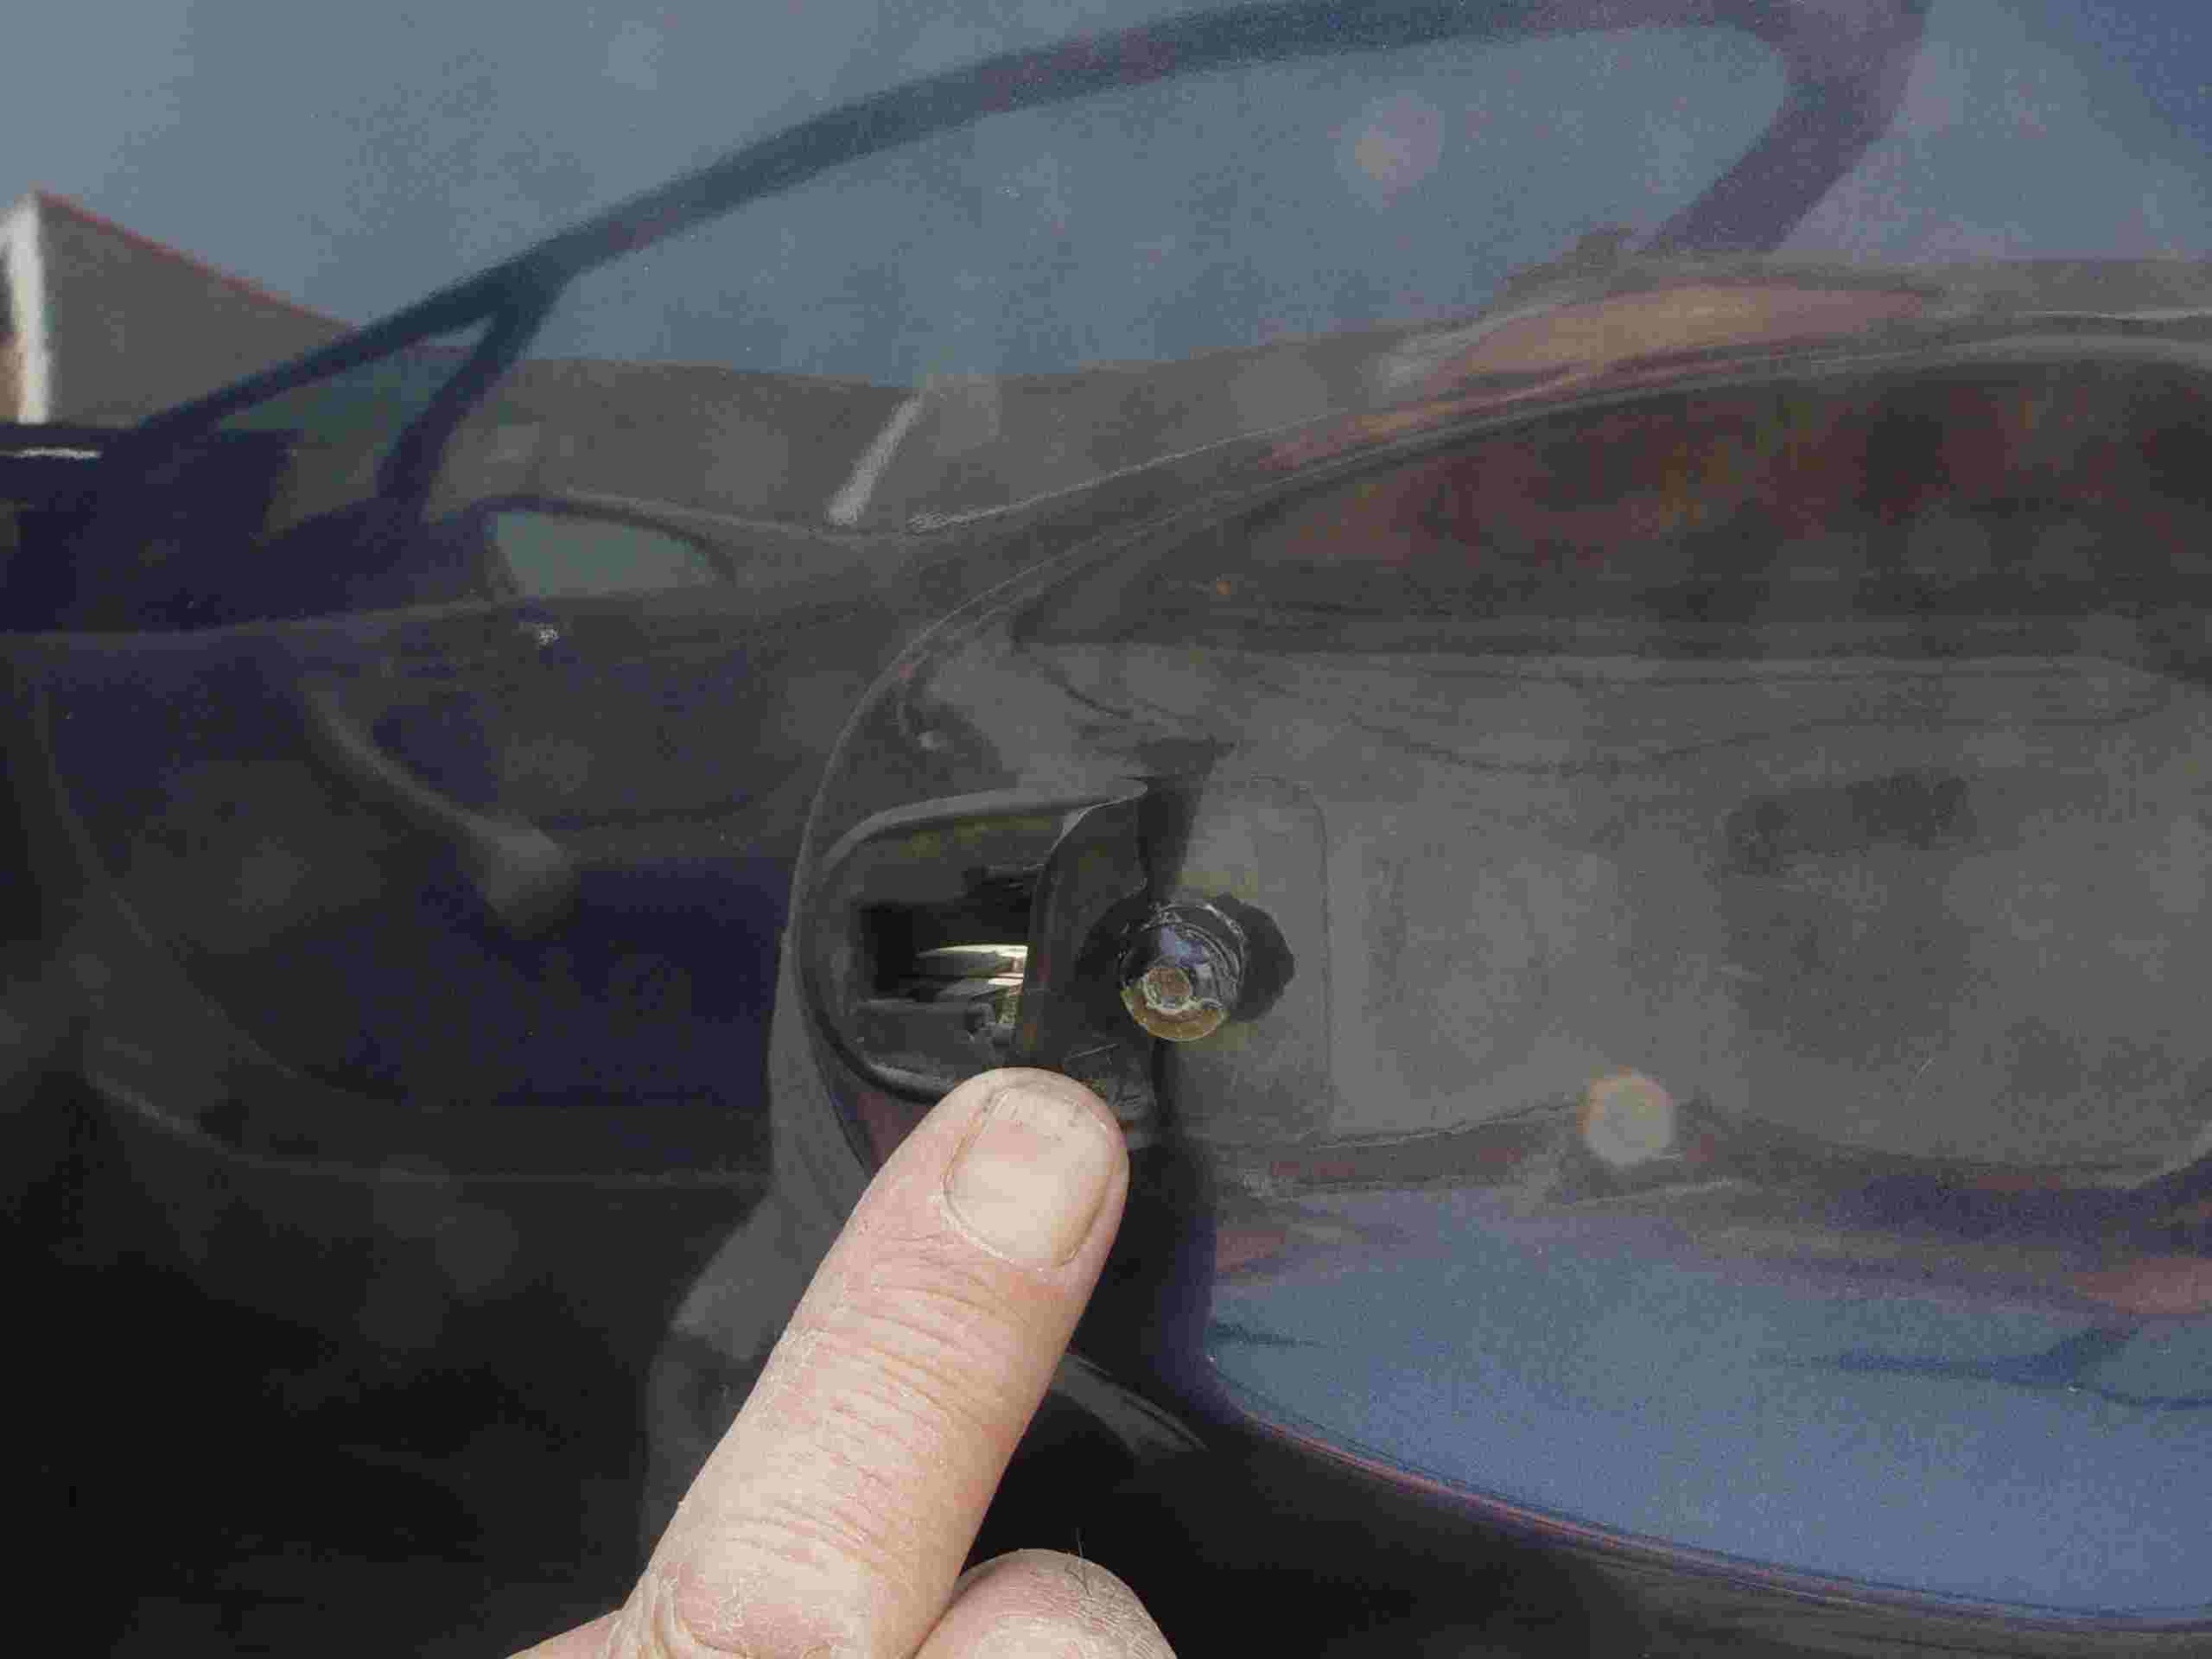 Locating hidden
screws and fixings on modern cars is always a problem, this photo shows one such screw, In the photo on the right the screw body can be seen just protruding through the hole, using your special Torx driver get the screw to this position before placing the end cap into position for fixing, it makes the job easier.
Locating hidden
screws and fixings on modern cars is always a problem, this photo shows one such screw, In the photo on the right the screw body can be seen just protruding through the hole, using your special Torx driver get the screw to this position before placing the end cap into position for fixing, it makes the job easier.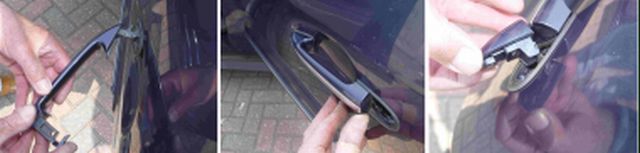
Having checked the the lock functions correctly,*Door locks with remote
* Door locks when security knob is pushed down
* In the case of the drivers door , that the key locks the door
* Child lock feature works( rear doors only)
Replace the exterior handle, insert the handle and push forward thereby engaging the retention hooks, finish off by fitting the end cap secured by the Torx screw, remember to replace the grommet. replace the inner lining, fitting new white retention studs purchased earlier as required. There is little doubt that this job requires more patience than skill, if you are tempted to do the job yourself, then study this page first or print it off using it as a reference, if you come across items that are not covered photograph them for your own use and reference, it does help when you come to re-assemble, particularly if it is not on the same day as removing. Allow yourself up to two hours to complete this task. Although hopefully this page will greatly assist you. Good luck , Lofty
Broken sulphated Aluminium Door Hinges on Pre Face Lift 'A' Class
If you own a Mercedes-Benz vehicle the last thing you would expect is for the doors to drop off!
Well that is what will happen if you do not ensure they are fully lubricated frequently, three in one light oil or silicone spray will do the job and will ensure the hinges are operating smoothly.
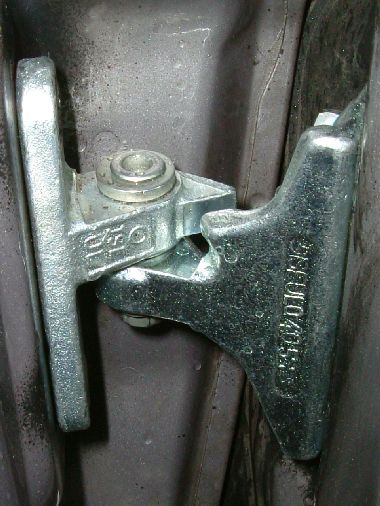
David a fellow owners discovered that his early model 'A' Class is fitted with Aluminium hinges, certainly not a material that one would expect hinges to me made of and perhaps for just once Mercedes have realised their mistake and changed to them to steel on later model cars.
 However in his case it was not just wear that caused a problem but sulphation of the aluminium as well which acts the same as rust (iron oxide) on steel eating away at the base material until it shows itself and causes a problem
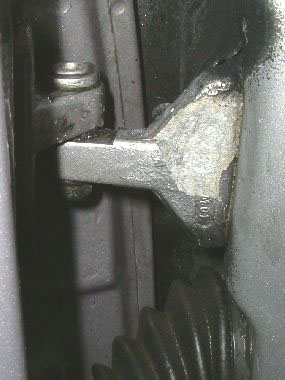
The first signs of problems is when the sulphation building up beneath the paintwork pickles off causing the metal to be exposed, a white power being evident and if you happen to live near the seaside then that will speed up the process as salt in the atmosphere will attack the exposed aluminium.
It is interesting that where aluminium is used on outboard motors as used on boats a sacrifial anode is fitted which protects the aluminium against attack, itself be sacrificed to attack first, in this case no such anode is fitted and so the hinges just sulphate away
Should this problem arise on you car then the only alternative is replace the hinges,
To assist you in replacing the new hinge in precisely the right location, spraying over and around the old hinge before removal will give a template on which to mount the new hinge, re may recall we used the same methods when replacing front struts and swivel bearings, you can always over spray with the correct body colour after having fitted the new hinges as they are purchased in raw metal state (unpainted)
 But beware these doors are heavy and so you will need to block and wedge the door before releasing the defective hinge's
which of course can only be done with the door fully open.
But beware these doors are heavy and so you will need to block and wedge the door before releasing the defective hinge's
which of course can only be done with the door fully open.Having supported and secured the door, remove the door restraint from the 'A' or 'B' post the threaded fixing in the door will be secured so it should remain for the re-installation process.
You will require a 13mm ring spanner to remove the section of the hinge attached to the 'A' or 'B' post depending on which hinge you are replacing
 Remember the last thing you want when the hinge is removed, is for the door to twist on the remaining hinge, to prevent this either secure the help of an assistant or secure the door in such a way as the prevent twisting.
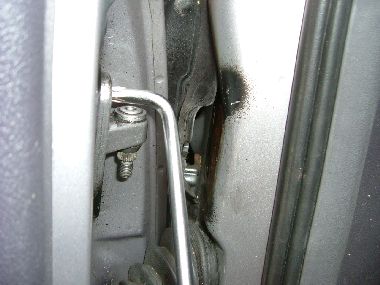
 You will need a 'Torx' 45 bit for removing the portion of hinge attached to the 'B' Post
DO NOT ATTEMPT REMOVAL WITH INCORRECT TOOLS or damaged 'Torx' screws will prevent replacing the hinge.
having mounted the portion on the door, mount the section on the 'A' or 'B' post sliding it to position, When tightening the nut on the bolt ensure it is not over tightened; the hinge pin is a tapered spine, as is used on windscreen wiper blade arms, over tightening could cause damage to the new hinge.
Also bear this in mind if attempting to tighten existing hinges.
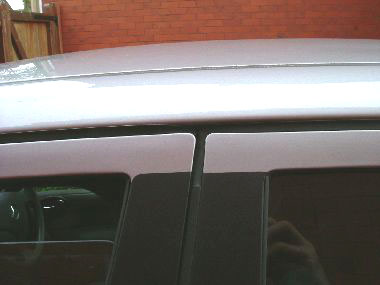 Having aligned the hinge and tightened sufficient to support the door check the appearance and level of the tops of the doors, realign to ensure that the gap between roof and tops of the new replaced door remains constant with the other door.
 When you are satisfied with the fitment of the door fully tighten both the 'Torx' screws and bolts to door and 'A' or 'B' Post
Replace the door restraint
Checking doors for hinge problems.
With the door fully open, hold the door top and bottom check for movement in the hinges by lifting the bottom of the door , there should little if any rocking movement.
Keep all door, bonnet and rear hatch hinges lubricated at all times.
I would like to thank owners André
of the Netherlands/Holland. as well as John and David from the UK for their photographs and input used on this page.
Thank you Lofty
Next.
Back to Index,
Purchase DVD.
Please Make a Donation.