When sending units from either W168 or W169 please ensure that the electrical connection is well protected against damage , also be aware that the FTC/ECU on the W169 will be returned uninstalled on the valve chest this is to prevent damage in transit.
11.12.13 ECU testing have be requested to put in an instruction sheet 'How to install the FTC/ECU and what torque to apply to the secuing screws.' Most of the information and photographs on this page has been donated by various owners in an attempt to help others overcome problems, despite the fact that I have collated it I cannot vouch for any of the procedures or details on this page as my own car is a manual gearbox and I know little about the fully automatic transmissions fitted to the 'A' Class or any other car. I have however managed to back the page up with other information which I have access to.
Of one thing however I am assured, the information and photographs are more comprehensive and instructional than any information you might be able to extract from Mercedes-Benz workshop manager's or dealership who appear to only have one solution to an automatic transmission problem? Replace the complete transmission with all that entails or quoting several thousands of £££££ for the repair which of course will only have a limited warrantee. Thanks to all readers who have forwarded information and in some cases excellent photos which have been used in the formation of this page along with Lynn who supplied this useful contact.
Stephens+Engineering+Automatics when all else failed this company sorted out Lynn's gear box and gave her a warrantee, she in turn recommends this company to other owners with automatic transmission problems
However I would point out that since this mail was received ,some years back and with the help of owners of automatic 'A' Class models massive steps forward have been made to resolve and discover what causes of the 'F' display that along with the professional help of ECU testing.com. owners that can fend for themselves with DIY can now resolve all of the problems that cause this annoying display which produces such problems on the Automatic transmission .
Those of you with handbooks for your Automatic 'A' Class should will have this information in part in your Owners handbook Under Automatic Transmission (In my handbook page page 207) . However I am very much aware that a large number of owners World wide having purchased used vehicles do not have owners handbooks and therefore will not be aware of the procedures to be employed when a Fault occurs on the automatic transmission, 'F' Displayed, hopefully this information will help you and advise you what is going on and what to do to get home or a place of safety when the 'F' displays and normal driving is not possible.
Automatic Transmission Driving your Car.
This information is taken direct from he owners handbook (MB order No.6515 0254 02 Part number 168 584 01 87.
The individual gears are selected automatically, depending on:-
1 Selector lever with shift ranges 4,3,1 and 1.
2 Program switch position.
3 Accelerator position.
4 Road Speed.
The transmission automatically adapts to the individual driving style of the driver by adjusting its shift positions.
The adjustment of the shift points is a continuous process which permanently reflects the road and traffic conditions at any given moment, as well as the drivers own requirements .
If the operating circumstances change , the automatic transmission reacts by adjusting the gear shift program.
Pulling away
Apply the service/foot brake to release the selector lever lock. Release the parking/hand brake With the engine at Idling speed, select a drive position . Allow the gear engagement process to run completely , especially if the engine is cold .
This is indicated by a gentle jerk.
Release the service brake (foot) and depress the accelerator pedal.
Up-shifts and cold start.
Up-shifts are made at higher engine speeds after a cold start than when the engine is at operating temperature. This helps the catalytic converter to reach its regular operating temperature more quickly.
Accelerator pedal conditions position.
Light throttle = early up-shifts.
more throttle = later up-shifts.
Kick down -- Depress the accelerator pedal beyond the pressure point = maximum acceleration , shift down into lowest gear possible.
Ease back on accelerator as soon as the desired speed has been reached __ the transmission will shift back up.
Stopping
Leave the selector lever in the drive D or R position and apply the service/foot brake or parking/hand brake to prevent the vehicle from either rolling forwards ( or backwards on an uphill gradient.)
Manoeuvring
When manoeuvring in a tight space, control the speed by carefully applying and releasing the service brake (foot), Do not depress the accelerator pedal too suddenly or too far.
P Parking
Apply the parking/hand brake (hand)
Move the selector lever to position P
On steep slopes , turn the the front wheels towards the kern-side, taking care not to damage the tyres. P Parking lock
Additional safeguard when the vehicle is parked .
Only select this position when the vehicle is stationary Note The ignition Key can only be removed from the ignition lock when the selector lever is in Position P .
When the ignition key is removed , the selector lever is locked in position P To engage the steering wheel lock: turn the the steering wheel slightly after the key has been removed .
Reverse Gear
Only select R when the car is stationary.
The current selector lever position is indicated in the instrument cluster display.
Program Selector Switch
S = Standard, switch pressed on S symbol. this position is used in all normal driving conditions .
W Winter, switch pressed on the W symbol Up-shifts and downshifts are made at a lower speeds and rpm than in the S program. simply press the S/W switch to change between programs . Emergency running mode If during a journey the transmission no longer shifts, even in varying operating conditions , the transmission has entered emergency running mode.
The letter 'F' will appear on the instrument cluster display.
To make it possible to continue the journey , 2nd and reverse gears can still be selected.
In such cases , proceed as follow:- Stop the car.
Move the selector lever to position P
switch off the engine
Wait at least 10 seconds
Start the engine
Move the selector lever to position D 2nd gear is engaged.
Move the selector to lever position R reverse gear is engaged.
Have the transmission examined without delay. Having a diagnostics test done will pin point the problem by code, Owners of Petrol cars built pre February 2001, Diesel's 2004 you will need to visit either a MB garage or an independent Mercedes garage where they have Star diagnostic equipment available.
Post 2001 /2004 vehicles your vehicle's should be EOBD compliant and therefore you can use any EOBD diagnostics tool to read the codes.
This question was asked by a reader who was able to select gears without depressing the brake pedal.
A fellow reader, John provided this answer:- It is the cable adjuster under the bonnet that goes from the brake /ignition switch to the gearbox.
This is a small cable, not the main cable for the park pawl, it just moves a small cam in the gearbox out of
the way to allow the car to be taken out of park only if the brake is
pressed.
It is a really strange white auto adjuster thing in the middle of the
cable with a black button on. If the press the button you can collapse
the adjuster, by pushing it, pressing again will allow it to release to
the position it needs to be in.
Now. Mine also moves from park without the brake but I actually prefer
it that way myself so I have never experimented with the position you
should have it in before pressing the release button on the adjuster, he
will have to try it to figure the correct way. I think that it has to be
collapsed. Put the car in park, foot off the brake and press the button.
If that doesn't work then he will have to tray brake on brake off
ignition on / off and whatever to get it set correctly unless he can
find instructions in WIS. John
In my opinion whether required or not it is a wise move to have your foot on the brake pedal when starting any car, in the case of automatics this rule is always best followed if accidents are to be prevented. Lofty
This above document will print out and will be useful in the event of a problem. Click top left hand corner
Gear selector Photos which may help owners encountering problems.
Do remember that if you want the PCB professionally repaired then it is advisable not to tamper or try DIY repairs , Having been repaired by ECU testing the Board will have a life time warrantee.
Gear Selector PCB failure One of the problems on the fully Automatic transmission is the PCB that forms part of the gear selector module situated inside the car, Cleaning of this unit as outlined further down the page does seem to help, however it does not always appear to last long term.
Peter from Australia who also suffered this problem had his board checked by an auto technician who found many dry joints and poor soldering on the PCB. see his e-mail:- Dear Lofty
Many thanks for such an excellent, helpful site. I just want to add one suggestion for other people who suffer the 'F fault' - get an electronics technician to check the printed circuit board and re-solder bad connections if needed.
My wife's A-class suffered the automatic transmission 'F' fault.
I removed the shift sensor module, as your site suggested, and cleaned it with no-residue cleaning fluid.
I also asked an electronics technician to look at the sensor module's printed circuit board.
The technician said it was a wonder the sensor module ever worked, because it had various badly soldered or 'dry' joints.
He re-soldered the joints (especially the ones where the main power cable plugs in) and it has worked fine so far. He only charged $10 (Australian).
I suggest your readers do the same if they have the Auto transmission 'F-fault' problems
Thanks again for such useful money-saving info.
Best regards
Peter Ritchie (Australia)
Following repair he has had no problems.
If you have a problem and would like your board checked please contact ECU Testing.com will now undertake this task for you as well as checking the board for faults they can also replace defective components on the board link to site:- e-mail/ECU Testing.com/ Repairs to Gear Selector Module PCB 'A' Class Fully Automatic Transmission. or telephone 0044(0)1773535638 Mention 'lofty's Homepage' when calling it would also be helpful if you could enclose a history of the fault (Details of the fault) and any fault codes that point to this module.
The mail below is typical of the mails I receive Lofty
I've got a 1999 full auto A160, tonight on the dash as I was driving home an F appeared.
Luckily I was just arriving home, as the car didn't have any guts to get up a slight incline......OK I have an existing problem with the alternator belt, tensioner is knackered however still ticking along, I'm waiting for the part so the car can be repaired on Friday. Do you think if the tensioner has completely given up this could be part of the F problem? Yes, In my view the only way there could have been a connection between these two faults was if the battery power was low caused by the belt not rotating the alternator as should be the case. Battery power is important with the automatic gearbox as it is powered by electrical circuits.
Although I have heard of this display many many times with the car going into 'limp home mode' I'm not aware of what causes it and have never seen the reason printed. I communicated this to the owner in question. The reader has kindly come back with further information that may help other owners
I took the car into MB for a diagnostic check....mainly due to reading through forums and feeling nervous the car would be heading to the scrappies.
Fault stored was P1872 - Gear selector module......."fault is only stored at present and code was able to be erased, if fault reoccurs then new module is required"
They told me that the fault may or may not happen again, however had the fault been "recurring" as opposed to "stored" then a repair would be needed As soon as possible (asap).
£73.40 including VAT for diagnostic.
Module A1683701309/7088 £274.00
Thank you Paul for the information dated 20/11/08
This e-mail was received from Peter in NZ which may also help other owners with this problem.23/12/2010
Firstly our little A160 with the automatic tip-tronic type gearbox has been seen with the dreaded F sign on a rather too frequent basis, amongst other less obvious maladies.
Well I looked carefully at what your website has to offer and agree whole heartedly it is pretty much right... but I do think it should make clear that the PCB on the gear-stick mounting frame is I think
significantly more cunning than I anyway gave it credit for.
Firstly the original was a real problem, cleaning it with contact spray was only marginally successful, it had immediate good results but within a week or so it was back to the bad old days only worse, however a squirt down the gear-stick hole allows it to be driven for a short time
to get it home ... The solution in my case was to fit a PCB from a later model, from an A190 that is a 2002 model or later, that has quite amazing results it cleans up the lumpy gear change issues, improves the gear meshing significantly and generally makes a huge difference.
I've been back to Peter with some questions, because what is bread &
butter to one person can be a mammoth task to another.
He says, The replacement of the PCB for another one is easily within the scope of
a careful DIYer ... just unclip the plastic sections and remove the 3 small T6 Torx screws that hold the PCB to the plastic frame and patiently swap it out.
Now there is a risk with the PCB swap that the slide is not placed correctly over the drive fork and if that happens it will break the slide and I am confident it will not be possible to get a replacement from MB .. You obviously also need to be careful of static electricity, so wear a anti-static wrist band when touching the PCB!
But those are the downsides to what is not a difficult to do if taken with care!
Thanks Peter My further observations would be to ensure if undertaking/attempting this task to acquire the selector module from an accident damaged vehicle rather than a scraped vehicle irrespective of age.
I make this comment knowing that a number of owners have sold their cars for scrap being totally unable at reasonable cost to undertake the repairs needed, 16/5/2011 the cost of the replacement parts being more than the market/trade in price of the car. Albeit we are slowly getting to grips with the unit with the help of ECU testing where parts were previously too expensive to replace we are now able to get them tested and repaired.
Always disconnect the battery when working on electrical components on the car this must be the case with main ECU as well as the FTC.ECU
So if buying a used unit, there may be some wisdom in buying a one from a later model than you actually own car, as the replacement may have modifications that your defective has not got. That's just one more bit of information that may assist owners with what is a nightmare situation particularly where the vehicle is in good general condition but of low financial value. It is unlikely that a MB main dealer will want to undertake this task, they will want to fit a new selector module which may with fitting cost you more than your car is worth. Follow up mail Lofty,
My A160 with the modified gear change PCB from a A190 has now done
about a 2500Km (3.1.2011) without the slightest sign of an 'F' displaying so I think it
is a goer and I cannot tell you how much better it goes - better fuel economy and
far smoother on the changes both up and down so would recommend the
upgrade for any or the 1999 era vehicles weather it goes well or not. Peter
Low Battery power
So can the problem you are experiencing with your Auto transmission be
attributed to your battery? This information was posted on a forum and I feel sure that a number of Automatic transmission owners could find the information useful.
The owners had a A190 fully auto W Reg. that often jumped out of gear and displayed 'F' which he found he could over come by switching off the engine for two minutes and then re-starting. All would then be well until until the next time, however his problems were worsened by the fact that when we got a cold spell the car would not start first time, as a result replaced his battery, which has also cured to date at least, the 'F problem.
OK so the battery cost him £100, but my goodness its cheaper than taking the car to Mercedes where the diagnostics test alone will cost you £50 minimum plus Vat + the repairs, well the sky appears to be the limit with MB on this repair/problem. The owner in question also highlighted a very good point, it is usual for original batteries to last longer than replacements, and its also the case that auto boxes appear to start their antics 'F' etc at between 50-70000, the car driven 12 to 140000 miles a year will give you almost to the day the life of the battery 4-5 years max, so if your car is displaying these problems fully charge the battery or at least get it tested it may be the cause of your problems and all though the battery will cost, it will not cost you what MB will charge you to examine your car and come up with the list of possible faults, the vast number of which could be down to the state of the battery.
Lofty.
I read with interest the thread about the A class automatic gear selector modules going faulty with the thought being that it is the infra-red detectors that are getting dirty. I found it odd that everyone seems to be trying to clean them out with contact cleaner. There are no contacts in these sensors. They are essentially an infra-red light emitting diode in one side and a photo transistor on the other. The transistor detecting an arm interrupting the light beam. The most likely thing to get into the sensors is dust and an air line will clear this away. Contact cleaner has lubricants in them and this will leave an oily film on the transducers which will attract more dirt. If you want to use a solvent cleaner to wash the transducer I would use Iso-Propanol (IPA) which is readily available from electronic suppliers such as Maplins.co.uk This will leave no residue when it has evaporated and will not damage electronic components. Let it all evaporate before re-powering the board.
John Harmer, Senior Area Engineer
Unquote
Thanks John , the more information on this problem the better, even with 'Star' Diagnostics MB seem to be guessing when it comes to dealing with the 'F' Display or just quote for a new gearbox and selector module which isn't helpful when the repair costs more than the car is worth in money terms.
Lofty
I wanted to say a big thank you for the clarity of information and instructions with respect to dreaded "F" issue on the Mercedes A Class. I have a 2002 LWB Automatic and had the F mode turn up on the dash a few months ago.
I had a local dealer look at the car and was quoted between £900 to £1300 to fix. As with many others in my position this repair value exceeds the price of the car so I considered scrapping the car and was offered £200 when I phone around! Then I discovered your website and having read the details in full on page 59 decided to have a look at the gear selector module . I successfully removed the PCB and sent it off for testing and was pleased to hear the board had a fault. It cost £190 for the repair, at ECU Testing.com. It took a further hour for me to fit everything back when the PCB was returned. The "F" fault was fixed and the car has been driving better that ever, the gear change has never been so smooth.
A really excellent result considering the tricky decision of scrapping and spending money I would not see a return on. Your site saved the day, thank you Lofty!!!!!!!
Best regards
R
A little extra information for you on the W168 A170 Full Automatic
The 'F' issue affected us every 2 to 3 thousand miles, however lately its done it as frequently as every 10 miles - I checked the fault codes and found gear selector module to be listed.
I note that on your page http://www.aclassinfo.co.uk/mypage.59a.htm the 5th image has an arrow pointing to what's referred to as a selector lever, this is incorrect, its simply an interlock solenoid that stops you from moving the gear lever at certain times.
I have attached pictures of the circuit board, this and the interlock are the only electronic components in the lever. It should be noted that the selector position is detected by infrared break beam sensors, not any type of copper slip connections, which means the usual culprit of dirty copper tracks or cracks is ruled out. The circuit board looks fine, no broken tracks or dry joints, so I can only presume that if it is indeed the selector module that's at fault(sometimes the fault code could be erroneous) then its possibly a design flaw or perhaps a software fault or perhaps weakening sensor LED's.
This information was provided by another Ausie who got herself out of trouble by cleaning the PCB, she has offered this information if you intend doing the same or just want to remove the PCB to send to ECU Testing.com for service.
A few of things I learnt in the process of cleaning the IR detectors, an enhancement to John Hurley’s excellent instructions (for rank amateurs such as I):
(1) The metal clip that holds the Bowden cable in place in the turret frame (p4, p1 and p2) is a mongrel remove. Brute force seems to be the answer. Luckily it goes back more easily.
(2) The top of the unit consists of two nested layers, each with it’s own set of plastic clips; John says airily “When you see the unit out of the housing it is very self explanatory” – and it is, if you know what is going on! There are TWO sets of clips – a) the four lower clips, offset towards the corners of the unit, hold the unit onto the console frame and b) the upper set of clips hold the two nested halves of the unit together. You cannot release the inner unit (b) until you have taken the unit off the frame (a).
Don’t worry, it is self-explanatory when you see it : –)
(3) When putting it back together, you must get the little sliding switch on the PCB lined up with the slot in the metal fork? attached to the gear lever – obviously, or the switch will not slide as the gear lever is moved and so engage with the IR sensors. [I would guess that in the manufacturing process, there is a jig that keeps the sliding switch in the correct position when the top ‘clicks’ into place.
In the absence of a jig, a technical bamboo satay skewer poked up the inside of the console fits either of the little square sockets underneath the sliding switch, and can be used to hold the switch in the right place while you line it all up.
(4) John’s advice to unbolt the handbrake worked well, but was a little more tricky to replace - in the absence of a hoist to allow me to slacken off the handbrake cable when putting it back together!
The work around is to pop the cup holder and AC vents out of the end of the console to give access to the handbrake while the console is loosely fitted into place. Unhitch the handbrake cable from the lever, and bolt the lever back into place. I didn’t want to damage the wire rope of the cable by trying to grip it with a pair of pliers, so I tied a length of Venetian blind cord to the cable, and put enough tension on it to be able to slip the end of the cable back into the handbrake lever.
The fiendishly cunning secret is to use the right knot – a simple 'Prusik hitch' didn’t grip the cable well enough, so I used an Icicle hitch. It looks more complicated than it is – instructions for tying it may be found online, search for ‘Icicle hitch’ or ‘Icicle knot’ Thank you Caroline, it does not mean much to me because my car is a manual, but I am sure it will help others .
Lofty 17/01/2013.
.
I have cleaned up the infra red sensors and put it all back together and so far its been fine, but its too early to call it, I will update you in a few months to let you know if cleaning helped. Thank you Darren every little helps. Regards
Update on Darren's car, It ran well for approx 4 months, the fault then reoccurred and the car is at present un-drivable. I will update you further information when I hear the outcome. The latest news from Darren:- Lofty
and the very latest :-
I decided to purchase a gear selector module from the dealer, I got a 10%
discount making it £332 inc vat
Despite the dealer insisting that a new module needs to be coded, I decided
to just try it anyway and on my 1999 car it plugged straight in without
coding and it selects gears correctly without the dreaded F
So a bit more info on the status for you, I'll put it through its MOT and
take it for a proper drive and see how we get on.
Darren had on the 20th of August mailed me to say he was going to scrap the car as the repair was going to cost more than the car was worth in ££, the true worth to the owner is of course invariably a great deal more than the trade in or salvage value of the vehicle. As you can see Darren has obviously changed his mind and has now carried out a repair himself and rightly ignored the information that MB seem to always use that the new unit will need coding to the vehicle. Previous cases and this again show that this information is nothing but a ploy to get owners to have the work done in MB work shops which of course increases the cost of repair. That along with labour and Vat exceeds what the owner is prepared to spend on the car, which is understandable if you take into account the age of the vehicle.
As with buying a car from the car sales you do have to set a limit when it comes to spending out on repairs on the older Vehicles, especially if the work be carried out is not guaranteed to cure the fault long term.
Lets hope Darren has made the right choice in repairing his car and may he now get many more miles from it.
lofty
And yet more information from Peter in Australia,
Dear Lofty
Many thanks for such an excellent, helpful site. I just want to add one suggestion for other people who suffer the 'F fault' - get an electronics technician to check the printed circuit board and re-solder bad connections if needed.
My wife's A-class suffered the automatic transmission 'F' fault.
I removed the shift sensor module, as your site suggested, and cleaned it with no-residue cleaning fluid.
I also asked an electronics technician to look at the sensor module's printed circuit board.
The technician said it was a wonder the sensor module ever worked, because it had various badly soldered or 'dry' joints.
He re-soldered the joints (especially the ones where the main power cable plugs in) and it has worked fine so far. He only charged $10 (Australian).
I suggest your readers do the same if they have the Auto transmission 'F-fault' problems
Thanks again for such useful money-saving info.
Best regards
Peter Ritchie (Australia) Thank you Peter that sounds like real good information to me and may account for boards failing a few weeks after they have been cleaned which although can help does not always appear to be the total answer. If you follow Peters advise and it proves successful please feed back information.
It is also worth reading John's mail who backs up what Darren has said about the infra-red sensors
Hello Lofty,
Here is some information I think your readers might like.
My background is building very high performance racing engines and the cars that go with them, and I am the type of person who does not like things that do not work the way they should. I have owned many Mercedes cars because they are very well built and the brand has a good reputation. I am aware over the past few years that Mercedes has lost out in the reliability area on some of its cars. Which brings me onto the A class (W168) and the number of reports I have read about the “F” problem with the full auto box.
This is how the story goes;
I have all ways liked the A Class (Baby Benz) and it just so happened that my mother needed a small car, and I wanted a reason to find out why so many A Class owners had problems with Mass Air Flow Sensors and the F problem.
I decided to buy a used A 160 (99 model with 60K) off a well know auction site, because of the problems with the car I got a very good deal [I paid a 1/3 of the true value]. The first thing I did was send the MAFS of for repair (it had a broken reed) to ECU testing, the service from this company is better than 1st class. I had the unit back 48 hours after I shipped it out, plus I got the discount (thanks Lofty).
With the MAS refitted the cars engine ran very well, but the auto box had the F problem. Now this is the bit of the jigsaw that had the most frustration in the repair. The first thing I had to do was get a trans oil dipstick from MB, it took me a long time to find a dealer that would order one for me, but in the end I got one from the dealer near Brook lands race track. This dealer is first class and the spares department people are only to happy to help. The thing they do not tell you is how to use the dipstick; now this may sound odd, but at first I thought I had got the wrong dipstick because it was way too long for the dip stick tube, but it turns out this dipstick is used on many MB cars and it is only the end bit that counts, i.e. the stick bottoms out in the box. When you have ALL the information it is quite simple, I was just looking at the problem to hard because of my background in motor racing.
The key to checking the oil level in this box is this;
Get the gearbox up to 78C, [Do Not Guess, drop a temp probe down the dipstick or get a infrared temp gun] [after a long run the gearbox will be over 80C} go thru the gears, then put the lever into N or P with the engine running and make sure you are at 11.5 on the dipstick. If you are going to do an oil change, get the level correct with the old fluid first. Measure the amount of oil you get out of the box when you drain it (because you never get all the old oil out) and replace with the same amount of new ATF. THE OIL SHOULD/MUST BE “MOBIL ATF320”.
Just changing the oil will not on its own fix the F problem, but it is good practice to know what you are starting with, after all new oil in the box is always good.
The thing about the F problem that did not make sense to me was the fact that you could turn off the engine and the problem would go away for a bit before returning. If it was a major problem it would come back at once. The next thing I had read about the problem was from people who had replaced the car battery, and the problem was not as bad. This got me thinking, why did this made a difference. The answer is quit simple and proves where the problem lies! And also points to the fix. When you restart the car you put the ‘Gear selector module’ back into N, and with this the F goes away, i.e. you have cleared the problem for a short while, and if you have a new battery the problem goes away for a longer time, all this point to the infrared sensors in the ‘Gear Selector Module’ being dirty!! And why a new battery helps.
I can not take all the credit for this because half way through my repair I looked at what ‘Darren Smith’ had done, and he is 100% correct. You do not need to take the unit all the way apart, and in fact you do not need to take the unit of the car to repair, but it does not take very long to remove. All you need to do is take the gear knob off, [half twist the bottom part of the knob and then pull up, do not punch your self in the face!]
Remove all the plastic from around the selector, unclip the part of the selector that holds the circuit board, (easy job if you have the unit on the bench) make sure you do not drop the small spring or small white part that is under the S & W switch. You do not need to remove the circuit board from its plastic housing; all you need to do to fix the unit is spray it with Electrical Contact Cleaner!
I would love to know how many new ‘Gear selector modules’ have been sold because of a small amount of dirt!!
So to end my story, my mother now has a Mercedes A160 that runs like new and cost very little to repair because of your web site, a big thank from us all!!
Best Regards
John Hurley.
To try and clarify things even further I have asked john if he will explain where and how this PCB complete with infra red detectors is located and accessed he has responded with this further help document:- Hello Lofty,
The PCB is just under the gear lever indicator panel; i.e. the bit that has P/R/N/D on it. I have attached the photos. The PCB is the gear selector module. The part on the side lower down is just a lock out pin driven by a solenoid, this is to stop you from changing gear at speed (from D to R).
The procedure to remove the PCB is;
1. Remove gear knob. [twist the bottom plastic ring {on the gear knob}, then pull up on gear knob]
2. Remove the plastic cover which is attached to the centre console (by the bottom of the gear lever). {you do this by pulling up on the cover}.
3. Remove the switch panel from the centre console (windows switch etc)
4. Remove centre console. (on my model it is 3 screws, one in the cup holder, 1 each side of the gear indicator. Also I removed the hand brake lever complete; 2 bolts only). {I removed the hand brake lever this way for two reasons, 1. so I could remove the centre console, 2 I did not want to remove the hand grip off the lever}
5. Remove the plastic trim from under the radio console, the bit between the carpet and the radio console. (1 screw each side of the gear lever housing, then pull back on the trim.)
6. With the lever in 'N' unbolt the 3 bolts that hold the unit to the floor, remove the electric connectors, turn the unit on its side and push out the pin that holds the Bowden cable to the unit.
7. Remove the Bowden cable and place the unit on the bench.
To get to the PCB all you have to do now is take the unit apart by pushing down on the plastic clips on the side of the unit. {When you see the unit out of the housing it is very self explanatory)
To 'FIX' I sprayed mine with "Electrical Contact Cleaner" you can buy this at Halfords. {I sprayed mine 3 times and blow dry each time} you can spray the whole board.
Thank you John for your contributions I'm confident they will help other owners overcome what is to many an most annoying and expensive defect. Having located the board you will be able to see the infra-red sensors which are ringed in Darren's photos above, Marked Photo1 & 2
There is little doubt that with Both Darren's and John as well as other contributors we are a little closer to solving the problem of the 'F' Display which appears on the Auto 'A' Class World wide with none of the forums coming up with the answers, If you undertake this cleaning process and it cures you 'F' problem please mail lofty so that we can see just how successful this procedure is. John Hurley
John has now provided his e-mail address so if your really stuck and need advise he may be able to advise you but please do not abuse his kind offer. j.hurly So in the case of the fully automatic transmission if your selector display shows 'F' there is every chance that it is the 'Gear selector module' This is the generally called the gear lever on Manual boxes and selector on automatics. This selector module does include electronic equipment and it appears it is this that causes the problem.
The trouble code on the Diagnostics will be P1872 and the component costs £274.00 part number A168 370 1309/7088 If this item is required on your car always use your vehicles Vin number to ensure the correct part is obtained/ordered. Also if you have a diagnostics tool see page 69 It is worth deleting any fault codes to see if it re-appears before spending out on spares. If you car is pre 2001 you would need to get this carried out by a garage using 'Star' diagnostics , post 2001 you can delete the code using your own diagnostics tool and it is cheaper to buy one rather than go to Mercedes-Benz for the deletion of this codes.
The owner with the 'F' Problem on his car has now had the car sorted, however he is of the opinion that garages with 'Star' diagnostics have to fit it as the module requires synchronizing with the car ,
What this involves I really do not know however he does say that the whole repair only takes about an hour , see mail
MB "assured" me the fault was within the selector module, just under the gear stick....so although the cable harness comes with the selector unit this was not fitted as the old one was deemed OK......so I hope, as wherever the cable harness terminates...I presume the gearbox, this apparently requires the engine to be dropped to gain access.
So far the "F" has not come back, although sometimes the gear change in drive can be unpredictable, for instance I can put the accelerator down but it takes more than a moment to do anything....not handy when pulling out of a junction at rush hour. The MB parts guy did say my faulty gear selector had been superseded twice so the part number of the new unit was slightly different.
Replacing the unit is straight forward as once the covers are removed its just 3 set screws that hold it in position however the unit has to be configured to the car so unfortunately a definite MB job, no more than 1 hour. This has been contradicted by Darren in his comments above.
Honestly the car is coming up for 10 years with 54k on the clock....if I can get another unblemished 25k-30k out of it I'll be happy.
Cheers Paul
To fit the unit complete as sold with the Bowden cable assembly, according to Mercedes, the engine has to be lowered, obviously another good design feature to ensure Mercedes Workshops do not run out of business!!
It could be of course, that the fault lies in the selector Module/mechanism alone, so you may get away with fitting just that part of your purchase. if contracting Mercedes to do this job for you, make sure you know what they are contracting to fit, in respect this complete unit, to lower the engine and replace the linkage/cables which could be perfectly sound will cost you about 6 hours in labour.
In Paul's case, Mercedes did the job free of charge, because they had botched a previous job, they therefore contacted him and explained that changing just the selector module ( Gear selector) should be sufficient to clear the defect, which is all they did, so do not get conned by being told it is a 6 hour job when all they intend doing is changing the selector module, the safest way to confirm the complete job has been done, if they insist is to ask for all defective parts removed on completion, remember these are your property and you have every right to ask for them, do not be put off including of course any parts that come with the new unit and which are left unused, you may need these at some later stage.
Paul Harman another of contributors, has also made the point that if the Bowden cables are sound then they are best left well alone including the adjustment as this would affect the gear change when the new unit was fitted, so if doing this job yourself avoid pressing the RED push button which allows the cable adjustment to be made. (see three photos above)
As far as the 5 pin cable which goes from the back end of the transmission casing (FTC.ECU)it is still not clearly defined although it's obvious that it connects into the cars electronic system at some point.
As is confirmed in Peters mail above the module may also repairable, I understand that there are a number of soldered joints that breakdown as they get older. Re soldering these joints (work carried out by an auto technician(ECU testing are working on these units at present 1/4/2011)and you may well find it cures the fault, If you are able to locate the fault then in this instance because you are simply replacing the existing repaired unit, re-programming should not be necessary. Speak to you garage in respect of this matter.
Do remember when they 'F' displays on your display that your car will automatically go into the 'limp home mode'(speed will be limited) when this happens normal driving and speeds will not be possible
If you have to resort to MB workshops sorting out your problem make sure you get a written quote and a wise move is to make the point to any garage you use that you want all bits removed available to view when picking up your car.
That way you will know what's been fitted and will be able to ensure that all the new components supplied were fitted and not bypassed because the engine has to be lowered to undertake certain tasks.
Few of us mind paying where a good job is done, none of us like being conned, if an item supplied as part of a kit is purchased and then not used it is your property if you have paid for the complete kit.
An example of this is the selector module that comes complete with the Bowden cable, it may not be necessary to replace this component and to do so may require the engine to be lowered increasing the cost of repairs.
So watch points . If the garage do not fit this cable and it may well not be necessary, you need to be able to pick it up with the car, the alternative is they will have fitted the new cable for which you have paid and you can now view the old unit when collecting your car. Sad but we just cannot trust garages to do what they say, and I'm afraid history has shown that MB are no acceptation to that comment.
This photo shows the automatic gearbox /transmission removed from the car, in this instance we can see where the sector module Bowden cable connects. So what does the Bowden do?
Well according to Paul H (we have more than one Paul donating information to this page )The Bowden cable selects between P/R/N/3(D position) and the selector just sends commands via the CAN bus to the control system that then controls the transmission to swap third gear which is the default for one of the others.
When 'F' is displayed the transmission control shuts down (Goes into 'limp home mode' or 'F'(Fail Mode))and you only have third gear, hence no ability to go up hill with only 1000rpm max in third gear, (perhaps a bit of an oversight on MB here,) they should really have allowed a
few more rpm when in 'Fail mode'('F') on the automatic because the torque converter loses all of the 1000 rpm at low speed). I suspect that third gear is the straight through where gearbox output rpm = crankshaft rpm and fourth and fifth gears are overdrive gears which makes it simpler and less likely to
fail than the others which all have cogs. This is the case on the ZF electronic transmissions used by Volvo and BMW which conveniently have the electronics in an external box!
The 5 pin connector can also be seen at the rear of the transmission casing, this is where the electronics for the transmission connect onto the NTC.ECU where both the Bowden cable and or the electrical loom are replaced it may be necessary to lower the engine as like so many other things the cables are located between the under floor and upper side of the engine, albeit these would located adjacent to the selector module.
Thanks Paul.
I'm publishing this mail from Paulo in this instance, because the content really highlights the need for owners of A class with automatic transmissions to ensure that the coolant is changed at the prescribed interval failure to do so can result in the corrosion inhibitor contained within the coolant weakening and thereby allowing vital parts valves etc to become damaged by corrosion.
Dear Lofty,
I looked for a user feedback function on your website, but as I could find
none I am sending this report by e-mail as a contribution to the fantastic
service you provide to A-Class owners worldwide.
You may recall that we have been in touch last year, when I purchased your
excellent CD-ROM. To recap my status, I live in Brazil and have owned a 2002
A190 (fully automatic gearbox) since new.
Earlier this year, as I returned home from a trip some two hours away, I got
the dreaded "F" code on the instrument panel. Luckily, I was only a couple
of miles from home, so I was able to limp along in whatever gear (probably
3rd) the car was stuck in.
To make a long story short, the problem was diagnosed as a massive failure
of the auto-box module. As this part alone costs in excess of six thousand US
dollars (approx. 3700 pounds) at local Mercedes Benz dealers, I had the
service done at an independent shop, which sourced the module from Europe
and also replaced a number of other items (K1 clutch, assorted gaskets,
coolant etc.). The grand total, including labour, was about the same as I
would have paid at a main dealer for the module alone - still pretty hard to
swallow, though. Not to mention the fact that the car was out of service for
almost three months while the module was being sourced and imported.
This problem occurred at approximately 32k miles (48000 km), so I would urge
all fellow A-Class owners to replace the coolant at shorter intervals, as
you have already advised, and also to be mindful of anything that may cause
the module to operate at abnormally high temperatures.
The A-Class has a lot of things going for it - but the auto-box is definitely
not one of them, judging from my experience and that of other owners. If you
think that my experience is worth passing on to your readers, please feel
free to do so. Kind regards, Paulo
.
This info was received from Dave in Botswana and may be useful when undertaking the procedure below.
M.B. official spec for t/oil is initial 6.3 litres. 3.3 litres for oil change. As a bush job, I filled with 3.3L then dipped with bare stick and measured the height from bottom of my stick to oil level. i.e; 55mm.
Has any one measured the markings on a genuine dip stick? Also M.B. @ 30C the oil should be between 2 and 4. 70 to 80 deg C, the oil level should be between 8 and 12 marks on their dip stick. I was 30 years in the motor trade, so please note that oil level heights do not have to be correct to the mm. There is a minimum before it gives problems and maximum before it causes other problems. Regards David
This information kindly is provided by Chris it will give you some idea of what is involved in changing the transmission fluid when undertaken at your request by a garage along with the parts you should expect to see on the invoice.
If you have been considering doing this job yourself then it is recommended that only experienced DIY enthusiasts tackle this procedure and you do need some special tools if you are going to the job to a high standard which will ensure maximum return for your trouble.
When Mercedes did this for me three years ago, it was 320€ and as far as I could tell, the mechanic spent most of his time chatting to his buddy while the transmission warmed up...
I was GOB smacked when I got the bill - I thought I was going to be there for an hour at the most... three hours later I was finally back in the car!!! I should have asked for an estimate first.
Anyway, the gearbox has been 100% reliable and I've just gone past 150000km so I guess peace of mind comes with a price tag.
I'll give the procedure a go this weekend.
Thanks again Paul
So you can instantly see that getting Mercedes-Benz workshops to do this job is costly, I suspect mainly because of the time it takes, it would be asking too much for the mechanic to be getting on with other tasks while the gear box warmed/heated up the fluid for instance 3 x hours in the UK is going to cost at in the region of £240 and that's the minimum cost, remember that's before the appointed mechanic has even raised the bonnet! Plus of course the dreaded VAT. So if you were considering getting any work done on your car, always get a quote first and if you haven't used the garage before ask them to just jot that down for you and keep it handy. And please bear in mind I have not undertaken this task as my car has a manual gearbox so I cannot add anything to what Chris has said. Please remember not matter what the task it could be more costly than taking your car to the garage if you are not competent to undertake any procedure/repair, so always consider the situation before commencing any work on your car.
I'll now hand over to Chris.
Transmission Fluid change Procedure
***Message from one of my readers 'BIG JOHN', Reference the the dip stick mentioned in this procedure which is not installed/fitted on the automatic gearbox as standard, unless fitted by the previous owner)
Over the years posts on the forum have suggested that the automatic transmission dip stick is not available or that MB would not supply it.
Several years ago I bought one from a MB parts department without any problem it just had to be ordered from Milton Keynes for next day delivery.
The details are:- DIPSTICK for measuring automatic gearbox fluid level. Part Number: W168 589 012 100 the current cost including VAT is £23.22 14.01.11
Two owners have now provided information as to the measurements on the dip stick, which may enable owners to make up the own measuring devise if you are not able to obtain a dip stick, Marking on an original trans GB stick are as follows:- from the bottom tip of the stick to level 1 is 10mm then 5mm between each level up to 12 (1-12)
My car is a manual GB but if it were a Auto I'd be thinking of making up a dip stick using curtain spring , you can buy it by the meter, the sort of thing you use to hang net curtains up at your window . I confident this could be marked with paint to indicate the various levels and the stiffness improved to ensure it produces an accurate measurement of the fluid when hot .
(The part number is correct as W168xx and not the normal A168xx)
The oil filler/dipstick pipe has a plastic sealing cover retained by plastic "tamper" pin which has to be broken to remove the cap the original pin is black (as is the cover) the replacement pin is red.
The details are:- PIN Part Number: A1409910055 the current cost including VAT is £1.20 What john has said is still true today, only in the last two weeks I have had one owner tell me that MB parts would not sell him the stick saying it was for Garage use only, if this happens to you simply shop elsewhere, I contacted my branch and they agreed to sell him one, although they did ask for the part number!
So the dipstick for checking transmission fluid level is available from Mercedes parts and my branch of MB Parts at Bognor Road, Chichester, in West Sussex Tel 01243. 776111 is prepared to supply it .
Clint had problems with his Dad's car hesitating when going from gear to gear, having checked every thing else on the car he finally got round to checking the transmission fluid, only to find that the specialist Garage who had changed the fluid had overfilled it by 700ml which raised the fluid 60-70 mm on the dip stick when hot, having drained off the excess all signs of the hesitation had gone and the car now runs well , so remember these levels do matter and will affect the running of the car.
Thank you Clint for that information and you other comments.
Lofty Other parts also needed are:- 1. Transmission fluid (See link below.) 2. Filter 3..Sump gasket 4. Sump plug 5.Copper washer 6. Tamperproof plug
7.Pan magnet(may be reusable )Note on later models the sump pan has been increased in depth by 3mm, MB recommend that this be fitted, but it is extra cost! but is does come with a drain plug and seal. 8.Transmission fluid I would suggest the use of genuine Mercedes fluids, bearing in mind the cost of a replacement gearbox!
I would suggest getting the transmission fully hot and checking the fluid level before starting work. If you then drain the fluid into a marked container you will know how much fluid to use on initial refill of transmission.
Removal of the sump pan to change the transmission filter and install a pan magnet [magnets were not fitted to earlier cars] is also a good thing to do.
Note:- Both the drain plug and sump pan bolts can be quite tight so proceed with care, ensuring that Toro bits are fully located in the head of the bolt.
With reference to above:
1. Drain fluid/fluid from transmission
2. Remove sump pan [note that there will still be a quantity of fluid within the sump pan which is best not relocated down your sleeve]
3. Change transmission filter
A [this simply pulls out of the transmission case]
4. Clean out sump pan using a lint free cloth 5. Install pan magnet 6. Refit sump pan using new gasket 7. Refit drain plug with new copper washer
8. Refill with the required amount of fluid ( Auto Trans MB Fluid £!0.20 a litre 14.1.11 ) before starting the engine 9. Start engine and allow to idle in P. checking/correcting fluid level if necessary 10. Warm up transmission and shift through all gears [with vehicle stationary] while warming up.
After warming up transmission, wait at least 2 minutes and check fluid level with engine running in P or N 11. Check transmission fluid temperature
When transmission is cold, level must be between marks 2 and 4.
The exact fluid level must be between 8 and 12 at 70-80 degrees c [transmission fluid temperature] If you want to get an accurate reading you will need an infra red temperature gun or similar device Temperature gun next day delivery tel 07864991164 [as mentioned previously I would suggest aiming to get the fluid level exactly on the 12 mark]
Model 168, use HHT to call up current transmission fluid temperature in one of the selector positions P R N or D [this is where I used a hand held infra-red thermometer pointed directly at the sump pan to determine fluid temperature, I would also suggest checking the temperature only in P or N as checking it in D or R could prove to be dangerous] 12.(*** see information above) Insert dipstick as far as the stop, pull out, read off level.
Insufficient/excessive fluid quantity causes malfunctions and transmission damage. 13. Check fluid level again. Correct if necessary. 14. Refit tamperproof cap 15. Check for leaks
Torque settings;
Drain plug 22NM
fluid pan to transmission 8NM
Note to ensure that the required temperatures I purchased an infrared temperature sensor /gun from Maplin's although this cost just on £30.00 it was well worth while and assisted me greatly in doing the job well.
Sorry if this seems rather lengthy but this job is possible if you know your way round you car and are mechanically minded and it is worth taking your time remember you are saving yourself £500 at my local Mercedes dealership prices but the job must be done well & right or you will face extra costs!! If I can be of further help please do not hesitate to e-mail me.
Regards, Chris.
Other helpful information, links and Photos kindly received from Oliver :- For " Changing full Automatic Transmission Fluid " you can find: For
WDB168 A140 year 2003 with gearbox 722700 00 246734
for the ATF : I use Fuchs Titan ATF 4000 automatic transmission Fluid
(Good price at www.opieoils.co.uk =25 £ for 5 litres
For 168.589.012.100 gauge = 13 € without taxes and transport( www.mannes.fr
168.377.03.95 filter = 8€
140.991.00.55 goupille =0,57€
Fully Automatic transmission information
Removing the Valve chest from the Gearbox . Dear Lofty.
This may be of interest to your readers:-
Okay so the transmission control unit is out now and on its way to ECU testing.com After conflicting info I purchased a manual from emanualonline. The manual took an age to load, but is excellent with all MB info. £9.99.
Anyway the procedure is:- 1. Get the car in the air 2. remove the sump plug and drain the oil. Keep it all and measure it so that you know how much to put back in. 3. Remove the ECU connector on the rear of the gearbox above the sump. The connector has a red safety clip, slide this towards the gearbox, then squeeze the top of the connector close to the cable exit and pull, it is a difficult one but comes with a little force. 4. clean the area to avoid any dirt getting into the gearbox, it can be damaged by very little contaminant, use lint free cloth etc.]
5. Remove the sump pan and then the oil filter housing which just pulls out. 5. Remove 16 of the 18 screws that secure the unit. 6. support the unit and remove the last 2 screws and drop the unit into a clean container. 7.Package carefully and send away.
notes 1 the connector on the top remains with the unit and drops with the unit when it is removed. 2. package well in plastic and bubble wrap. don't attempt to clean, or remove any parts to have a look. 3. There is no need to remove the wheel, or arch liner.
Robin Page
Thanks Robin I'm sure this will help readers who wish to get their Valve chest refurbished.
There is little doubt that the automatic transmission is a very complex piece of machinery, these are photographs of just part of the automatic box known as the valve chest the 4 copper/brass caps along with one alloy cap. these according to owner Paul support the solenoids against there retaining spring in each case
If you look at the automatic gearbox valve chest, right hand photo, you will see a five pin connector, this connects the electronics of the gearbox/ECU to the selector module in the cab. when a new selector module is purchased it comes complete with cable but the engine has to be lowered to get it down the back of the engine and gearbox
AS far as I'm concerned this whole set up is a mystery something I'd prefer not have on my car, at least with the manual gear box I know what I have and how it works.
There were two valve chests on E-bay this week,24.11.08 but again take care in what you purchase. It appears the NTC.ECU is coded to your car however repairing and replacing the existing unit will not affect its operation. If buying from any source seek an assurance in writing that it is in working order and even then you may have to switch your NTC.ECU to the replacement chest, if compatible.
These photos were kindly provided by Henk.
They clearly show the electronics plug that goes to the FTC/ECU which MUST be disconnected before attempting to release or lower the Valve chest. They also show the finer details of the valve chest when removed from the gearbox.
The filters can also be seen these will come away with the valve chest although are normally located in the upper section, retain these safely for replacement when refitting the chest.
Lofty only recommends ECU Testing.com for this repair, other companies that claim to be able to repair this unit have written them off in the process. The Valve chest will cost you £1000.00 + to replace so use a company you know you can trust .
When removing the Valve Chest support it while removing the many securing screws. Lower with caution as the unit is quite heavy and you need to ensure that all securing bolts have been removed.
Have plenty of lint free cloth or absorbent material to hand to soak up the residual fluid that will have remained in the channels of the Valve chest.
Wear protective glasses or visor to avoid getting splashes /droplets of fluid in the eyes and be prepared for splashes of residual fluid when you do finally allow the valve chest to separate from the gearbox. First Aid Where the fluid comes into contact with the skin wash off as soon as possible using soap and water, DO NOT BE TEMPTED TO TAMPER WITH THIS UNIT, DAMAGED UNITS CANNOT BE PREPAIRED
As can be see , there are numerous gullies machined into the body of the valve chest, the walls and upper machined surface must not become damaged while removed, like the head of the engine when fitting a new head Gasket the machined flat surfaces must remain unblemished,
When sending your Valve chest for repair , ensure it is suitably packed in Bubble rap and a polythene bag, then placed in a suitable box this will ensure your unit is delivered and returned safely. Do not use shredded paper or similar products as these will contaminate the valve chest making it almost impossible to clean due to the residual sticky fluid on the valve chest Taking digital camera shots of this unit when removed will ensure you have a reference for checking when re-installing.
Note Mercedes Recommend replacing the oil pan on some models when re-assembling the unit so check with MB when purchasing parts to see if this applies to your Vin number .
Repairs to the ECU of the Fully automatic transmission.(Gearbox) This repair can now be undertaken by ECU Testing Be warned there are other companies claiming they can repair these units one such Company is in Milan. As one owner found they can't! They simply returning his FTC/ECU in bits and claiming it was not repairable leaving him now in a situation where a new ECU will cost him 1700€ and Mercedes-Benz refusing to supply unless they fit it. It is also apparent from what this owner says that only some of the solenoids are available from Mercedes, another good reason for using ECU Testing.com His findings :- After studying your web site and with a great help from one friend of mine, we tried to fix the problem; after MB Star diagnostic test trouble codes P 1841 and P1844 appeared so it was quite clear that I had to change transmission solenoid Y3/7Y2 MB part number A 1683771035 and valve solenoid Y3/7Y2 MB part number A 1683770135.
As you may know Mercedes Benz sells only A 1683770135 (€35 including VAT), but unfortunately A 1683771035 is not available as a replacement part, .....I must admit that after clearing the 2 trouble codes, the car went well for only 10 Kames, after that the "F" code popped up again, so I tried to get a 2nd hand A1683771035.....I checked again the transmission ECU with a new A1683770135 valve solenoid together a tested OK 2nd hand A1683771035, and P1841 and P1844 popped up again after a 5-10 Km test.
To tell the story short none of my previous valve solenoids were out of order, as Star diagnosis suggested in the first test. Part of this disappointed owners e-mail:- Quote I called BBA Reman in RHO (Milan, Italy) as they stated they're able to fix a faulty Mercedes transmission ECU for euros 400+vat, with 2 years warranty...and unlimited kms coverage
I sent them the ECU for bench testing and they called me at the phone after a couple of days to tell me that the ECU can't be repaired, they were not able to explain why, but they simply told me they were going to send it back to me......I waited for the ECU shipped back and everyone will agree my disappointment when I opened the package and I found my ECU totally dismantled, please see picture.
BBA Reman don't have a reply for this, the Technician said : "it just happens when you try to repair it ......"
Unquote
So be warnedthis is not a DIY repair it requires the attention of a skilled technician who is fully aware of what he/she is doing. If having to send your valve chest to the UK is inconvenient, it may well be an inconvenience that will pay dividends in the long run saving you a great deal of money and Heartache.
Having said that I cannot say what the percentage of unit's ECU Testing receive that turn out to be none repairable. I will endeavour to find out.
Common fault codes for a failed transmission ECU:-
P1843 - Valve Y3/7y4 - Pulse width Modulated Solenoid Valve. Torque Converter Lock up clutch
P1842 - Valve Y3/7y3 - Pulse Width Modulated Solenoid valve 2/5/R shift
P1840 - Valve Y3/7y1 - Pulse width modulated solenoid valve 1/4 shift
P1884 - Valve Y3/7y5 - Pulse width modulated solenoid valve. Shift pressure
P1841 - Valve Y3/7y2 - Pulse width modulated solenoid valve. 3 shift
But please study the information provided on their page for part numbers etc. ECU Testing have kindly agreed a 10% discount off the total cost off £228.00 (08/02/2011) for my readers. If contacting the company you must mention 'Lofty's Homepage' and when completing the test page downloadable from the above link, enter 'Lofty's Homepage' in the Company Name, box, this will secure you the 10% discount.
Fault codes and information along with photographs kindly provided by ECU Testing.com Note the location of the component information details
The photographs on the right show you the FTC/ECU that will be serviced are part of the overhaul/repair of your unit .
Please see the note about sending the complete chest when sending for repair.
This is to try and prevent a similar situation to that experienced by one owner where the unit was damaged beyond repair by the garage who obviously did not know what they were doing, damaging the unit in the process.
Special Note Where the fault codes point to the NTC.ECU (Front Transmission Control/Electronic Control Module) of the auto transmission you are advised to return the complete valve chest, as shown above to ECU testing. This enables them to check and replace the solenoid valves if defective as well as remove and test the FTC/ECU repairing as required.
If you intend having the unit repaired then under no circumstances tamper with this very complex component. Removing any parts is likely to allow springs and none return ball valves to be released which are impossible to replace correctly unless you are very familiar with this unit. Damage may even be caused by removing the solenoids in uncontrolled conditions. Damaged or missing components also make it none repairable, but a handling charge may still be made. The valve chest in this photograph was scrap as the garage that had removed it had attempted repair, loosing component parts as well as having damaged it beyond repair by ECU testing or any other company the damage included. , The seal had been ripped apart for the P1884 Valve Y3/7y2 – Pulse width modulated solenoid valve shift pressure, and several ball bearings and springs had been lost for the pressure valves.
The only alternative left for the owner, a replacement Valve Chest complete with transmission ECU at great cost and in many instances a greater cost than the value of the car. When sending your units for test/repair please ensure they are suitably packed, bubble wrap and a polythene bag will protect your unit against damage and contamination. ECU testing will ensure the items are suitably packed for their return journey.
Please remember this is a complex and very expensive part of your car, if you do not feel confident enough to remove it, have it removed and re-installed by a garage workshop, preferably one where you have had work done before and know you can trust them to do a good job. MB main dealers will almost certainly want to fit a New valve chest or FTC.ECU which is not necessary as these are very expensive items, both are normally serviceable once removed.
Lofty
Again I would like to thanks all those owners of automatics who have made contributions to this page large and small, It has not been possible to name every body, never the less your contribution will assist other owners with the 'A' Class owners with this section of the overall site getting upwards of 2500 visitors a day Thank you.
Gerd of Germany has kindly provided the PDF for the Automatic transmission, even if you cannot read German the diagrams may be of interest to you. However should you wish to translate any given section, copy and paste in Google translate on the WWW:-
Example for 722.7 Teil4.pdf First page :-
84 opto-electronic switch gear recognition
85 opto-electronic switch circuit Tip
86 opto-electronic switch program selector
A61 crossing detection module
This e-mail (Information) below was received from Bruce who has had problems with his automatic transmission.
With so many cases where either the selector PCB or the valve chest forming the bottom of the transmission (Gearbox) is responsible for the fault it is easy to suggest that one or both may be the cause of the problem.
However in Bruce's case the problem was totally different , the cause of his failure to obtain certain gears being caused by a fractured weld, there is no way that diagnostics will pick up a mechanical failure such as this , only a strip of the transmission which necessitates the removal of the engine and gearbox and then stripping the gearbox did this failure come to light.
Not a failure I have heard of before and sincerely hope I do not hear of again. But one perhaps we should bear in mind if all else fails to resolve the fault of missing gears .
Thank you Bruce for the information and Photos.
Lofty
Dear Clive, Lofty, Jason, Ecu testing.com.
As is often the case I've been barking up the wrong tree - or I had two problems one pre-existing that masked the other but hey "that's life"
Of the two ECUs the one below the gear shift had had an issue in the past so that was one problem and ECU testing fixed it, it just wasn't the fatal problem.
The problem when we left you however was not the ECU, either of them, it was much more fundamental; the first picture shows the fourth gear (clutch?) gear component as it should be...
This picture is what 'Stephens Engineering Automatics Ltd' found literally floating in the gearbox:
Or
The 'welding' of the two parts had failed so when in fourth there could be no drive at all!
Detecting no drive caused the management system to put the car in 'get home' mode - 2nd gear, not good with 200 miles to go! Thank heavens for a quality 'get you home' policy eh?
So all that flushing, filter changing etc was a waste of time, BUT now I have a good fault code reader and so much more knowledge - as well as an inordinate amount of ATF used once for flushing now destined for the tidy tip.
Still it's only money and I can laugh about it.
By the way Sally took the car to the Lake District the day after we got it from Stephens - silly or what?
Thanks to all who have helped on the way: Lofty, ECU Testing.com (whose guarantee does means lifetime), David Groom, Jason of Stephens Eng and not least S, my wife, for scrapping me off the ceiling and agreeing to fund the job! Oh you too, just to listen to me and tell me to invest in another filter!
Would I do it again? In a heartbeat!
Regards
Bruce
Just one more e-mail that points to the poor workmanship in the soldering area on the PCB selector module.
Do bear in mind that ECU testing .com will do a professional job in the repair of this module and will put a life time guarantee on their work.
Dear Lofty,
Don't need any advice yet - but keen to supply info re: the dreaded "F" gearbox fault on the W168 Auto transmission.
Our 2001 A160 engine completely failed a year ago - engine sludge build up - and we had an A190 engine successfully transplanted from the wrecking yards by a very talented mechanic who just would not give up. (But that's another story).....
After all the expense of the engine swap (and an expensive gearbox valve body replacement two years earlier) we started getting the dreaded "F" displayed and accompanied by the usual limp-home performance. A quick on/off with the engine and all resumed normally for a while. But this occurrence eventually became too frequent.
I bought a cheap OBD scanner and kept getting code P0600 - serial cable. It turned out to be the circuit board with several dry joints - particularly around the area where the cable connected to the board. That connection seemed like it had NEVER been soldered and was moving freely with no sign of previous soldering...
Re-soldering this board at this and a couple of other points completely cured the problem and stopped the codes.
Also what I thought had been a (normal) particularly rough downshift - during slowing/stopping - when the car drops from second to first gear (prior to fully stopping) completely vanished. This characteristic had always been with the car since we first had it (nearly eight years ago) and I was always told by an independent Benz mechanic "That's the way the w168 car is". So the fault must have been in the vehicle since new....
It now drives like it never has before. I'm quite thrilled by the improvement, but now have a serious distrust of Mercedes after previously thinking the brand mostly immune from poor production processes.
We also own a W210 - but it has been largely trouble free.
kind regards
Bruce
Brisbane, Australia.
This infornmation was provided by John unfortunatly there are no photos of the parts mentioned.
When John who is a qualified Mechanic and electrical technician had mechanical problems with his automatic transmission he repaired it himself and has forwarded this information to assist other owners who have Mechanical rather than electrical/FTC/ECU Problems
.
Symptoms of mechanical defect.
The car set off fine in first gear. As soon as it reached the 1-2 change
there was no second gear at all, the car revved and then the ECU/computer
put the vehicle into safe mode 'F' being on the instrument cluster display. Only one forward
gear was available.
It was revealed later that the 2nd gear (K2?) had separated from clutch centre.
In my
opinion caused by a faulty friction weld during manufacture. Nothing else was replaced
in the gearbox. All clutch plates were as new, transmission fluid was clean although I
did use new fluid when I reassembled.
Action.
I bought another scrap gearbox off e-bay costing £35 that had no forward drive
so would not set off at all. This suggested K1 and probably failed and that K2 was
OK so I took the risk and purchased the unit. Upon receiving it the gearbox had no mechanical
problems, just the friction clutch plates burnt out so I robbed the gear 2nd gear I needed.
The effected vehicle was a 2005 Vanio 1.6 with only 44k miles, which has the same power train as the W168 1.6 'A' Class
Action taken
1.W168 engine with auto transmission was removed . Procedure followed:-
2. Remove gearbox making sure that the torque converter stays with the gearbox. You will need to use a screwdriver or lever between the engine and the
gearbox to ensure that happens.
3. Remove the gearbox to a safe position on a workbench or work area
Stripping the gearbox
4. With gearbox on bench and the left hand side flat on the bench, bell housing pointing upwards
5. Remove all of the Torx fixings that you can see
6. Remove one Torx fixing that is now horizontal into the bottom of the gearbox. This actually goes through a shaft inside the gearbox
and holds the box toge. Carefully lift the top casing off exposing all the gears. Watch for shims and bearings sticking to the top case and put them back on their respective shafts.
7. Remove reverse gear with parking pawl and remove parking pawl assembly
8. All three shafts have to be lifted together to get them out of the box
as the gears will not clear each other for any one to be removed first.
9. All items are replaced in reverse order.
Observations
This gearbox is a little beauty. Very simple functionally and very
strong. They only fail because of the way in which Mercedes-Benz have decided
to increase revs when the engine is cold, taking the revs to higher than
the stall speed of the converter in order for the catalytic converter to start working
more quickly. This means that if you select 'D' Drive before the
engine revs drop (as can be seen on the rev.counter)( about two minutes after starting) you stand the chance of damaging the gearbox.
The solution is to run the engine for a couple on minutes from cold before you need to set off on you journey. This will ensure that the engine revolutions have settled back to about 700-800 and that the fluid in the automatic box is increasing in temperature.
I was not in a hurry to complete this job and took my time, It took me two
days to remove, two days to put back, the repair the transmission only took about 90 minutes gearbox. if you have all facilities available as well as the spare pair of eyes and hands required for some tasks I feel sure in could be completed in a day.
The cost of the repair was new transmission fluid, and the second hand transmission from which I removed the parts needed
The repair was successful and I am pleased with the outcome.
John Dickinson
Lofty's comment Do bear in mind that this is a big job for which you want tools along with workspace to work, as well reliable jack and lifting devise. Unless you have a good basic understanding of vehicle mechanics as well as prepared to implement all safety procedures it is a job best left to the professionals, However with a early model 'A' Class the cost of repair may be greater than the value of the vehicle if the work is undertaken by a garage.
It is worth noting that Mercedes-Benz is unlikely to undertake any mechanical repairs to any transmission, they will almost certainly quote for a factory rebuilt transmission be it Manual or automatic, so ensure you get a firm quote in writing before leaving you vehicle for repair. In the case of a manul transmission they will also want to fit a new clutch assembly the price for which would not be included with the replacement transmission.
Please read the pages below before considering undertaking this task:-


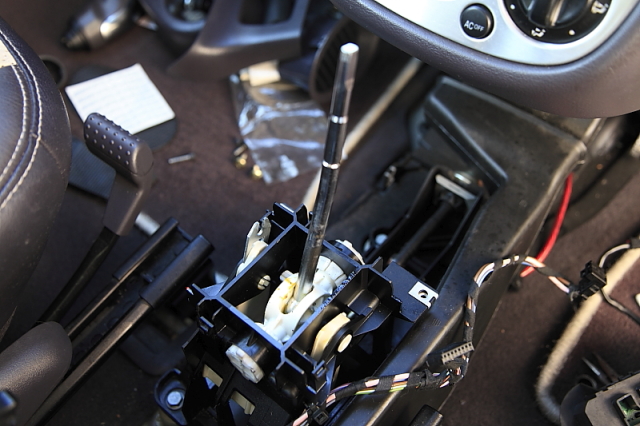
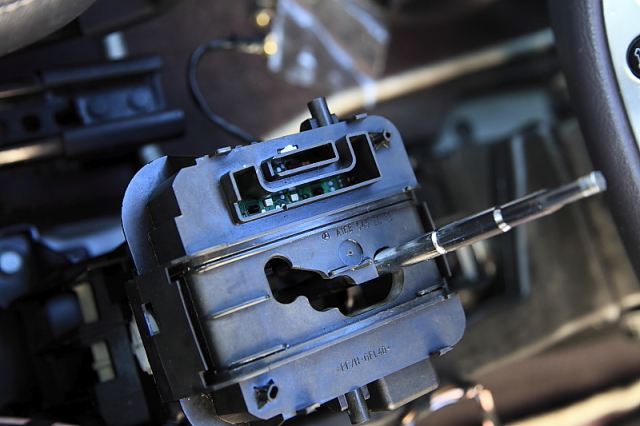
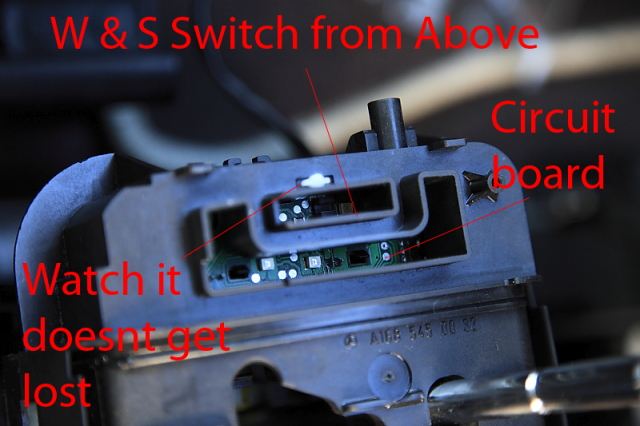
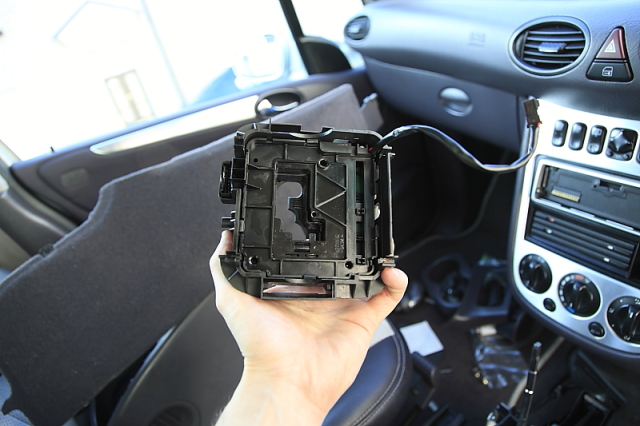
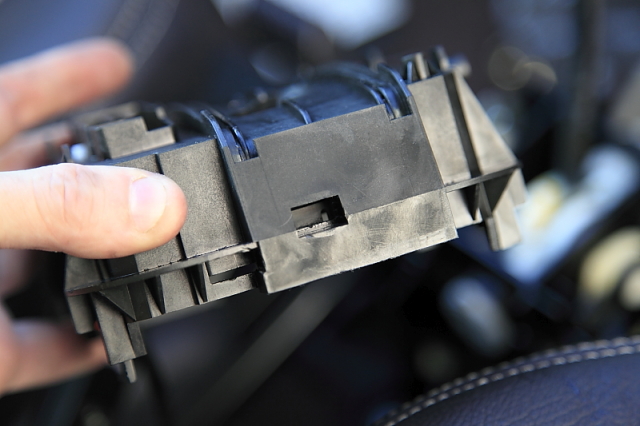
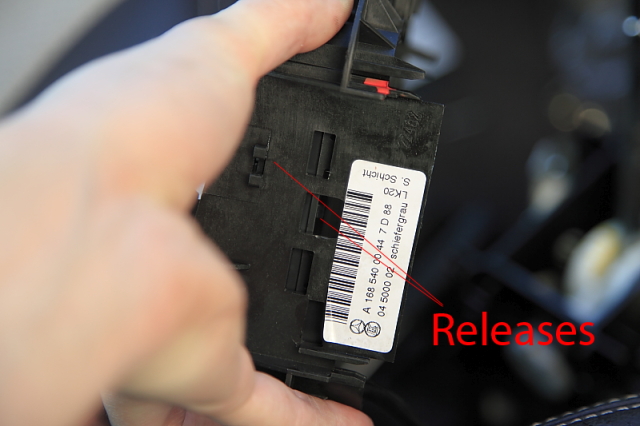
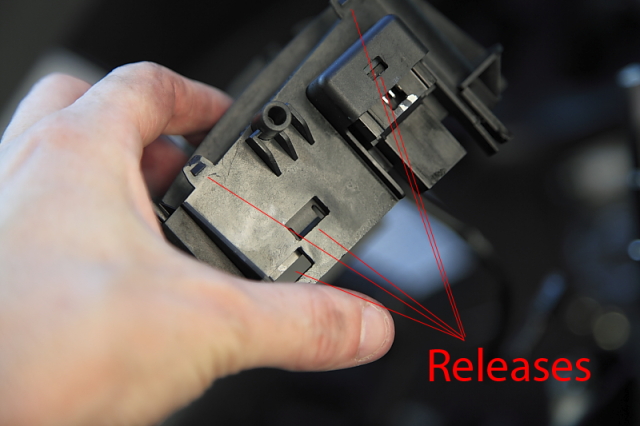
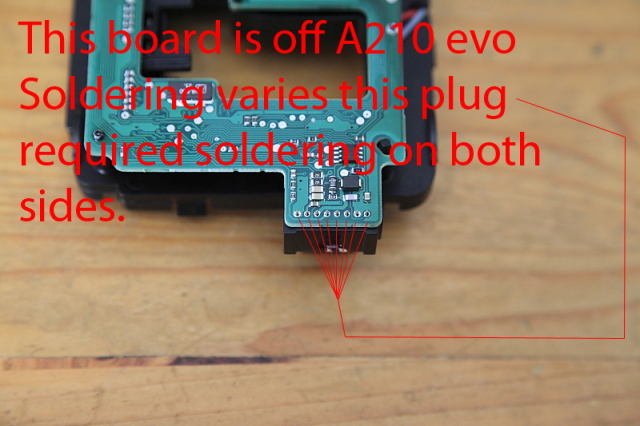
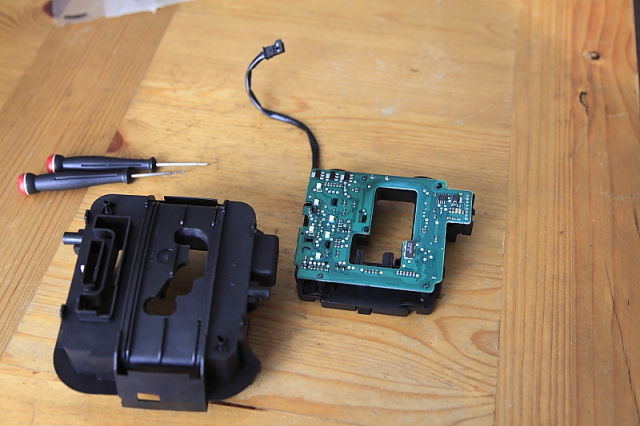

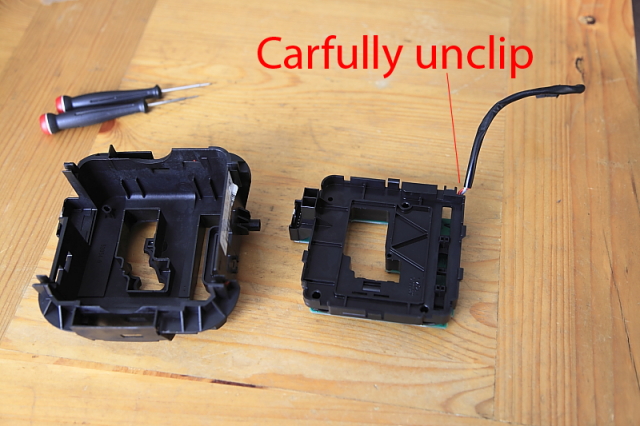
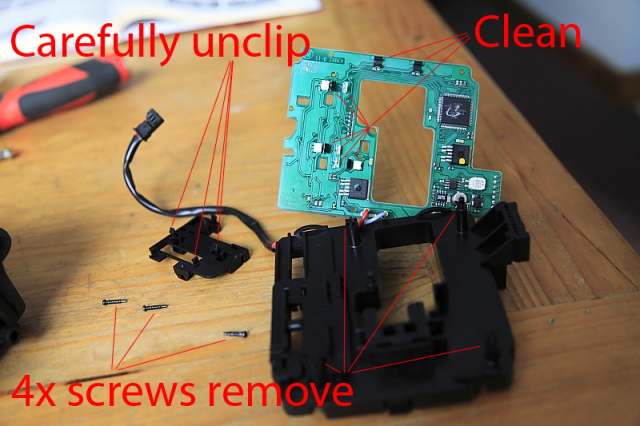
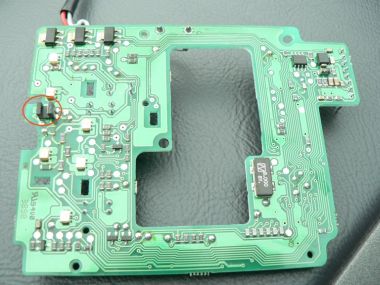
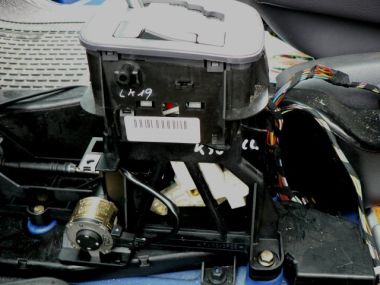
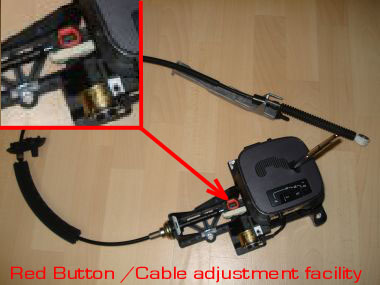 So in the case of the fully automatic transmission if your selector display shows 'F' there is every chance that it is the 'Gear selector module' This is the generally called the gear lever on Manual boxes and selector on automatics. This selector module does include electronic equipment and it appears it is this that causes the problem.
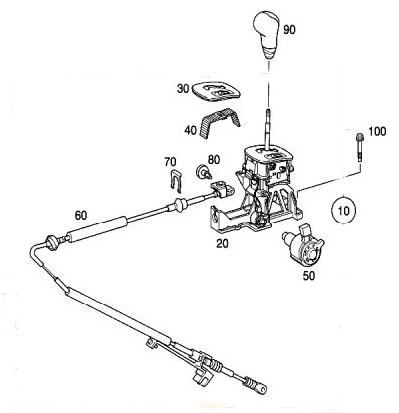 What this involves I really do not know however he does say that the whole repair only takes about an hour , see mail
 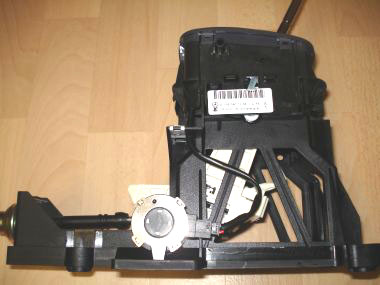 Honestly the car is coming up for 10 years with 54k on the clock....if I can get another unblemished 25k-30k out of it I'll be happy.
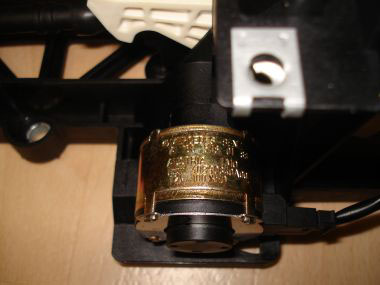 As is confirmed in Peters mail above the module may also repairable, I understand that there are a number of soldered joints that breakdown as they get older. Re soldering these joints (work carried out by an auto technician(ECU testing are working on these units at present 1/4/2011)and you may well find it cures the fault, If you are able to locate the fault then in this instance because you are simply replacing the existing repaired unit, re-programming should not be necessary. Speak to you garage in respect of this matter.
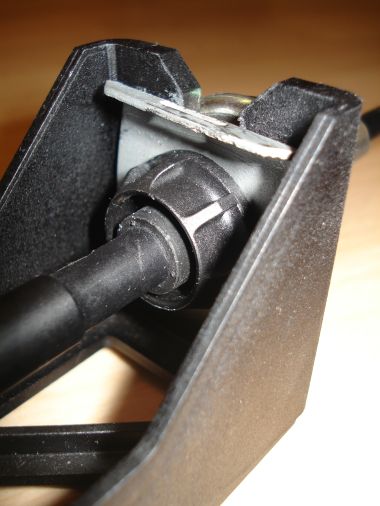
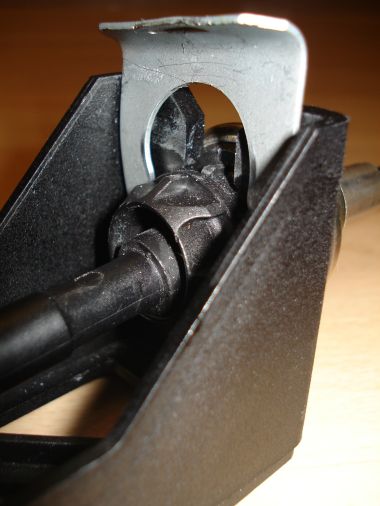
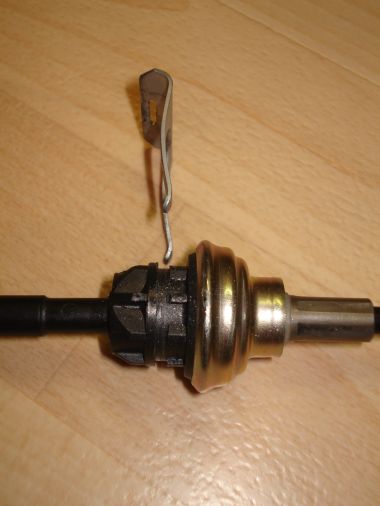
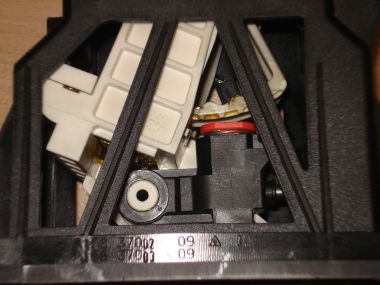
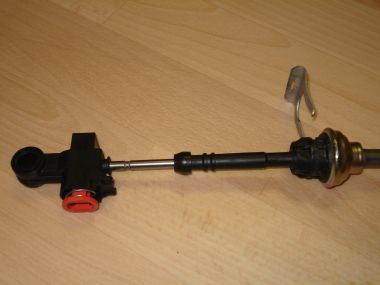
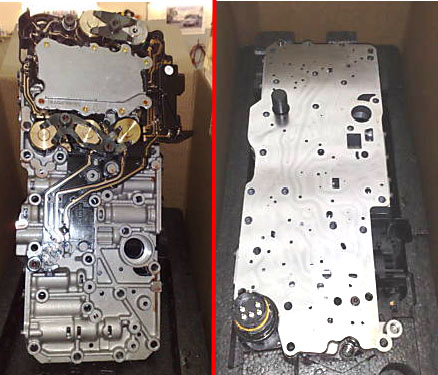
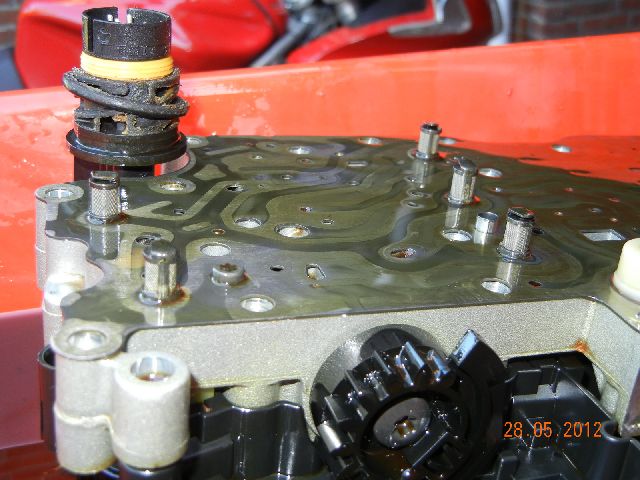
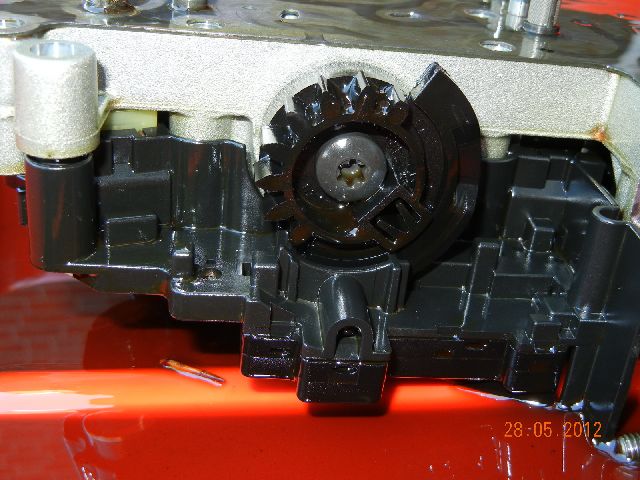
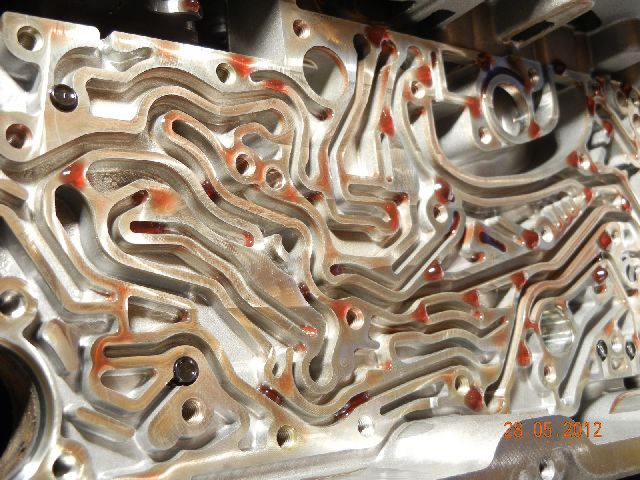
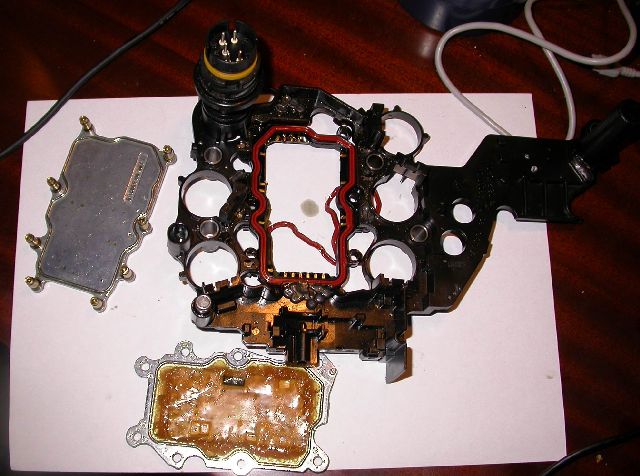 Quote
Quote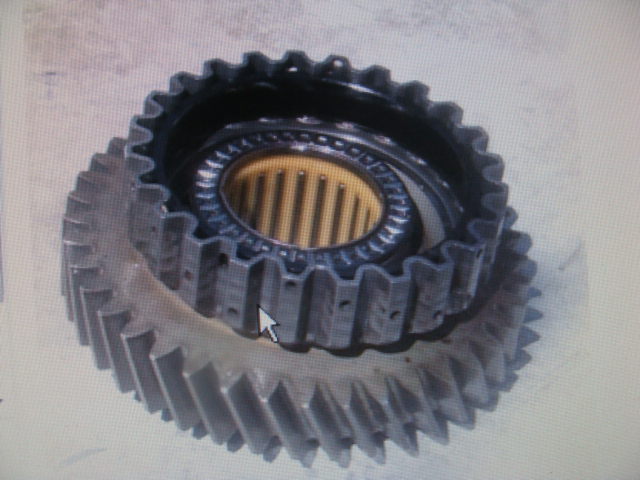
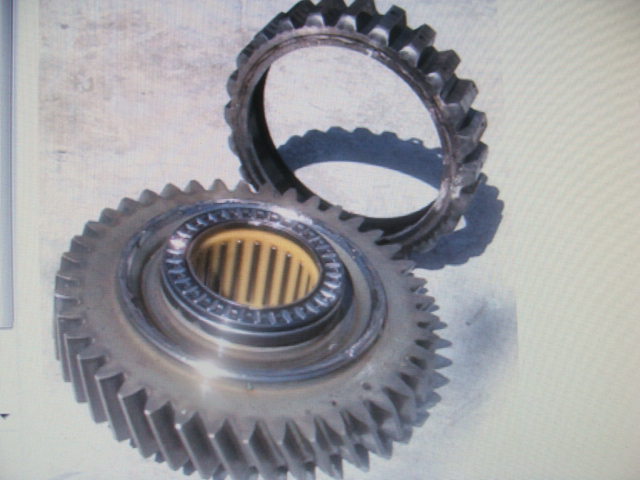 This picture is what 'Stephens Engineering Automatics Ltd' found literally floating in the gearbox:
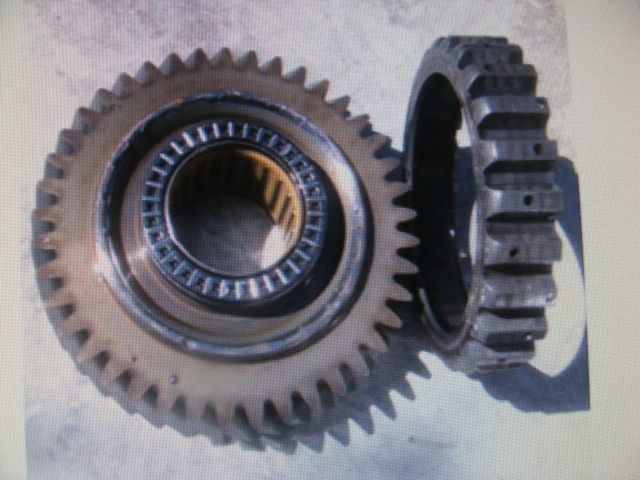 So all that flushing, filter changing etc was a waste of time, BUT now I have a good fault code reader and so much more knowledge - as well as an inordinate amount of ATF used once for flushing now destined for the tidy tip.